
Lửa trại LED với Raspberry Pi Pico (ma trận NeoPixel 8x8 + biến trở + Buzzer)
Một đống lửa trại không đốt cháy hay sưởi ấm gì, nhưng vẫn kêu lách tách! Raspberry Pi Pico vẽ ngọn lửa chân thực trên ma trận NeoPixel 8x8, được tính lại ở mỗi khung hình: tia lửa xuất hiện ở đáy, nhiệt nguội dần khi bốc lên và chuyển từ đỏ sang trắng. Một biến trở đặt chiều cao ngọn lửa, một nút nhấn chuyển giữa các chủ đề Lửa, Gas, Phép thuật và Thạch anh tím, và buzzer thêm tiếng củi cháy lách tách. Hoạt ảnh thủ tục, ADC, PWM và MicroPython trong cùng một dự án.
Video
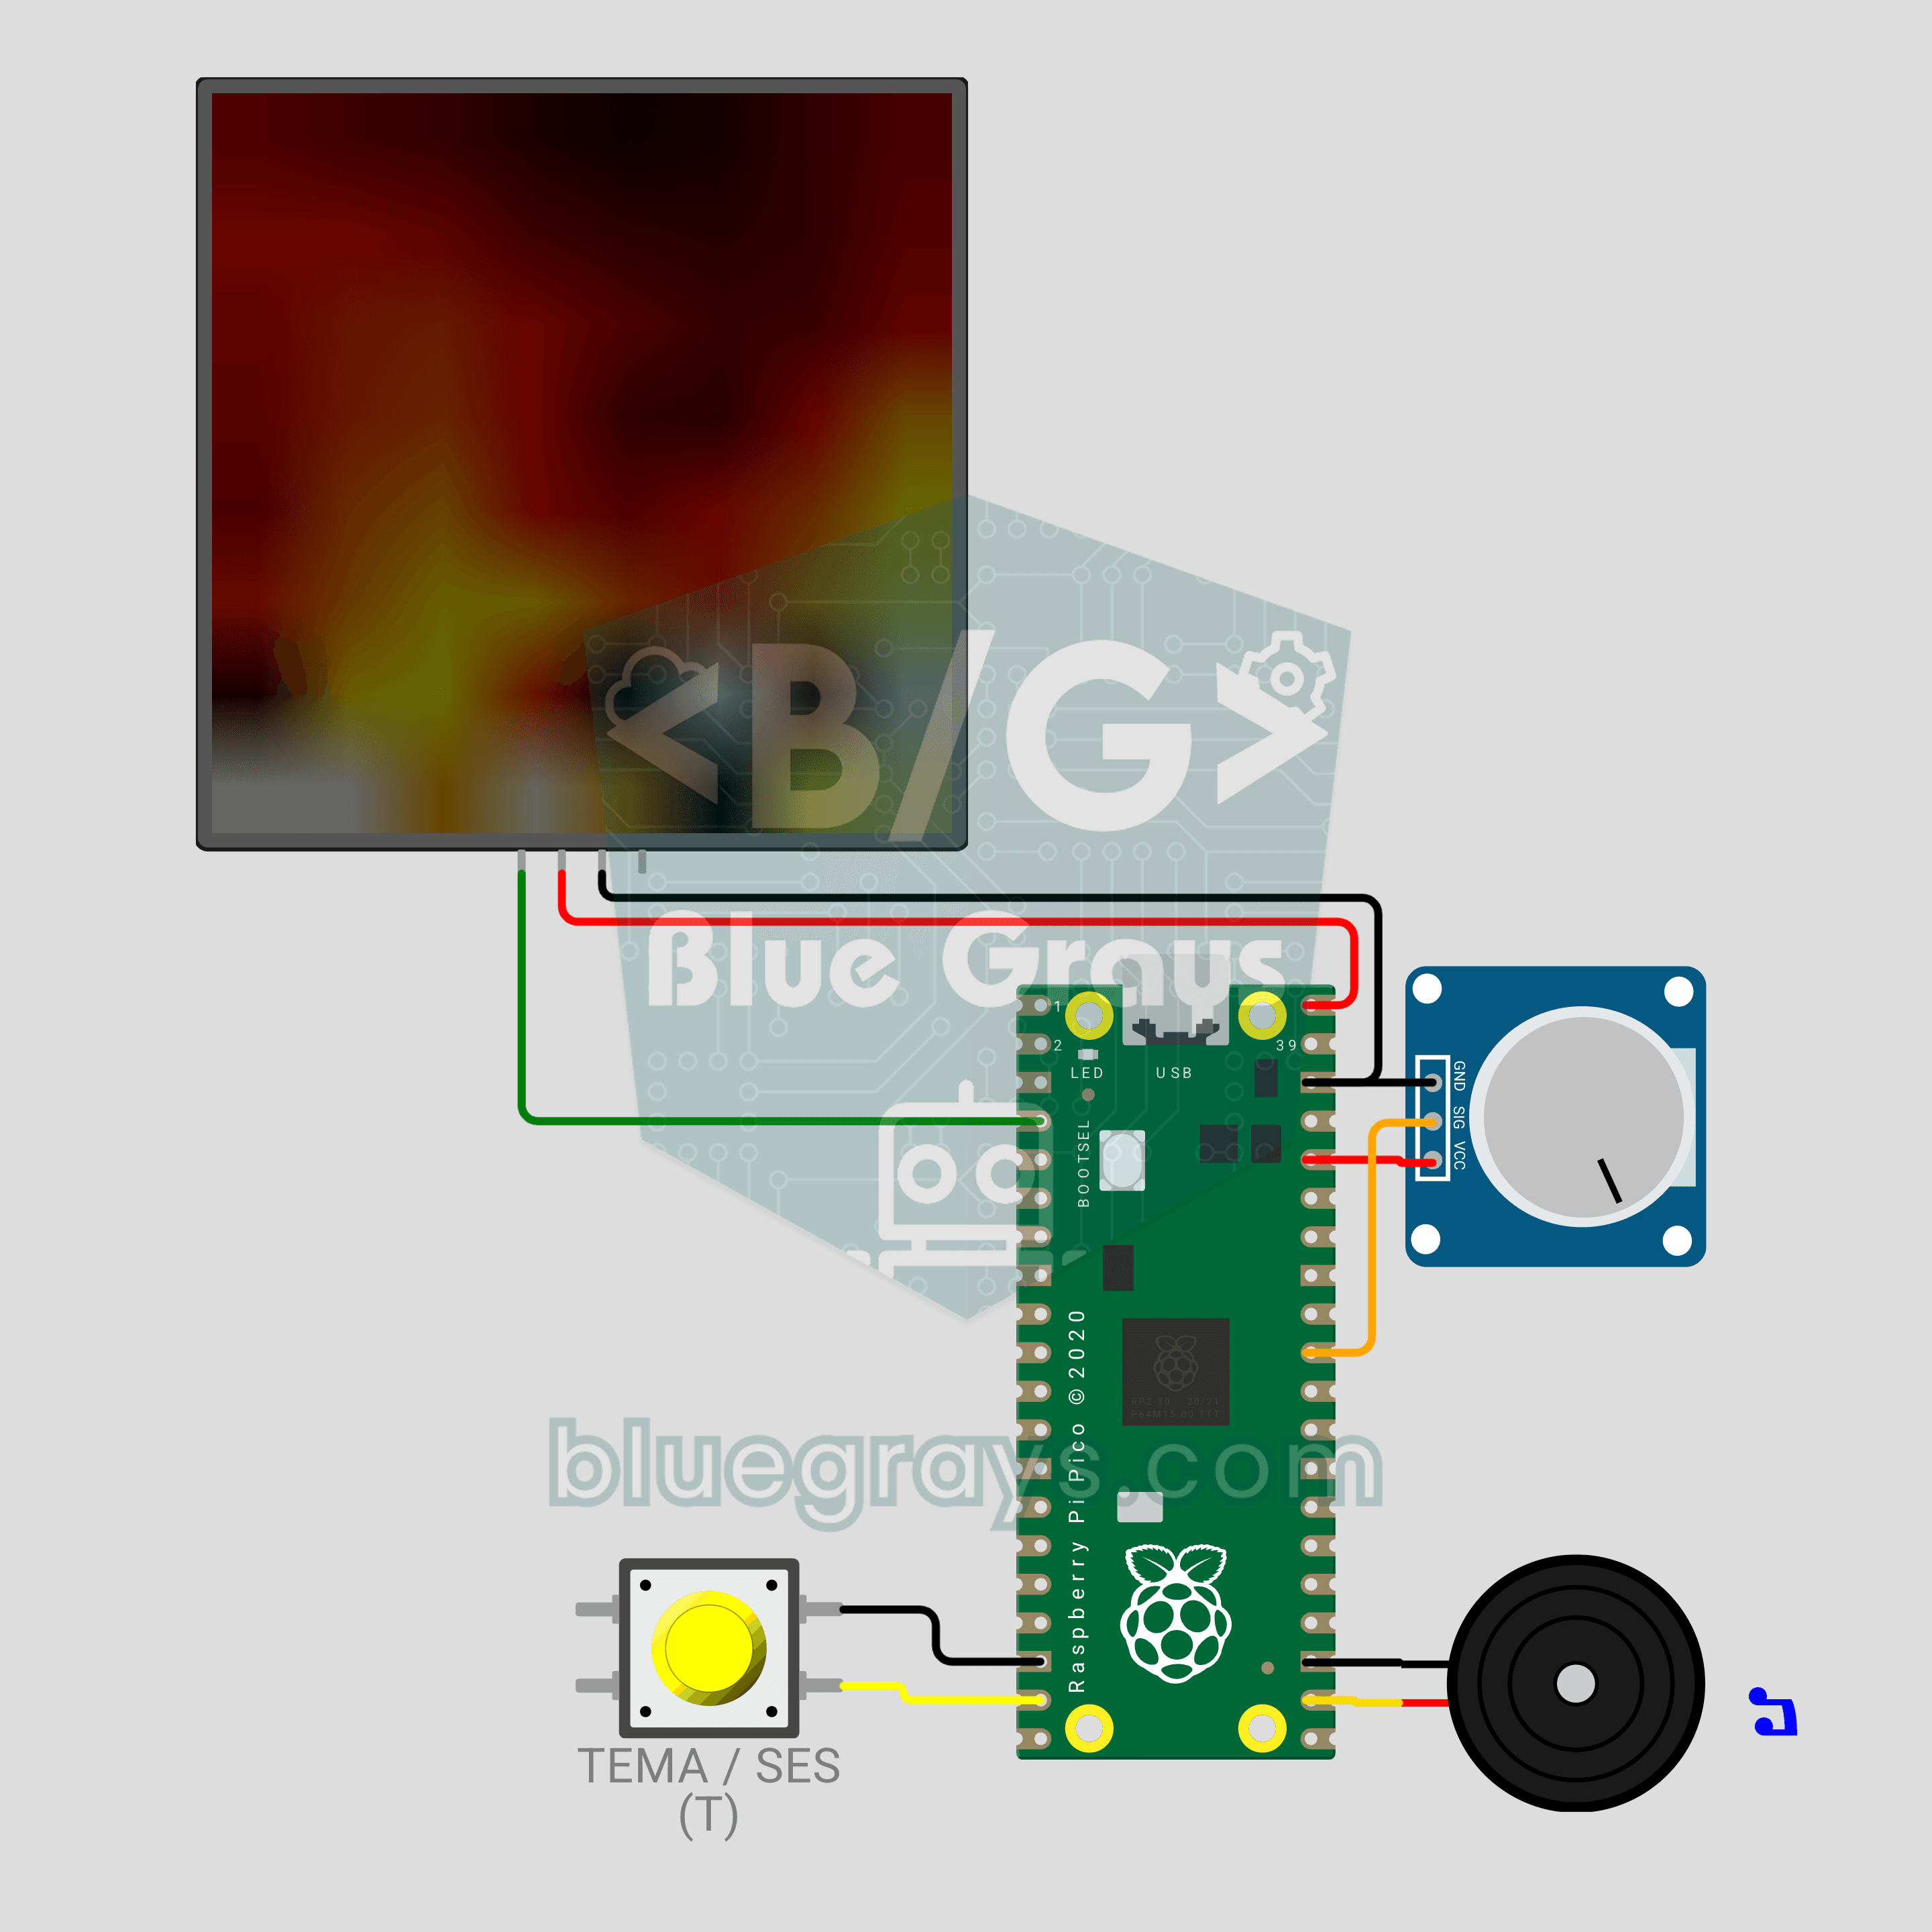
Sơ đồ mạch
Mã nguồn
1# ─────────────────────────────────────────
2#   BlueGrays · bluegrays.com
3#   Raspberry Pi Pico LED Campfire (8x8 NeoPixel Matrix + Potentiometer + Buzzer)
4# ─────────────────────────────────────────
5# Realistic fire animation on an 8x8 NeoPixel matrix. The potentiometer
6# sets the flame height, a short button press changes the theme (Fire,
7# Gas, Magic, Amethyst) and a long press toggles the crackle sound.
8#
9# Pins:
10#   GP2  -> matrix DIN (VDD -> VBUS, VSS -> GND)
11#   GP26 -> Potentiometer wiper (ADC0)
12#   GP14 -> Button (other leg to GND)
13#   GP17 -> Buzzer (+)
14
15from machine import Pin, PWM, ADC
16from neopixel import NeoPixel
17import time
18import random
19
20# ============ SETTINGS ============
21W = 8                  # Columns
22H = 8                  # Rows
23SERPENTINE = False     # True for zigzag-wired panels
24BRIGHTNESS = 0.4       # Wokwi draws colors as-is, 0.4 shows the flame clearly
25                       # 0.15-0.2 recommended on USB 2.0 (500 mA), use external 5V for brighter
26FRAME_MS = 35          # Frame time (~28 FPS)
27LONG_PRESS_MS = 900    # Hold time to toggle sound
28
29# ============ HARDWARE ============
30matrix = NeoPixel(Pin(2), W * H)
31pot = ADC(26)                           # ADC0
32button = Pin(14, Pin.IN, Pin.PULL_UP)
33buzzer = PWM(Pin(17))
34buzzer.duty_u16(0)
35
36# ============ STATE ============
37# heat[x][y]: column x, y = 0 is the bottom row; 0 = cold, 255 = hottest
38heat = [[0] * H for _ in range(W)]
39theme = 0
40THEME_NAMES = ["Fire", "Gas", "Magic", "Amethyst"]
41sound_on = True
42
43
44# ============ COLOR PALETTE ============
45def heat_color(t):
46    # Map heat (0-255) to a color by theme: black -> deep -> bright -> white
47    t192 = (t * 191) // 255
48    ramp = (t192 & 0x3F) << 2      # 0-252 ramp per band
49    if t192 & 0x80:
50        r, g, b = 255, 255, ramp   # Hottest: yellow -> white
51    elif t192 & 0x40:
52        r, g, b = 255, ramp, 0     # Middle: red -> yellow
53    else:
54        r, g, b = ramp, 0, 0       # Cool: black -> red
55    if theme == 1:
56        r, b = b, r                # Gas: blue flame
57    elif theme == 2:
58        r, g = g, r                # Magic: green flame
59    elif theme == 3:
60        b = max(b, r * 3 // 4)     # Amethyst: purple flame
61        g = g // 2
62    return (int(r * BRIGHTNESS), int(g * BRIGHTNESS), int(b * BRIGHTNESS))
63
64
65def pixel_index(x, row):
66    # row 0 = top row
67    if SERPENTINE and row % 2 == 1:
68        return row * W + (W - 1 - x)
69    return row * W + x
70
71
72# ============ FIRE SIMULATION ============
73def fire_step(intensity):
74    # intensity 0-1: flame height. High = less cooling + more sparks
75    cooling = int(115 - 55 * intensity)    # 115 (short) -> 60 (tall)
76    sparking = int(70 + 150 * intensity)   # 70 -> 220 (probability)
77    max_cool = (cooling * 10) // H + 2
78
79    for x in range(W):
80        col = heat[x]
81        # Every cell cools a little
82        for y in range(H):
83            c = col[y] - random.getrandbits(8) % max_cool
84            col[y] = c if c > 0 else 0
85        # Heat drifts up and diffuses
86        for y in range(H - 1, 1, -1):
87            col[y] = (col[y - 1] + col[y - 2] + col[y - 2]) // 3
88        # Random sparks at the base
89        if random.getrandbits(8) < sparking:
90            y = random.getrandbits(1)
91            col[y] = min(255, col[y] + 160 + random.getrandbits(6))
92
93    # 4) Light blending with neighbor columns: the flame waves more naturally
94    for y in range(2, H):
95        row_vals = [heat[x][y] for x in range(W)]
96        for x in range(W):
97            left = row_vals[x - 1] if x > 0 else row_vals[x]
98            right = row_vals[x + 1] if x < W - 1 else row_vals[x]
99            heat[x][y] = (row_vals[x] * 2 + left + right) // 4
100
101
102def render():
103    for x in range(W):
104        for y in range(H):
105            matrix[pixel_index(x, H - 1 - y)] = heat_color(heat[x][y])
106    matrix.write()
107
108
109# ============ CRACKLE SOUND ============
110def crackle(intensity):
111    # Random very short "ticks" = crackling wood
112    if not sound_on:
113        return
114    if random.getrandbits(8) < int(10 + 50 * intensity):
115        buzzer.freq(1500 + random.getrandbits(12))   # 1500-5595 Hz
116        buzzer.duty_u16(6000)
117        time.sleep_ms(2 + random.getrandbits(2))
118        buzzer.duty_u16(0)
119
120
121def beep(freq, ms):
122    buzzer.freq(freq)
123    buzzer.duty_u16(20000)
124    time.sleep_ms(ms)
125    buzzer.duty_u16(0)
126
127
128# ============ BUTTON ============
129btn_state = 1
130btn_raw = 1
131btn_changed = time.ticks_ms()
132press_start = 0
133long_done = False
134
135
136def handle_button():
137    # Short press = theme, long press = sound on/off
138    global btn_state, btn_raw, btn_changed, press_start, long_done, theme, sound_on
139    now = time.ticks_ms()
140    raw = button.value()
141    if raw != btn_raw:
142        btn_raw = raw
143        btn_changed = now
144    if time.ticks_diff(now, btn_changed) > 25 and raw != btn_state:
145        btn_state = raw
146        if raw == 0:
147            press_start = now
148            long_done = False
149        elif not long_done:
150            theme = (theme + 1) % len(THEME_NAMES)
151            print("Theme:", THEME_NAMES[theme])
152            beep(1200, 30)
153    if btn_state == 0 and not long_done and time.ticks_diff(now, press_start) > LONG_PRESS_MS:
154        long_done = True
155        sound_on = not sound_on
156        print("Sound:", "ON" if sound_on else "OFF")
157        beep(1600 if sound_on else 500, 80)
158
159
160# ============ MAIN LOOP ============
161print("== BlueGrays · bluegrays.com ==")
162print("Pico 8x8 Campfire")
163print("Pot = flame height | Short press = theme | Long press = sound")
164
165smooth = pot.read_u16() / 65535
166while True:
167    start = time.ticks_ms()
168    handle_button()
169
170    # Smooth the pot value (jitter should not make the flame jump)
171    smooth += (pot.read_u16() / 65535 - smooth) * 0.2
172    fire_step(smooth)
173    render()
174    crackle(smooth)
175
176    # Constant frame rate
177    spent = time.ticks_diff(time.ticks_ms(), start)
178    if spent < FRAME_MS:
179        time.sleep_ms(FRAME_MS - spent)
180FAQ
Vì sao nên giảm độ sáng trên mạch thật?
Code dùng `BRIGHTNESS = 0.4` vì Wokwi vẽ màu đúng như được gửi. Ma trận thật có thể kéo khoảng 1 A khi ngọn lửa lớn, trong khi cổng USB 2.0 chỉ cấp 500 mA. Khi chạy bằng USB, hãy đặt giá trị này thành 0.15–0.2; muốn sáng hơn, hãy cấp nguồn cho ma trận từ adapter 5V 2A và nối chung GND.
Mình đổi chiều cao và màu ngọn lửa thế nào?
Xoay biến trở sang trái để có than hồng âm ỉ, sang phải để ngọn lửa bốc tới đỉnh ma trận. Nhấn nhanh nút nhấn để đổi lần lượt Lửa, Gas, Phép thuật và Thạch anh tím. Trong Wokwi, hãy bấm vào biến trở và dùng các phím mũi tên, nhấn T để đổi chủ đề.
Mình tắt tiếng lách tách hoặc làm nó thưa hơn thế nào?
Giữ nút nhấn khoảng một giây: tiếng bíp cao nghĩa là âm thanh đã bật, tiếng bíp thấp nghĩa là đã tắt. Muốn ít tiếng lách tách hơn, hãy giảm số 10 và 50 trong `10 + 50 * intensity` bên trong `crackle()`. Hãy dùng buzzer thụ động để phát âm thanh.
Mình có cần cài thư viện nào không?
Không. Các module `neopixel`, `machine` và `random` có sẵn trong MicroPython cho Pico. Hãy cài MicroPython lên Pico và lưu code vào đó với tên `main.py` trong Thonny; sau đó ngọn lửa tự bắt đầu mỗi khi Pico được cấp nguồn.