
ES-27고급
ESP32 비동기 웹 서버 (LCD에 IP 표시)
이 프로젝트에서는 ESP32를 같은 Wi-Fi 네트워크의 휴대폰이나 컴퓨터에서 제어할 수 있는 비동기 웹 서버로 만들어요. ESPAsyncWebServer 라이브러리 덕분에 서버가 여러 요청을 동시에 처리할 수 있어요(요청 하나에 블로킹되는 기존 WebServer.h와 달라요). 브라우저에서 ESP32의 IP 주소를 열고 ON/OFF 버튼(/on, /off 경로)을 눌러 GPIO 5에 연결된 LED를 켜고 끌 수 있어요.
4.8(16)
26 완료
휴대폰 버튼을 눌러 책상 위의 불을 켜면 마법 같은 기분이 들어요. ESP32가 집 Wi-Fi에 접속해 작은 LCD 화면에 자기 주소를 써요. 휴대폰이나 컴퓨터의 브라우저에 그 주소를 입력하면 페이지의 ON, OFF 버튼으로 LED를 제어할 수 있어요. 화면에는 지금 불이 켜져 있는지 꺼져 있는지도 나와요.
동영상
회로도
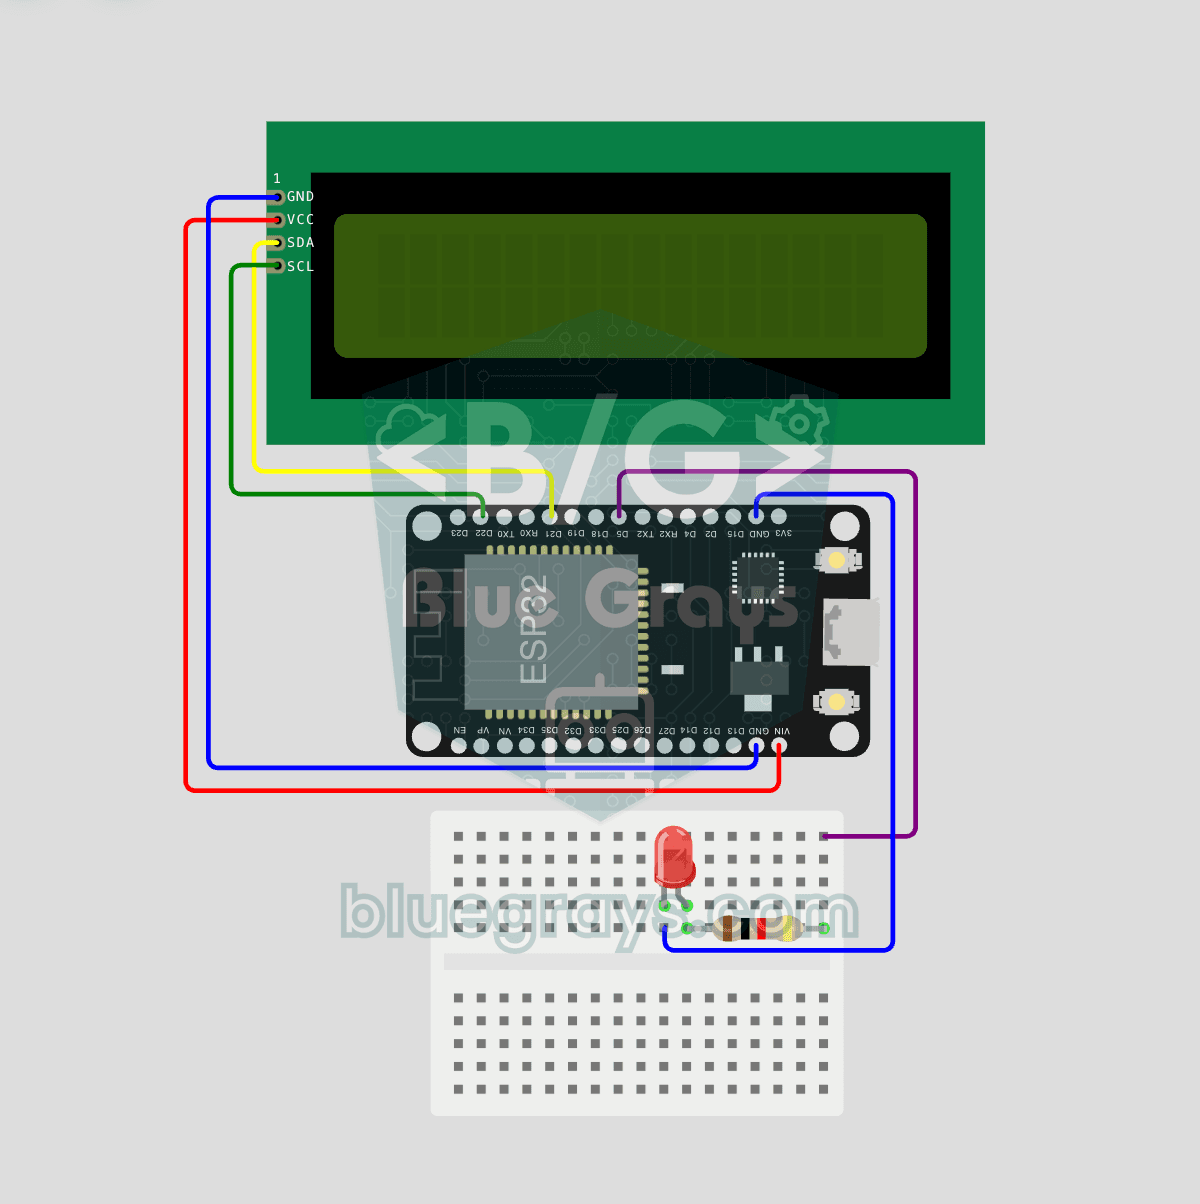
소스 코드
C++ (Arduino IDE)
1// ─────────────────────────────────────────
2//   BlueGrays · bluegrays.com
3//   ESP32 Asynchronous Web Server (with IP Display on LCD)
4// ─────────────────────────────────────────
5// The ESP32 runs an asynchronous web server. Open its IP address from a
6// phone or computer on the same Wi-Fi and switch the LED with the ON/OFF
7// buttons. The I2C LCD shows the IP address on the top row and the LED
8// state on the bottom row.
9//
10// Pins:
11//   GPIO 5  -> LED (with a 220 ohm resistor, cathode to GND)
12//   GPIO 21 -> LCD SDA
13//   GPIO 22 -> LCD SCL
14//   LCD VCC -> VIN (5V), GND -> GND
15
16#include <Wire.h>
17#include <LiquidCrystal_I2C.h>
18#include <WiFi.h>
19#include <AsyncTCP.h>
20#include <ESPAsyncWebServer.h>
21
22// Wi-Fi credentials (Wokwi default). Use your own network on real hardware
23const char* WIFI_SSID = "Wokwi-GUEST";
24const char* WIFI_PASS = "";
25
26// Pin definitions
27#define LED_PIN 5
28
29bool ledState = false;                 // Is the LED on
30AsyncWebServer server(80);             // Web server on port 80
31LiquidCrystal_I2C lcd(0x27, 16, 2);    // Address 0x27, 16x2
32
33// Refreshes the LCD: IP and LED state
34void updateLcd() {
35  lcd.clear();
36  lcd.setCursor(0, 0);
37  // Skip "IP:" when the IP is over 13 chars
38  String ip = WiFi.localIP().toString();
39  if (ip.length() <= 13) lcd.print("IP:");
40  lcd.print(ip);
41  lcd.setCursor(0, 1);
42  lcd.print(ledState ? "LED: ON     " : "LED: OFF    ");
43}
44
45// HTML page, stored in flash (PROGMEM). processor() fills the %STATE% placeholder
46const char INDEX_HTML[] PROGMEM = R"rawliteral(
47<!DOCTYPE html>
48<html lang="en">
49<head>
50<meta charset="utf-8">
51<meta name="viewport" content="width=device-width,initial-scale=1">
52<title>BlueGrays LED Control</title>
53<style>
54body{font-family:Arial;text-align:center;padding:20px;background:#1a1a2e;color:#fff}
55h1{color:#4ea8de}
56.state{font-size:28px;margin:30px}
57button{padding:18px 40px;font-size:18px;margin:8px;border:none;border-radius:8px;cursor:pointer;color:#fff}
58.on{background:#2ecc71}.off{background:#e74c3c}
59</style>
60</head>
61<body>
62<h1>BlueGrays LED Control</h1>
63<div class="state">LED: %STATE%</div>
64<a href="/on"><button class="on">ON</button></a>
65<a href="/off"><button class="off">OFF</button></a>
66</body>
67</html>
68)rawliteral";
69
70// Replaces %STATE% in the page with the LED state
71String processor(const String& var) {
72  if (var == "STATE") return ledState ? "ON" : "OFF";
73  return String();
74}
75
76void setup() {
77  pinMode(LED_PIN, OUTPUT);
78  digitalWrite(LED_PIN, LOW);
79
80  // V1 default I2C: SDA=21 SCL=22
81  Wire.begin(21, 22);
82  lcd.init();
83  lcd.backlight();
84
85  // Splash screen, 3 s
86  lcd.setCursor(3, 0);
87  lcd.print("BlueGrays");
88  lcd.setCursor(2, 1);
89  lcd.print("WebServer v1");
90  delay(3000);
91  lcd.clear();
92
93  // Connect to Wi-Fi, wait until connected
94  lcd.setCursor(0, 0);
95  lcd.print("Connecting WiFi");
96  lcd.setCursor(0, 1);
97  lcd.print("Please wait...");
98
99  WiFi.mode(WIFI_STA);
100  WiFi.begin(WIFI_SSID, WIFI_PASS);
101  while (WiFi.status() != WL_CONNECTED) delay(500);
102
103  // Routes: "/" page, "/on" on, "/off" off
104  server.on("/", HTTP_GET, [](AsyncWebServerRequest *r) {
105    r->send_P(200, "text/html", INDEX_HTML, processor);
106  });
107
108  server.on("/on", HTTP_GET, [](AsyncWebServerRequest *r) {
109    ledState = true;
110    digitalWrite(LED_PIN, HIGH);
111    updateLcd();
112    r->redirect("/");
113  });
114
115  server.on("/off", HTTP_GET, [](AsyncWebServerRequest *r) {
116    ledState = false;
117    digitalWrite(LED_PIN, LOW);
118    updateLcd();
119    r->redirect("/");
120  });
121
122  // Start the server, show the IP on the LCD
123  server.begin();
124  updateLcd();
125}
126
127void loop() {
128  // The async server runs in the background
129  delay(100);
130}
131FAQ
비동기 웹 서버가 기존 WebServer보다 왜 좋아요?
기존 WebServer는 요청을 차례로 처리하고 반복문 안에서 `handleClient()`를 계속 호출해야 해요. ESPAsyncWebServer는 요청을 백그라운드에서 처리해서 여러 브라우저가 동시에 접속할 수 있고, 반복문은 다른 작업에 쓸 수 있어요.
라이브러리는 어떻게 설치해요?
ESPAsyncWebServer와 AsyncTCP 라이브러리가 필요해요. Arduino IDE의 Library Manager에서 "ESPAsyncWebServer"(ESP32Async)를 검색해 설치하면 AsyncTCP는 의존성으로 함께 설치돼요.
집 밖에서 인터넷으로 페이지에 접속할 수 있어요?
기본적으로는 같은 로컬 네트워크에서만 접속할 수 있어요. 외부에서 접속하려면 포트 포워딩이 필요하지만 보안 위험이 있어서, 대신 Blynk, MQTT 또는 클라우드 기반 방법을 권장해요.
PROGMEM으로 HTML을 넣는다는 게 무슨 뜻이에요?
HTML 페이지가 코드 안에 텍스트로 플래시 메모리에 저장되어 RAM을 차지하지 않아요. 그래서 별도의 파일 시스템(LittleFS)을 만들지 않고도 웹 인터페이스를 제공할 수 있어요.