
블록 프로젝트 111개 · Arduino · ESP32 · Pico
블록 코딩으로 만드는 Arduino, ESP32, Pico 프로젝트
코드를 한 줄씩 읽는 대신 알록달록한 블록을 따라가 봐요. BlueGrays 프로젝트 111개에 블록 버전이 준비되어 있어요. 각 블록은 보드에서 실행되는 실제 코드의 한 줄에 대응해요.
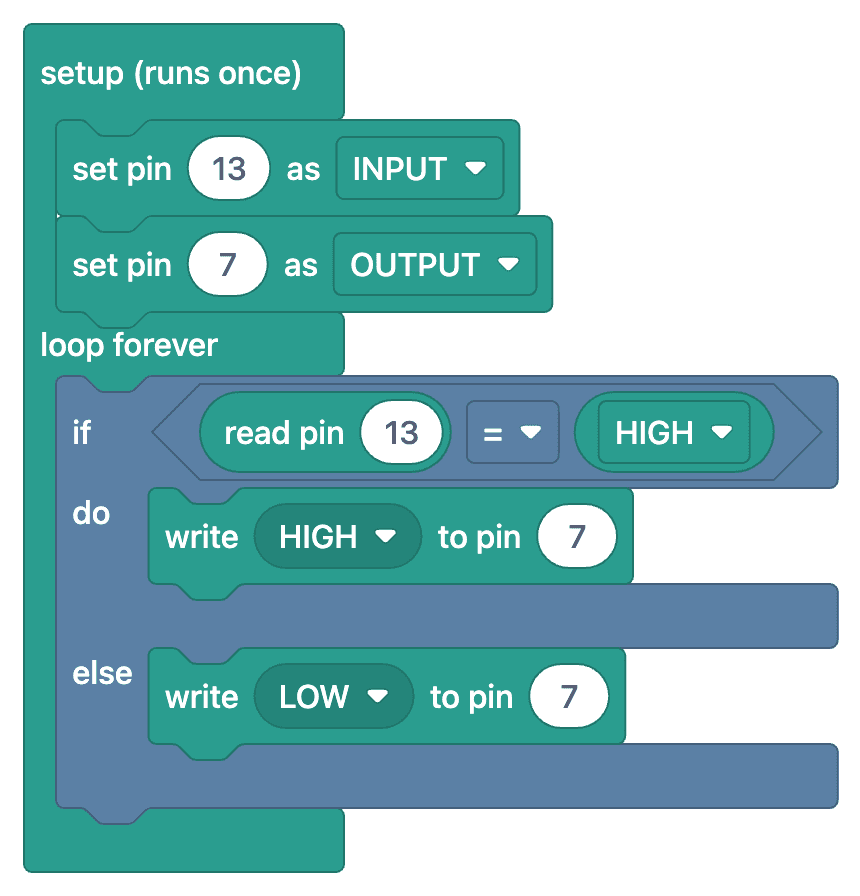
블록 코딩이란?
블록 코딩은 코드를 입력하는 대신 퍼즐 조각 같은 블록으로 프로그램을 만드는 방법이에요. "핀을 출력으로 설정", "LED 켜기", "1초 기다리기" 같은 명령이 각각 하나의 블록이고, 블록을 차례로 쌓으면 프로그램이 완성돼요. 세미콜론이나 괄호, 오타를 걱정할 필요가 없어 프로그램의 논리에 집중할 수 있어요.
BlueGrays는 자체 제작한 블록 세트를 사용하며, 블록은 앱에서 사용하는 언어로 표시돼요. 앱을 영어로 사용하면 블록에도 "repeat forever", "write HIGH to pin"이라고 표시돼요. Arduino와 ESP32 프로젝트의 블록은 C++ 코드에, Raspberry Pi Pico 프로젝트의 블록은 MicroPython 코드에 대응해요.
목표는 계속 블록만 쓰는 것이 아니라 코드를 이해하는 거예요. 같은 프로젝트의 블록과 코드를 나란히 보면 각 줄이 어떤 역할을 하는지 알 수 있어요. 프로젝트를 몇 개 해 보면 블록 없이도 코드를 읽기 시작해요.
BlueGrays 블록 코딩 사용 방법
앱에서 블록 프로젝트의 코드 섹션을 열면 블록을 볼 수 있어요. 다음 네 단계를 따라가 봐요.
- 01
블록 프로젝트 선택
블록 배지가 있는 프로젝트에는 블록 버전이 제공돼요. 필터를 사용하면 블록 프로젝트만 볼 수도 있어요.
- 02
"블록으로 보기" 켜기
코드 섹션의 스위치를 켜면 코드가 블록으로 바뀌어요. 이미지를 누르면 전체 화면으로 열리고 확대해서 볼 수 있어요.
- 03
블록 이해하기
"블록 이해하기" 탭에서는 프로그램을 단계별로 설명해요. 각 단계에 해당하는 블록과 그 역할만 보여 줘요.
- 04
실제 코드로 넘어가기
스위치를 끄면 같은 프로그램이 코드로 표시돼요. 코드를 복사해 Arduino IDE에 붙여 넣고 보드에 업로드해요. Pico는 Thonny를 사용해요.
하나의 프로그램: 블록과 코드
왼쪽은 프로젝트의 블록이고, 오른쪽은 보드에서 실행되는 코드예요. 모든 블록에는 대응하는 코드 줄이 있어요.
블록
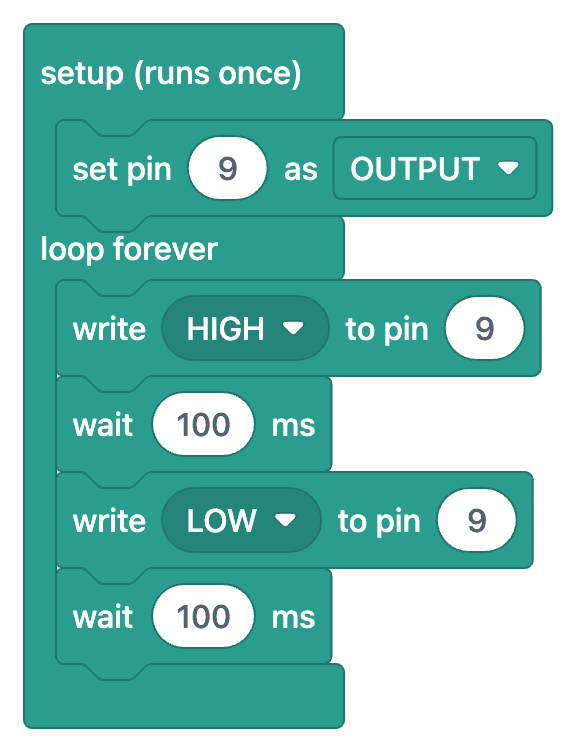
코드
1// ─────────────────────────────────────────
2//   BlueGrays · bluegrays.com
3//   LED Blink
4// ─────────────────────────────────────────
5// Blinks a single LED on and off every 100 ms. Shows the basic use of the
6// digitalWrite and delay functions.
7//
8// Pins:
9//   D9 -> LED (with a 220 ohm resistor)
10
11void setup() {
12  pinMode(9,OUTPUT);     // LED pin as output
13}
14
15void loop() {
16  digitalWrite(9,HIGH);  // Turn the LED on
17  delay(100);            // Wait 100 ms (1000 ms = 1 s)
18  digitalWrite(9,LOW);   // Turn the LED off
19  delay(100);
20}
21블록 프로젝트
블록 버전이 있는 모든 프로젝트를 플랫폼별로 모았어요. 무료 프로젝트가 먼저 표시돼요. 프로젝트 31개는 블록과 코드까지 모두 무료예요.
Arduino 프로젝트블록 프로젝트 74개

LED Blink
The very first hello of electronics: switching a single LED on and off. The Arduino turns the LED on and off at short intervals, so the light blinks quickly.

Two LEDs Blinking Alternately
Two LEDs blink quickly in turn: when one lights up the other goes off, as if they were tossing a ball back and forth.

Traffic Light
A tiny copy of the traffic light you see on the road every day. Red stays on for two seconds, yellow flashes for a moment, green stays on for two seconds, then it goes back to red through yellow…

LED Police Lights
Just like the lights on a police car: the red LED flashes three times in quick succession, then the blue LED flashes three times, and the pattern keeps repeating without a break.

LED Chaser
Lights that switch on one after another, as if they were running. The Arduino lights six LEDs one at a time; each glows for a brief moment and goes out, so the light walks from start to end and then…

Knight Rider LED Effect
The classic scanner light: a dot of light slides from one end of six LEDs to the other and then comes back.

LED Chaser with Adjustable Speed
Six LEDs light up one after another, so the light seems to run from one end to the other.

Knight Rider LED Effect with Adjustable Speed
A light runs from one end of six LEDs to the other, turns around and runs back again.
Arduino 프로젝트: 모든 블록 프로젝트
- AR-9LED Control with a Push Button (Push)무료
- AR-10Toggle an LED with a Button (On/Off)무료
- AR-11Measuring Light Intensity with an LDR무료
- AR-12Night Light with Ldr무료
- AR-13Using a Buzzer무료
- AR-14Frequency Setting with Buzzer무료
- AR-27HC-SR04 Distance Measurement (Serial Display)무료
- AR-37Reading a Reed Switch무료
- AR-45DS1302 RTC Clock Module Setup무료
- AR-55Temperature and Humidity with DHT11무료
- AR-613x4 Keypad Operation무료
- AR-16Reading IR Remote Control Codes
- AR-17Led On/Off with IR Receiver and Remote Control
- AR-19Lighting 220V Bulb with Push Button
- AR-20Lighting 220V Bulb with Button (On-Off)
- AR-21Lighting 220V Bulb with Remote Control
- AR-22Laser Warning System
- AR-23Laser Security System
- AR-24Motion Detector with Motion Sensor
- AR-25Doorbell and Light with Motion Sensor
- AR-26Simple Piano with Buzzer and Button
- AR-28Parking Sensor with HC-SR04
- AR-29Print Message on 2x16 LCD Screen
- AR-30Bouncing Text Animation on LCD
- AR-31Measuring Distance Using LCD Display
- AR-32Using LCD Screen with I2C
- AR-33Height Measurement Project
- AR-34Control an LED from Your Phone via Bluetooth
- AR-35Using a Servo Motor
- AR-36Servo Motor Operation with Potentiometer
- AR-38Reed Switch Door Sensor
- AR-39Using an RGB LED
- AR-40Smooth Color Transition with RGB Led
- AR-42Displaying Numbers 0-99 on a 7-Segment Display
- AR-43Counter with 7-Segment Display and Buttons
- AR-44Temperature Measurement with NTC and 2x16 Lcd Display
- AR-46DS1302 RTC Clock with LCD Display
- AR-47Displaying 0-9999 on a 4-Digit 7-Segment Display
- AR-48Digital Clock with 4-Digit 7-Segment Display
- AR-49Bomb Animation with 4-Digit 7-Segment Display
- AR-50Using a Flame Sensor
- AR-51Using a Gas Sensor
- AR-52Flame and Gas Sensor Alarm
- AR-53RFID Value Reading
- AR-54RFID Authentication
- AR-56Digital Voltmeter with LCD Display
- AR-58Two-Way Communication Between 2 Arduinos
- AR-59Led Control with Joystick
- AR-60Servo Control with Joystick
- AR-62LED Control with a 3x4 Keypad
- AR-634x4 Keypad Operation
- AR-64Password Lock with 4x4 Keypad and LCD
- AR-67Using a Stepper Motor
- AR-68360-Degree Servo from a Stepper Motor
- AR-69Using a WS2812B LED Strip
- AR-70Police Lights with WS2812B
- AR-71WS2812B LED Chaser
- AR-72WS2812B LED Chaser (Fill Effect)
- AR-73WS2812B Knight Rider Effect
- AR-74WS2812B Knight Rider Effect (3 LEDs)
- AR-75WS2812B Animation 1
- AR-77Reading Reflection (Proximity) with TCRT5000
- AR-78TCRT5000 Black and White Surface Detection
- AR-82Smart Stair and Corridor Lighting
- AR-83Smart Irrigation Station
- AR-95Arduino Reaction Time Test with Sound Cue: Measure Your Reflexes in Milliseconds (LCD + Buzzer + 3 LEDs)
ESP32 프로젝트블록 프로젝트 23개

LED Blink with ESP32
Teaches basic GPIO output usage with ESP32. We achieve a blinking effect by turning an LED on and off from a digital pin. ESP32 version of the classic blink project on Arduino UNO; the basic blink commands in the Arduino environment are the same, but the ESP32's pin layout and 3.3 V GPIO levels differ from those of the Arduino UNO.

ESP32 LED Control with Push Button (Push)
The LED lights up when the button is pressed and turns off when released. Shows how the ESP32's digital input pin and internal pull-up resistor are used. The INPUT_PULLUP mode eliminates the need for an external resistor.

ESP32 LED Control with Pushbutton (Toggle)
Each time the button is pressed the state of the LED changes: if it is on it turns off, if it is off it turns on. Classic toggle pattern. With debounce we clean up the mechanical noise of the pushbutton to ensure a single toggle with a single press.

ESP32 Built-in LED Blink
Blinking the built-in blue LED on the ESP32 DevKit V1. No external components required! The first project you should try when you buy an ESP32. GPIO 2 is connected to the built-in LED.

ESP32 Traffic Light
Real traffic light simulation with 3 LEDs red-yellow-green. Timings close to real traffic logic: red long, yellow short, green long. Classic example of sequential GPIO control.

ESP32 Knight Rider LED
6 LEDs moving sequentially from left to right and right to left (Knight Rider style). A basic example of using for loops and arrays. Teaches the logic of direction change.

ESP32 LED Fade with PWM
Smoothly changing the brightness of the LED from 0 to max, from max to 0. We control PWM with analogWrite() as in Arduino - the same syntax as ESP32 Arduino Core 3.0+ works without problems. Pin definition + pinMode + analogWrite is enough.

ESP32 RGB LED Control
Unlimited color generation with a single RGB LED instead of 3 separate LEDs. As in Arduino, we make a rainbow transition by setting the R/G/B values with analogWrite(). Color theory (such as red+green=yellow) is seen practically.
ESP32 프로젝트: 모든 블록 프로젝트
- ES-11Reading Light Intensity with the ESP32 LDR Module무료
- ES-14ESP32 HC-SR04 Ultrasonic Distance Sensor무료
- ES-15ESP32 DHT22 Temperature and Humidity (with LCD Display)무료
- ES-20ESP32 MQ-2 Gas/Smoke Detector Alarm무료
- ES-21ESP32 RFID RC522 Card Reader (with LCD)무료
- ES-7ESP32 Police Strobe Light Effect
- ES-10ESP32 Night Light with LDR
- ES-12ESP32 Melody Playback with Buzzer
- ES-13ESP32 LED Brightness Control with a Potentiometer (Analog → PWM)
- ES-16ESP32 Servo Motor (Potentiometer Control)
- ES-17ESP32 I2C LCD Display (16x2)
- ES-18Digital Clock with ESP32 and DS1307 RTC (I2C + LCD)
- ES-19Automatic Lighting with the ESP32 PIR Motion Sensor
- ES-23ESP32 TM1637 4-Digit 7-Segment Display
- ES-24ESP32 WS2812B NeoPixel Strip Control
Raspberry Pi Pico 프로젝트블록 프로젝트 10개
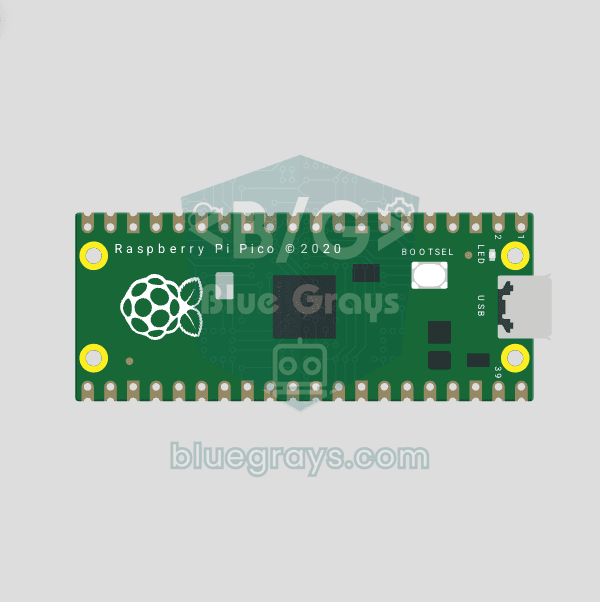
Raspberry Pi Pico Onboard LED Blink (Pico and Pico W)
The opening project of the Raspberry Pi Pico series! We blink the Pico's green built-in LED to confirm the board works, the classic "Hello World" first experiment. No external parts needed, just the Pico and a USB cable. The code is written in MicroPython, the language officially supported by the Raspberry Pi Foundation.
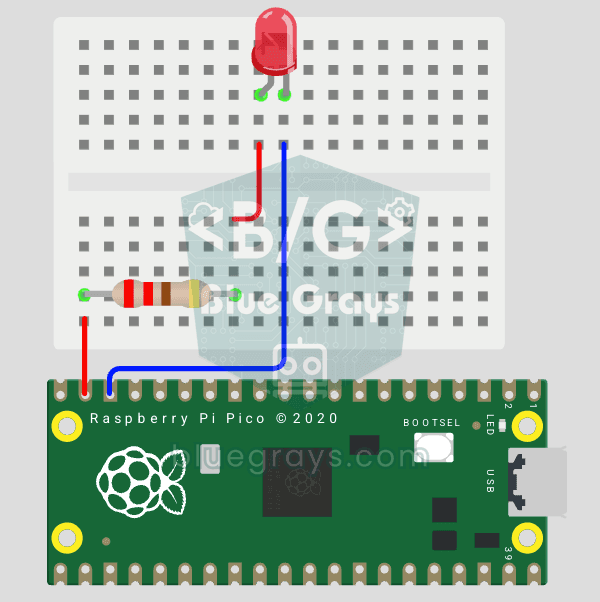
Raspberry Pi Pico: Controlling an External LED (Breadboard)
The next step after the Pico's built-in LED: connect an external LED on a breadboard and control it through pin GP14. You'll learn how to use any of the Pico's GPIO pins as an output, the LED's polarity (long leg = anode/+, short leg = cathode/–) and why a current-limiting resistor (220Ω) is a must. Without the resistor, too much current flows through the LED and it can burn out.
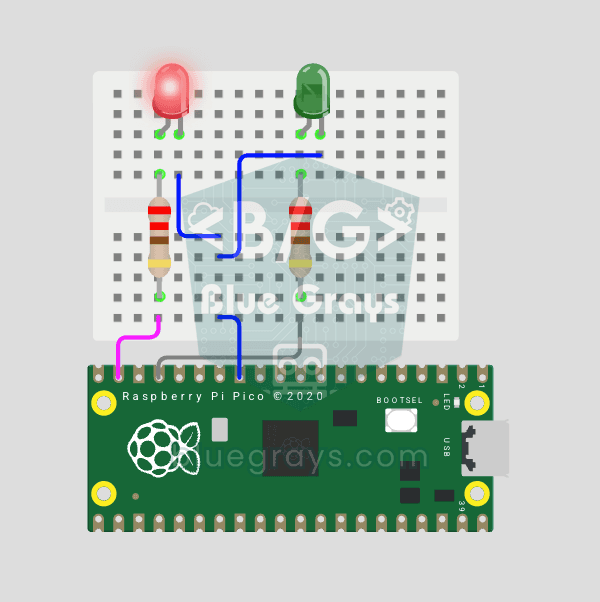
Raspberry Pi Pico Alternating Two LEDs (Blink-Flip Pattern)
The next step after the Pico's single LED: the classic flip-flop animation, with two LEDs blinking in turn. One LED turns off as the other turns on, the most basic example of handling multiple GPIOs. Two LEDs of different colors (red on GP14, green on GP13) swap every 500 ms. With MicroPython's Pin.toggle() method, the code stays short and readable.
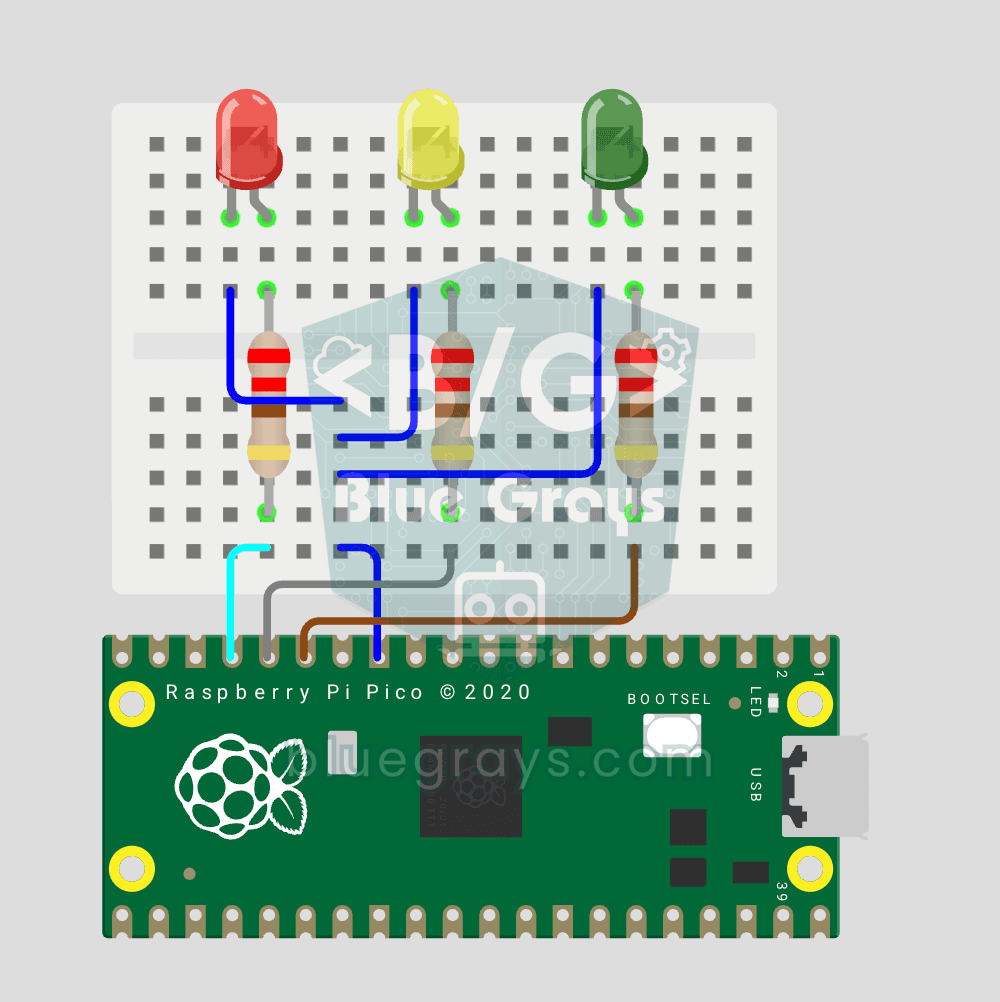
Raspberry Pi Pico Traffic Light Simulator (3 LEDs Sequential)
We recreate real traffic light logic with red, yellow and green LEDs, the first Pico project to move up to 3 LEDs! Green says "go" for 4 seconds, yellow "get ready" for 1.5 seconds, red "stop" for 3 seconds, and red+yellow "set off" for 1 second (the European traffic light pattern). You'll learn to define functions (def all_off()), state machine logic and multi-GPIO synchronization.
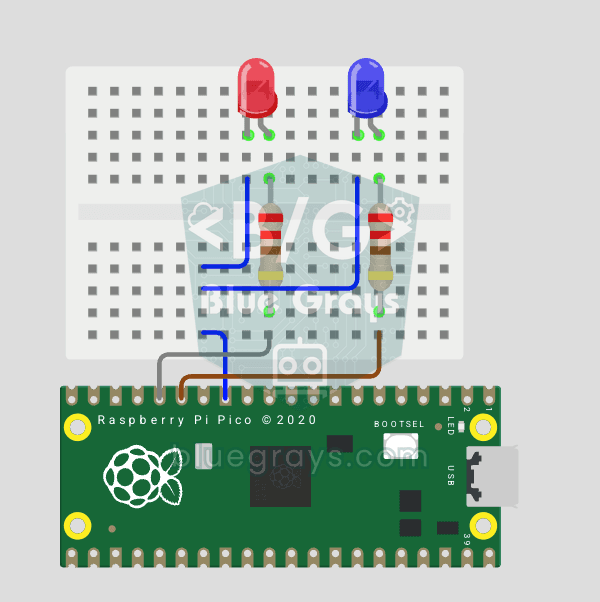
Raspberry Pi Pico Police Strobe Light Effect (Red + Blue)
We simulate a police car's light bar with a Raspberry Pi Pico in its simplest form! The red and blue LEDs take turns (flip-flop): while red is on, blue is off, and they swap every 0.3 seconds, forever. The code writes the two steps directly in a single while True loop; the speed is set with the WAIT_MS constant.
Raspberry Pi Pico 3-Burst Police Flip-Flop (2 LEDs)
Rhythmic variation of the police strobe project — 3-burst flip-flop! Same 2-LED circuit (GP11 red + GP12 blue), but a different pattern: red LED flashes 3 times rapidly, then blue flashes 3 times, forever. This "burst + switch" pattern is the most recognizable rhythm of real police siren lights. Learn parametrized function def burst(led, count, duration_ms), rhythm design, and generating different visual effects with code on same circuit.
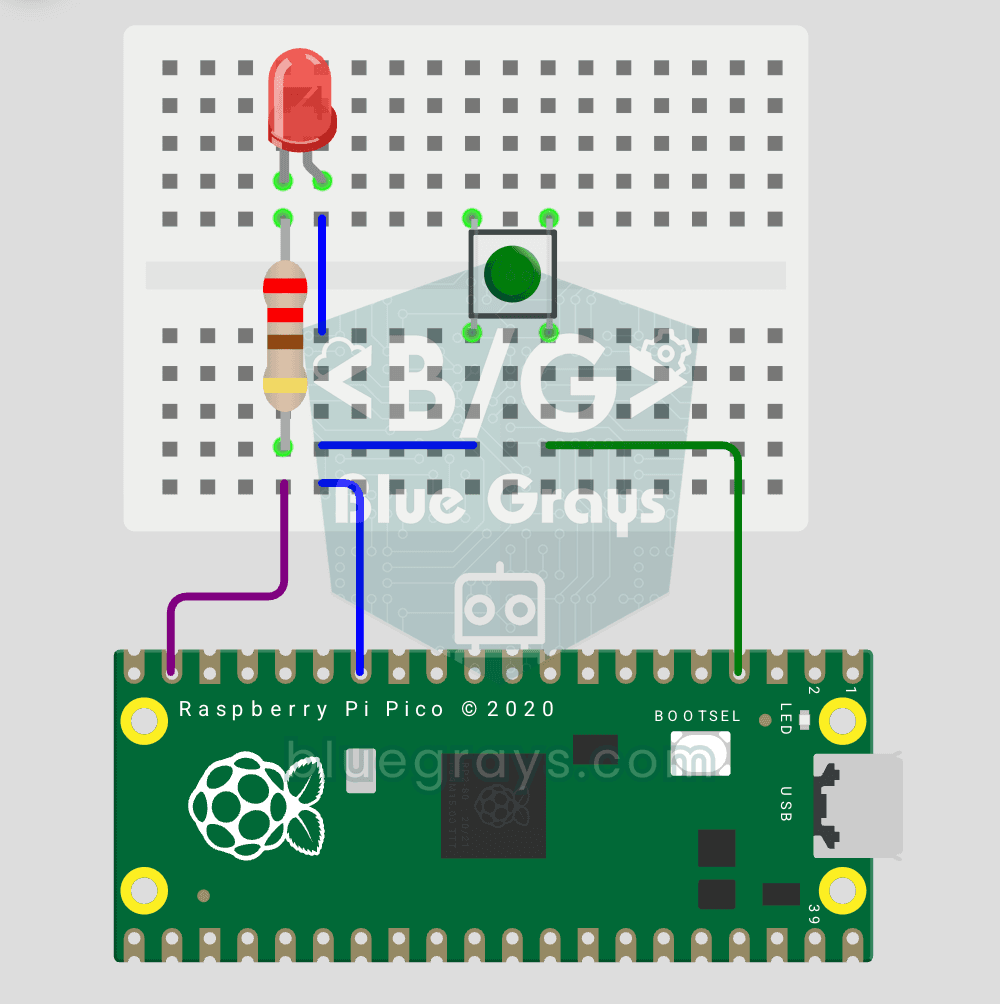
Raspberry Pi Pico Button Toggle LED
Button + LED — next level! Unlike the basic button project, there is no need to hold the button. Press and release → LED on. Press and release again → LED off (toggle). Same circuit (LED GP14, Button GP2), but big code difference. Learn edge detection (capturing the 1→0 falling moment), state tracking, debounce (mechanical bounce filter). MicroPython's led.toggle() swaps state in one line. Foundation of all interactive button projects (mode switcher, IRQ, double-click).
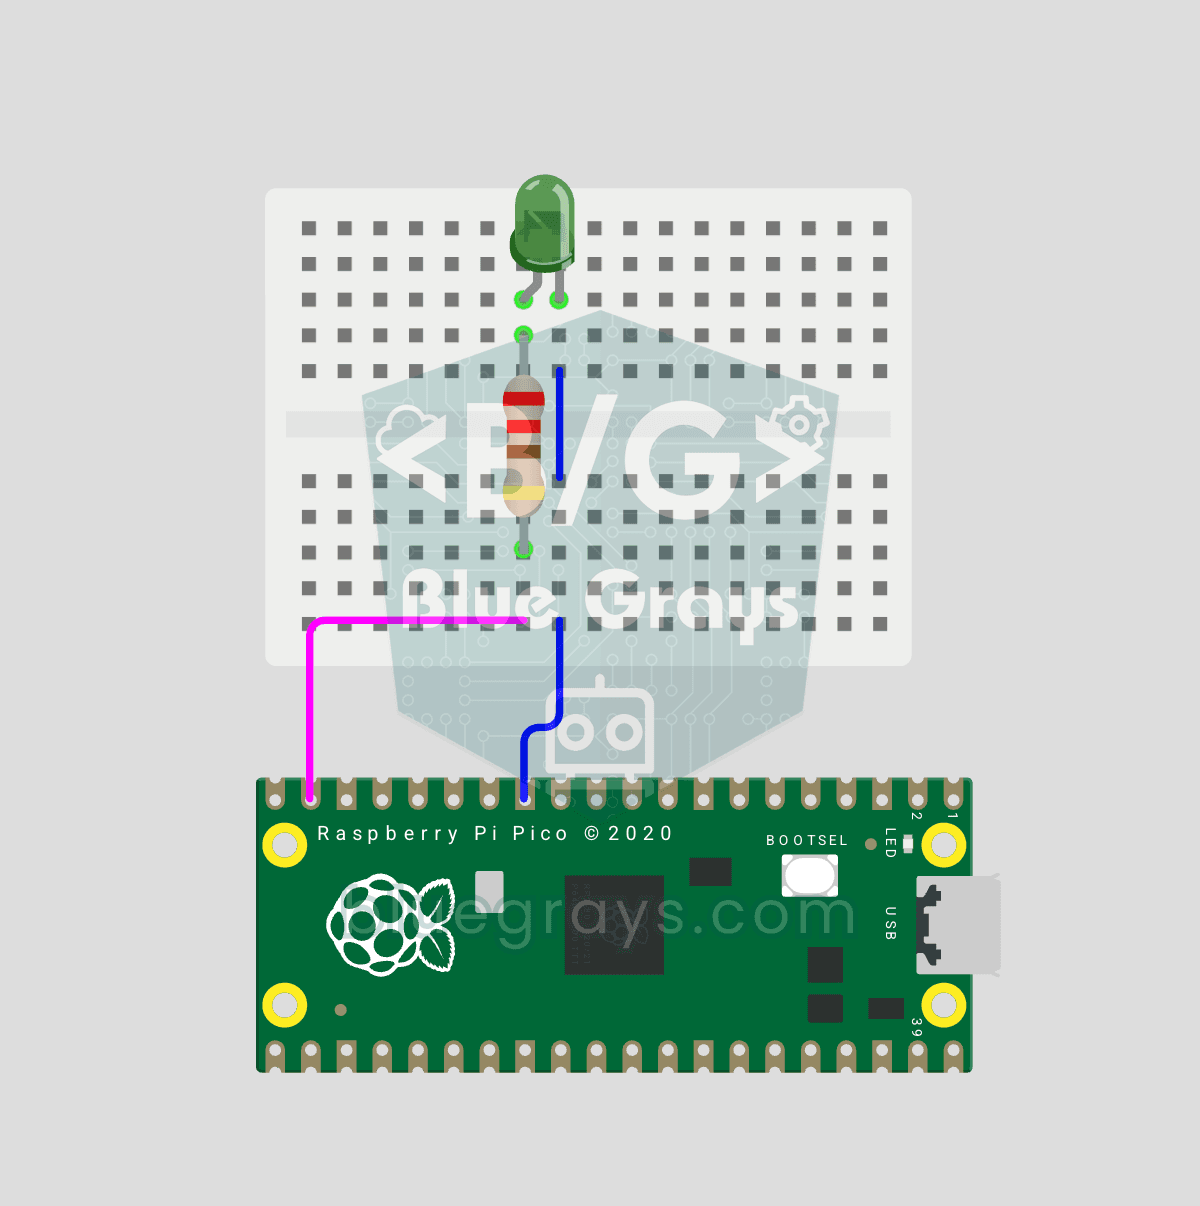
Raspberry Pi Pico PWM LED Fade (Breathing Effect)
The LED doesn't just blink anymore, it breathes! With the Raspberry Pi Pico's PWM (Pulse Width Modulation), the LED's brightness slowly rises and then slowly fades, a calm "breathing" effect like a sleeping laptop's light. You'll learn the machine.PWM class, the 16-bit brightness value from 0–65535 with duty_u16() and the PWM frequency.
Raspberry Pi Pico 프로젝트: 모든 블록 프로젝트
누구를 위한 기능인가요?
어린이와 부모님
어린이가 코딩을 배울 때 책상 위의 LED를 직접 켜 보면 훨씬 오래 기억에 남아요. 블록으로 프로그램을 쉽게 읽고, 회로는 함께 만들 수 있어요.
선생님과 동아리
로봇 코딩 수업에서는 프로젝트를 먼저 블록으로 설명한 뒤 코드로 넘어갈 수 있어요. 모든 프로젝트에 부품 목록과 회로도가 준비되어 있어요.
입문자
Arduino 블록 코딩은 처음 몇 개의 프로젝트에서 코드의 논리를 가장 빠르게 익히는 방법이에요. 블록으로 시작하고, 준비가 되면 코드로 넘어가 보세요.
자주 묻는 질문
블록 기반 코딩이란 무엇인가요?
명령을 글자로 입력하는 대신 퍼즐 조각처럼 서로 맞물리는 블록으로 표현하는 프로그래밍 방법이에요. 오타가 생기지 않아 입문자와 어린이가 프로그램의 논리를 더 쉽게 이해할 수 있어요.
BlueGrays에서 블록을 제공하는 프로젝트는 몇 개인가요?
현재 총 111개예요. Arduino 프로젝트 76개, ESP32 프로젝트 25개, Raspberry Pi Pico 프로젝트 10개가 있어요. 더 많은 프로젝트가 블록으로 변환되면서 목록도 늘어나요.
블록 코딩은 무료인가요?
앱은 무료예요. 블록 프로젝트 31개의 블록과 코드는 누구나 볼 수 있어요. 나머지 프로젝트는 코드와 마찬가지로 Premium을 이용하면 블록의 잠금이 해제돼요.
블록을 보드에 바로 업로드할 수 있나요?
아니요. 블록은 프로그램을 읽고 이해하기 쉽게 보여 주는 역할을 해요. 보드에 업로드하는 것은 항상 해당 프로젝트의 실제 코드예요. 코드를 Arduino IDE에, Pico라면 Thonny에 복사해 업로드해요.
블록으로 나만의 프로그램을 만들 수 있나요?
아직은 지원하지 않아요. 각 프로젝트의 블록은 저희가 직접 만들고 코드와 일대일로 연결해요. 그래서 화면에 보이는 블록은 항상 테스트를 거쳐 정상적으로 작동하는 프로그램에 대응해요.
Scratch나 mBlock과는 어떻게 다른가요?
Scratch와 mBlock에서는 컴퓨터에서 블록을 드래그해 나만의 프로그램을 만들어요. BlueGrays의 모든 블록 프로젝트에는 회로도, 부품 목록, 실제 코드가 함께 제공돼요. 블록은 그 코드를 읽기 쉽게 보여 주는 버전이에요. 두 방식은 서로 보완해 줘요.
어린이에게도 적합한가요? 몇 살부터 시작할 수 있나요?
글을 편하게 읽을 수 있는 9~10세 이상의 어린이라면 어른과 함께 시작할 수 있어요. 첫 프로젝트는 납땜이 필요 없어요. 브레드보드에 LED, 버튼, 부저를 연결해 만들어요.
블록은 어떤 언어로 제공되나요?
영어, 튀르키예어, 독일어, 스페인어, 프랑스어, 이탈리아어로 제공돼요. 블록은 앱에서 사용하는 언어로 표시돼요.
BlueGrays 앱
휴대폰으로 시작하는 블록 코딩
블록, 회로도, 부품 목록, 실제 코드를 한 화면에서 볼 수 있어요. iOS와 Android에서 무료로 이용할 수 있어요.

휴대폰으로 스캔
카메라로 코드를 비추면 휴대폰의 앱 스토어가 열려요.