
Raspberry Pi Pico LED 모닥불 (8x8 NeoPixel 매트릭스 + 가변저항 + 부저)
아무것도 태우거나 데우지 않지만 타닥타닥 소리는 나는 모닥불이에요! Raspberry Pi Pico가 8x8 NeoPixel 매트릭스에 프레임마다 새로 계산한 실감 나는 불꽃을 그려요. 아래쪽에서 불티가 생기고, 열은 올라가면서 식으며 빨강에서 흰색으로 빛나요. 가변저항은 불꽃 높이를 정하고, 버튼은 Fire, Gas, Magic, Amethyst 테마를 바꾸며, 부저는 장작 타는 소리를 더해요. 절차적 애니메이션, ADC, PWM, MicroPython을 한 프로젝트에서 배워요.
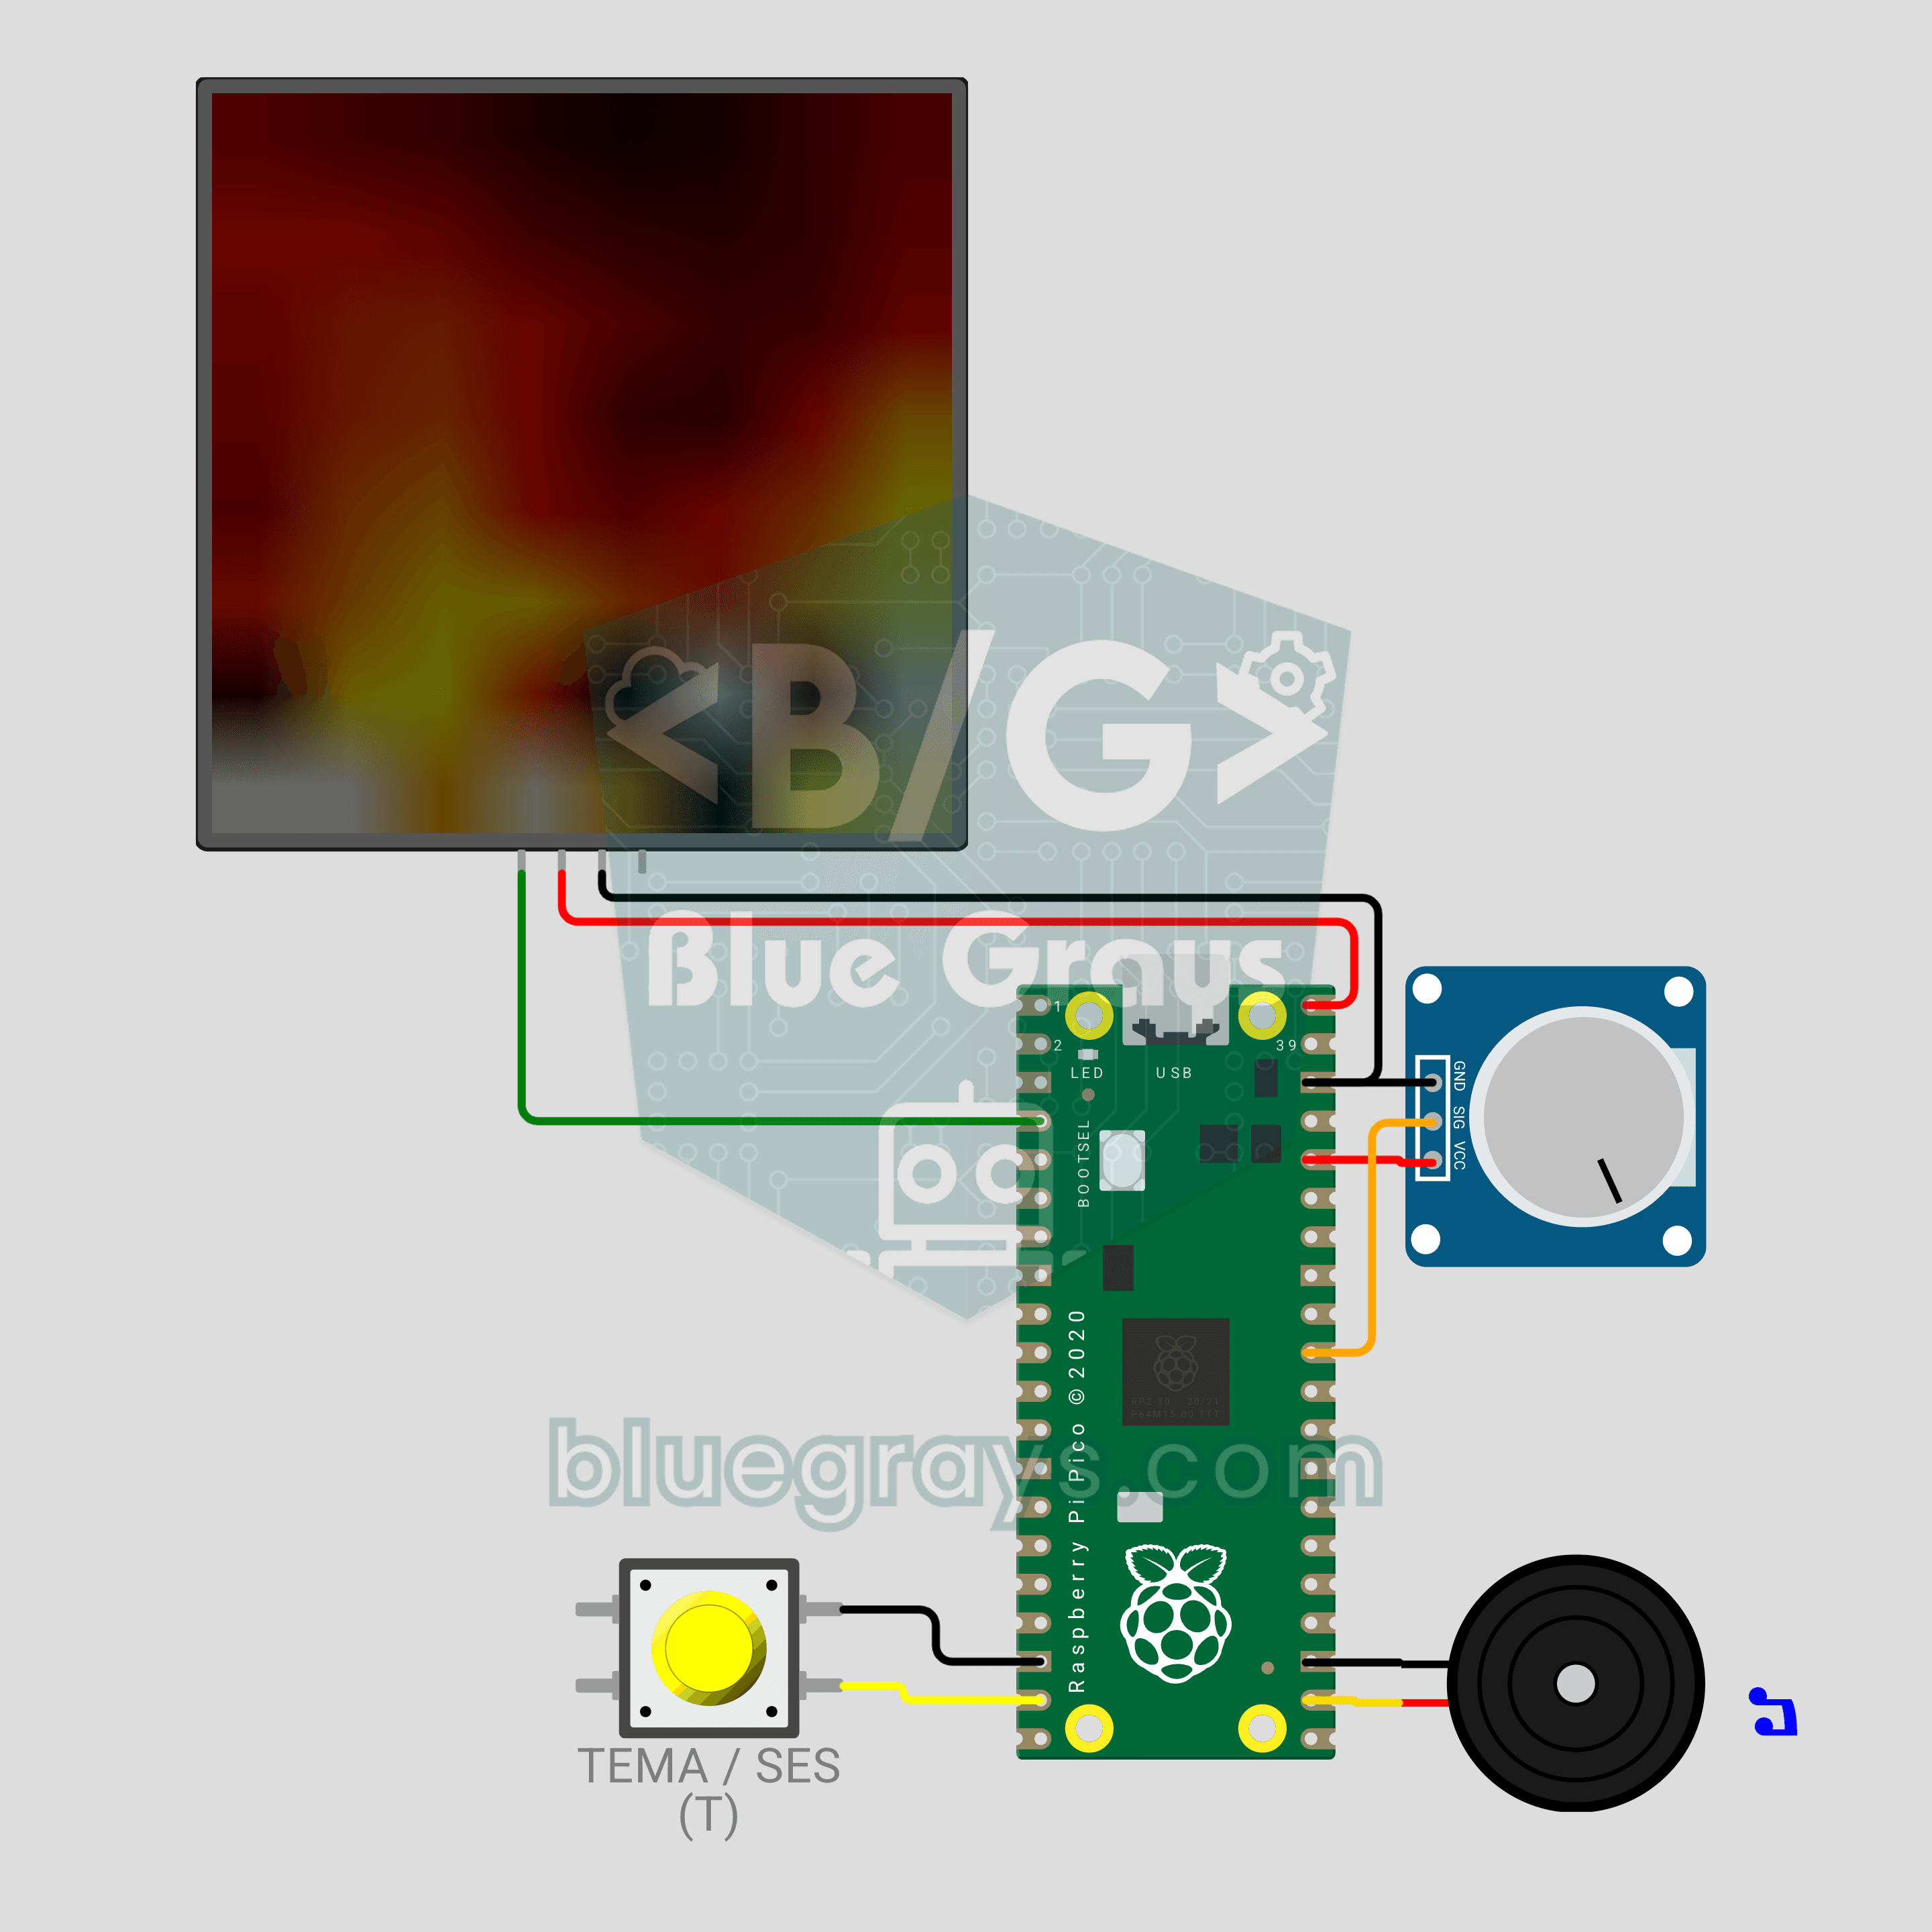
동영상
회로도
소스 코드
1# ─────────────────────────────────────────
2#   BlueGrays · bluegrays.com
3#   Raspberry Pi Pico LED Campfire (8x8 NeoPixel Matrix + Potentiometer + Buzzer)
4# ─────────────────────────────────────────
5# Realistic fire animation on an 8x8 NeoPixel matrix. The potentiometer
6# sets the flame height, a short button press changes the theme (Fire,
7# Gas, Magic, Amethyst) and a long press toggles the crackle sound.
8#
9# Pins:
10#   GP2  -> matrix DIN (VDD -> VBUS, VSS -> GND)
11#   GP26 -> Potentiometer wiper (ADC0)
12#   GP14 -> Button (other leg to GND)
13#   GP17 -> Buzzer (+)
14
15from machine import Pin, PWM, ADC
16from neopixel import NeoPixel
17import time
18import random
19
20# ============ SETTINGS ============
21W = 8                  # Columns
22H = 8                  # Rows
23SERPENTINE = False     # True for zigzag-wired panels
24BRIGHTNESS = 0.4       # Wokwi draws colors as-is, 0.4 shows the flame clearly
25                       # 0.15-0.2 recommended on USB 2.0 (500 mA), use external 5V for brighter
26FRAME_MS = 35          # Frame time (~28 FPS)
27LONG_PRESS_MS = 900    # Hold time to toggle sound
28
29# ============ HARDWARE ============
30matrix = NeoPixel(Pin(2), W * H)
31pot = ADC(26)                           # ADC0
32button = Pin(14, Pin.IN, Pin.PULL_UP)
33buzzer = PWM(Pin(17))
34buzzer.duty_u16(0)
35
36# ============ STATE ============
37# heat[x][y]: column x, y = 0 is the bottom row; 0 = cold, 255 = hottest
38heat = [[0] * H for _ in range(W)]
39theme = 0
40THEME_NAMES = ["Fire", "Gas", "Magic", "Amethyst"]
41sound_on = True
42
43
44# ============ COLOR PALETTE ============
45def heat_color(t):
46    # Map heat (0-255) to a color by theme: black -> deep -> bright -> white
47    t192 = (t * 191) // 255
48    ramp = (t192 & 0x3F) << 2      # 0-252 ramp per band
49    if t192 & 0x80:
50        r, g, b = 255, 255, ramp   # Hottest: yellow -> white
51    elif t192 & 0x40:
52        r, g, b = 255, ramp, 0     # Middle: red -> yellow
53    else:
54        r, g, b = ramp, 0, 0       # Cool: black -> red
55    if theme == 1:
56        r, b = b, r                # Gas: blue flame
57    elif theme == 2:
58        r, g = g, r                # Magic: green flame
59    elif theme == 3:
60        b = max(b, r * 3 // 4)     # Amethyst: purple flame
61        g = g // 2
62    return (int(r * BRIGHTNESS), int(g * BRIGHTNESS), int(b * BRIGHTNESS))
63
64
65def pixel_index(x, row):
66    # row 0 = top row
67    if SERPENTINE and row % 2 == 1:
68        return row * W + (W - 1 - x)
69    return row * W + x
70
71
72# ============ FIRE SIMULATION ============
73def fire_step(intensity):
74    # intensity 0-1: flame height. High = less cooling + more sparks
75    cooling = int(115 - 55 * intensity)    # 115 (short) -> 60 (tall)
76    sparking = int(70 + 150 * intensity)   # 70 -> 220 (probability)
77    max_cool = (cooling * 10) // H + 2
78
79    for x in range(W):
80        col = heat[x]
81        # Every cell cools a little
82        for y in range(H):
83            c = col[y] - random.getrandbits(8) % max_cool
84            col[y] = c if c > 0 else 0
85        # Heat drifts up and diffuses
86        for y in range(H - 1, 1, -1):
87            col[y] = (col[y - 1] + col[y - 2] + col[y - 2]) // 3
88        # Random sparks at the base
89        if random.getrandbits(8) < sparking:
90            y = random.getrandbits(1)
91            col[y] = min(255, col[y] + 160 + random.getrandbits(6))
92
93    # 4) Light blending with neighbor columns: the flame waves more naturally
94    for y in range(2, H):
95        row_vals = [heat[x][y] for x in range(W)]
96        for x in range(W):
97            left = row_vals[x - 1] if x > 0 else row_vals[x]
98            right = row_vals[x + 1] if x < W - 1 else row_vals[x]
99            heat[x][y] = (row_vals[x] * 2 + left + right) // 4
100
101
102def render():
103    for x in range(W):
104        for y in range(H):
105            matrix[pixel_index(x, H - 1 - y)] = heat_color(heat[x][y])
106    matrix.write()
107
108
109# ============ CRACKLE SOUND ============
110def crackle(intensity):
111    # Random very short "ticks" = crackling wood
112    if not sound_on:
113        return
114    if random.getrandbits(8) < int(10 + 50 * intensity):
115        buzzer.freq(1500 + random.getrandbits(12))   # 1500-5595 Hz
116        buzzer.duty_u16(6000)
117        time.sleep_ms(2 + random.getrandbits(2))
118        buzzer.duty_u16(0)
119
120
121def beep(freq, ms):
122    buzzer.freq(freq)
123    buzzer.duty_u16(20000)
124    time.sleep_ms(ms)
125    buzzer.duty_u16(0)
126
127
128# ============ BUTTON ============
129btn_state = 1
130btn_raw = 1
131btn_changed = time.ticks_ms()
132press_start = 0
133long_done = False
134
135
136def handle_button():
137    # Short press = theme, long press = sound on/off
138    global btn_state, btn_raw, btn_changed, press_start, long_done, theme, sound_on
139    now = time.ticks_ms()
140    raw = button.value()
141    if raw != btn_raw:
142        btn_raw = raw
143        btn_changed = now
144    if time.ticks_diff(now, btn_changed) > 25 and raw != btn_state:
145        btn_state = raw
146        if raw == 0:
147            press_start = now
148            long_done = False
149        elif not long_done:
150            theme = (theme + 1) % len(THEME_NAMES)
151            print("Theme:", THEME_NAMES[theme])
152            beep(1200, 30)
153    if btn_state == 0 and not long_done and time.ticks_diff(now, press_start) > LONG_PRESS_MS:
154        long_done = True
155        sound_on = not sound_on
156        print("Sound:", "ON" if sound_on else "OFF")
157        beep(1600 if sound_on else 500, 80)
158
159
160# ============ MAIN LOOP ============
161print("== BlueGrays · bluegrays.com ==")
162print("Pico 8x8 Campfire")
163print("Pot = flame height | Short press = theme | Long press = sound")
164
165smooth = pot.read_u16() / 65535
166while True:
167    start = time.ticks_ms()
168    handle_button()
169
170    # Smooth the pot value (jitter should not make the flame jump)
171    smooth += (pot.read_u16() / 65535 - smooth) * 0.2
172    fire_step(smooth)
173    render()
174    crackle(smooth)
175
176    # Constant frame rate
177    spent = time.ticks_diff(time.ticks_ms(), start)
178    if spent < FRAME_MS:
179        time.sleep_ms(FRAME_MS - spent)
180FAQ
실제 회로에서는 왜 밝기를 낮춰야 해요?
Wokwi는 보낸 색을 그대로 그리기 때문에 코드는 `BRIGHTNESS = 0.4`를 써요. 실제 매트릭스는 불꽃이 크면 약 1 A를 쓸 수 있는데, USB 2.0 포트는 500 mA를 공급해요. USB로 쓸 때는 0.15–0.2로 정하고, 더 밝게 하려면 매트릭스를 5V 2A 어댑터로 구동하고 접지를 연결하세요.
불꽃 높이와 색은 어떻게 바꿔요?
가변저항을 왼쪽으로 돌리면 은은한 숯불이, 오른쪽으로 돌리면 매트릭스 꼭대기까지 닿는 불꽃이 돼요. 버튼을 짧게 누르면 Fire, Gas, Magic, Amethyst 순으로 바뀌어요. Wokwi에서는 가변저항을 클릭하고 화살표 키를 쓰고, T를 누르면 테마가 바뀌어요.
타닥 소리를 끄거나 덜 나게 하려면 어떻게 해요?
버튼을 약 1초 동안 누르세요. 높은 삐 소리는 소리 켜짐, 낮은 삐 소리는 꺼짐이에요. 타닥 소리를 줄이려면 `crackle()` 안의 `10 + 50 * intensity`에서 10과 50을 낮추세요. 소리에는 수동 부저를 쓰세요.
라이브러리를 설치해야 해요?
아니요. `neopixel`, `machine`, `random` 모듈은 Pico용 MicroPython에 기본으로 들어 있어요. Pico에 MicroPython을 설치하고 Thonny에서 코드를 `main.py`로 저장하면, Pico가 켜질 때마다 불이 저절로 피어올라요.