
ESP32 Bluetooth LED e relè
Accendi e spegni un LED e un relè dal telefono via Bluetooth, senza internet né Wi-Fi. Questo progetto è la guida passo passo del modello Bluetooth LED e relè dell'app, montato con un ESP32 e un modulo relè da 5 V. Vai in La Mia Officina › Dispositivi › Aggiungi dispositivo › Bluetooth, scegli LED e relè e carica il codice con Ottieni il codice. Anche il pulsante Configura come pannello Bluetooth in questa pagina apre la procedura con questo modello.
Video
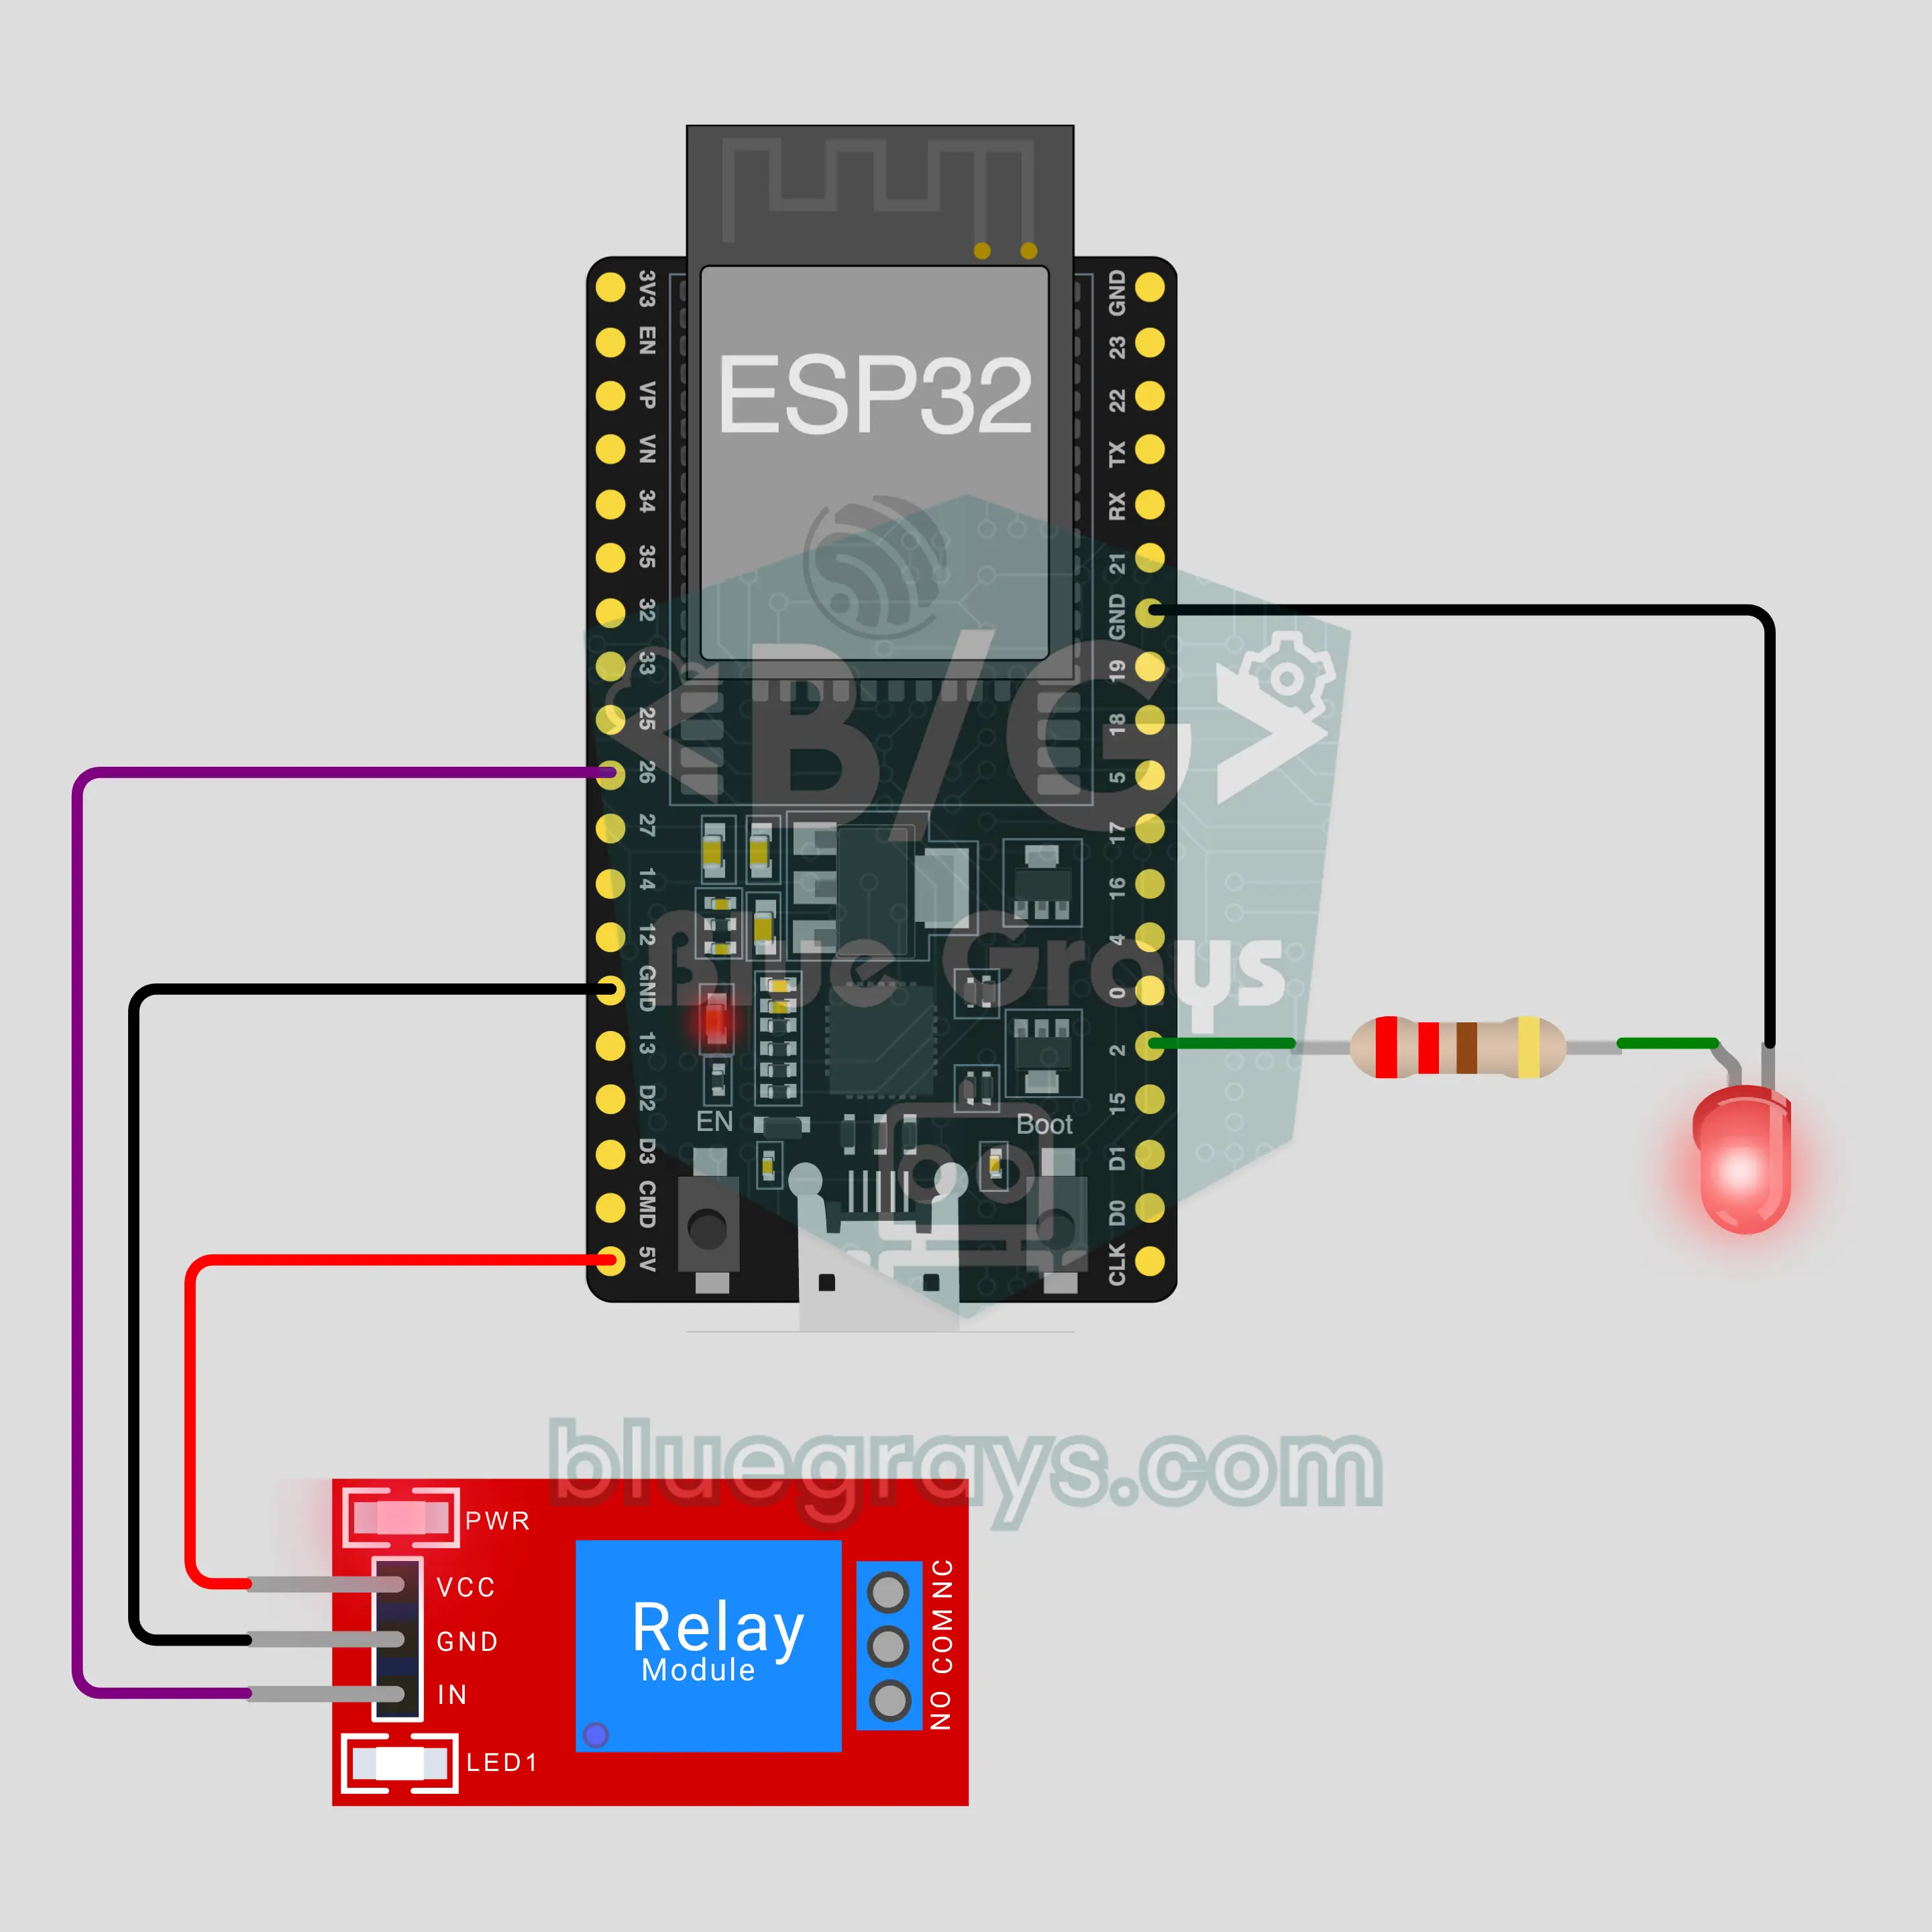
Schema circuito
Codice sorgente
1// ┌───────────────────────────┐
2// │ BlueGrays · bluegrays.com │
3// │ Bluetooth · ESP32         │
4// │ BG-Lamba                  │
5// └───────────────────────────┘
6// LED e relè
7// Scheda in Arduino IDE: ESP32 Dev Module
8// la libreria BLE arriva con il pacchetto schede ESP32, niente da installare in più
9
10#include <BLEDevice.h>
11#include <BLEServer.h>
12#include <BLE2902.h>
13
14const char BLE_NAME[] = "BG-Lamba";  // la scheda si annuncia con questo nome e l’app la trova così nell’elenco
15
16// Pin: cambiali qui se hai collegato in modo diverso
17const int LED_PIN = 2;
18const int RELAY_PIN = 26;
19const bool RELAY_ACTIVE_LOW = true;  // la maggior parte dei moduli relè si attiva con LOW
20
21void btWrite(const char *text);
22void onValue(const char *key, const char *value);
23void sendAll();
24void onLinkLost();
25
26// ── L’app invia righe "chiave=valore"; con "?" la scheda manda tutti i suoi valori ──
27char line[65];
28uint8_t lineLen = 0;
29unsigned long lastRxMs = 0;
30
31bool is(const char *a, const char *b) { return strcmp(a, b) == 0; }
32bool isOn(const char *v) { return v[0] == '1'; }
33
34void sendText(const char *key, const char *value) {
35  char out[72];
36  snprintf(out, sizeof(out), "%s=%s\n", key, value);
37  btWrite(out);
38}
39
40void sendInt(const char *key, long value) {
41  char text[12];
42  snprintf(text, sizeof(text), "%ld", value);
43  sendText(key, text);
44}
45
46void sendFloat(const char *key, float value) {
47  char text[16];
48  dtostrf(value, 1, 1, text);
49  sendText(key, text);
50}
51
52void handleLine(char *text) {
53  char *eq = strchr(text, '=');
54  if (eq == nullptr) {
55    if (text[strlen(text) - 1] == '?') {
56      btWrite("@v=1.0\n");  // la riga "@v" comunica all’app la versione del codice
57      sendAll();
58    }
59    return;
60  }
61  *eq = '\0';
62  onValue(text, eq + 1);
63}
64
65void feed(char c) {
66  lastRxMs = millis();
67  if (c == '\n' || c == '\r') {
68    if (lineLen == 0) return;
69    line[lineLen] = '\0';
70    lineLen = 0;
71    handleLine(line);
72  } else if (lineLen < sizeof(line) - 1) {
73    line[lineLen++] = c;
74  }
75}
76
77// ── Bluetooth (Nordic UART) ──
78#define UART_SERVICE "6E400001-B5A3-F393-E0A9-E50E24DCCA9E"
79#define UART_RX "6E400002-B5A3-F393-E0A9-E50E24DCCA9E"
80#define UART_TX "6E400003-B5A3-F393-E0A9-E50E24DCCA9E"
81
82BLECharacteristic *txChar = nullptr;
83volatile bool linked = false;
84volatile bool linkLost = false;
85// i byte in arrivo passano dal task Bluetooth a loop() tramite un piccolo buffer circolare
86const int RX_SIZE = 256;
87volatile uint8_t rxBuf[RX_SIZE];
88volatile int rxHead = 0, rxTail = 0;
89
90class ServerEvents : public BLEServerCallbacks {
91  void onConnect(BLEServer *server) override { linked = true; }
92  void onDisconnect(BLEServer *server) override { linked = false; linkLost = true; }
93};
94
95class RxEvents : public BLECharacteristicCallbacks {
96  void onWrite(BLECharacteristic *c) override {
97    auto v = c->getValue();
98    for (size_t i = 0; i < v.length(); i++) {
99      int next = (rxHead + 1) % RX_SIZE;
100      if (next == rxTail) break;
101      rxBuf[rxHead] = (uint8_t)v[i];
102      rxHead = next;
103    }
104  }
105};
106
107// le righe partono in pacchetti da 20 byte (funziona con ogni telefono)
108void btWrite(const char *text) {
109  if (!linked || txChar == nullptr) return;
110  size_t n = strlen(text);
111  for (size_t i = 0; i < n; i += 20) {
112    size_t len = n - i < 20 ? n - i : 20;
113    txChar->setValue((uint8_t *)text + i, len);
114    txChar->notify();
115    delay(4);
116  }
117}
118
119void btBegin() {
120  BLEDevice::init(BLE_NAME);
121  BLEServer *server = BLEDevice::createServer();
122  server->setCallbacks(new ServerEvents());
123  BLEService *uart = server->createService(UART_SERVICE);
124  txChar = uart->createCharacteristic(UART_TX, BLECharacteristic::PROPERTY_NOTIFY);
125  txChar->addDescriptor(new BLE2902());
126  BLECharacteristic *rx = uart->createCharacteristic(UART_RX, BLECharacteristic::PROPERTY_WRITE | BLECharacteristic::PROPERTY_WRITE_NR);
127  rx->setCallbacks(new RxEvents());
128  uart->start();
129  BLEAdvertisementData adv;
130  adv.setFlags(0x06);
131  adv.setCompleteServices(BLEUUID(UART_SERVICE));
132  BLEAdvertisementData scan;
133  scan.setName(BLE_NAME);
134  BLEAdvertising *advertising = BLEDevice::getAdvertising();
135  advertising->setAdvertisementData(adv);
136  advertising->setScanResponseData(scan);
137  BLEDevice::startAdvertising();
138}
139
140void btPoll() {
141  while (rxTail != rxHead) {
142    char c = (char)rxBuf[rxTail];
143    rxTail = (rxTail + 1) % RX_SIZE;
144    feed(c);
145  }
146  if (linkLost) {
147    linkLost = false;
148    onLinkLost();
149    delay(100);
150    BLEDevice::startAdvertising();
151  }
152}
153
154// ── ESP32 ──
155bool ledOn = false, relayOn = false;
156
157void setRelay(bool on) {
158  if (RELAY_ACTIVE_LOW) {
159    if (on) { pinMode(RELAY_PIN, OUTPUT); digitalWrite(RELAY_PIN, LOW); }
160    else { pinMode(RELAY_PIN, INPUT); }  // spegnere rilascia il pin: un HIGH a 3,3 V non basta a spegnere un modulo da 5 V
161  } else {
162    pinMode(RELAY_PIN, OUTPUT); digitalWrite(RELAY_PIN, on ? HIGH : LOW);
163  }
164}
165
166void apply() {
167  digitalWrite(LED_PIN, ledOn ? HIGH : LOW);
168  setRelay(relayOn);
169}
170
171void onValue(const char *key, const char *value) {
172  if (is(key, "led")) ledOn = isOn(value);
173  else if (is(key, "role")) relayOn = isOn(value);
174  apply();
175}
176
177void sendAll() {
178  sendInt("led", ledOn);
179  sendInt("role", relayOn);
180}
181
182void onLinkLost() {
183}
184
185void setup() {
186  Serial.begin(115200);
187  pinMode(LED_PIN, OUTPUT);
188  apply();
189  btBegin();
190  Serial.print(F("BlueGrays Bluetooth: "));
191  Serial.println(BLE_NAME);
192}
193
194void loop() {
195  btPoll();
196}
197FAQ
Funziona con l'iPhone?
Sì. Il Bluetooth Low Energy (BLE) integrato nell'ESP32 parla sia con iPhone sia con Android. Un iPhone non può collegarsi ai moduli Bluetooth classici come HC-05 e HC-06, e questo progetto non ne ha bisogno. Non provare ad associare la scheda dalle impostazioni Bluetooth del telefono; le schede BLE possono non comparire lì, è normale. La connessione la crea l'app BlueGrays.
Posso collegare una lampada vera al relè?
Il modulo relè può commutare i 230 V, ma la corrente di rete può uccidere. In questo progetto ai morsetti COM e NO non è collegato nulla; il relè mostra che funziona con il suo clic e il LED del modulo. Se vuoi provare un carico, comincia con un circuito a bassa tensione, come una pila o un alimentatore da 12 V. Se passi ai 230 V, fallo con qualcuno esperto, non lasciare fili o viti scoperti e non superare la corrente indicata sul modulo.
Perché il LED blu della scheda si accende insieme al mio LED?
Su molte schede ESP32 DevKit anche il LED blu integrato è collegato a GPIO2. Il tuo LED è sullo stesso pin, quindi lampeggiano insieme; non è un guasto. Anzi, è comodo: se un filo è allentato, il LED blu ti mostra comunque che il comando è arrivato alla scheda. Se non lo vuoi, sposta il tuo LED su un altro pin (per esempio GPIO4) e cambia LED_PIN nel codice.
Servono internet o il Wi-Fi? Qual è la portata?
No. Il telefono si collega direttamente alla scheda via Bluetooth, senza router né server. In casa la portata è di solito intorno ai 10 metri e i muri la riducono. La scheda si collega a un solo telefono alla volta; quando quel telefono si scollega, la scheda ricomincia a trasmettere e un altro telefono può collegarsi. Per comandarla da fuori casa, scegli un progetto che usa il pannello IoT via Wi-Fi dell'app.