
Raspberry Pi Pico से 4 मोड वाले बटन सिलेक्टर के साथ ट्रैफ़िक लाइट (स्टेट मशीन)
1 बटन से 4 ट्रैफ़िक लाइट मोड! हर दबाव मोड बदलता है: सामान्य चक्र (लाल → पीला → हरा), सिर्फ़ लाल (रुकें), चमकती पीली (सावधानी/रात का मोड) और बंद (मेंटेनेंस)। आप स्टेट मशीन (mode वेरिएबल तय करता है कि कौन-सा व्यवहार चले) और (mode + 1) % 4 से मोड के बीच घूमना सीखते हैं।
वीडियो
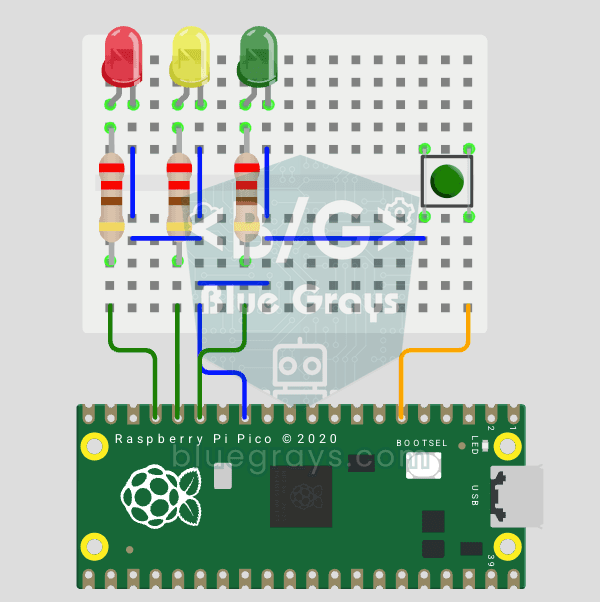
सर्किट डायग्राम
सोर्स कोड
1# ─────────────────────────────────────────
2#   BlueGrays · bluegrays.com
3#   Raspberry Pi Pico Traffic Light with 4-Mode Button Selector (State Machine, GP11-13 + GP4)
4# ─────────────────────────────────────────
5# One button cycles 4 modes: normal cycle (red -> yellow -> green), red
6# only, yellow flash and off. Uses a state machine and non-blocking timing
7# with time.ticks_ms(), so the button is always responsive.
8#
9# Pins:
10#   GP11 -> Green LED
11#   GP12 -> Yellow LED
12#   GP13 -> Red LED (each LED with 220 ohm)
13#   GP4  -> Button (other leg to GND)
14
15from machine import Pin
16import time
17
18# ============ LEDS ============
19green  = Pin(11, Pin.OUT)   # Green
20yellow = Pin(12, Pin.OUT)   # Yellow
21red    = Pin(13, Pin.OUT)   # Red
22
23# ============ BUTTON ============
24button = Pin(4, Pin.IN, Pin.PULL_UP)   # Reads 0 when pressed
25
26# ============ STATE ============
27# Mode: 0 normal cycle, 1 red only, 2 yellow flash, 3 off
28mode = 0
29last_btn = 1                 # Previous button value
30blink_state = False          # Yellow flash state
31last_tick = time.ticks_ms()  # Last flash toggle
32
33# ============ NORMAL CYCLE ============
34normal_step = 0                     # 0: red, 1: yellow, 2: green
35normal_last = time.ticks_ms()       # Step start time
36NORMAL_TIMES = [3000, 1000, 3000]   # Red, Yellow, Green (ms)
37LEDS = [red, yellow, green]
38
39def all_off():
40    # Turn all LEDs off
41    red.off(); yellow.off(); green.off()
42
43# ============ MAIN LOOP ============
44while True:
45    btn = button.value()
46
47    # ---- Button pressed (1 -> 0): mode change ----
48    if last_btn == 1 and btn == 0:
49        mode = (mode + 1) % 4
50        all_off()
51        normal_step = 0
52        normal_last = time.ticks_ms()
53        time.sleep_ms(200)   # Debounce
54    last_btn = btn
55
56    now = time.ticks_ms()
57
58    # ---- Normal traffic light cycle ----
59    if mode == 0:
60        if time.ticks_diff(now, normal_last) > NORMAL_TIMES[normal_step]:
61            normal_step = (normal_step + 1) % 3
62            normal_last = now
63        all_off()
64        LEDS[normal_step].on()
65
66    # ---- Red only (stop) ----
67    elif mode == 1:
68        all_off(); red.on()
69
70    # ---- Yellow flash, 0.4 s (caution/night) ----
71    elif mode == 2:
72        if time.ticks_diff(now, last_tick) > 400:
73            blink_state = not blink_state
74            yellow.value(blink_state)
75            last_tick = now
76            red.off(); green.off()
77
78    # ---- Off ----
79    else:
80        all_off()
81
82    time.sleep_ms(10)
83FAQ
स्टेट मशीन क्या है?
एक ही वेरिएबल (mode) तय करता है कि प्रोग्राम अभी क्या कर रहा है। हर बटन दबाने पर mode बदलता है और लूप सिर्फ़ मौजूदा mode का कोड चलाता है। मुश्किल व्यवहार को व्यवस्थित रखने का यह स्टैंडर्ड तरीका है।
(mode + 1) % 4 क्या करता है?
यह mode को एक बढ़ाता है और 4 पर पहुँचते ही वापस 0 पर ले आता है, इसलिए mode हमेशा 0, 1, 2, 3, 0, 1... के क्रम में घूमता रहता है।
time.sleep() की जगह ticks_ms() क्यों इस्तेमाल करें?
sleep() के दौरान Pico बटन नहीं पढ़ सकता, इसलिए मोड देर से बदलता है। ticks_ms() और ticks_diff() से LED के चरणों में लंबा इंतज़ार नहीं होता। फिर भी यह वर्ज़न मोड बदलने पर डिबाउंस के लिए 200 ms और हर लूप के आखिर में 10 ms रुकता है; इन अंतरालों में बटन दोबारा नहीं पढ़ा जाता।
क्या नया मोड जोड़ा जा सकता है?
हाँ, मोड की संख्या 5 करें और नए मोड के लिए अलग व्यवहार वाला ब्लॉक लिखें, जैसे हरी चमक या सारी लाइटों को क्रम से जलाना।