
111 ब्लॉक प्रोजेक्ट · Arduino · ESP32 · Pico
ब्लॉक कोडिंग से Arduino, ESP32 और Pico प्रोजेक्ट
कोड को लाइन बाय लाइन पढ़ने के बजाय रंगीन ब्लॉक देखें। BlueGrays के 111 प्रोजेक्ट ब्लॉक के रूप में भी उपलब्ध हैं। हर ब्लॉक, बोर्ड पर चलने वाले असली कोड की एक लाइन से मेल खाता है।
ब्लॉक कोडिंग क्या है?
ब्लॉक कोडिंग में प्रोग्राम टाइप करने के बजाय पहेली के टुकड़ों जैसे ब्लॉक जोड़कर बनाया जाता है। "पिन को आउटपुट बनाएँ", "LED चालू करें" और "1 सेकंड रुकें" जैसे हर कमांड का एक ब्लॉक होता है। इन्हें एक के नीचे एक लगाने से प्रोग्राम बनता है। सेमीकोलन, ब्रैकेट या टाइपिंग की गलतियों की चिंता नहीं होती, इसलिए आप प्रोग्राम के लॉजिक पर ध्यान दे सकते हैं।
BlueGrays अपने बनाए ब्लॉक सेट का इस्तेमाल करता है। ब्लॉक ऐप की भाषा में ही दिखते हैं: अगर ऐप अंग्रेज़ी में है, तो ब्लॉक पर "repeat forever" और "write HIGH to pin" लिखा होता है। Arduino और ESP32 प्रोजेक्ट में ब्लॉक C++ कोड से मेल खाते हैं, जबकि Raspberry Pi Pico प्रोजेक्ट में MicroPython कोड से।
मकसद हमेशा ब्लॉक इस्तेमाल करना नहीं, बल्कि कोड समझना है। किसी प्रोजेक्ट के ब्लॉक और कोड को साथ-साथ देखकर आप समझ सकते हैं कि हर लाइन क्या करती है। कुछ प्रोजेक्ट के बाद आप ब्लॉक की मदद के बिना भी कोड पढ़ने लगेंगे।
BlueGrays में ब्लॉक कोडिंग कैसे काम करती है?
ऐप में हर ब्लॉक प्रोजेक्ट के कोड सेक्शन में ब्लॉक मिलते हैं। चार स्टेप में:
- 01
ब्लॉक प्रोजेक्ट चुनें
ब्लॉक बैज वाले प्रोजेक्ट ब्लॉक के रूप में भी उपलब्ध हैं। फ़िल्टर लगाकर आप लिस्ट में सिर्फ़ ब्लॉक प्रोजेक्ट भी देख सकते हैं।
- 02
"ब्लॉक में दिखाएँ" चालू करें
कोड सेक्शन का स्विच चालू करने पर कोड ब्लॉक में बदल जाता है। इमेज पर टैप करके उसे फ़ुल स्क्रीन में खोलें और ज़ूम करके देखें।
- 03
ब्लॉक समझें
"ब्लॉक समझें" टैब प्रोग्राम को स्टेप बाय स्टेप समझाता है। हर स्टेप में सिर्फ़ उसी के ब्लॉक और उनका काम दिखता है।
- 04
असली कोड पर जाएँ
स्विच बंद करने पर वही प्रोग्राम कोड के रूप में दिखता है। उसे कॉपी करके Arduino IDE में (या Pico के लिए Thonny में) पेस्ट करें और अपने बोर्ड पर अपलोड करें।
एक ही प्रोग्राम: ब्लॉक और कोड
बाईं ओर प्रोजेक्ट के ब्लॉक हैं। दाईं ओर बोर्ड पर चलने वाला कोड है। हर ब्लॉक से मेल खाती एक लाइन कोड में मौजूद है।
ब्लॉक
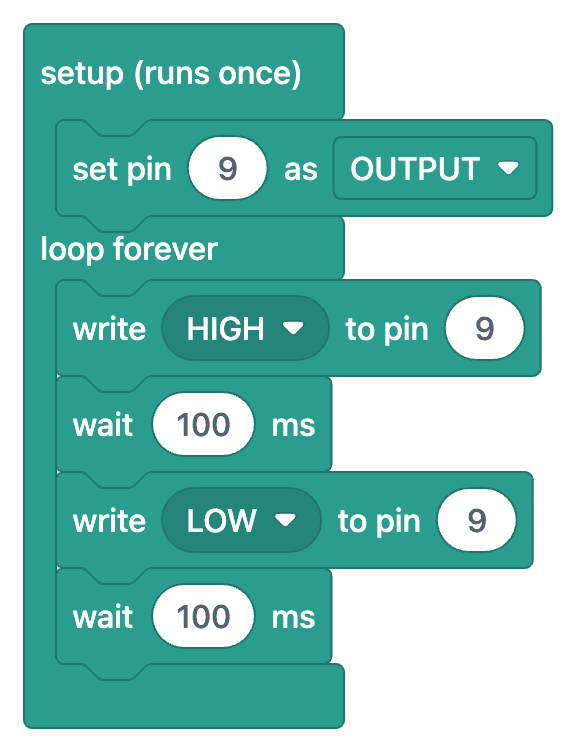
कोड
1// ─────────────────────────────────────────
2//   BlueGrays · bluegrays.com
3//   LED Blink
4// ─────────────────────────────────────────
5// Blinks a single LED on and off every 100 ms. Shows the basic use of the
6// digitalWrite and delay functions.
7//
8// Pins:
9//   D9 -> LED (with a 220 ohm resistor)
10
11void setup() {
12  pinMode(9,OUTPUT);     // LED pin as output
13}
14
15void loop() {
16  digitalWrite(9,HIGH);  // Turn the LED on
17  delay(100);            // Wait 100 ms (1000 ms = 1 s)
18  digitalWrite(9,LOW);   // Turn the LED off
19  delay(100);
20}
21ब्लॉक प्रोजेक्ट
प्लैटफ़ॉर्म के हिसाब से सभी ब्लॉक प्रोजेक्ट। मुफ़्त प्रोजेक्ट पहले दिखते हैं: इनमें से 31 प्रोजेक्ट के ब्लॉक और कोड पूरी तरह मुफ़्त हैं।
Arduino प्रोजेक्ट74 ब्लॉक प्रोजेक्ट

LED Blink
The very first hello of electronics: switching a single LED on and off. The Arduino turns the LED on and off at short intervals, so the light blinks quickly.

Two LEDs Blinking Alternately
Two LEDs blink quickly in turn: when one lights up the other goes off, as if they were tossing a ball back and forth.

Traffic Light
A tiny copy of the traffic light you see on the road every day. Red stays on for two seconds, yellow flashes for a moment, green stays on for two seconds, then it goes back to red through yellow…

LED Police Lights
Just like the lights on a police car: the red LED flashes three times in quick succession, then the blue LED flashes three times, and the pattern keeps repeating without a break.

LED Chaser
Lights that switch on one after another, as if they were running. The Arduino lights six LEDs one at a time; each glows for a brief moment and goes out, so the light walks from start to end and then…

Knight Rider LED Effect
The classic scanner light: a dot of light slides from one end of six LEDs to the other and then comes back.

LED Chaser with Adjustable Speed
Six LEDs light up one after another, so the light seems to run from one end to the other.

Knight Rider LED Effect with Adjustable Speed
A light runs from one end of six LEDs to the other, turns around and runs back again.
Arduino प्रोजेक्ट: सभी ब्लॉक प्रोजेक्ट
- AR-9LED Control with a Push Button (Push)मुफ़्त
- AR-10Toggle an LED with a Button (On/Off)मुफ़्त
- AR-11Measuring Light Intensity with an LDRमुफ़्त
- AR-12Night Light with Ldrमुफ़्त
- AR-13Using a Buzzerमुफ़्त
- AR-14Frequency Setting with Buzzerमुफ़्त
- AR-27HC-SR04 Distance Measurement (Serial Display)मुफ़्त
- AR-37Reading a Reed Switchमुफ़्त
- AR-45DS1302 RTC Clock Module Setupमुफ़्त
- AR-55Temperature and Humidity with DHT11मुफ़्त
- AR-613x4 Keypad Operationमुफ़्त
- AR-16Reading IR Remote Control Codes
- AR-17Led On/Off with IR Receiver and Remote Control
- AR-19Lighting 220V Bulb with Push Button
- AR-20Lighting 220V Bulb with Button (On-Off)
- AR-21Lighting 220V Bulb with Remote Control
- AR-22Laser Warning System
- AR-23Laser Security System
- AR-24Motion Detector with Motion Sensor
- AR-25Doorbell and Light with Motion Sensor
- AR-26Simple Piano with Buzzer and Button
- AR-28Parking Sensor with HC-SR04
- AR-29Print Message on 2x16 LCD Screen
- AR-30Bouncing Text Animation on LCD
- AR-31Measuring Distance Using LCD Display
- AR-32Using LCD Screen with I2C
- AR-33Height Measurement Project
- AR-34Control an LED from Your Phone via Bluetooth
- AR-35Using a Servo Motor
- AR-36Servo Motor Operation with Potentiometer
- AR-38Reed Switch Door Sensor
- AR-39Using an RGB LED
- AR-40Smooth Color Transition with RGB Led
- AR-42Displaying Numbers 0-99 on a 7-Segment Display
- AR-43Counter with 7-Segment Display and Buttons
- AR-44Temperature Measurement with NTC and 2x16 Lcd Display
- AR-46DS1302 RTC Clock with LCD Display
- AR-47Displaying 0-9999 on a 4-Digit 7-Segment Display
- AR-48Digital Clock with 4-Digit 7-Segment Display
- AR-49Bomb Animation with 4-Digit 7-Segment Display
- AR-50Using a Flame Sensor
- AR-51Using a Gas Sensor
- AR-52Flame and Gas Sensor Alarm
- AR-53RFID Value Reading
- AR-54RFID Authentication
- AR-56Digital Voltmeter with LCD Display
- AR-58Two-Way Communication Between 2 Arduinos
- AR-59Led Control with Joystick
- AR-60Servo Control with Joystick
- AR-62LED Control with a 3x4 Keypad
- AR-634x4 Keypad Operation
- AR-64Password Lock with 4x4 Keypad and LCD
- AR-67Using a Stepper Motor
- AR-68360-Degree Servo from a Stepper Motor
- AR-69Using a WS2812B LED Strip
- AR-70Police Lights with WS2812B
- AR-71WS2812B LED Chaser
- AR-72WS2812B LED Chaser (Fill Effect)
- AR-73WS2812B Knight Rider Effect
- AR-74WS2812B Knight Rider Effect (3 LEDs)
- AR-75WS2812B Animation 1
- AR-77Reading Reflection (Proximity) with TCRT5000
- AR-78TCRT5000 Black and White Surface Detection
- AR-82Smart Stair and Corridor Lighting
- AR-83Smart Irrigation Station
- AR-95Arduino Reaction Time Test with Sound Cue: Measure Your Reflexes in Milliseconds (LCD + Buzzer + 3 LEDs)
ESP32 प्रोजेक्ट23 ब्लॉक प्रोजेक्ट

LED Blink with ESP32
Teaches basic GPIO output usage with ESP32. We achieve a blinking effect by turning an LED on and off from a digital pin. ESP32 version of the classic blink project on Arduino UNO; the basic blink commands in the Arduino environment are the same, but the ESP32's pin layout and 3.3 V GPIO levels differ from those of the Arduino UNO.

ESP32 LED Control with Push Button (Push)
The LED lights up when the button is pressed and turns off when released. Shows how the ESP32's digital input pin and internal pull-up resistor are used. The INPUT_PULLUP mode eliminates the need for an external resistor.

ESP32 LED Control with Pushbutton (Toggle)
Each time the button is pressed the state of the LED changes: if it is on it turns off, if it is off it turns on. Classic toggle pattern. With debounce we clean up the mechanical noise of the pushbutton to ensure a single toggle with a single press.

ESP32 Built-in LED Blink
Blinking the built-in blue LED on the ESP32 DevKit V1. No external components required! The first project you should try when you buy an ESP32. GPIO 2 is connected to the built-in LED.

ESP32 Traffic Light
Real traffic light simulation with 3 LEDs red-yellow-green. Timings close to real traffic logic: red long, yellow short, green long. Classic example of sequential GPIO control.

ESP32 Knight Rider LED
6 LEDs moving sequentially from left to right and right to left (Knight Rider style). A basic example of using for loops and arrays. Teaches the logic of direction change.

ESP32 LED Fade with PWM
Smoothly changing the brightness of the LED from 0 to max, from max to 0. We control PWM with analogWrite() as in Arduino - the same syntax as ESP32 Arduino Core 3.0+ works without problems. Pin definition + pinMode + analogWrite is enough.

ESP32 RGB LED Control
Unlimited color generation with a single RGB LED instead of 3 separate LEDs. As in Arduino, we make a rainbow transition by setting the R/G/B values with analogWrite(). Color theory (such as red+green=yellow) is seen practically.
ESP32 प्रोजेक्ट: सभी ब्लॉक प्रोजेक्ट
- ES-11Reading Light Intensity with the ESP32 LDR Moduleमुफ़्त
- ES-14ESP32 HC-SR04 Ultrasonic Distance Sensorमुफ़्त
- ES-15ESP32 DHT22 Temperature and Humidity (with LCD Display)मुफ़्त
- ES-20ESP32 MQ-2 Gas/Smoke Detector Alarmमुफ़्त
- ES-21ESP32 RFID RC522 Card Reader (with LCD)मुफ़्त
- ES-7ESP32 Police Strobe Light Effect
- ES-10ESP32 Night Light with LDR
- ES-12ESP32 Melody Playback with Buzzer
- ES-13ESP32 LED Brightness Control with a Potentiometer (Analog → PWM)
- ES-16ESP32 Servo Motor (Potentiometer Control)
- ES-17ESP32 I2C LCD Display (16x2)
- ES-18Digital Clock with ESP32 and DS1307 RTC (I2C + LCD)
- ES-19Automatic Lighting with the ESP32 PIR Motion Sensor
- ES-23ESP32 TM1637 4-Digit 7-Segment Display
- ES-24ESP32 WS2812B NeoPixel Strip Control
Raspberry Pi Pico प्रोजेक्ट10 ब्लॉक प्रोजेक्ट
Raspberry Pi Pico Onboard LED Blink (Pico and Pico W)
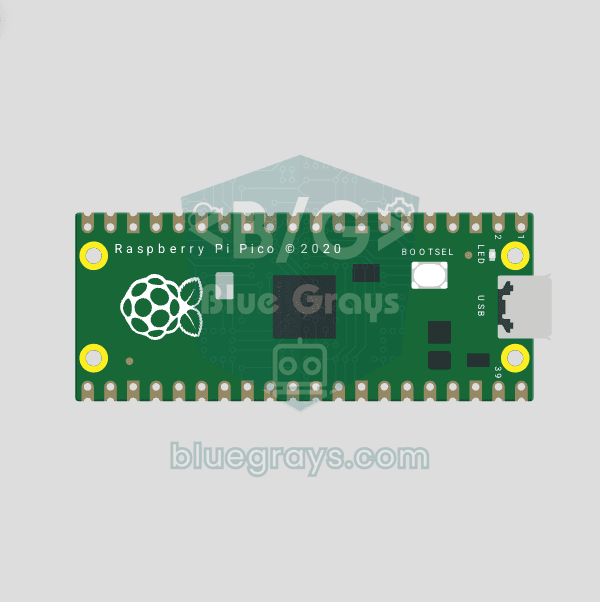
The opening project of the Raspberry Pi Pico series! We blink the Pico's green built-in LED to confirm the board works, the classic "Hello World" first experiment. No external parts needed, just the Pico and a USB cable. The code is written in MicroPython, the language officially supported by the Raspberry Pi Foundation.
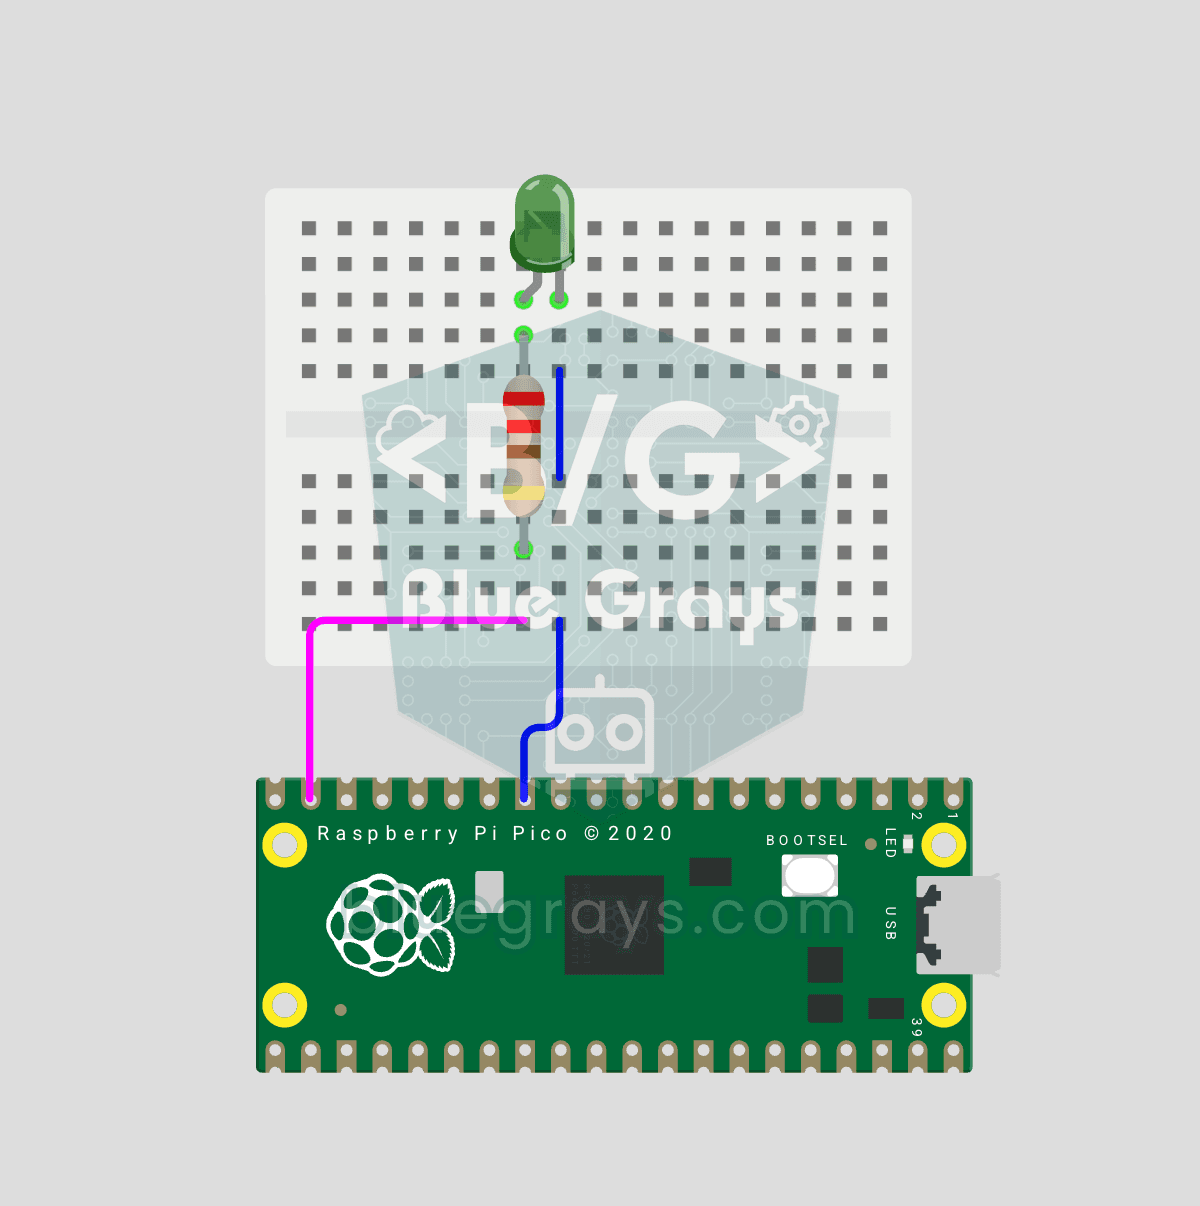
Raspberry Pi Pico: Controlling an External LED (Breadboard)
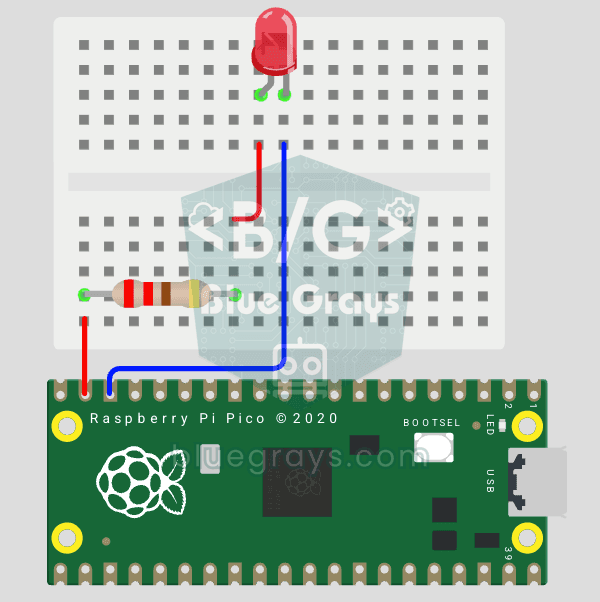
The next step after the Pico's built-in LED: connect an external LED on a breadboard and control it through pin GP14. You'll learn how to use any of the Pico's GPIO pins as an output, the LED's polarity (long leg = anode/+, short leg = cathode/–) and why a current-limiting resistor (220Ω) is a must. Without the resistor, too much current flows through the LED and it can burn out.
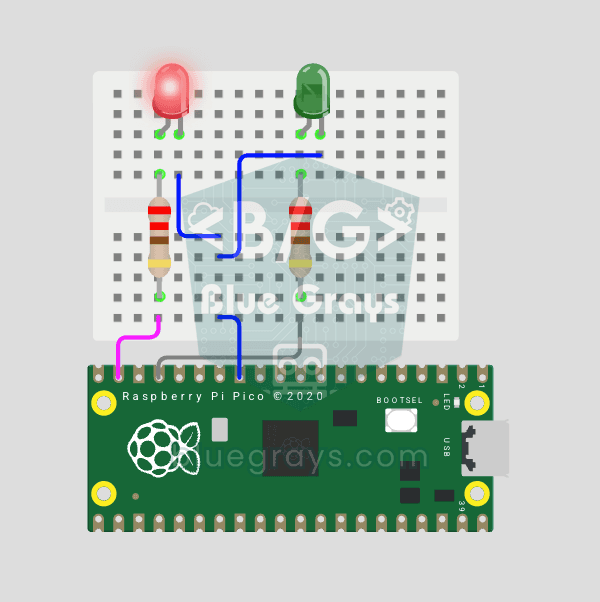
Raspberry Pi Pico Alternating Two LEDs (Blink-Flip Pattern)
The next step after the Pico's single LED: the classic flip-flop animation, with two LEDs blinking in turn. One LED turns off as the other turns on, the most basic example of handling multiple GPIOs. Two LEDs of different colors (red on GP14, green on GP13) swap every 500 ms. With MicroPython's Pin.toggle() method, the code stays short and readable.
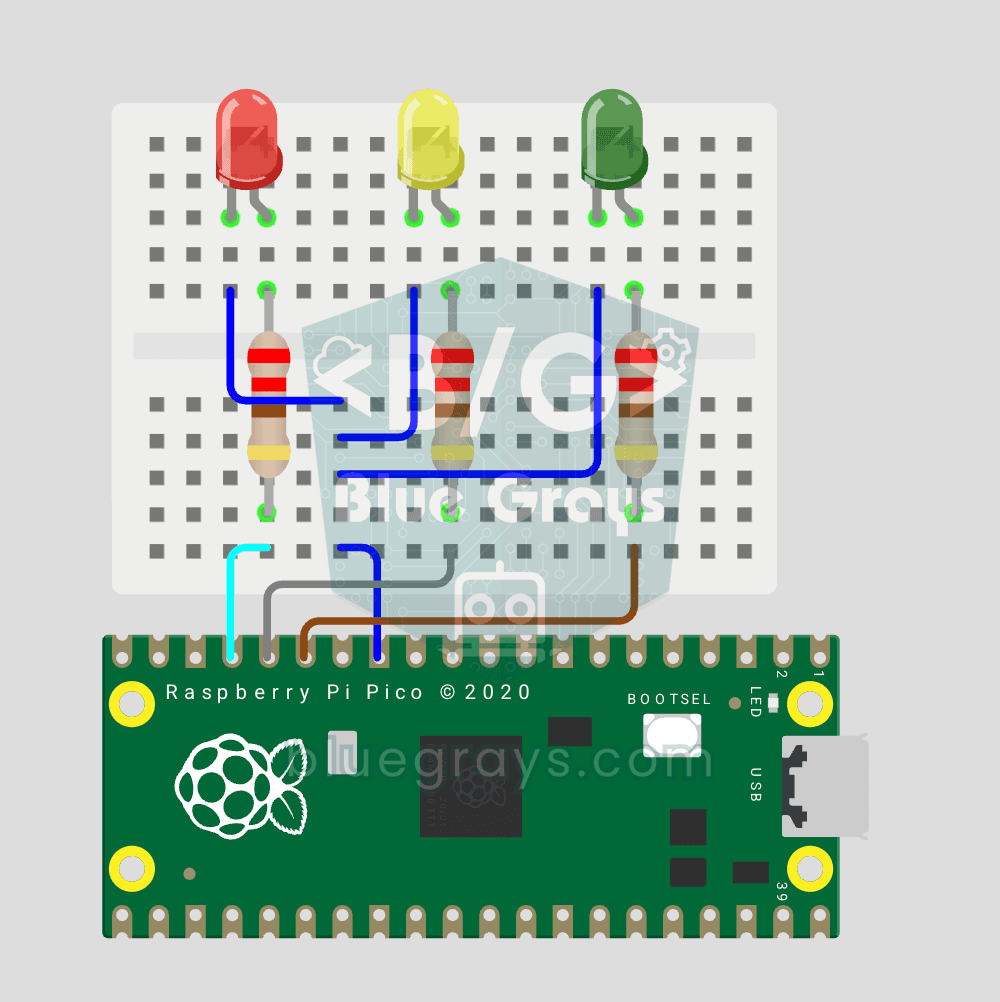
Raspberry Pi Pico Traffic Light Simulator (3 LEDs Sequential)
We recreate real traffic light logic with red, yellow and green LEDs, the first Pico project to move up to 3 LEDs! Green says "go" for 4 seconds, yellow "get ready" for 1.5 seconds, red "stop" for 3 seconds, and red+yellow "set off" for 1 second (the European traffic light pattern). You'll learn to define functions (def all_off()), state machine logic and multi-GPIO synchronization.
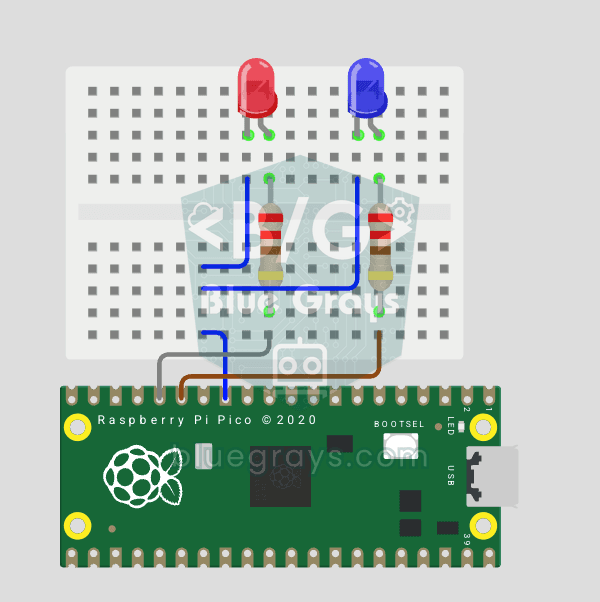
Raspberry Pi Pico Police Strobe Light Effect (Red + Blue)
We simulate a police car's light bar with a Raspberry Pi Pico in its simplest form! The red and blue LEDs take turns (flip-flop): while red is on, blue is off, and they swap every 0.3 seconds, forever. The code writes the two steps directly in a single while True loop; the speed is set with the WAIT_MS constant.
Raspberry Pi Pico 3-Burst Police Flip-Flop (2 LEDs)
Rhythmic variation of the police strobe project — 3-burst flip-flop! Same 2-LED circuit (GP11 red + GP12 blue), but a different pattern: red LED flashes 3 times rapidly, then blue flashes 3 times, forever. This "burst + switch" pattern is the most recognizable rhythm of real police siren lights. Learn parametrized function def burst(led, count, duration_ms), rhythm design, and generating different visual effects with code on same circuit.
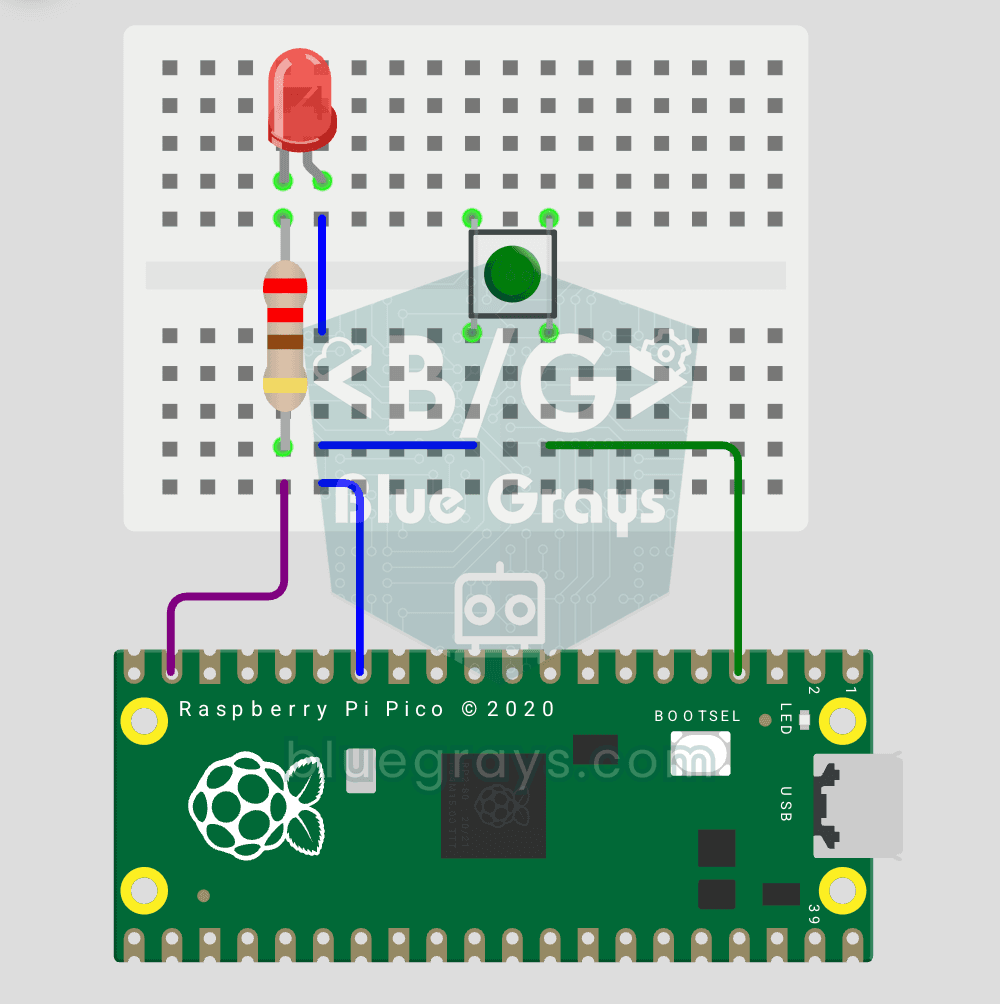
Raspberry Pi Pico Button Toggle LED
Button + LED — next level! Unlike the basic button project, there is no need to hold the button. Press and release → LED on. Press and release again → LED off (toggle). Same circuit (LED GP14, Button GP2), but big code difference. Learn edge detection (capturing the 1→0 falling moment), state tracking, debounce (mechanical bounce filter). MicroPython's led.toggle() swaps state in one line. Foundation of all interactive button projects (mode switcher, IRQ, double-click).
Raspberry Pi Pico PWM LED Fade (Breathing Effect)
The LED doesn't just blink anymore, it breathes! With the Raspberry Pi Pico's PWM (Pulse Width Modulation), the LED's brightness slowly rises and then slowly fades, a calm "breathing" effect like a sleeping laptop's light. You'll learn the machine.PWM class, the 16-bit brightness value from 0–65535 with duty_u16() and the PWM frequency.
Raspberry Pi Pico प्रोजेक्ट: सभी ब्लॉक प्रोजेक्ट
यह किनके लिए है?
बच्चे और माता-पिता
बच्चों के लिए कोडिंग सीखना तब ज़्यादा यादगार होता है, जब उससे मेज़ पर रखी LED जल उठती है। ब्लॉक से प्रोग्राम पढ़ना आसान हो जाता है और आप साथ मिलकर सर्किट बनाते हैं।
शिक्षक और क्लब
रोबोटिक्स या STEM क्लास में आप किसी प्रोजेक्ट को पहले ब्लॉक से समझा सकते हैं, फिर उसके कोड पर जा सकते हैं। हर प्रोजेक्ट के साथ पार्ट्स की लिस्ट और सर्किट डायग्राम तैयार मिलता है।
शुरुआती
अपने पहले कुछ प्रोजेक्ट में कोड का लॉजिक समझने का सबसे तेज़ तरीका Arduino ब्लॉक कोडिंग है। ब्लॉक से शुरुआत करें और जब तैयार महसूस करें, तो कोड पर जाएँ।
अक्सर पूछे जाने वाले सवाल
ब्लॉक आधारित कोडिंग क्या है?
यह प्रोग्रामिंग का एक तरीका है, जिसमें कमांड टाइप किए हुए टेक्स्ट के बजाय पहेली के टुकड़ों की तरह जुड़ने वाले ब्लॉक के रूप में दिखते हैं। टाइपिंग की गलतियाँ नहीं होतीं, इसलिए बच्चे और शुरुआत करने वाले प्रोग्राम का लॉजिक आसानी से समझ पाते हैं।
BlueGrays के कितने प्रोजेक्ट में ब्लॉक मिलते हैं?
अभी 111 प्रोजेक्ट हैं: 76 Arduino, 25 ESP32 और 10 Raspberry Pi Pico प्रोजेक्ट। जैसे-जैसे और प्रोजेक्ट ब्लॉक में बदले जाते हैं, लिस्ट बढ़ती जाती है।
क्या ब्लॉक कोडिंग मुफ़्त है?
ऐप मुफ़्त है। 31 ब्लॉक प्रोजेक्ट के ब्लॉक और कोड सभी के लिए उपलब्ध हैं। बाकी प्रोजेक्ट में कोड की तरह ब्लॉक भी Premium से अनलॉक होते हैं।
क्या ब्लॉक सीधे अपने बोर्ड पर अपलोड किए जा सकते हैं?
नहीं। ब्लॉक प्रोग्राम को पढ़ना और समझना आसान बनाते हैं। बोर्ड पर हमेशा प्रोजेक्ट का असली कोड ही अपलोड होता है। कोड को Arduino IDE में या Pico के लिए Thonny में कॉपी करके अपलोड करें।
क्या ब्लॉक जोड़कर अपना प्रोग्राम बनाया जा सकता है?
अभी नहीं। हम हर प्रोजेक्ट के ब्लॉक तैयार करते हैं और हर ब्लॉक को उसके कोड से मिलाते हैं। इस तरह आपको दिखने वाले ब्लॉक हमेशा ऐसे प्रोग्राम से मेल खाते हैं, जिसे टेस्ट किया गया है और जो सही काम करता है।
यह Scratch या mBlock से कैसे अलग है?
Scratch और mBlock में आप कंप्यूटर पर ब्लॉक ड्रैग करके अपना प्रोग्राम लिखते हैं। BlueGrays में हर ब्लॉक प्रोजेक्ट के साथ सर्किट डायग्राम, पार्ट्स की लिस्ट और असली कोड मिलता है। ब्लॉक उसी कोड का आसानी से पढ़ा जा सकने वाला रूप हैं। दोनों एक-दूसरे के पूरक हैं।
क्या यह बच्चों के लिए सही है? किस उम्र से शुरू कर सकते हैं?
आसानी से पढ़ पाने वाले 9-10 साल और उससे बड़े बच्चे किसी बड़े के साथ शुरुआत कर सकते हैं। शुरुआती प्रोजेक्ट में सोल्डरिंग की ज़रूरत नहीं होती। इन्हें ब्रेडबोर्ड पर LED, बटन और बज़र से बनाया जाता है।
ब्लॉक किन भाषाओं में हैं?
अंग्रेज़ी, तुर्की, जर्मन, स्पैनिश, फ़्रेंच और इतालवी। आप जिस भाषा में ऐप इस्तेमाल करते हैं, ब्लॉक उसी भाषा में दिखते हैं।
BlueGrays ऐप
अपने फ़ोन पर ब्लॉक कोडिंग शुरू करें
ब्लॉक, सर्किट डायग्राम, पार्ट्स की लिस्ट और असली कोड, एक ही स्क्रीन पर। iOS और Android पर मुफ़्त।

अपने फ़ोन से स्कैन करें
कैमरे को कोड की ओर करें। आपके फ़ोन का ऐप स्टोर खुल जाएगा।