
Orologio binario con Raspberry Pi Pico (6 LED + pulsante)
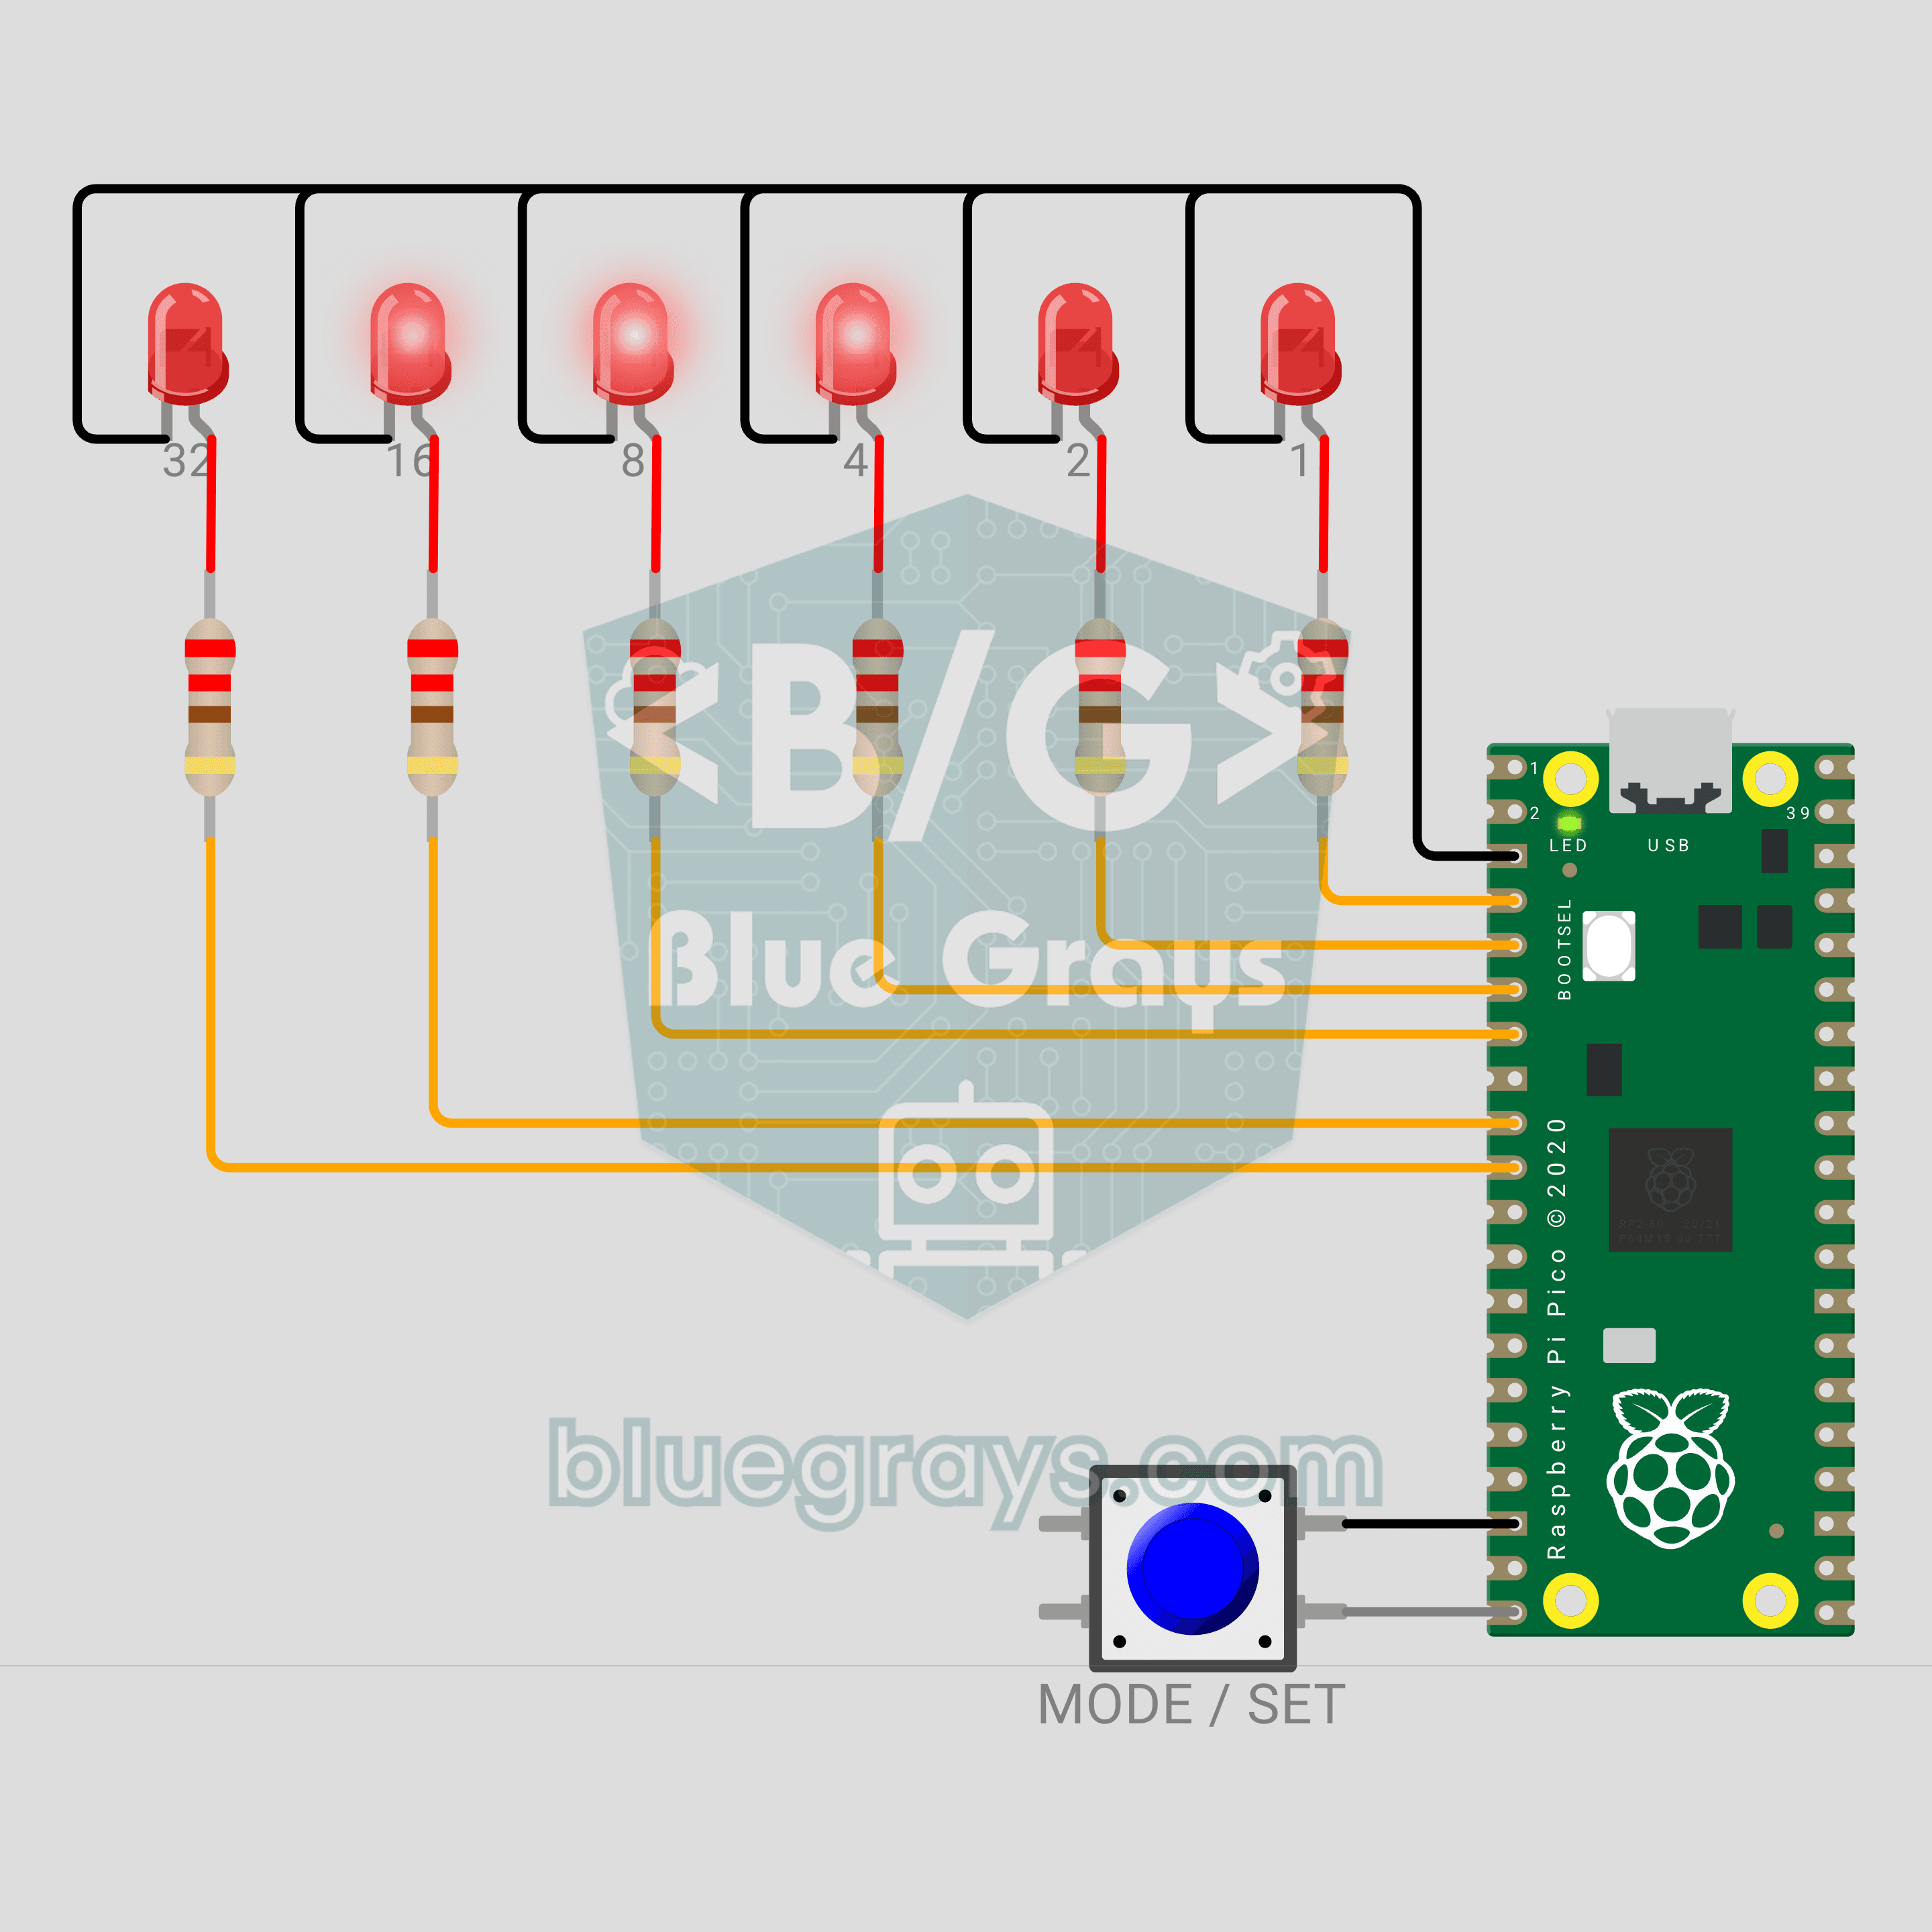
Questo orologio non usa cifre! Costruiamo con il Raspberry Pi Pico un orologio che mostra l'ora in binario. I 6 LED sono le posizioni 32-16-8-4-2-1; somma quelli accesi e leggi i secondi, i minuti o le ore. Un solo pulsante cambia campo e regola l'ora, e a ogni ora esatta i LED fanno una scia di luce.
Video
Schema circuito
Codice sorgente
1# ─────────────────────────────────────────
2#   BlueGrays · bluegrays.com
3#   Orologio binario con Raspberry Pi Pico (6 LED + pulsante)
4# ─────────────────────────────────────────
5# Un orologio che mostra l'ora in numeri binari. I 6 LED sono le posizioni
6# 32-16-8-4-2-1; i LED accesi sommati danno il valore. Una pressione breve
7# passa tra secondi, minuti e ore; una lunga regola il campo. A ogni ora
8# esatta parte una scia di luce e il LED della scheda batte i secondi.
9#
10# Pin:
11#   GP2  -> LED 1 (bit 0), tramite 220 ohm
12#   GP3  -> LED 2 (bit 1), tramite 220 ohm
13#   GP4  -> LED 4 (bit 2), tramite 220 ohm
14#   GP5  -> LED 8 (bit 3), tramite 220 ohm
15#   GP6  -> LED 16 (bit 4), tramite 220 ohm
16#   GP7  -> LED 32 (bit 5), tramite 220 ohm
17#   GP15 -> Pulsante (altro piedino a GND)
18#   LED  -> LED della scheda (battito dei secondi)
19#   GND  -> Catodi dei LED, pulsante
20
21from machine import Pin
22import time
23
24# ============ IMPOSTAZIONI ============
25START_TIME = (12, 59, 50)  # Ora di partenza (h, m, s)
26SEC, MIN, HOUR = range(3)
27START_MODE = SEC       # Campo mostrato all'avvio
28LONG_MS = 800          # Durata della pressione lunga
29DEBOUNCE_MS = 20       # Tempo di antirimbalzo del pulsante
30MODE_MS = 500          # Quanto resta visibile il segno di modo
31BLINK_MS = 300         # Periodo di lampeggio in regolazione
32SET_TIMEOUT_MS = 10000 # La regolazione salva dopo questo tempo senza pressioni
33SWEEP_STEP_MS = 60     # Passo della scia dell'ora esatta
34SWEEP_ROUNDS = 2       # Numero di scie
35TICK_MS = 100          # Durata del lampo del LED della scheda
36LOOP_MS = 5            # Passo del ciclo
37
38# In ordine bit 0 (1) ... bit 5 (32)
39LED_PINS = (2, 3, 4, 5, 6, 7)
40MODE_NAMES = ("SANIYE / SECONDS", "DAKIKA / MINUTES", "SAAT / HOURS")
41# Segno di modo: 1, 2 o 3 LED da sinistra (secondi, minuti, ore)
42MODE_MARKS = (0b100000, 0b110000, 0b111000)
43
44
45# ============ HARDWARE ============
46leds = [Pin(gp, Pin.OUT, value=0) for gp in LED_PINS]
47# Il nome "LED" trova il LED della scheda sia sul Pico sia sul Pico W (sul W non è un pin GP)
48tick_led = Pin("LED", Pin.OUT, value=0)   # Il LED sulla scheda del Pico
49
50
51class Button:
52    # Pulsante con pull-up: legge 0 quando è premuto. update() 1 = premuto, -1 = rilasciato
53    def __init__(self, gp):
54        self.pin = Pin(gp, Pin.IN, Pin.PULL_UP)
55        self.down = False
56        self.changed_at = time.ticks_ms()
57
58    def update(self, now):
59        pressed = self.pin.value() == 0
60        if pressed != self.down and time.ticks_diff(now, self.changed_at) >= DEBOUNCE_MS:
61            self.down = pressed
62            self.changed_at = now
63            return 1 if pressed else -1
64        return 0
65
66    def held_ms(self, now):
67        return time.ticks_diff(now, self.changed_at)
68
69
70button = Button(15)
71shown = -1                 # Ultimo schema sui LED
72
73
74def show_bits(pattern):
75    # Se lo schema è cambiato, scrivi i 6 LED: bit i -> LED i
76    global shown
77    if pattern == shown:
78        return
79    shown = pattern
80    for i, led in enumerate(leds):
81        led.value((pattern >> i) & 1)
82
83
84def binary(v):
85    # Testo binario a 6 cifre, es. 13 -> 001101
86    return "".join("1" if v >> i & 1 else "0" for i in range(5, -1, -1))
87
88
89# ============ OROLOGIO ============
90clock_s = (START_TIME[0] * 3600 + START_TIME[1] * 60 + START_TIME[2]) % 86400
91start = time.ticks_ms()
92next_second = time.ticks_add(start, 1000)
93tick_off_at = start
94
95
96def hms():
97    return clock_s // 3600, clock_s // 60 % 60, clock_s % 60
98
99
100def field_value(m):
101    h, mi, s = hms()
102    return (s, mi, h)[m]
103
104
105def time_text():
106    return "%02d:%02d:%02d" % hms()
107
108
109# ============ STATO ============
110mode = START_MODE
111setting = False            # Modalità regolazione
112long_done = False          # Pressione lunga già gestita per questa pressione
113marker_until = start       # Quando finisce il segno di modo
114sweep_at = None            # Inizio della scia di luce
115blink_ref = start          # Inizio del ciclo di lampeggio
116last_press = start         # Ultima pressione in regolazione
117
118
119def report(prefix):
120    v = field_value(mode)
121    print("%s %s: %d = %s  (%s)" % (prefix, MODE_NAMES[mode], v, binary(v), time_text()))
122
123
124def save_setting(now):
125    global setting
126    setting = False
127    print("Saat ayarlandi / Time set: %s" % time_text())
128
129
130def on_short(now):
131    global mode, marker_until, clock_s, blink_ref, last_press
132    if setting:
133        # In regolazione ogni pressione breve aggiunge 1 al campo scelto
134        h, mi, s = hms()
135        if mode == HOUR:
136            h = (h + 1) % 24
137        else:
138            mi = (mi + 1) % 60
139        clock_s = h * 3600 + mi * 60 + s
140        blink_ref = now
141        last_press = now
142        report("+1")
143    else:
144        mode = (mode + 1) % 3
145        marker_until = time.ticks_add(now, MODE_MS)
146        report("Mod / Mode")
147
148
149def on_long(now):
150    global setting, clock_s, next_second, blink_ref, last_press
151    if setting:
152        if mode == MIN:
153            # Dopo aver regolato i minuti, i secondi ripartono da zero
154            clock_s -= clock_s % 60
155            next_second = time.ticks_add(now, 1000)
156        save_setting(now)
157    elif mode == SEC:
158        # In modalità secondi una pressione lunga azzera i secondi (sincronia con un segnale orario)
159        clock_s -= clock_s % 60
160        next_second = time.ticks_add(now, 1000)
161        print("Saniye sifirlandi / Seconds zeroed: %s" % time_text())
162    else:
163        setting = True
164        blink_ref = now
165        last_press = now
166        report("Ayar / Set")
167
168
169def frame(now):
170    # Schema dei LED in questo momento: scia > segno di modo > regolazione (lampeggia) > valore
171    if sweep_at is not None:
172        step = time.ticks_diff(now, sweep_at) // SWEEP_STEP_MS
173        pos = step % 10
174        return 1 << (pos if pos < 6 else 10 - pos)     # avanti e indietro
175    if time.ticks_diff(marker_until, now) > 0:
176        return MODE_MARKS[mode]
177    if setting and time.ticks_diff(now, blink_ref) // BLINK_MS % 2:
178        return 0
179    return field_value(mode)
180
181
182# ============ CICLO PRINCIPALE ============
183print("== BlueGrays · bluegrays.com ==")
184print("Pico Ikili Saat / Binary Clock")
185print("Kisa basis: alan degistir, uzun basis: ayarla / Short press: next field, long: set")
186print("LED'ler / LEDs: 32 16 8 4 2 1")
187report("Mod / Mode")
188
189next_loop = time.ticks_ms()
190while True:
191    now = time.ticks_ms()
192
193    # Contatore dei secondi: ogni nuovo secondo si somma al precedente, così non c'è deriva
194    if time.ticks_diff(now, next_second) >= 0:
195        next_second = time.ticks_add(next_second, 1000)
196        clock_s = (clock_s + 1) % 86400
197        tick_led.value(1)
198        tick_off_at = time.ticks_add(now, TICK_MS)
199        if clock_s % 60 == 0:
200            print("Saat / Time %s" % time_text()[:5])
201        if clock_s % 3600 == 0 and not setting:
202            sweep_at = now                 # Ora esatta: scia di luce
203    if not setting and time.ticks_diff(now, tick_off_at) >= 0:
204        tick_led.value(0)
205    if sweep_at is not None and time.ticks_diff(now, sweep_at) >= SWEEP_STEP_MS * 10 * SWEEP_ROUNDS:
206        sweep_at = None
207
208    # Pulsante: la pressione breve agisce al rilascio, quella lunga appena passa LONG_MS
209    b = button.update(now)
210    if b == 1:
211        long_done = False
212        sweep_at = None                    # Una pressione ferma la scia
213    elif button.down and not long_done and button.held_ms(now) >= LONG_MS:
214        long_done = True
215        on_long(now)
216    elif b == -1 and not long_done:
217        on_short(now)
218
219    if setting:
220        tick_led.value(1)          # LED della scheda acceso durante la regolazione
221        if time.ticks_diff(now, last_press) >= SET_TIMEOUT_MS:
222            save_setting(now)
223
224    show_bits(frame(now))
225
226    # Passo fisso: attendere fino ai prossimi 5 ms
227    next_loop = time.ticks_add(next_loop, LOOP_MS)
228    wait = time.ticks_diff(next_loop, time.ticks_ms())
229    if wait > 0:
230        time.sleep_ms(wait)
231    else:
232        next_loop = time.ticks_ms()
233FAQ
Come si legge un orologio binario?
Da sinistra a destra i LED valgono 32, 16, 8, 4, 2 e 1. Somma i valori dei LED accesi: nello schema 001101 sono accesi 8, 4 e 1, quindi 13. Le ore non superano mai 23, perciò nel campo delle ore il LED più a sinistra resta spento. Il monitor seriale stampa ogni valore con la sua forma binaria.
Perché bastano 6 LED?
Con 6 bit si conta da 0 a 63 (2 alla sesta = 64 valori). Secondi e minuti arrivano a 59 e le ore a 23, quindi tutto sta in 6 bit. Per vedere ore, minuti e secondi insieme servirebbe una fila di LED per ogni campo (17 LED in tutto).
L'orologio si azzera se manca la corrente?
Sì. Il Pico non ha un orologio con batteria tampone, quindi il codice riparte da `START_TIME` a ogni accensione. Un modulo RTC con batteria come il DS1307 manterrebbe l'ora. In questo progetto regoli ore e minuti con il pulsante in pochi secondi dopo l'accensione.
Posso usare LED di altri colori?
Sì. I LED rossi, verdi, gialli e arancioni si accendono bene a 3,3 V con 220 Ω. Quelli blu e bianchi richiedono circa 3 V e a 3,3 V possono sembrare deboli; per loro scendi a 100 Ω. Dare un altro colore alle posizioni alte rende l'orologio più facile da leggere.