

学校のカードや建物のキーホルダーをかざすと、ドアが持ち主を識別できるのはなぜでしょうか?カードをRFIDリーダーに近づけると、ESP32がカード固有のID番号を読み取り、小さなLCDディスプレイに表示します。数秒後には、次のカードを待つ画面に戻ります。カードで開くドアや出席管理システムを作るための第一歩です。
動画
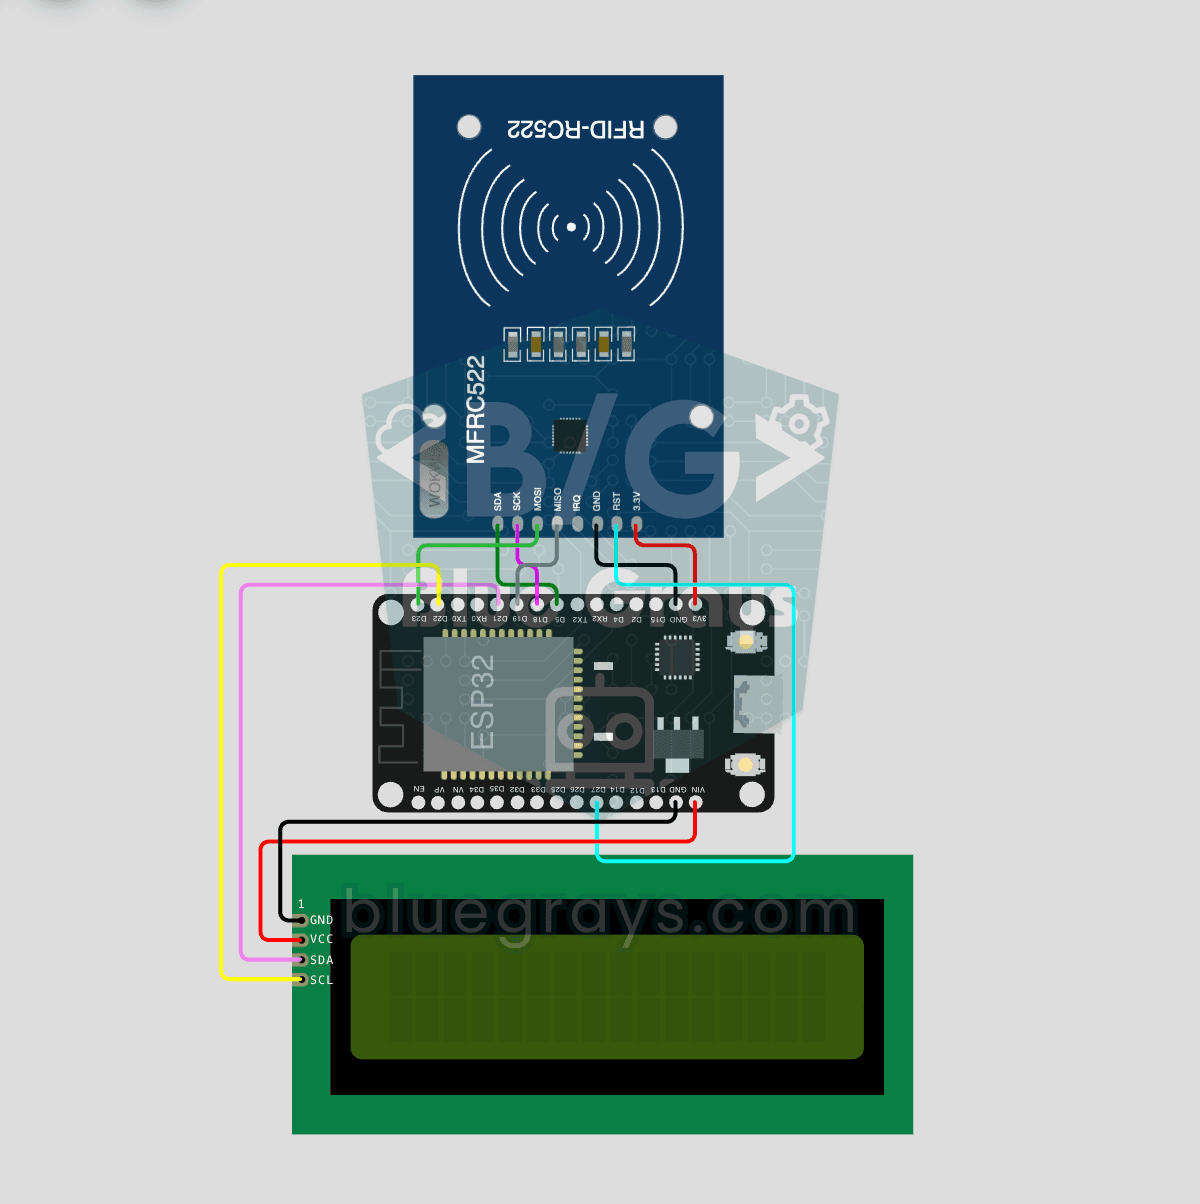
回路図
ソースコード
Arduino (C++)
1// ─────────────────────────────────────────
2//   BlueGrays · bluegrays.com
3//   ESP32 RFID RC522 Card Reader (with LCD)
4// ─────────────────────────────────────────
5// Reads the RC522 RFID module over SPI; the UID of a scanned card is shown
6// in HEX on the 16x2 I2C LCD for 3 s, then the "scan a card" screen
7// returns.
8//
9// Pins:
10//   GPIO 5  -> RC522 SDA (SS)
11//   GPIO 18 -> RC522 SCK, GPIO 19 -> RC522 MISO, GPIO 23 -> RC522 MOSI
12//   GPIO 27 -> RC522 RST
13//   GPIO 21 -> LCD SDA, GPIO 22 -> LCD SCL
14//   RC522 3.3V -> RC522 3.3V -> 3V3, IRQ is left unconnected
15//   LCD VCC -> LCD VCC -> 5V (VIN), all GNDs common
16
17#include <Wire.h>
18#include <LiquidCrystal_I2C.h>
19#include <SPI.h>
20#include <MFRC522.h>
21
22// Pin definitions
23const int RST_PIN = 27;   // RC522 RST
24const int SS_PIN  = 5;    // RC522 SDA (SS)
25
26// SPI pins are the VSPI default
27MFRC522 rfid(SS_PIN, RST_PIN);
28LiquidCrystal_I2C lcd(0x27, 16, 2);   // LCD addr 0x27 or 0x3F
29
30unsigned long lastScan = 0;                 // Last scan time (ms)
31const unsigned long DISPLAY_HOLD = 3000;    // UID display time (ms)
32bool showingCard = false;                   // Is a UID on the screen
33
34// Waiting screen
35void showWaitMessage() {
36  lcd.clear();
37  lcd.setCursor(0, 0);
38  lcd.print("Kart okutun");
39  lcd.setCursor(0, 1);
40  lcd.print("Scan a card");
41}
42
43void setup() {
44  Wire.begin(21, 22);   // I2C: SDA=21, SCL=22
45  lcd.init();
46  lcd.backlight();
47
48  // Splash screen 3 s
49  lcd.setCursor(3, 0);
50  lcd.print("BlueGrays");
51  lcd.setCursor(3, 1);
52  lcd.print("RFID v1.0");
53  delay(3000);
54
55  // Start SPI and the RC522
56  SPI.begin();
57  rfid.PCD_Init();
58  delay(50);
59
60  showWaitMessage();
61}
62
63void loop() {
64  // When the time is up, go back to the waiting screen
65  if (showingCard && millis() - lastScan > DISPLAY_HOLD) {
66    showWaitMessage();
67    showingCard = false;
68  }
69
70  // Leave if there is no new card or it cannot be read
71  if (!rfid.PICC_IsNewCardPresent() || !rfid.PICC_ReadCardSerial()) {
72    delay(50);
73    return;
74  }
75
76  // Print the UID in HEX, e.g. 0A:1B:2C:3D
77  lcd.clear();
78  lcd.setCursor(0, 0);
79  lcd.print("Kart UID:");
80  lcd.setCursor(0, 1);
81  for (byte i = 0; i < rfid.uid.size; i++) {
82    if (rfid.uid.uidByte[i] < 0x10) lcd.print("0");
83    lcd.print(rfid.uid.uidByte[i], HEX);
84    // No separator for a 7-byte UID: 14 chars fit the line
85    if (rfid.uid.size <= 5 && i < rfid.uid.size - 1) lcd.print(":");
86  }
87
88  lastScan = millis();
89  showingCard = true;
90
91  // Halt the card and stop encryption
92  rfid.PICC_HaltA();
93  rfid.PCD_StopCrypto1();
94}
95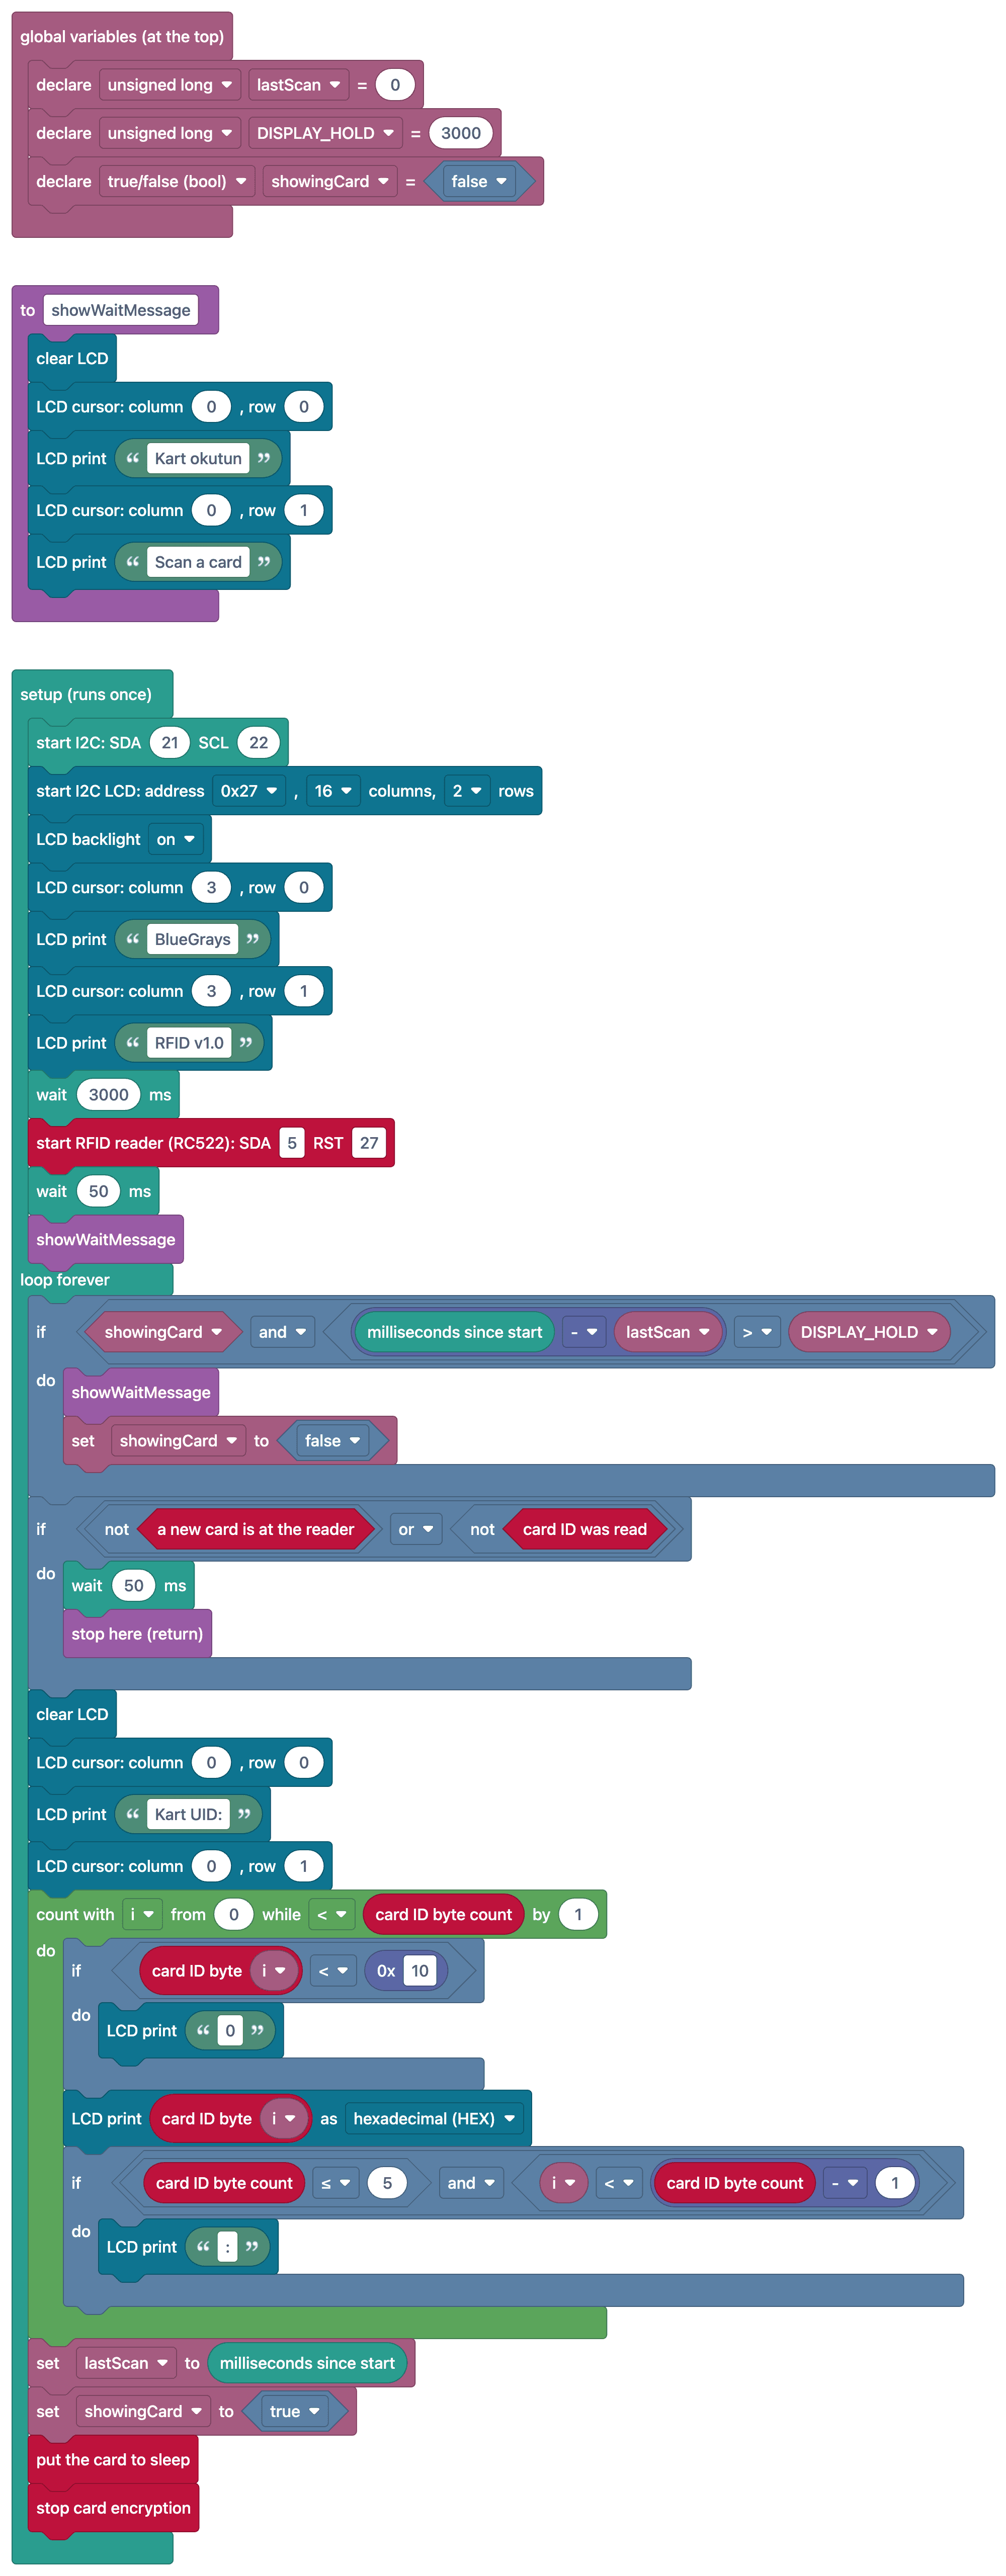
よくある質問
RC522をESP32のどのピンに接続しますか?▾
ESP32の標準SPIピンを使用します。SCK = GPIO 18、MISO = GPIO 19、MOSI = GPIO 23です。SDA(SS)とRSTにはコードで指定したピン(例:5と27)を使ってください。電源電圧は必ず3.3 Vにしてください。
LCDとRFIDは同時に使えますか?▾
はい。LCDはI2C(GPIO 21/22)、RC522はSPIバスを使用するため、互いに干渉しません。2つの独立した通信バスが同時に動作します。
カードによってUIDが4バイトだったり7バイトだったりするのはなぜですか?▾
MIFARE Classicカードは通常4バイト、MIFARE UltralightやNTAGタグは7バイトのUIDを使用します。照合する際は、UIDの長さも確認してください。
コードを変更せずに許可するカードを追加できますか?▾
はい。「管理者カード」を読み取った後に、次のカードをリストへ追加するモードを実装できます。リストはPreferencesを使って不揮発性メモリに保存できます。