
#158中級
Raspberry Pi Picoで信号機の4モードをボタンで切り替え(ステートマシン、GP11-13 + GP4)
1個のボタンで信号機の4つのモードを切り替えます!押すたびに、**通常サイクル**(赤→黄→緑の順に点灯)、**赤のみ**(停止)、**黄色点滅**(注意・夜間モード)、**消灯**(メンテナンス)へ切り替わります。**ステートマシン**(`mode`変数で実行する動作を決定)、**剰余演算によるモードの循環**(`(mode + 1) % 4`で0→1→2→3→0を繰り返す)、**処理を止めない時間管理**(`time.ticks_ms()` + `time.ticks_diff()`でLEDの各段階の時間を管理)を学びます。ただし、モード切り替え時には待ち時間があります。
5.0(1)
15 完了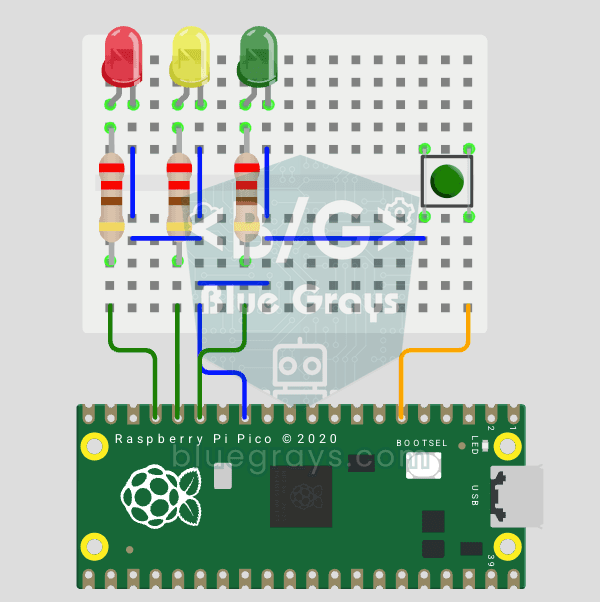
実際の信号機は、夜間に黄色を点滅させたり、必要に応じて赤のままにしたりします。このプロジェクトでは、それらを1個のボタンで選べます。押すたびに、赤・黄・緑が順番に点灯する通常サイクル、赤のみ、黄色点滅、全消灯へ切り替わります。Raspberry Pi Picoは、信号を制御しながらボタンの押下も逃さず読み取ります。
動画
回路図
ソースコード
MicroPython
1# ─────────────────────────────────────────
2#   BlueGrays · bluegrays.com
3#   Raspberry Pi Pico Traffic Light with 4-Mode Button Selector (State Machine, GP11-13 + GP4)
4# ─────────────────────────────────────────
5# One button cycles 4 modes: normal cycle (red -> yellow -> green), red
6# only, yellow flash and off. Uses a state machine and non-blocking timing
7# with time.ticks_ms(), so the button is always responsive.
8#
9# Pins:
10#   GP11 -> Green LED
11#   GP12 -> Yellow LED
12#   GP13 -> Red LED (each LED with 220 ohm)
13#   GP4  -> Button (other leg to GND)
14
15from machine import Pin
16import time
17
18# ============ LEDS ============
19green  = Pin(11, Pin.OUT)   # Green
20yellow = Pin(12, Pin.OUT)   # Yellow
21red    = Pin(13, Pin.OUT)   # Red
22
23# ============ BUTTON ============
24button = Pin(4, Pin.IN, Pin.PULL_UP)   # Reads 0 when pressed
25
26# ============ STATE ============
27# Mode: 0 normal cycle, 1 red only, 2 yellow flash, 3 off
28mode = 0
29last_btn = 1                 # Previous button value
30blink_state = False          # Yellow flash state
31last_tick = time.ticks_ms()  # Last flash toggle
32
33# ============ NORMAL CYCLE ============
34normal_step = 0                     # 0: red, 1: yellow, 2: green
35normal_last = time.ticks_ms()       # Step start time
36NORMAL_TIMES = [3000, 1000, 3000]   # Red, Yellow, Green (ms)
37LEDS = [red, yellow, green]
38
39def all_off():
40    # Turn all LEDs off
41    red.off(); yellow.off(); green.off()
42
43# ============ MAIN LOOP ============
44while True:
45    btn = button.value()
46
47    # ---- Button pressed (1 -> 0): mode change ----
48    if last_btn == 1 and btn == 0:
49        mode = (mode + 1) % 4
50        all_off()
51        normal_step = 0
52        normal_last = time.ticks_ms()
53        time.sleep_ms(200)   # Debounce
54    last_btn = btn
55
56    now = time.ticks_ms()
57
58    # ---- Normal traffic light cycle ----
59    if mode == 0:
60        if time.ticks_diff(now, normal_last) > NORMAL_TIMES[normal_step]:
61            normal_step = (normal_step + 1) % 3
62            normal_last = now
63        all_off()
64        LEDS[normal_step].on()
65
66    # ---- Red only (stop) ----
67    elif mode == 1:
68        all_off(); red.on()
69
70    # ---- Yellow flash, 0.4 s (caution/night) ----
71    elif mode == 2:
72        if time.ticks_diff(now, last_tick) > 400:
73            blink_state = not blink_state
74            yellow.value(blink_state)
75            last_tick = now
76            red.off(); green.off()
77
78    # ---- Off ----
79    else:
80        all_off()
81
82    time.sleep_ms(10)
83
よくある質問
ステートマシンとは何ですか?▾
1つの変数(mode)で、プログラムの現在の動作を決める仕組みです。ボタンを押すたびにmodeが変わり、ループは現在のモードに対応するコードだけを実行します。複雑な動作を整理するための標準的な方法です。
(mode + 1) % 4は何をしますか?▾
モードを1増やし、4に達すると0に戻します。これにより、モードが0、1、2、3、0、1…と繰り返し切り替わります。
time.sleep()の代わりにticks_ms()を使うのはなぜですか?▾
sleep()中はPicoがボタンを読み取れないため、モードの切り替えが遅れます。ticks_ms()とticks_diff()を使えば、LEDの各段階で長く待機せずに済みます。ただし、このバージョンではモード切り替え時のチャタリング対策に200 ms、各ループの最後に10 msの待ち時間があり、その間はボタンを読み取りません。
新しいモードを追加できますか?▾
はい、モード数を5に増やし、新しいモード用の動作ブロックを追加してください。緑色の点滅や、すべてのライトを順番に点灯させる動作などを追加できます。