
111 block project · Arduino · ESP32 · Pico
Block coding para sa mga Arduino, ESP32 at Pico project
Sundan ang makukulay na block sa halip na basahin ang code linya por linya. 111 BlueGrays project ang may block version, at bawat block ay katapat ng isang linya ng totoong code na tumatakbo sa board.
Ano ang block coding?
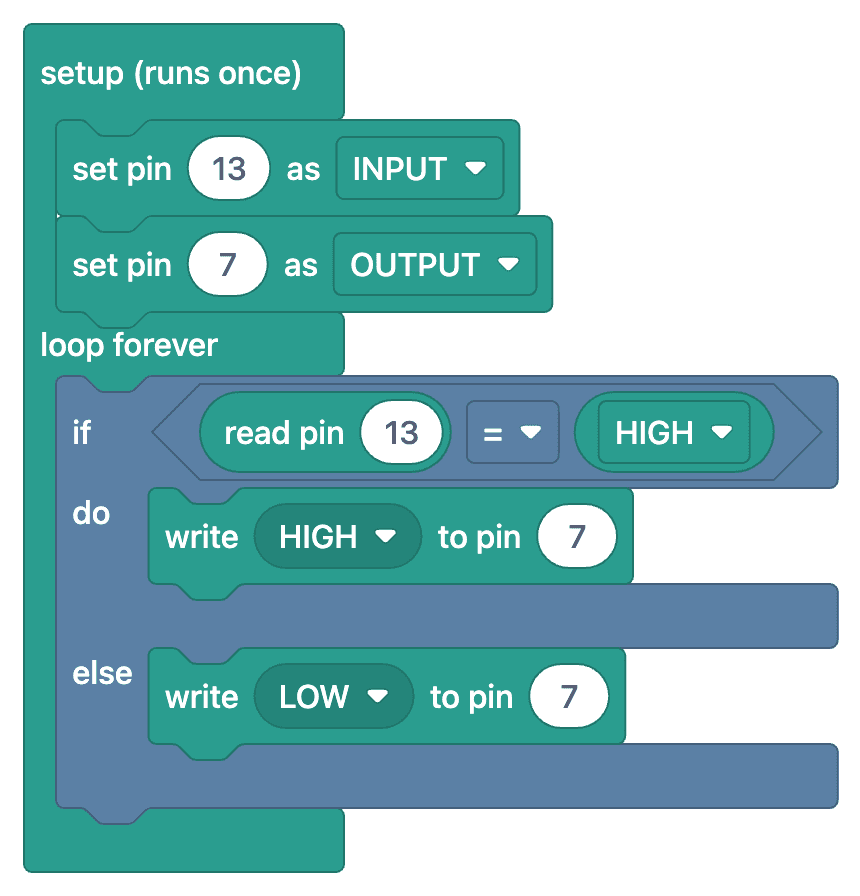
Ang block coding ay pagbuo ng program mula sa mga block na parang puzzle sa halip na i-type ito. Tig-iisang block ang "Itakda ang pin bilang output", "i-on ang LED" at "maghintay ng 1 segundo", at nabubuo ang program kapag pinagpatong-patong ang mga ito. Walang semicolon, bracket o typo na kailangang alalahanin, kaya makakapag-focus ka sa lohika.
May sariling block set ang BlueGrays, at nagsasalita ng wika mo ang mga block: kung English ang app, nakasulat sa mga block ang "repeat forever" at "write HIGH to pin". Sa mga Arduino at ESP32 project, katapat ng C++ code ang mga block; sa mga Raspberry Pi Pico project, katapat ng MicroPython.
Ang layunin ay hindi manatili sa block magpakailanman kundi maunawaan ang code. Itabi ang mga block ng isang project sa code nito at makikita mo kung ano ang ginagawa ng bawat linya. Pagkatapos ng ilang project, makakabasa ka na ng code kahit walang block.
Paano gumagana ang block coding sa BlueGrays
Sa app, nasa code section ng bawat block project ang mga block. Apat na hakbang:
- 01
Pumili ng block project
May kasamang block version ang mga project na may block badge. Puwede mo ring i-filter ang listahan para block project lang ang lumabas.
- 02
I-on ang "Ipakita bilang block"
Isang switch sa code section ang nagpapalit sa code bilang mga block. I-tap ang larawan para buksan ito nang full screen at i-zoom.
- 03
Unawain ang mga block
Ginagabayan ka ng tab na "Unawain ang mga block" sa program nang hakbang-hakbang, ipinapakita lang ang mga block ng bawat hakbang at ang ginagawa ng mga ito.
- 04
Lumipat sa totoong code
I-off ito at lalabas bilang code ang parehong program. Kopyahin ito sa Arduino IDE (o Thonny para sa Pico) at i-upload sa board mo.
Iisang program: mga block at code
Nasa kaliwa ang mga block ng project. Nasa kanan ang code na tumatakbo sa board. May katapat na linya ng code ang bawat block.
Mga Block
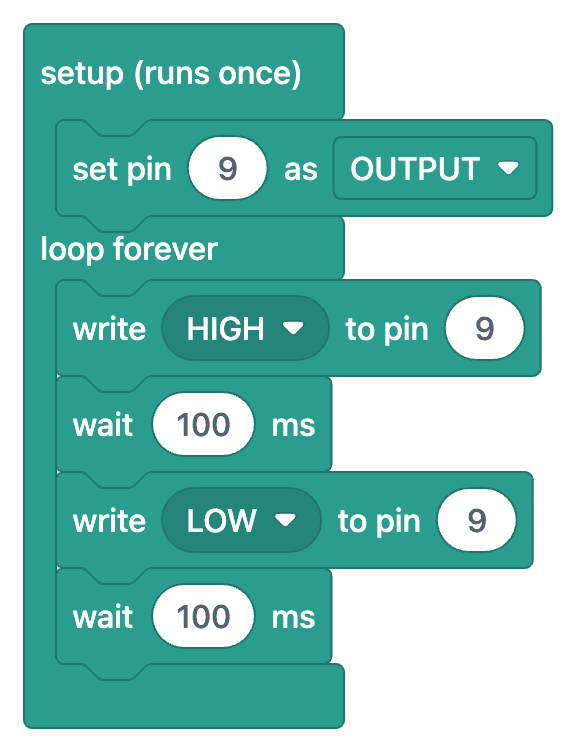
Code
1// ─────────────────────────────────────────
2//   BlueGrays · bluegrays.com
3//   LED Blink
4// ─────────────────────────────────────────
5// Blinks a single LED on and off every 100 ms. Shows the basic use of the
6// digitalWrite and delay functions.
7//
8// Pins:
9//   D9 -> LED (with a 220 ohm resistor)
10
11void setup() {
12  pinMode(9,OUTPUT);     // LED pin as output
13}
14
15void loop() {
16  digitalWrite(9,HIGH);  // Turn the LED on
17  delay(100);            // Wait 100 ms (1000 ms = 1 s)
18  digitalWrite(9,LOW);   // Turn the LED off
19  delay(100);
20}
21Mga block project
Bawat project na may block version, ayon sa platform. Nauuna ang mga libreng project: 31 sa mga ito ang ganap na libre, kasama ang mga block at code.
Mga Arduino project74 block project

LED Blink
The very first hello of electronics: switching a single LED on and off. The Arduino turns the LED on and off at short intervals, so the light blinks quickly.

Two LEDs Blinking Alternately
Two LEDs blink quickly in turn: when one lights up the other goes off, as if they were tossing a ball back and forth.

Traffic Light
A tiny copy of the traffic light you see on the road every day. Red stays on for two seconds, yellow flashes for a moment, green stays on for two seconds, then it goes back to red through yellow…

LED Police Lights
Just like the lights on a police car: the red LED flashes three times in quick succession, then the blue LED flashes three times, and the pattern keeps repeating without a break.

LED Chaser
Lights that switch on one after another, as if they were running. The Arduino lights six LEDs one at a time; each glows for a brief moment and goes out, so the light walks from start to end and then…

Knight Rider LED Effect
The classic scanner light: a dot of light slides from one end of six LEDs to the other and then comes back.

LED Chaser with Adjustable Speed
Six LEDs light up one after another, so the light seems to run from one end to the other.

Knight Rider LED Effect with Adjustable Speed
A light runs from one end of six LEDs to the other, turns around and runs back again.
Mga Arduino project: lahat ng block project
- AR-9LED Control with a Push Button (Push)Libre
- AR-10Toggle an LED with a Button (On/Off)Libre
- AR-11Measuring Light Intensity with an LDRLibre
- AR-12Night Light with LdrLibre
- AR-13Using a BuzzerLibre
- AR-14Frequency Setting with BuzzerLibre
- AR-27HC-SR04 Distance Measurement (Serial Display)Libre
- AR-37Reading a Reed SwitchLibre
- AR-45DS1302 RTC Clock Module SetupLibre
- AR-55Temperature and Humidity with DHT11Libre
- AR-613x4 Keypad OperationLibre
- AR-16Reading IR Remote Control Codes
- AR-17Led On/Off with IR Receiver and Remote Control
- AR-19Lighting 220V Bulb with Push Button
- AR-20Lighting 220V Bulb with Button (On-Off)
- AR-21Lighting 220V Bulb with Remote Control
- AR-22Laser Warning System
- AR-23Laser Security System
- AR-24Motion Detector with Motion Sensor
- AR-25Doorbell and Light with Motion Sensor
- AR-26Simple Piano with Buzzer and Button
- AR-28Parking Sensor with HC-SR04
- AR-29Print Message on 2x16 LCD Screen
- AR-30Bouncing Text Animation on LCD
- AR-31Measuring Distance Using LCD Display
- AR-32Using LCD Screen with I2C
- AR-33Height Measurement Project
- AR-34Control an LED from Your Phone via Bluetooth
- AR-35Using a Servo Motor
- AR-36Servo Motor Operation with Potentiometer
- AR-38Reed Switch Door Sensor
- AR-39Using an RGB LED
- AR-40Smooth Color Transition with RGB Led
- AR-42Displaying Numbers 0-99 on a 7-Segment Display
- AR-43Counter with 7-Segment Display and Buttons
- AR-44Temperature Measurement with NTC and 2x16 Lcd Display
- AR-46DS1302 RTC Clock with LCD Display
- AR-47Displaying 0-9999 on a 4-Digit 7-Segment Display
- AR-48Digital Clock with 4-Digit 7-Segment Display
- AR-49Bomb Animation with 4-Digit 7-Segment Display
- AR-50Using a Flame Sensor
- AR-51Using a Gas Sensor
- AR-52Flame and Gas Sensor Alarm
- AR-53RFID Value Reading
- AR-54RFID Authentication
- AR-56Digital Voltmeter with LCD Display
- AR-58Two-Way Communication Between 2 Arduinos
- AR-59Led Control with Joystick
- AR-60Servo Control with Joystick
- AR-62LED Control with a 3x4 Keypad
- AR-634x4 Keypad Operation
- AR-64Password Lock with 4x4 Keypad and LCD
- AR-67Using a Stepper Motor
- AR-68360-Degree Servo from a Stepper Motor
- AR-69Using a WS2812B LED Strip
- AR-70Police Lights with WS2812B
- AR-71WS2812B LED Chaser
- AR-72WS2812B LED Chaser (Fill Effect)
- AR-73WS2812B Knight Rider Effect
- AR-74WS2812B Knight Rider Effect (3 LEDs)
- AR-75WS2812B Animation 1
- AR-77Reading Reflection (Proximity) with TCRT5000
- AR-78TCRT5000 Black and White Surface Detection
- AR-82Smart Stair and Corridor Lighting
- AR-83Smart Irrigation Station
- AR-95Arduino Reaction Time Test with Sound Cue: Measure Your Reflexes in Milliseconds (LCD + Buzzer + 3 LEDs)
Mga ESP32 project23 block project

LED Blink with ESP32
Teaches basic GPIO output usage with ESP32. We achieve a blinking effect by turning an LED on and off from a digital pin. ESP32 version of the classic blink project on Arduino UNO; the basic blink commands in the Arduino environment are the same, but the ESP32's pin layout and 3.3 V GPIO levels differ from those of the Arduino UNO.

ESP32 LED Control with Push Button (Push)
The LED lights up when the button is pressed and turns off when released. Shows how the ESP32's digital input pin and internal pull-up resistor are used. The INPUT_PULLUP mode eliminates the need for an external resistor.

ESP32 LED Control with Pushbutton (Toggle)
Each time the button is pressed the state of the LED changes: if it is on it turns off, if it is off it turns on. Classic toggle pattern. With debounce we clean up the mechanical noise of the pushbutton to ensure a single toggle with a single press.

ESP32 Built-in LED Blink
Blinking the built-in blue LED on the ESP32 DevKit V1. No external components required! The first project you should try when you buy an ESP32. GPIO 2 is connected to the built-in LED.

ESP32 Traffic Light
Real traffic light simulation with 3 LEDs red-yellow-green. Timings close to real traffic logic: red long, yellow short, green long. Classic example of sequential GPIO control.

ESP32 Knight Rider LED
6 LEDs moving sequentially from left to right and right to left (Knight Rider style). A basic example of using for loops and arrays. Teaches the logic of direction change.

ESP32 LED Fade with PWM
Smoothly changing the brightness of the LED from 0 to max, from max to 0. We control PWM with analogWrite() as in Arduino - the same syntax as ESP32 Arduino Core 3.0+ works without problems. Pin definition + pinMode + analogWrite is enough.

ESP32 RGB LED Control
Unlimited color generation with a single RGB LED instead of 3 separate LEDs. As in Arduino, we make a rainbow transition by setting the R/G/B values with analogWrite(). Color theory (such as red+green=yellow) is seen practically.
Mga ESP32 project: lahat ng block project
- ES-11Reading Light Intensity with the ESP32 LDR ModuleLibre
- ES-14ESP32 HC-SR04 Ultrasonic Distance SensorLibre
- ES-15ESP32 DHT22 Temperature and Humidity (with LCD Display)Libre
- ES-20ESP32 MQ-2 Gas/Smoke Detector AlarmLibre
- ES-21ESP32 RFID RC522 Card Reader (with LCD)Libre
- ES-7ESP32 Police Strobe Light Effect
- ES-10ESP32 Night Light with LDR
- ES-12ESP32 Melody Playback with Buzzer
- ES-13ESP32 LED Brightness Control with a Potentiometer (Analog → PWM)
- ES-16ESP32 Servo Motor (Potentiometer Control)
- ES-17ESP32 I2C LCD Display (16x2)
- ES-18Digital Clock with ESP32 and DS1307 RTC (I2C + LCD)
- ES-19Automatic Lighting with the ESP32 PIR Motion Sensor
- ES-23ESP32 TM1637 4-Digit 7-Segment Display
- ES-24ESP32 WS2812B NeoPixel Strip Control
Mga Raspberry Pi Pico project10 block project
Raspberry Pi Pico Onboard LED Blink (Pico and Pico W)
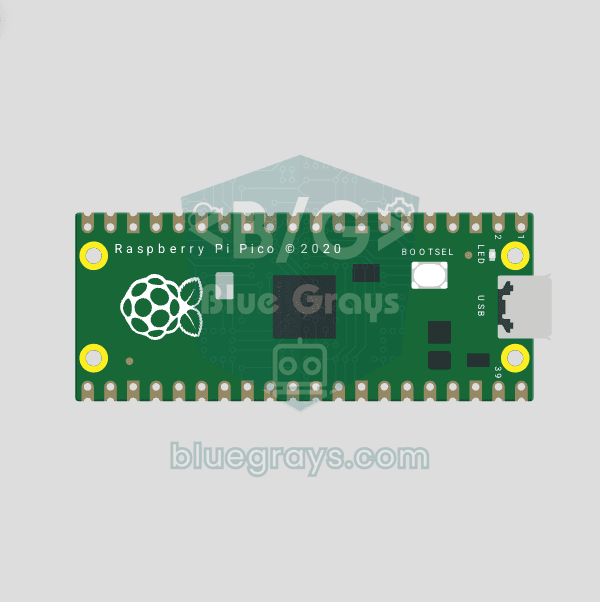
The opening project of the Raspberry Pi Pico series! We blink the Pico's green built-in LED to confirm the board works, the classic "Hello World" first experiment. No external parts needed, just the Pico and a USB cable. The code is written in MicroPython, the language officially supported by the Raspberry Pi Foundation.
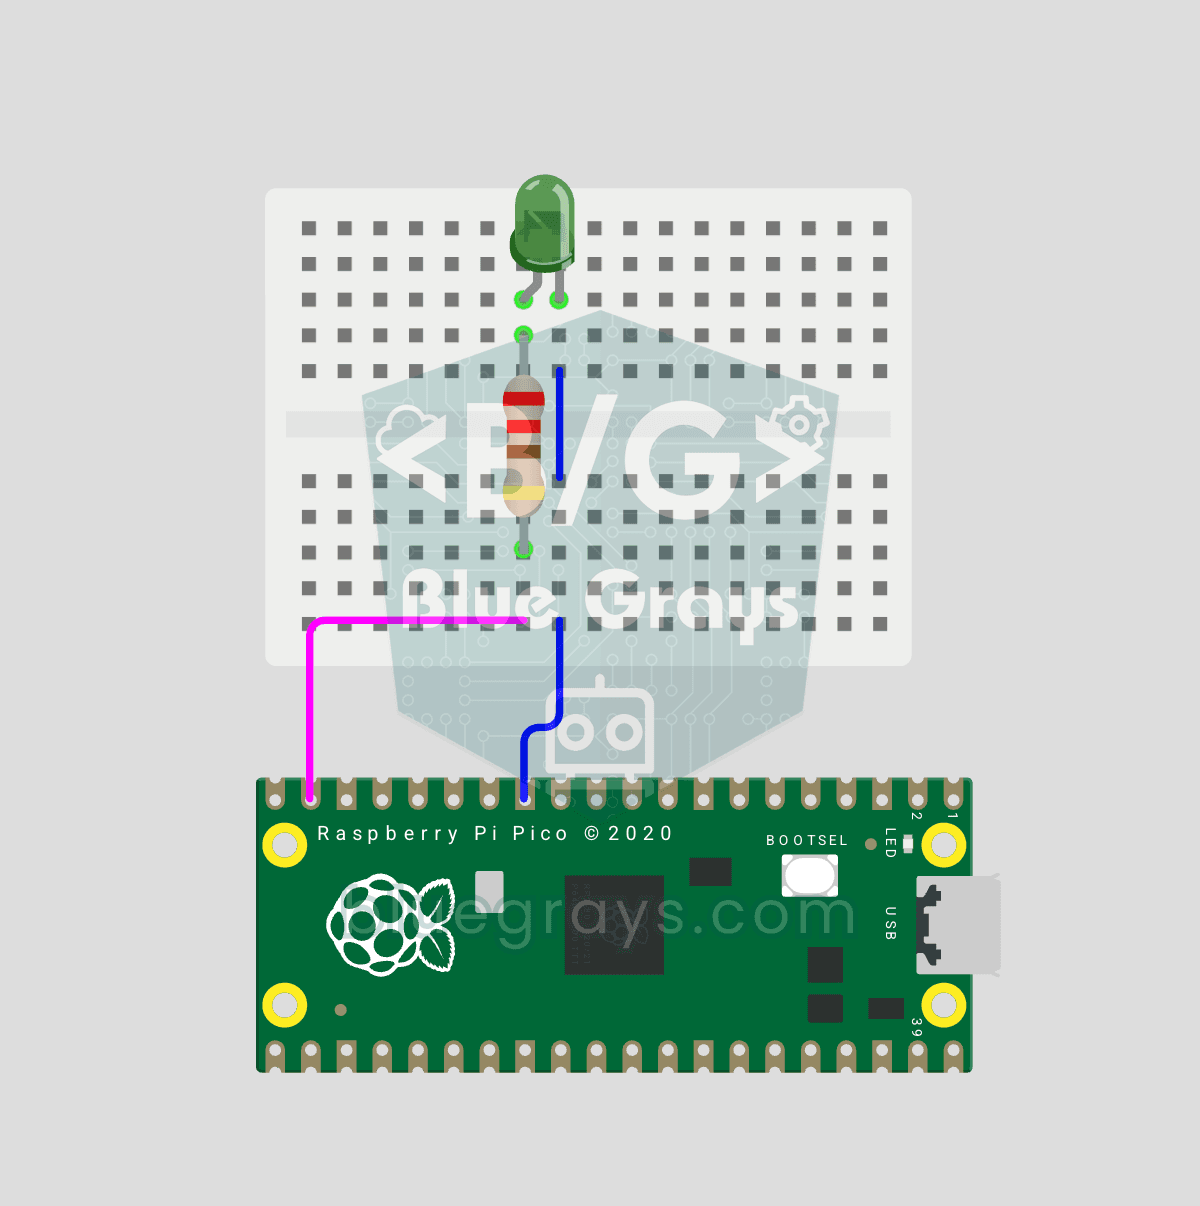
Raspberry Pi Pico: Controlling an External LED (Breadboard)
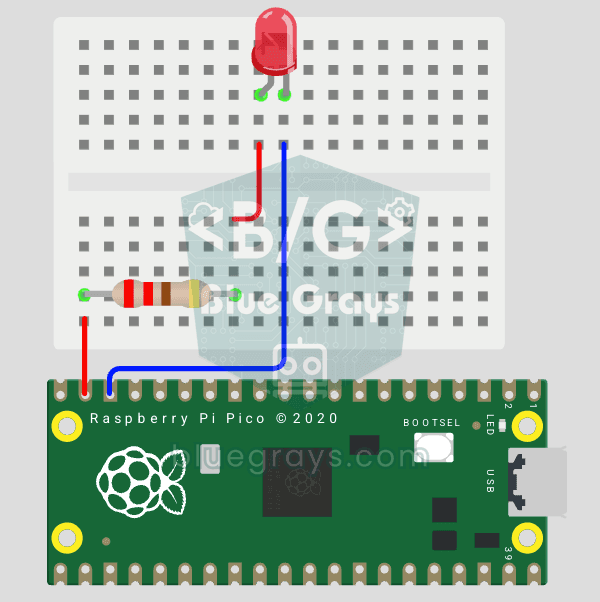
The next step after the Pico's built-in LED: connect an external LED on a breadboard and control it through pin GP14. You'll learn how to use any of the Pico's GPIO pins as an output, the LED's polarity (long leg = anode/+, short leg = cathode/–) and why a current-limiting resistor (220Ω) is a must. Without the resistor, too much current flows through the LED and it can burn out.
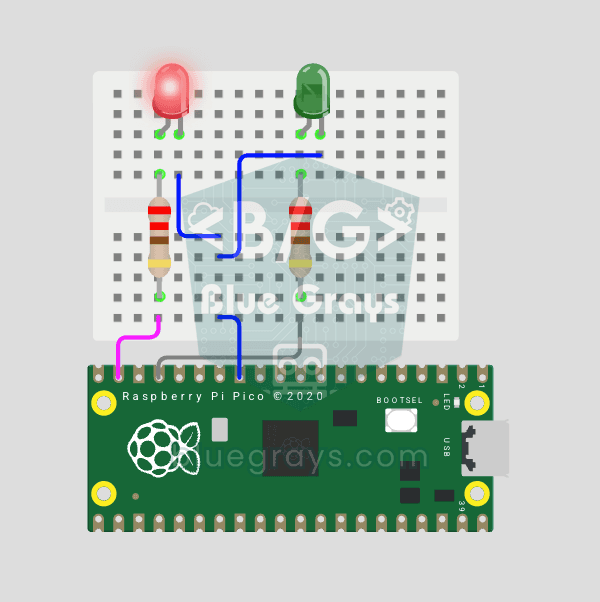
Raspberry Pi Pico Alternating Two LEDs (Blink-Flip Pattern)
The next step after the Pico's single LED: the classic flip-flop animation, with two LEDs blinking in turn. One LED turns off as the other turns on, the most basic example of handling multiple GPIOs. Two LEDs of different colors (red on GP14, green on GP13) swap every 500 ms. With MicroPython's Pin.toggle() method, the code stays short and readable.
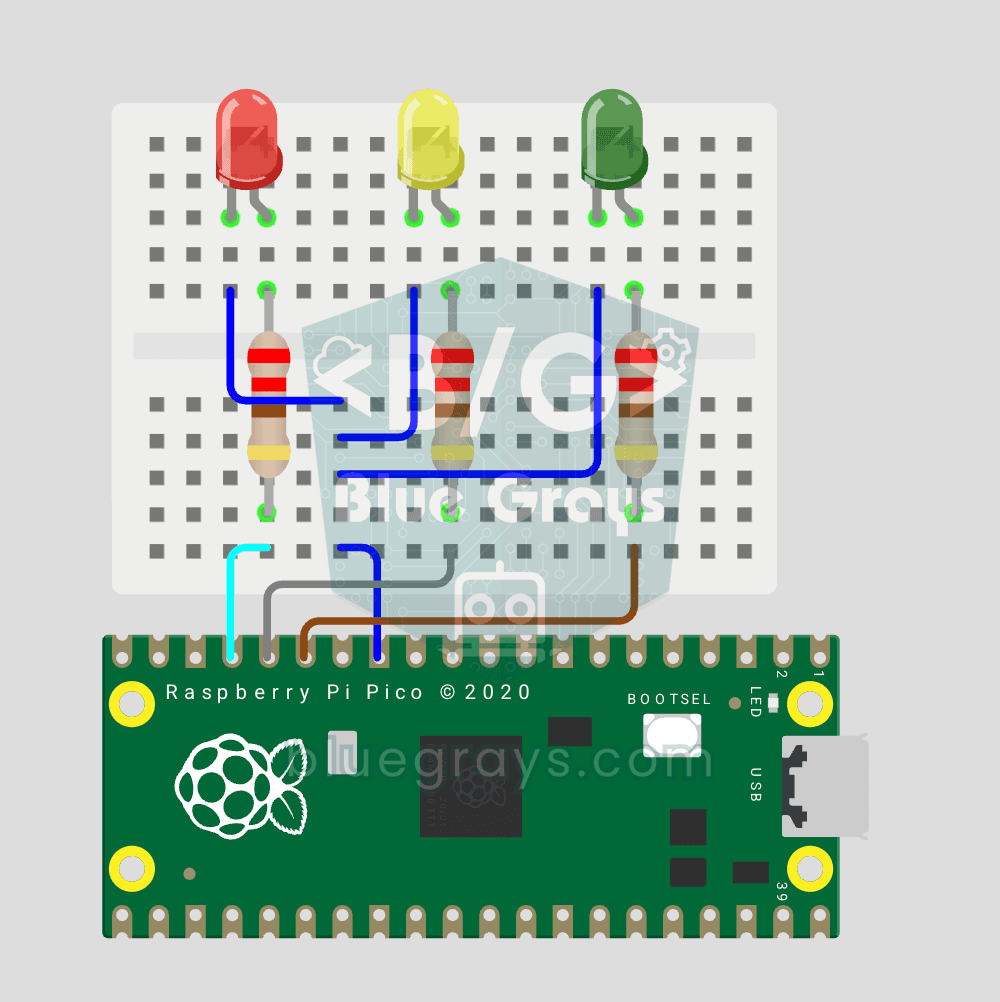
Raspberry Pi Pico Traffic Light Simulator (3 LEDs Sequential)
We recreate real traffic light logic with red, yellow and green LEDs, the first Pico project to move up to 3 LEDs! Green says "go" for 4 seconds, yellow "get ready" for 1.5 seconds, red "stop" for 3 seconds, and red+yellow "set off" for 1 second (the European traffic light pattern). You'll learn to define functions (def all_off()), state machine logic and multi-GPIO synchronization.
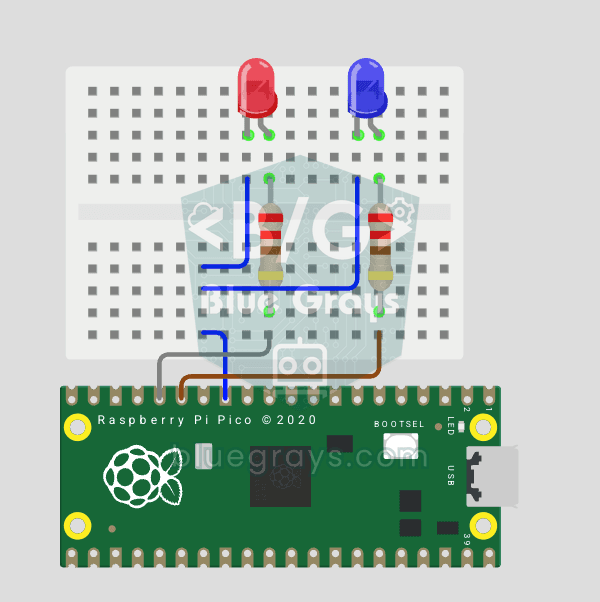
Raspberry Pi Pico Police Strobe Light Effect (Red + Blue)
We simulate a police car's light bar with a Raspberry Pi Pico in its simplest form! The red and blue LEDs take turns (flip-flop): while red is on, blue is off, and they swap every 0.3 seconds, forever. The code writes the two steps directly in a single while True loop; the speed is set with the WAIT_MS constant.
Raspberry Pi Pico 3-Burst Police Flip-Flop (2 LEDs)
Rhythmic variation of the police strobe project — 3-burst flip-flop! Same 2-LED circuit (GP11 red + GP12 blue), but a different pattern: red LED flashes 3 times rapidly, then blue flashes 3 times, forever. This "burst + switch" pattern is the most recognizable rhythm of real police siren lights. Learn parametrized function def burst(led, count, duration_ms), rhythm design, and generating different visual effects with code on same circuit.
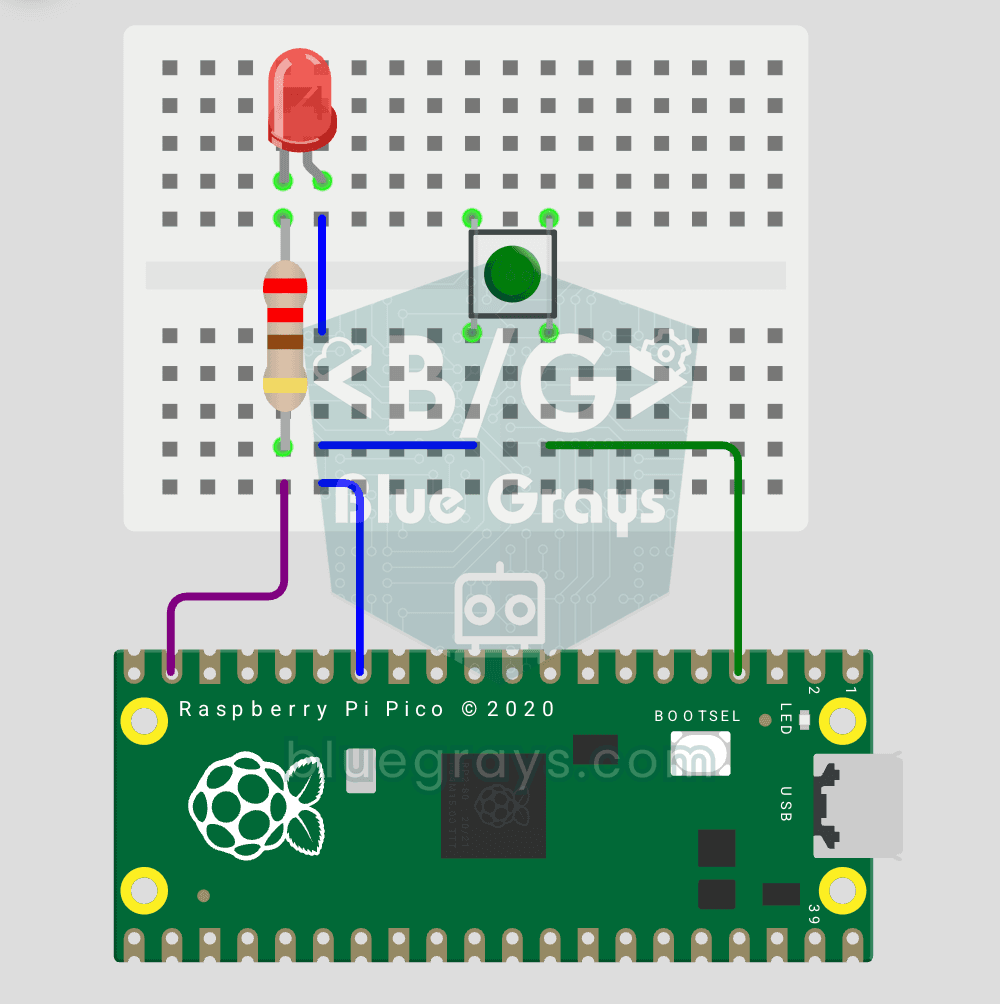
Raspberry Pi Pico Button Toggle LED
Button + LED — next level! Unlike the basic button project, there is no need to hold the button. Press and release → LED on. Press and release again → LED off (toggle). Same circuit (LED GP14, Button GP2), but big code difference. Learn edge detection (capturing the 1→0 falling moment), state tracking, debounce (mechanical bounce filter). MicroPython's led.toggle() swaps state in one line. Foundation of all interactive button projects (mode switcher, IRQ, double-click).
Raspberry Pi Pico PWM LED Fade (Breathing Effect)
The LED doesn't just blink anymore, it breathes! With the Raspberry Pi Pico's PWM (Pulse Width Modulation), the LED's brightness slowly rises and then slowly fades, a calm "breathing" effect like a sleeping laptop's light. You'll learn the machine.PWM class, the 16-bit brightness value from 0–65535 with duty_u16() and the PWM frequency.
Mga Raspberry Pi Pico project: lahat ng block project
Para kanino ito?
Mga bata at magulang
Mas tumatatak ang coding para sa mga bata kapag nagtatapos ito sa LED na umiilaw sa mesa. Ginagawang madaling basahin ng mga block ang program, at sabay ninyong bubuuin ang circuit.
Mga guro at club
Sa robotics o STEM class, puwede mong ipaliwanag muna ang project gamit ang mga block, tapos lumipat sa code nito. May handang listahan ng piyesa at circuit diagram ang bawat project.
Mga baguhan
Ang Arduino block coding ang pinakamabilis na paraan para makuha ang lohika ng mga una mong project. Magsimula sa mga block at lumipat sa code kapag handa ka na.
Mga madalas itanong
Ano ang block-based coding?
Isa itong paraan ng programming kung saan ipinapakita ang mga command bilang mga block na nagkakabit-kabit na parang puzzle piece sa halip na tina-type na text. Dahil hindi ka puwedeng magkamali sa pag-type, mas madaling nauunawaan ng mga baguhan at bata ang lohika ng program.
Ilang BlueGrays project ang may mga block?
Sa ngayon, 111: 76 Arduino, 25 ESP32 at 10 Raspberry Pi Pico project. Lumalaki ang listahan habang mas maraming project ang kino-convert.
Libre ba ang block coding?
Libre ang app. Bukas sa lahat ang mga block at code ng 31 block project. Sa ibang project, naa-unlock ang mga block gamit ang Premium, gaya ng code.
Puwede ko bang i-upload nang diretso ang mga block sa board ko?
Hindi. Pinapadali ng mga block na basahin at unawain ang program; ang laging napupunta sa board ay ang totoong code ng project. Kokopyahin mo ito sa Arduino IDE, o sa Thonny para sa Pico, at ia-upload.
Puwede ba akong bumuo ng sarili kong program gamit ang mga block?
Hindi pa. Inihahanda namin ang mga block para sa bawat project at itinutugma ang mga ito sa code nang isa-isa, kaya laging kumakatawan ang mga block na nakikita mo sa isang na-test na program na gumagana.
Paano ito naiiba sa Scratch o mBlock?
Sa Scratch at mBlock, nagda-drag ka ng mga block sa computer para isulat ang sarili mong program. Sa BlueGrays, may kasamang circuit diagram, listahan ng piyesa at totoong code ang bawat block project, at ang mga block ay madaling basahing bersyon ng code na iyon. Nagtutulungan ang dalawa.
Bagay ba ito sa mga bata? Ilang taon sila puwedeng magsimula?
Puwedeng magsimula kasama ang isang adult ang mga batang nasa 9 o 10 taong gulang na mahusay nang magbasa. Walang kailangang paghihinang sa mga unang project: binubuo ang mga ito sa breadboard na may LED, button at buzzer.
Sa anong mga wika ang mga block?
English, Turkish, German, Spanish, French at Italian. Lumalabas ang mga block sa wikang ginagamit mo sa app.
Ang BlueGrays app
Magsimula ng block coding sa phone mo
Mga block, circuit diagram, listahan ng piyesa at totoong code sa iisang screen. Libre sa iOS at Android.


I-scan gamit ang phone mo
Itutok ang camera sa code at magbubukas ang app store ng phone mo.