
Ognisko z diod LED z Raspberry Pi Pico (matryca NeoPixel 8x8 + potencjometr + buzzer)
Ognisko, które niczego nie pali ani nie grzeje, ale i tak trzaska! Raspberry Pi Pico rysuje na matrycy NeoPixel 8x8 realistyczny płomień, przeliczany w każdej klatce: u podstawy pojawiają się iskry, a ciepło stygnie, wznosząc się, i świeci od czerwieni do bieli. Potencjometr ustawia wysokość płomienia, przycisk przełącza motywy Ogień, Gaz, Magia i Ametyst, a buzzer dodaje trzask palącego się drewna. Animacja proceduralna, ADC, PWM i MicroPython w jednym projekcie.
Film
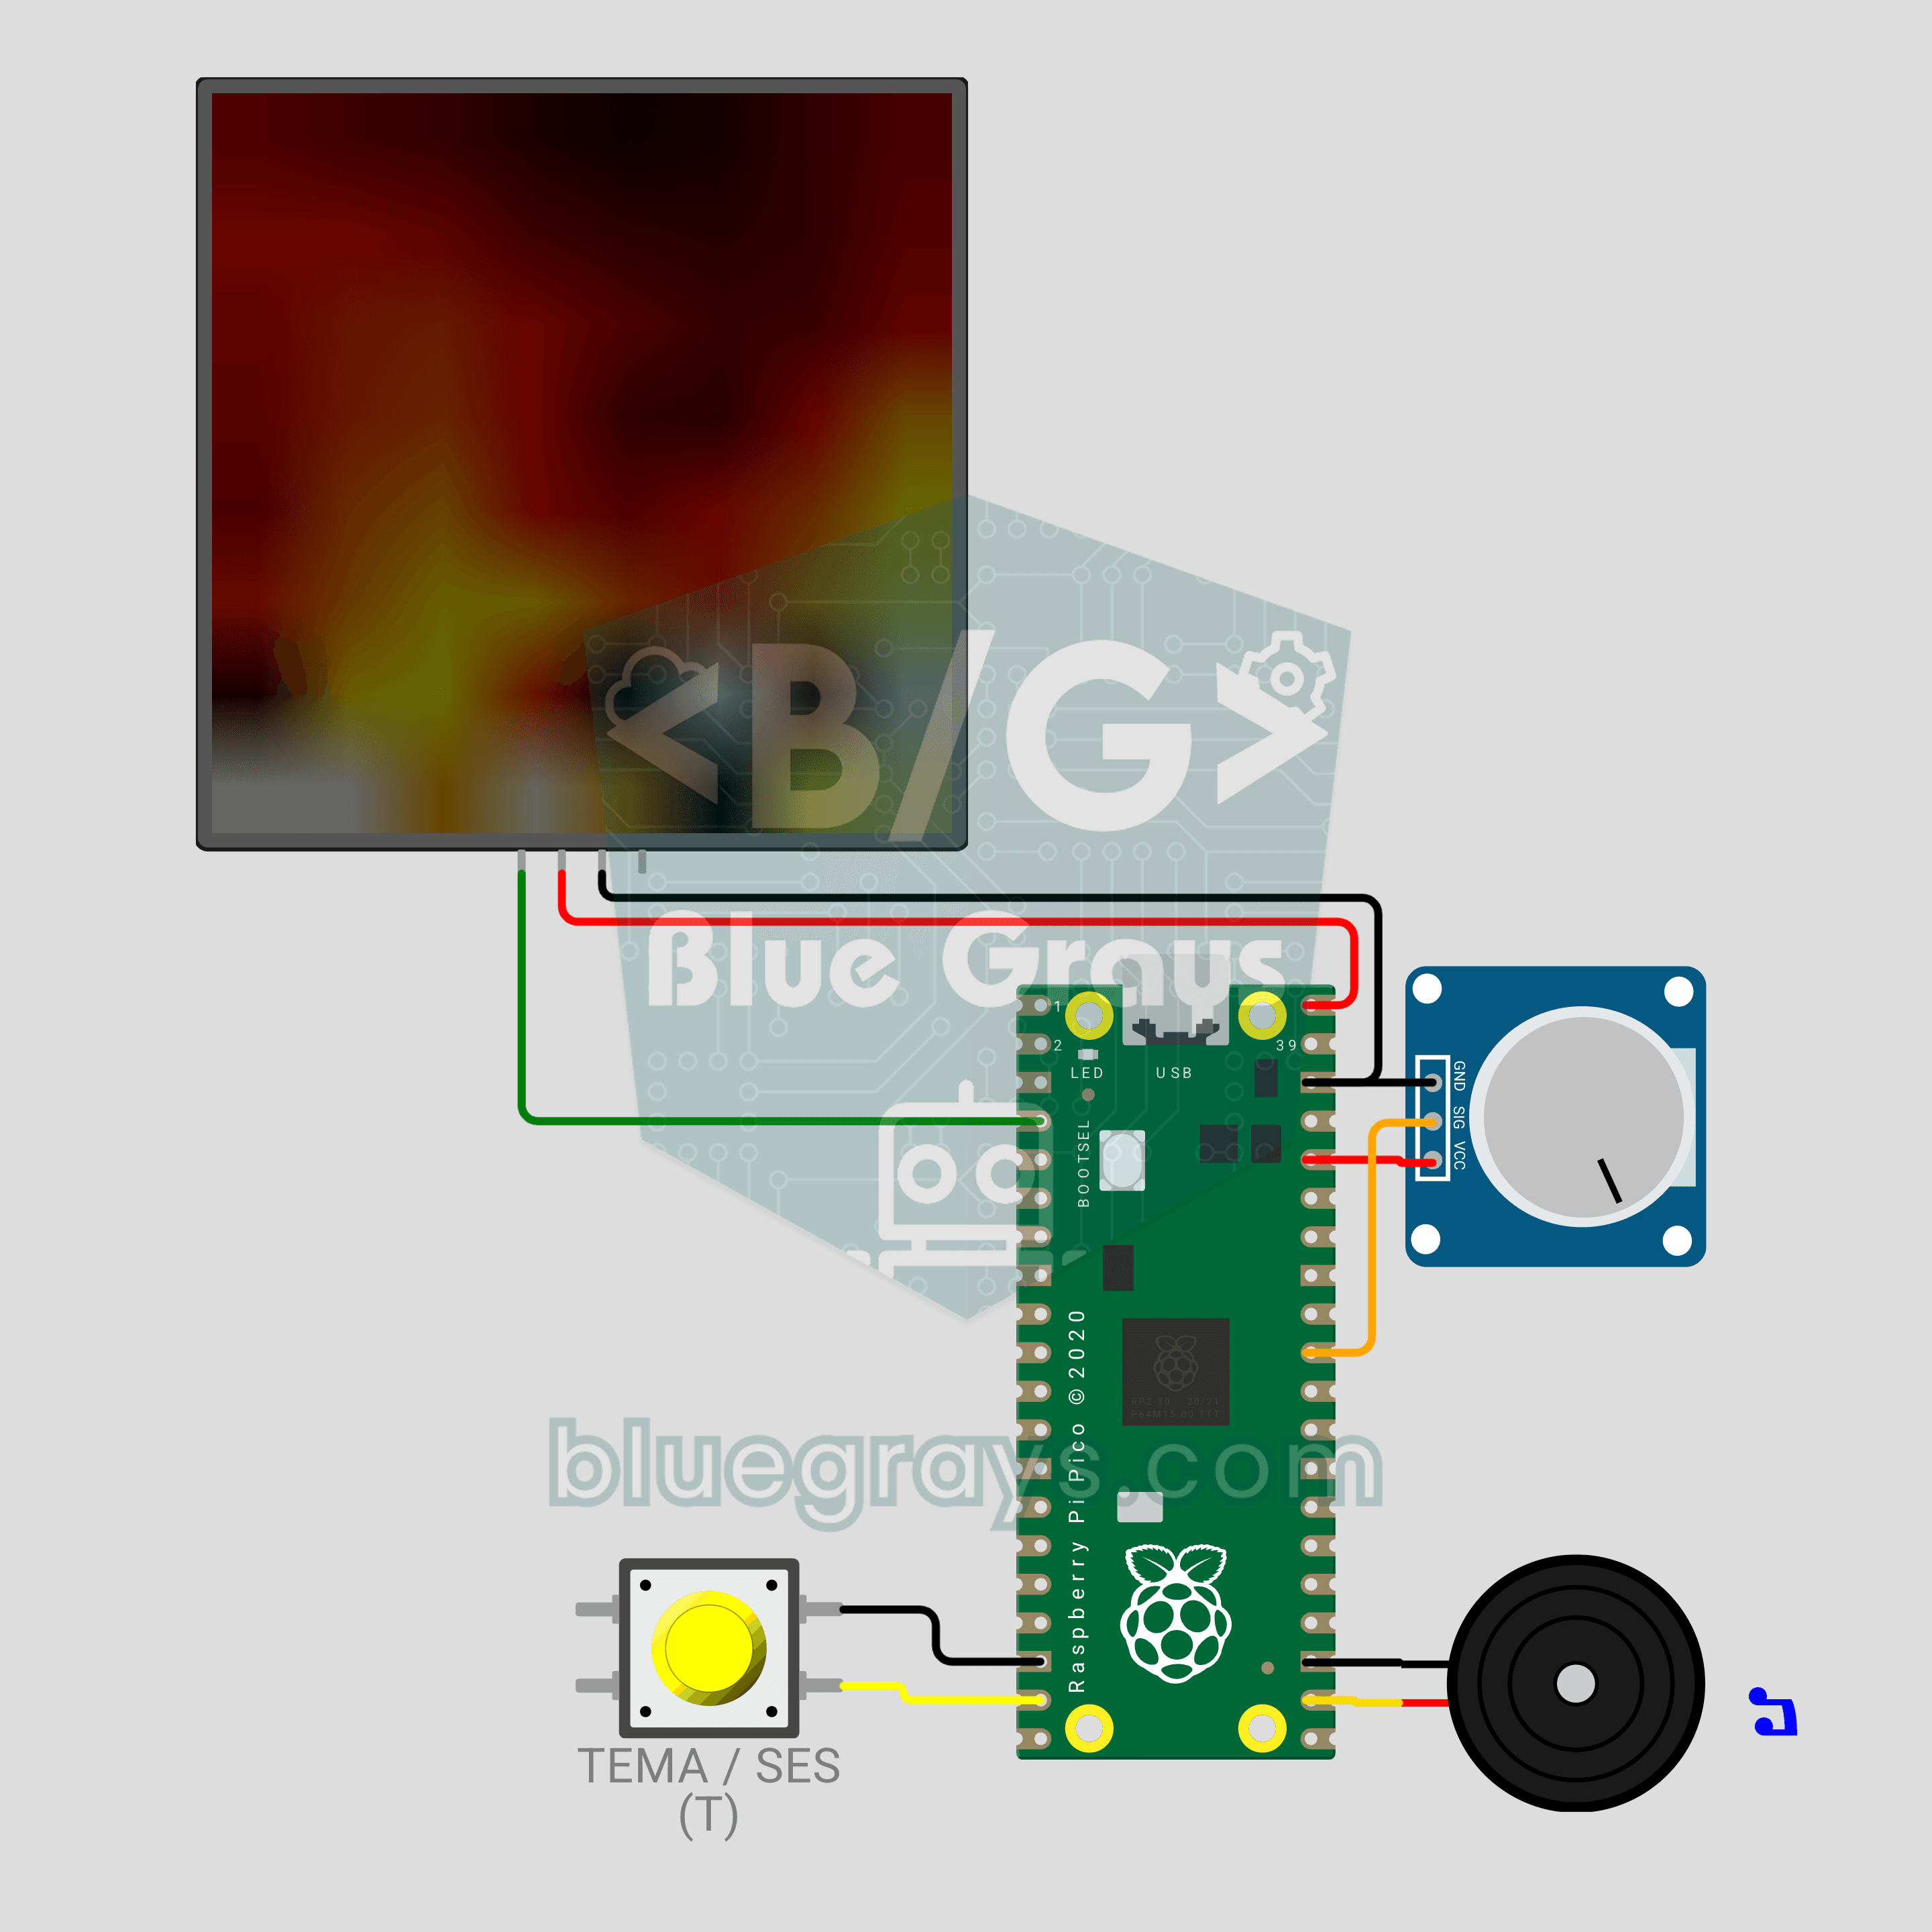
Schemat układu
Kod źródłowy
1# ─────────────────────────────────────────
2#   BlueGrays · bluegrays.com
3#   Raspberry Pi Pico LED Campfire (8x8 NeoPixel Matrix + Potentiometer + Buzzer)
4# ─────────────────────────────────────────
5# Realistic fire animation on an 8x8 NeoPixel matrix. The potentiometer
6# sets the flame height, a short button press changes the theme (Fire,
7# Gas, Magic, Amethyst) and a long press toggles the crackle sound.
8#
9# Pins:
10#   GP2  -> matrix DIN (VDD -> VBUS, VSS -> GND)
11#   GP26 -> Potentiometer wiper (ADC0)
12#   GP14 -> Button (other leg to GND)
13#   GP17 -> Buzzer (+)
14
15from machine import Pin, PWM, ADC
16from neopixel import NeoPixel
17import time
18import random
19
20# ============ SETTINGS ============
21W = 8                  # Columns
22H = 8                  # Rows
23SERPENTINE = False     # True for zigzag-wired panels
24BRIGHTNESS = 0.4       # Wokwi draws colors as-is, 0.4 shows the flame clearly
25                       # 0.15-0.2 recommended on USB 2.0 (500 mA), use external 5V for brighter
26FRAME_MS = 35          # Frame time (~28 FPS)
27LONG_PRESS_MS = 900    # Hold time to toggle sound
28
29# ============ HARDWARE ============
30matrix = NeoPixel(Pin(2), W * H)
31pot = ADC(26)                           # ADC0
32button = Pin(14, Pin.IN, Pin.PULL_UP)
33buzzer = PWM(Pin(17))
34buzzer.duty_u16(0)
35
36# ============ STATE ============
37# heat[x][y]: column x, y = 0 is the bottom row; 0 = cold, 255 = hottest
38heat = [[0] * H for _ in range(W)]
39theme = 0
40THEME_NAMES = ["Fire", "Gas", "Magic", "Amethyst"]
41sound_on = True
42
43
44# ============ COLOR PALETTE ============
45def heat_color(t):
46    # Map heat (0-255) to a color by theme: black -> deep -> bright -> white
47    t192 = (t * 191) // 255
48    ramp = (t192 & 0x3F) << 2      # 0-252 ramp per band
49    if t192 & 0x80:
50        r, g, b = 255, 255, ramp   # Hottest: yellow -> white
51    elif t192 & 0x40:
52        r, g, b = 255, ramp, 0     # Middle: red -> yellow
53    else:
54        r, g, b = ramp, 0, 0       # Cool: black -> red
55    if theme == 1:
56        r, b = b, r                # Gas: blue flame
57    elif theme == 2:
58        r, g = g, r                # Magic: green flame
59    elif theme == 3:
60        b = max(b, r * 3 // 4)     # Amethyst: purple flame
61        g = g // 2
62    return (int(r * BRIGHTNESS), int(g * BRIGHTNESS), int(b * BRIGHTNESS))
63
64
65def pixel_index(x, row):
66    # row 0 = top row
67    if SERPENTINE and row % 2 == 1:
68        return row * W + (W - 1 - x)
69    return row * W + x
70
71
72# ============ FIRE SIMULATION ============
73def fire_step(intensity):
74    # intensity 0-1: flame height. High = less cooling + more sparks
75    cooling = int(115 - 55 * intensity)    # 115 (short) -> 60 (tall)
76    sparking = int(70 + 150 * intensity)   # 70 -> 220 (probability)
77    max_cool = (cooling * 10) // H + 2
78
79    for x in range(W):
80        col = heat[x]
81        # Every cell cools a little
82        for y in range(H):
83            c = col[y] - random.getrandbits(8) % max_cool
84            col[y] = c if c > 0 else 0
85        # Heat drifts up and diffuses
86        for y in range(H - 1, 1, -1):
87            col[y] = (col[y - 1] + col[y - 2] + col[y - 2]) // 3
88        # Random sparks at the base
89        if random.getrandbits(8) < sparking:
90            y = random.getrandbits(1)
91            col[y] = min(255, col[y] + 160 + random.getrandbits(6))
92
93    # 4) Light blending with neighbor columns: the flame waves more naturally
94    for y in range(2, H):
95        row_vals = [heat[x][y] for x in range(W)]
96        for x in range(W):
97            left = row_vals[x - 1] if x > 0 else row_vals[x]
98            right = row_vals[x + 1] if x < W - 1 else row_vals[x]
99            heat[x][y] = (row_vals[x] * 2 + left + right) // 4
100
101
102def render():
103    for x in range(W):
104        for y in range(H):
105            matrix[pixel_index(x, H - 1 - y)] = heat_color(heat[x][y])
106    matrix.write()
107
108
109# ============ CRACKLE SOUND ============
110def crackle(intensity):
111    # Random very short "ticks" = crackling wood
112    if not sound_on:
113        return
114    if random.getrandbits(8) < int(10 + 50 * intensity):
115        buzzer.freq(1500 + random.getrandbits(12))   # 1500-5595 Hz
116        buzzer.duty_u16(6000)
117        time.sleep_ms(2 + random.getrandbits(2))
118        buzzer.duty_u16(0)
119
120
121def beep(freq, ms):
122    buzzer.freq(freq)
123    buzzer.duty_u16(20000)
124    time.sleep_ms(ms)
125    buzzer.duty_u16(0)
126
127
128# ============ BUTTON ============
129btn_state = 1
130btn_raw = 1
131btn_changed = time.ticks_ms()
132press_start = 0
133long_done = False
134
135
136def handle_button():
137    # Short press = theme, long press = sound on/off
138    global btn_state, btn_raw, btn_changed, press_start, long_done, theme, sound_on
139    now = time.ticks_ms()
140    raw = button.value()
141    if raw != btn_raw:
142        btn_raw = raw
143        btn_changed = now
144    if time.ticks_diff(now, btn_changed) > 25 and raw != btn_state:
145        btn_state = raw
146        if raw == 0:
147            press_start = now
148            long_done = False
149        elif not long_done:
150            theme = (theme + 1) % len(THEME_NAMES)
151            print("Theme:", THEME_NAMES[theme])
152            beep(1200, 30)
153    if btn_state == 0 and not long_done and time.ticks_diff(now, press_start) > LONG_PRESS_MS:
154        long_done = True
155        sound_on = not sound_on
156        print("Sound:", "ON" if sound_on else "OFF")
157        beep(1600 if sound_on else 500, 80)
158
159
160# ============ MAIN LOOP ============
161print("== BlueGrays · bluegrays.com ==")
162print("Pico 8x8 Campfire")
163print("Pot = flame height | Short press = theme | Long press = sound")
164
165smooth = pot.read_u16() / 65535
166while True:
167    start = time.ticks_ms()
168    handle_button()
169
170    # Smooth the pot value (jitter should not make the flame jump)
171    smooth += (pot.read_u16() / 65535 - smooth) * 0.2
172    fire_step(smooth)
173    render()
174    crackle(smooth)
175
176    # Constant frame rate
177    spent = time.ticks_diff(time.ticks_ms(), start)
178    if spent < FRAME_MS:
179        time.sleep_ms(FRAME_MS - spent)
180FAQ
Dlaczego w prawdziwym układzie trzeba zmniejszyć jasność?
Kod używa `BRIGHTNESS = 0.4`, bo Wokwi rysuje kolory dokładnie tak, jak zostały wysłane. Prawdziwa matryca przy dużym płomieniu może pobierać około 1 A, a port USB 2.0 daje 500 mA. Przy zasilaniu z USB ustaw 0.15–0.2; po większą jasność zasil matrycę z zasilacza 5V 2A i połącz masy.
Jak zmienić wysokość i kolor płomienia?
Obróć potencjometr w lewo, żeby dostać tlący się żar, a w prawo, żeby płomienie sięgały szczytu matrycy. Krótkie naciśnięcie przycisku przełącza po kolei motywy Ogień, Gaz, Magia i Ametyst. W Wokwi kliknij potencjometr i użyj strzałek, a motyw zmienisz klawiszem T.
Jak wyłączyć trzaskanie albo sprawić, żeby było rzadsze?
Przytrzymaj przycisk przez około sekundę: wysoki sygnał oznacza, że dźwięk jest włączony, a niski, że wyłączony. Żeby trzasków było mniej, zmniejsz liczby 10 i 50 w `10 + 50 * intensity` wewnątrz `crackle()`. Do dźwięku użyj pasywnego buzzera.
Czy muszę instalować jakieś biblioteki?
Nie. Moduły `neopixel`, `machine` i `random` są częścią MicroPython dla Pico. Wgraj MicroPython na Pico i zapisz na nim kod jako `main.py` w Thonny; ogień będzie się wtedy uruchamiał sam przy każdym włączeniu Pico.