
Fogata LED con Raspberry Pi Pico (Matriz NeoPixel 8x8 + Potenciómetro + Zumbador)
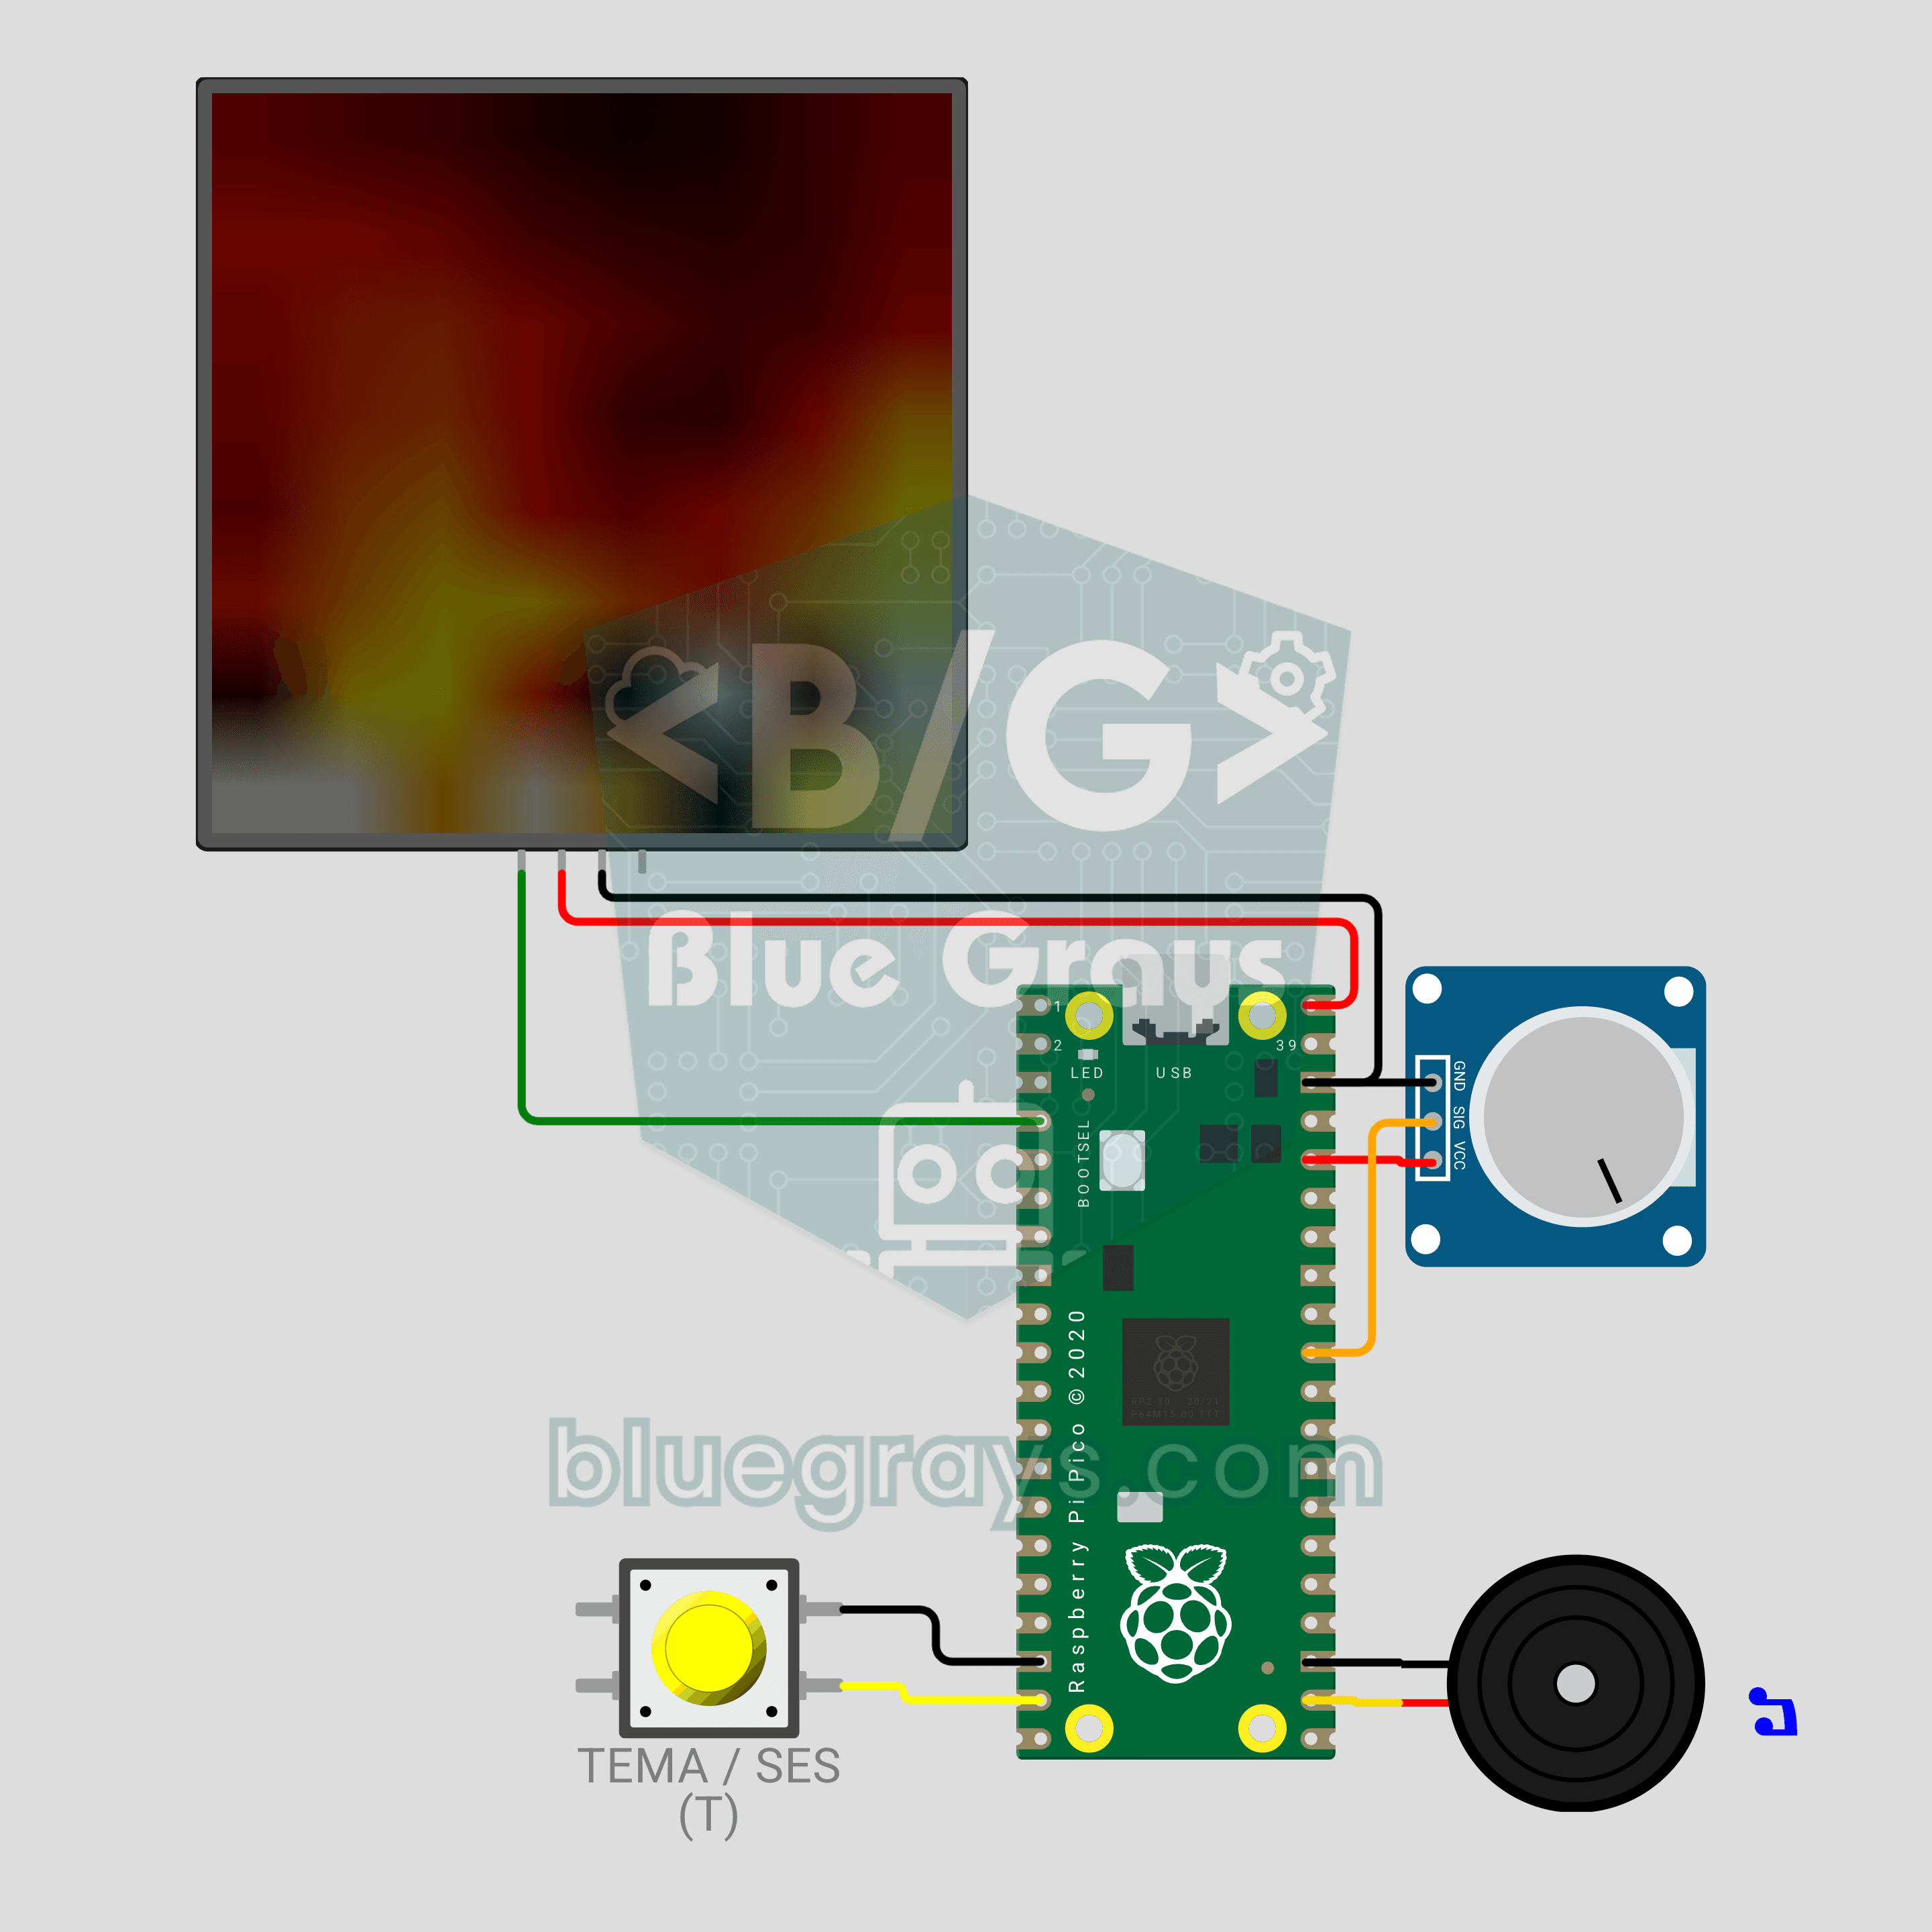
¡Una fogata que no quema ni calienta, pero que sí crepita! La **Raspberry Pi Pico** dibuja en una **matriz NeoPixel 8x8** una llama realista que se recalcula en cada fotograma: en la base saltan chispas, el calor se enfría al subir y brilla del rojo al blanco. El **potenciómetro** ajusta la altura de la llama, el **pulsador** cambia entre los temas Fuego, Gas, Magia y Amatista, y el **zumbador** añade el crepitar de la leña. Animación procedural, ADC, PWM y MicroPython en un solo proyecto.
Video
Diagrama del circuito
Código fuente
1# ─────────────────────────────────────────
2#   BlueGrays · bluegrays.com
3#   Fogata LED con Raspberry Pi Pico (Matriz NeoPixel 8x8 + Potenciómetro + Zumbador)
4# ─────────────────────────────────────────
5# Animación de fuego realista en una matriz NeoPixel de 8x8. El
6# potenciómetro ajusta la altura de la llama, una pulsación corta del
7# botón cambia el tema (Fire, Gas, Magic, Amethyst) y una larga alterna el
8# sonido de crujido.
9#
10# Pines:
11#   GP2  -> DIN de la matriz (VDD -> VBUS, VSS -> GND)
12#   GP26 -> Cursor del potenciómetro (ADC0)
13#   GP14 -> Botón (otra patilla a GND)
14#   GP17 -> Zumbador (+)
15
16from machine import Pin, PWM, ADC
17from neopixel import NeoPixel
18import time
19import random
20
21# ============ AJUSTES ============
22W = 8                  # Columnas
23H = 8                  # Filas
24SERPENTINE = False     # True para paneles cableados en zigzag
25BRIGHTNESS = 0.4       # Wokwi dibuja los colores tal cual; 0.4 muestra la llama con claridad
26                       # Se recomienda 0.15-0.2 con USB 2.0 (500 mA); usa 5V externos para más
27                       # brillo
28FRAME_MS = 35          # Tiempo de fotograma (~28 FPS)
29LONG_PRESS_MS = 900    # Tiempo de pulsación para alternar el sonido
30
31# ============ HARDWARE ============
32matrix = NeoPixel(Pin(2), W * H)
33pot = ADC(26)                           # ADC0
34button = Pin(14, Pin.IN, Pin.PULL_UP)
35buzzer = PWM(Pin(17))
36buzzer.duty_u16(0)
37
38# ============ ESTADO ============
39# heat[x][y]: columna x, y = 0 es la fila inferior; 0 = frío, 255 = el más caliente
40heat = [[0] * H for _ in range(W)]
41theme = 0
42THEME_NAMES = ["Ates / Fire", "Gaz / Gas", "Buyu / Magic", "Ametist / Amethyst"]
43sound_on = True
44
45
46# ============ PALETA DE COLORES ============
47def heat_color(t):
48    # Mapear el calor (0-255) a un color según el tema: negro -> intenso -> brillante -> blanco
49    t192 = (t * 191) // 255
50    ramp = (t192 & 0x3F) << 2      # Rampa de 0-252 por banda
51    if t192 & 0x80:
52        r, g, b = 255, 255, ramp   # Lo más caliente: amarillo -> blanco
53    elif t192 & 0x40:
54        r, g, b = 255, ramp, 0     # Medio: rojo -> amarillo
55    else:
56        r, g, b = ramp, 0, 0       # Frío: negro -> rojo
57    if theme == 1:
58        r, b = b, r                # Gas: llama azul
59    elif theme == 2:
60        r, g = g, r                # Mágico: llama verde
61    elif theme == 3:
62        b = max(b, r * 3 // 4)     # Amatista: llama morada
63        g = g // 2
64    return (int(r * BRIGHTNESS), int(g * BRIGHTNESS), int(b * BRIGHTNESS))
65
66
67def pixel_index(x, row):
68    # fila 0 = fila superior
69    if SERPENTINE and row % 2 == 1:
70        return row * W + (W - 1 - x)
71    return row * W + x
72
73
74# ============ SIMULACIÓN DE FUEGO ============
75def fire_step(intensity):
76    # intensidad 0-1: altura de la llama. Alta = menos enfriamiento + más chispas
77    cooling = int(115 - 55 * intensity)    # 115 (corto) -> 60 (alto)
78    sparking = int(70 + 150 * intensity)   # 70 -> 220 (probabilidad)
79    max_cool = (cooling * 10) // H + 2
80
81    for x in range(W):
82        col = heat[x]
83        # Cada celda se enfría un poco
84        for y in range(H):
85            c = col[y] - random.getrandbits(8) % max_cool
86            col[y] = c if c > 0 else 0
87        # El calor sube y se difunde
88        for y in range(H - 1, 1, -1):
89            col[y] = (col[y - 1] + col[y - 2] + col[y - 2]) // 3
90        # Chispas aleatorias en la base
91        if random.getrandbits(8) < sparking:
92            y = random.getrandbits(1)
93            col[y] = min(255, col[y] + 160 + random.getrandbits(6))
94
95    # 4) Mezcla de luz con las columnas vecinas: la llama ondea de forma más natural
96    for y in range(2, H):
97        row_vals = [heat[x][y] for x in range(W)]
98        for x in range(W):
99            left = row_vals[x - 1] if x > 0 else row_vals[x]
100            right = row_vals[x + 1] if x < W - 1 else row_vals[x]
101            heat[x][y] = (row_vals[x] * 2 + left + right) // 4
102
103
104def render():
105    for x in range(W):
106        for y in range(H):
107            matrix[pixel_index(x, H - 1 - y)] = heat_color(heat[x][y])
108    matrix.write()
109
110
111# ============ SONIDO DE CRUJIDO ============
112def crackle(intensity):
113    # "Chasquidos" aleatorios muy cortos = madera crepitando
114    if not sound_on:
115        return
116    if random.getrandbits(8) < int(10 + 50 * intensity):
117        buzzer.freq(1500 + random.getrandbits(12))   # 1500-5595 Hz
118        buzzer.duty_u16(6000)
119        time.sleep_ms(2 + random.getrandbits(2))
120        buzzer.duty_u16(0)
121
122
123def beep(freq, ms):
124    buzzer.freq(freq)
125    buzzer.duty_u16(20000)
126    time.sleep_ms(ms)
127    buzzer.duty_u16(0)
128
129
130# ============ BOTÓN ============
131btn_state = 1
132btn_raw = 1
133btn_changed = time.ticks_ms()
134press_start = 0
135long_done = False
136
137
138def handle_button():
139    # Pulsación corta = tema, pulsación larga = sonido activado/desactivado
140    global btn_state, btn_raw, btn_changed, press_start, long_done, theme, sound_on
141    now = time.ticks_ms()
142    raw = button.value()
143    if raw != btn_raw:
144        btn_raw = raw
145        btn_changed = now
146    if time.ticks_diff(now, btn_changed) > 25 and raw != btn_state:
147        btn_state = raw
148        if raw == 0:
149            press_start = now
150            long_done = False
151        elif not long_done:
152            theme = (theme + 1) % len(THEME_NAMES)
153            print("Tema / Theme:", THEME_NAMES[theme])
154            beep(1200, 30)
155    if btn_state == 0 and not long_done and time.ticks_diff(now, press_start) > LONG_PRESS_MS:
156        long_done = True
157        sound_on = not sound_on
158        print("Ses / Sound:", "ACIK / ON" if sound_on else "KAPALI / OFF")
159        beep(1600 if sound_on else 500, 80)
160
161
162# ============ BUCLE PRINCIPAL ============
163print("== BlueGrays · bluegrays.com ==")
164print("Pico 8x8 Kamp Atesi / Campfire")
165print("Pot = alev boyu / flame height | Kisa basis = tema / short press = theme | Uzun basis = ses / long press = sound")
166
167smooth = pot.read_u16() / 65535
168while True:
169    start = time.ticks_ms()
170    handle_button()
171
172    # Suavizar el valor del potenciómetro (la vibración no debe hacer saltar la llama)
173    smooth += (pot.read_u16() / 65535 - smooth) * 0.2
174    fire_step(smooth)
175    render()
176    crackle(smooth)
177
178    # Frecuencia de fotogramas constante
179    spent = time.ticks_diff(time.ticks_ms(), start)
180    if spent < FRAME_MS:
181        time.sleep_ms(FRAME_MS - spent)
182
Preguntas frecuentes
¿Por qué debo bajar el brillo en el circuito real?▾
El código usa `BRIGHTNESS = 0.4` porque Wokwi dibuja los colores tal cual. Una matriz real puede consumir cerca de 1 A con la llama al máximo, y un puerto USB 2.0 da 500 mA. Por USB, pon 0.15–0.2; para más brillo, alimenta la matriz con un adaptador de 5V 2A y une las masas (GND).
¿Cómo cambio la altura y el color de la llama?▾
Gira el potenciómetro a la izquierda para ver brasas y a la derecha para que las llamas lleguen arriba de la matriz. Una pulsación corta cambia entre Fuego, Gas, Magia y Amatista. En Wokwi, haz clic en el potenciómetro y usa las flechas; el tema cambia con la tecla T.
¿Cómo apago el crepitar o hago que suene menos?▾
Mantén pulsado el botón un segundo: un pitido agudo indica sonido activado y uno grave, desactivado. Para que crepite menos, reduce el 10 y el 50 de `10 + 50 * intensity` dentro de `crackle()`. Para el sonido usa un zumbador pasivo.
¿Necesito instalar alguna librería?▾
No. Los módulos `neopixel`, `machine` y `random` vienen incluidos en MicroPython para la Pico. Instala MicroPython en la Pico y guarda el código en ella como `main.py` desde Thonny; la fogata arrancará sola cada vez que la enciendas.