
ESP32 IoT Room Station (Relay + DHT22)
Turn your lamp on from your phone and watch your room's temperature and humidity live, wherever you are. This project is the step-by-step guide to the Room station IoT template in the app, built with an ESP32, a relay module and a DHT22. Go to Workshop › Devices › Add a device and pick Room station; Ohmi prepares the code with your own device key. The code on this page is an example: the key and Wi-Fi details are placeholders.
Control this device from the app
Connect your ESP32 or Raspberry Pi Pico W to Wi-Fi, then switch it on and off and watch live readings from your phone. Ohmi prepares the code; you just enter your Wi-Fi details and upload it.
Template in the app: Room station
- Where is it in the app?Add a new device from the Tools tab or Workshop › Devices and pick this template.
- Arduino libraryOpen the Library Manager in the Arduino IDE, search for BlueGraysIoT and install it.
The free plan includes 1 device, 1 chart and 24 hours of history. Premium adds more devices, more charts and longer history.
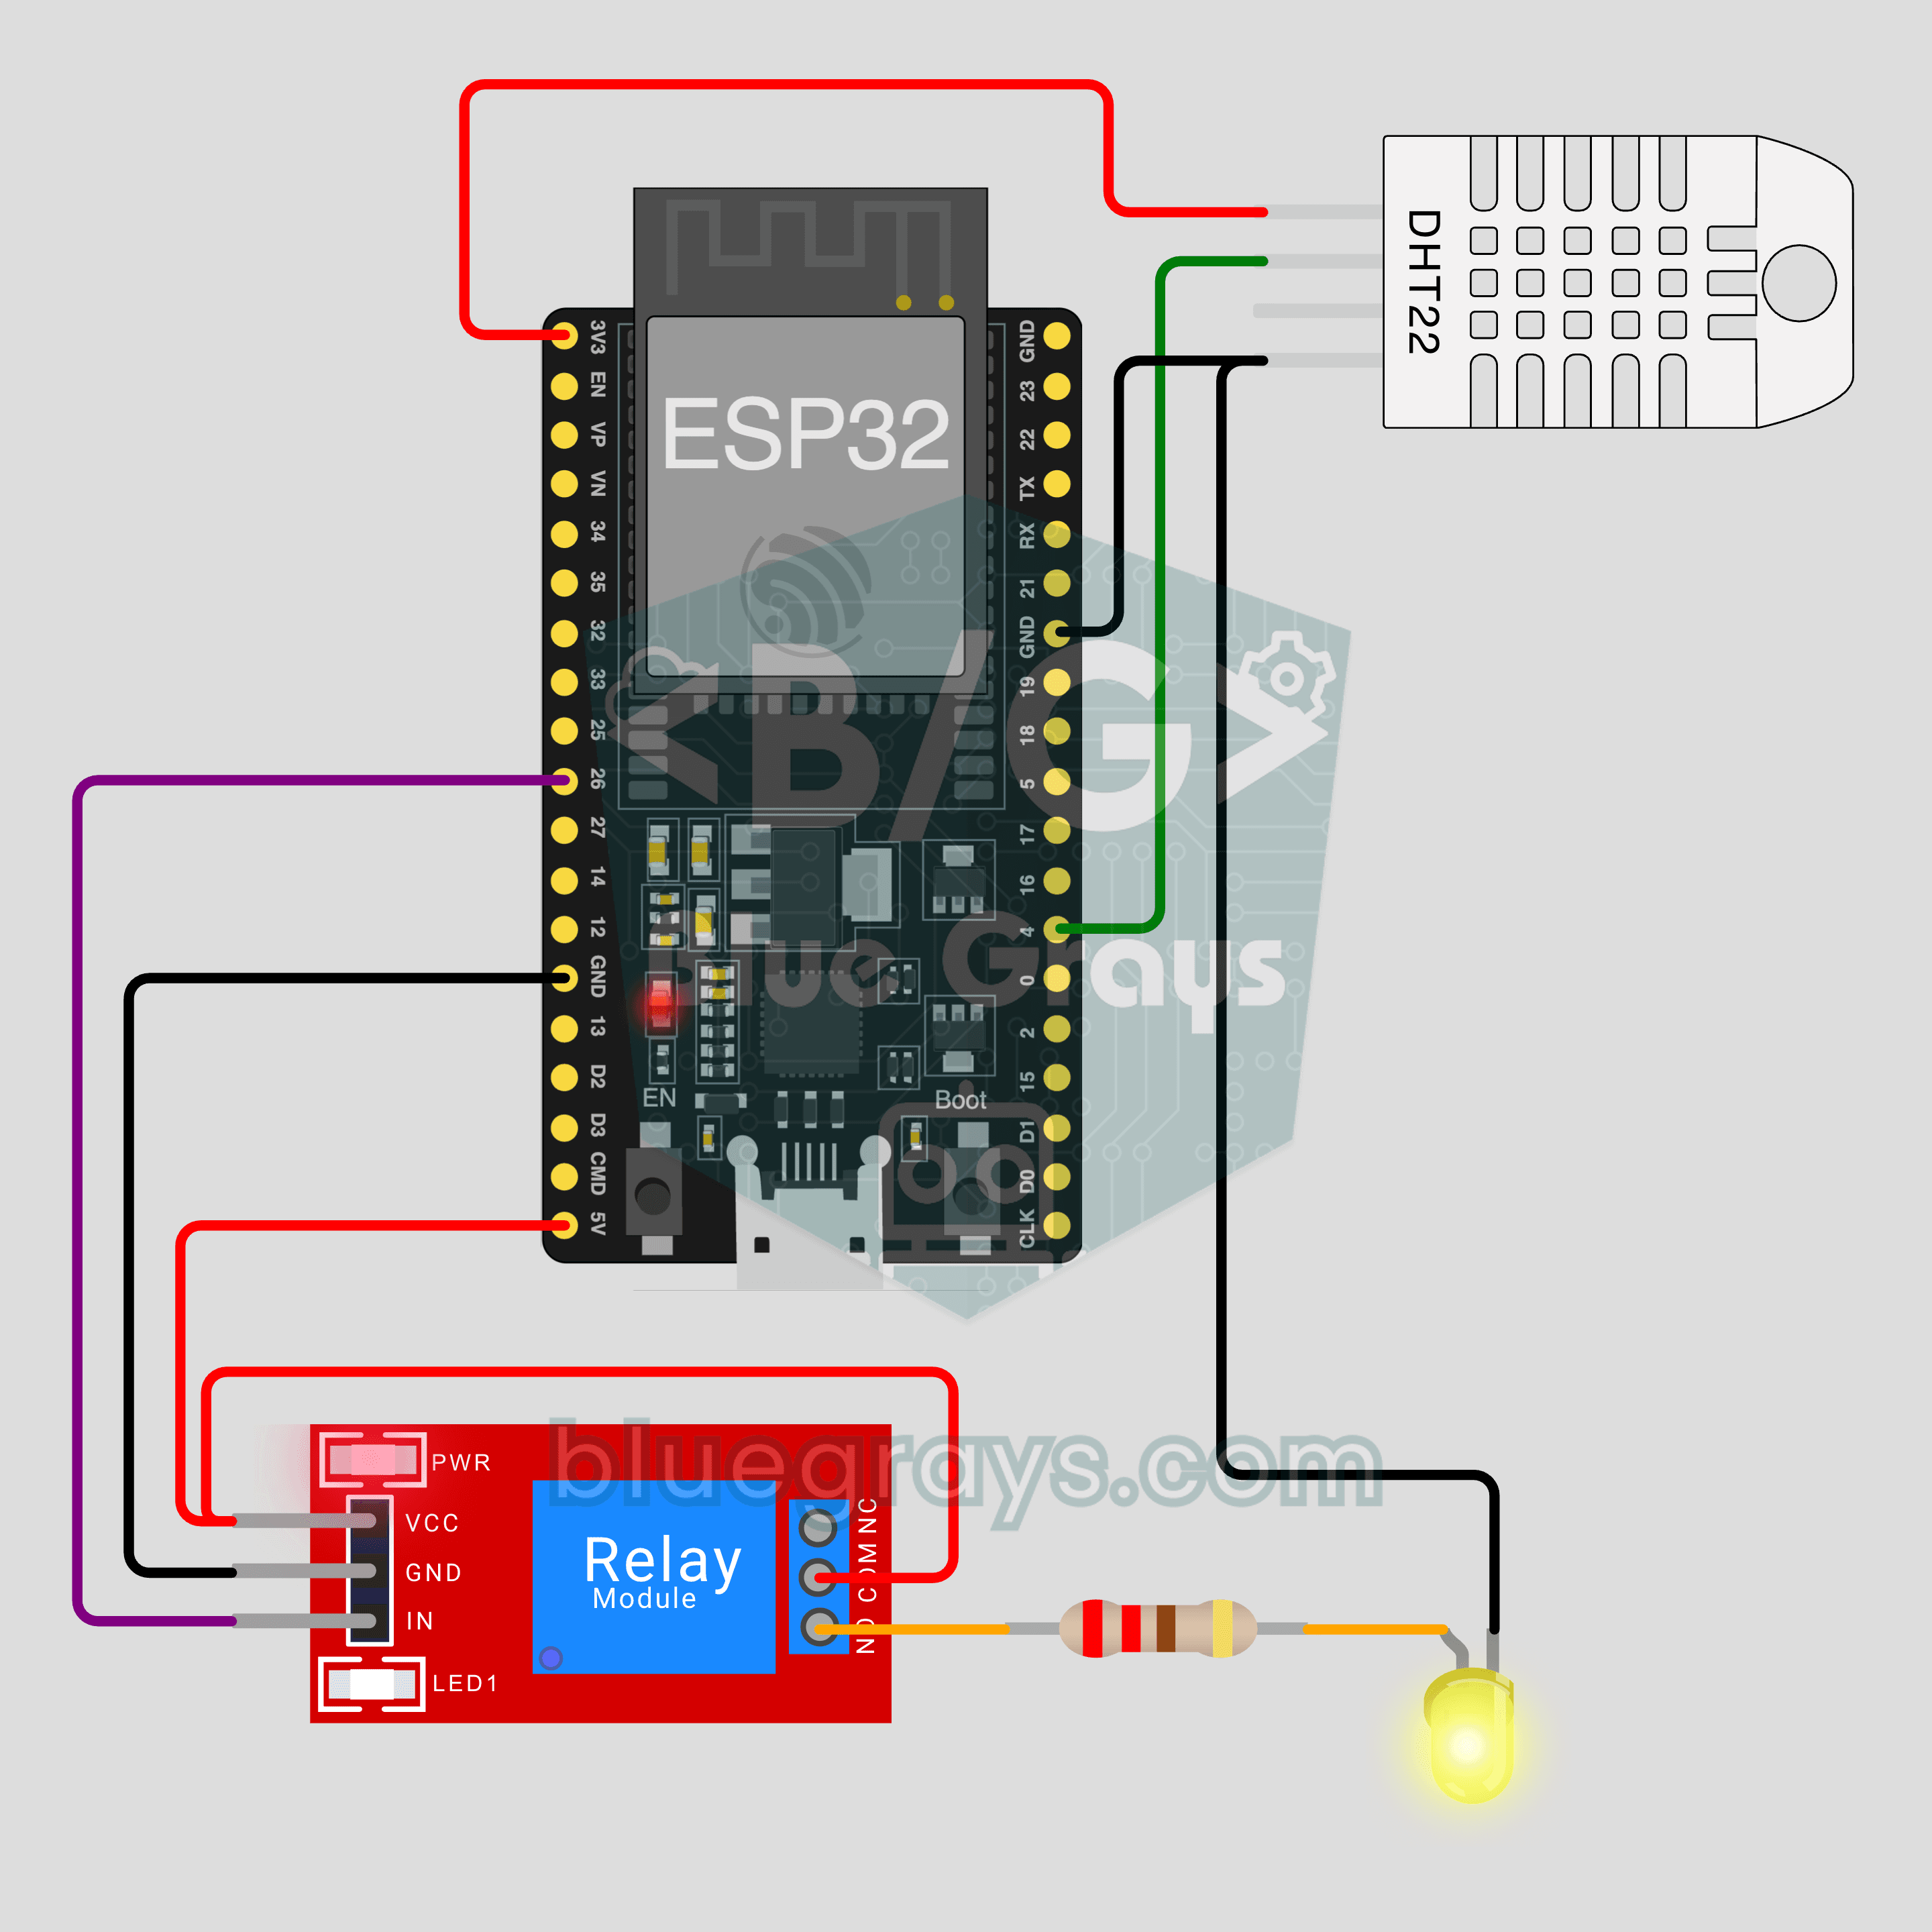
Circuit Diagram
Source Code
1// ─────────────────────────────────────────
2//   BlueGrays · bluegrays.com
3//   ESP32 IoT Room Station (Relay + DHT22)
4// ─────────────────────────────────────────
5// The "Room station" IoT template from the BlueGrays app: switch a lamp
6// from your phone with a relay while the DHT22 sends the room temperature
7// and humidity to the app every 2 seconds. Ohmi prepares the real code in
8// the app with your own device key (Workshop › Devices › Add a device);
9// the code here is an example, the device key and Wi-Fi details are
10// placeholders. Library Manager: BlueGraysIoT (with its dependencies). The
11// board only joins 2.4 GHz Wi-Fi networks. The relay switches on LOW. Only
12// wire a mains lamp with someone experienced; try with an LED first.
13//
14// Pins:
15//   GPIO26 -> Relay module IN
16//   5V, GND -> Relay module VCC, GND
17//   Relay COM -> 5V, NO -> 220 ohm -> LED anode, LED cathode -> GND
18//   GPIO4 -> DHT22 OUT (data)
19//   3V3, GND -> DHT22 VCC, GND
20//   Pico W: relay IN GP15, DHT22 OUT GP16
21
22/*
23 * Room station · BlueGrays IoT
24 * BlueGrays · bluegrays.com
25 * Do not share this code: it contains your device key and Wi-Fi password.
26 */
27
28#include <BlueGraysIoT.h>
29#include <DHT.h>
30
31const char *DEVICE_KEY = "YOUR_DEVICE_KEY";
32const char *WIFI_NAME = "YOUR_WIFI_NAME";
33const char *WIFI_PASSWORD = "YOUR_WIFI_PASSWORD";
34
35BlueGraysIoT bg(DEVICE_KEY);
36
37const int RELAY_PIN = 26;
38const bool RELAY_ACTIVE_LOW = true;  // most relay modules switch on LOW
39void setRelay(bool on) { digitalWrite(RELAY_PIN, (on != RELAY_ACTIVE_LOW) ? HIGH : LOW); }
40DHT dht(4, DHT22);
41unsigned long lastReadMs = 0;
42
43void setup() {
44  Serial.begin(115200);
45  pinMode(RELAY_PIN, OUTPUT);
46  setRelay(false);
47  bg.onSwitch("lamba", setRelay);
48  dht.begin();
49  bg.setDeadband("sicaklik", 0.1);
50  bg.setDeadband("nem", 1.0);
51  bg.setDebug(Serial);
52  bg.setLanguage(BG_LANG_EN);
53  bg.begin(WIFI_NAME, WIFI_PASSWORD);
54}
55
56void loop() {
57  bg.loop();  // avoid long delay() calls here
58  if (millis() - lastReadMs >= 2000) {
59    lastReadMs = millis();
60    bg.send("sicaklik", dht.readTemperature());
61    bg.send("nem", dht.readHumidity());
62  }
63}
64FAQ
Can I upload the code on this page straight to my board?
You can, but it will not connect: the device key and Wi-Fi details in it are placeholders. In the app go to Workshop › Devices › Add a device and pick Room station; Ohmi prepares the code with your key, network name and password. Copy that code and upload it. You can see the full code later in Device › Code and key.
Does it work with a Pico W?
Yes. Pick Pico W as the board when you add the device; the code stays the same and only the pins change: the relay goes to GP15 and the DHT22 to GP16. In Arduino IDE install the "pico" package from Boards Manager. The circuit and photo on this page were made with an ESP32.
Can I connect a real mains lamp?
Mains voltage (230 V or 120 V) can kill and start fires. Try with an LED first, as shown on this page. If you move to a real lamp, do it with someone who knows electrics: the plug is out of the socket, only the live wire goes through the relay's COM and NO terminals, no bare wire is left exposed, the circuit sits in a closed box and the lamp's power stays under the limit printed on the module.
Are my Wi-Fi password and device key safe?
Your Wi-Fi password stays on your phone and is never sent to our server; it is added to the code on the phone. The device key only travels in the header of the secure connection and is never printed to the serial monitor. Both are still inside the code, so do not share the code you copy from the app. If someone saw your key, get a new one with Renew key and upload the new code.