
Pico W IoT Temperature and Humidity (DHT22)
Watch your room's temperature and humidity live on your phone wherever you are. This project is the step-by-step guide to the Temperature and humidity IoT template in the app, built with a Raspberry Pi Pico W and a DHT22. Go to Workshop › Devices › Add a device, pick Pico W as the board and Temperature and humidity as the template; Ohmi prepares the code with your own device key. The code on this page is an example: the key and Wi-Fi details are placeholders.
Control this device from the app
Connect your ESP32 or Raspberry Pi Pico W to Wi-Fi, then switch it on and off and watch live readings from your phone. Ohmi prepares the code; you just enter your Wi-Fi details and upload it.
Template in the app: Temperature and humidity
- Where is it in the app?Add a new device from the Tools tab or Workshop › Devices and pick this template.
- Arduino libraryOpen the Library Manager in the Arduino IDE, search for BlueGraysIoT and install it.
The free plan includes 1 device, 1 chart and 24 hours of history. Premium adds more devices, more charts and longer history.
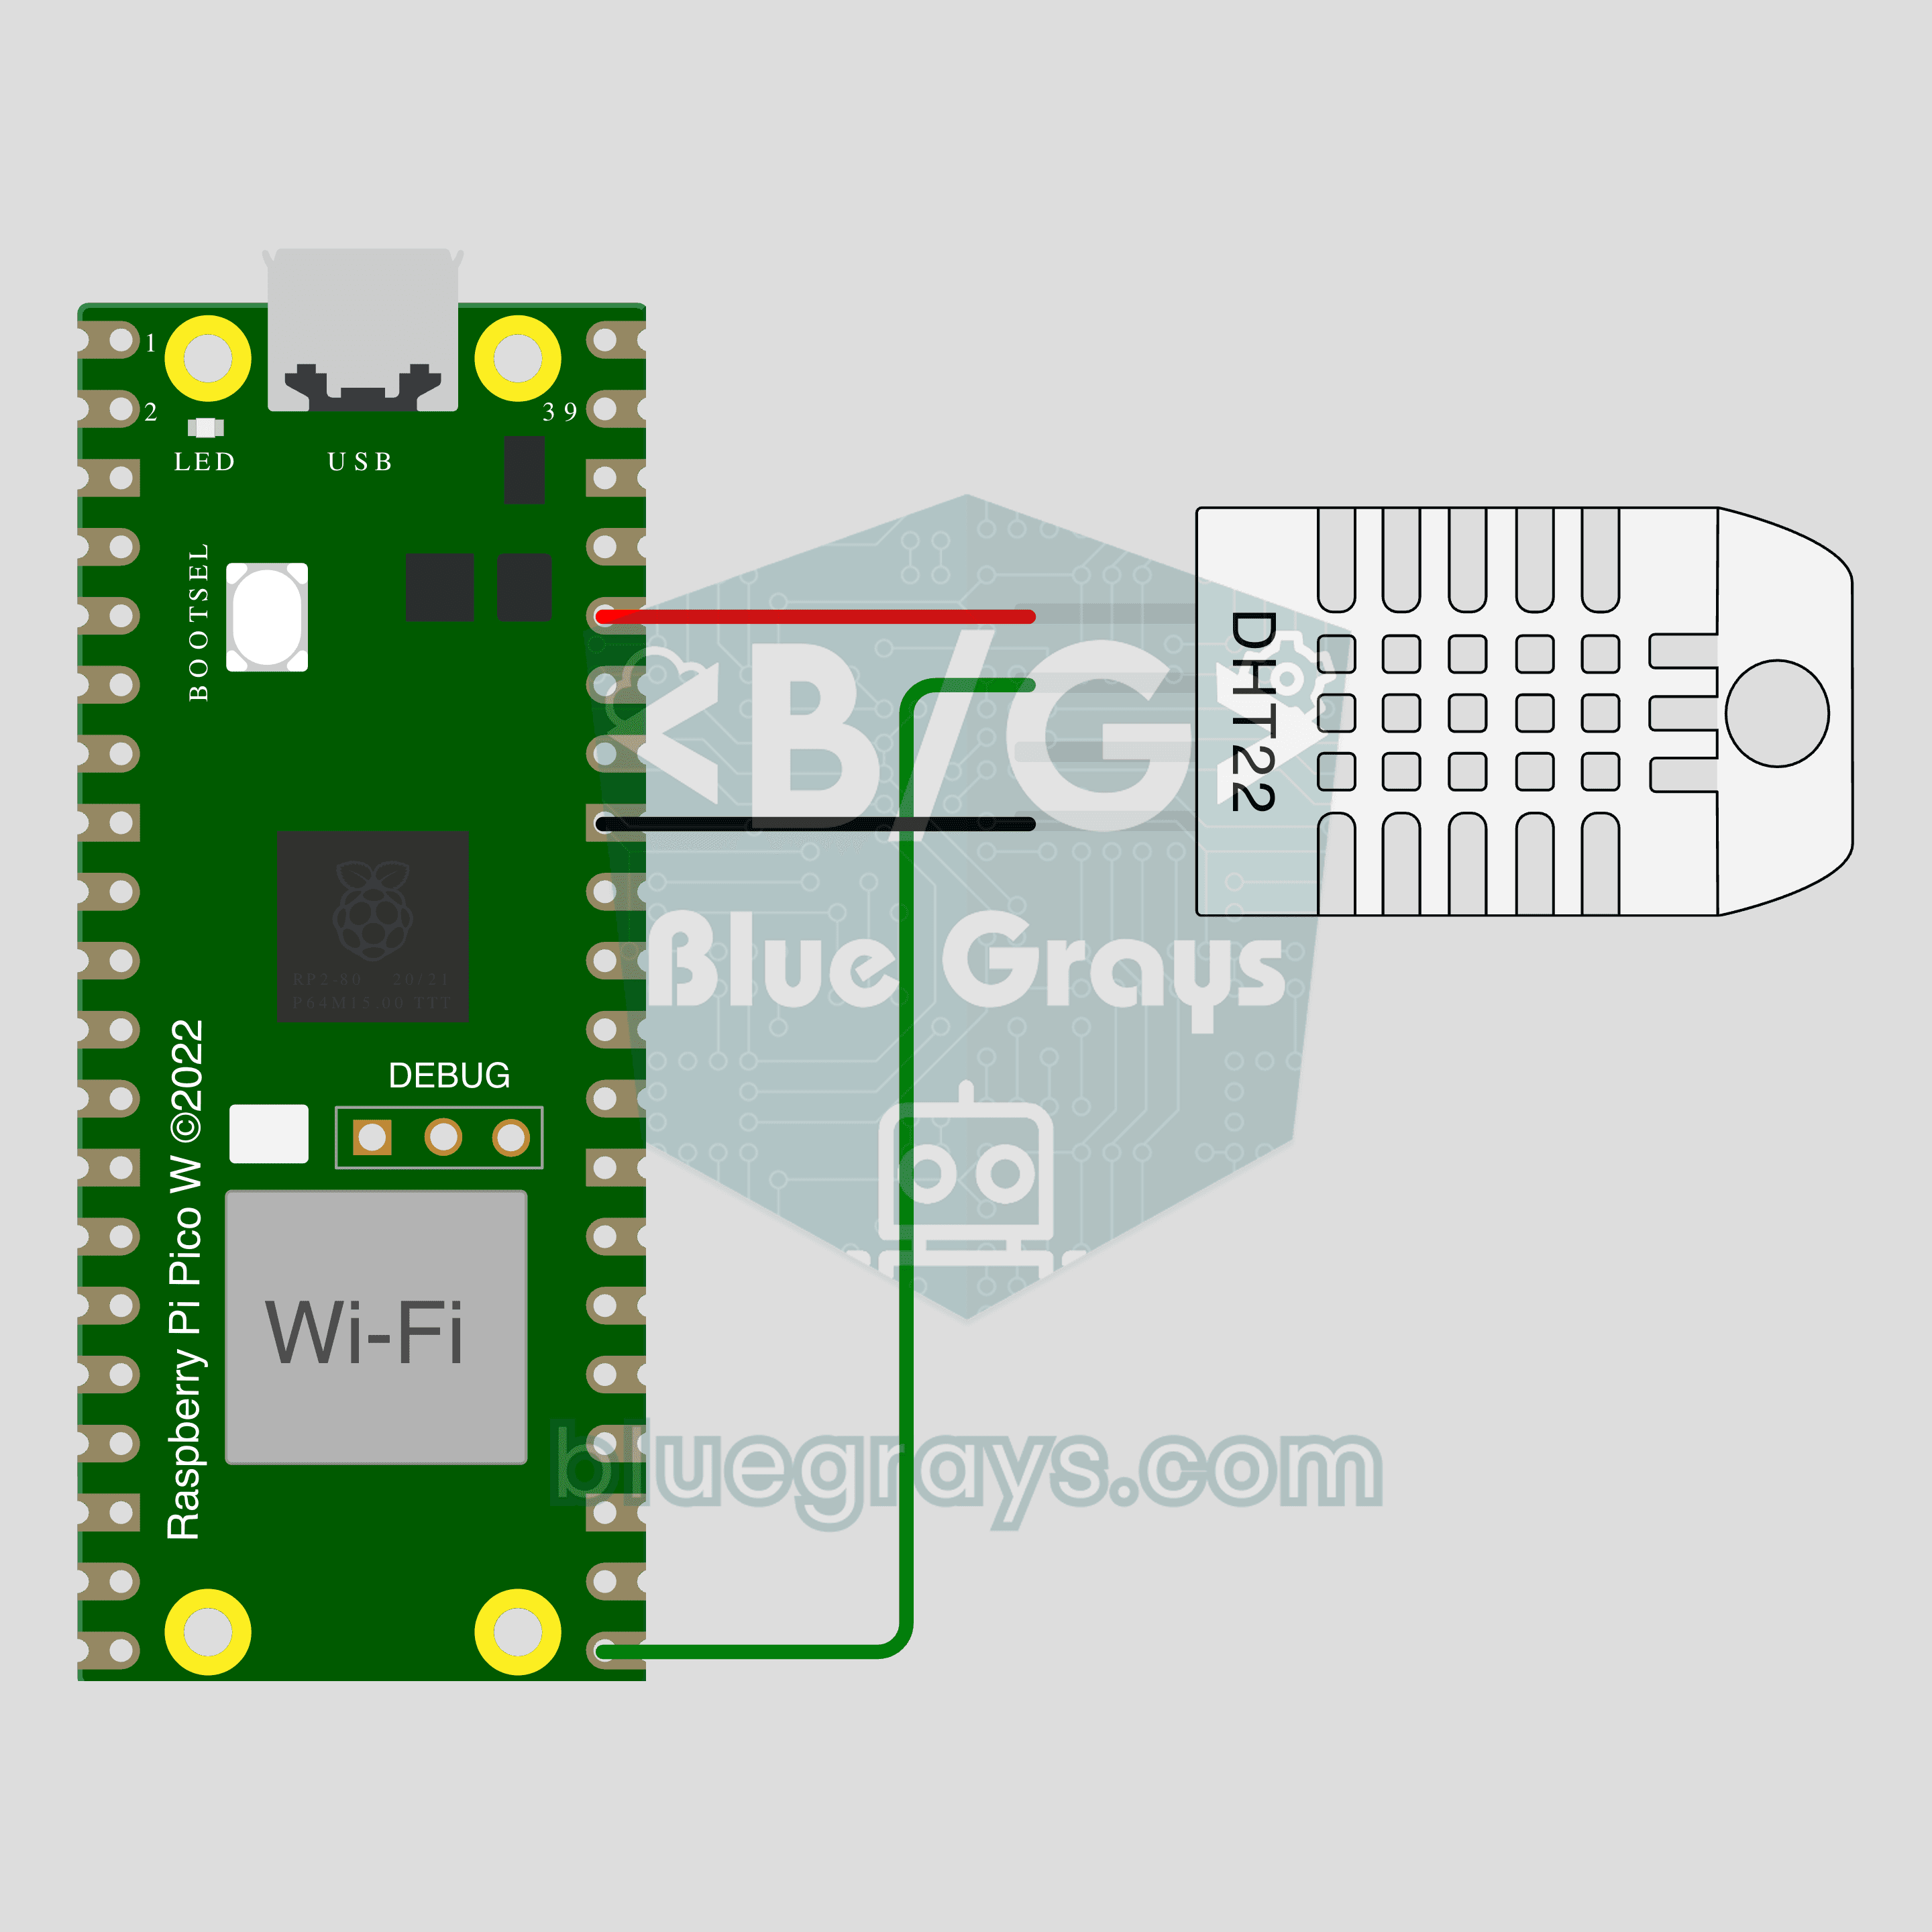
Circuit Diagram
Source Code
1// ─────────────────────────────────────────
2//   BlueGrays · bluegrays.com
3//   Pico W IoT Temperature and Humidity (DHT22)
4// ─────────────────────────────────────────
5// The "Temperature and humidity" IoT template from the BlueGrays app: the
6// DHT22 sends the room temperature and humidity to the app every 2
7// seconds, and the values build up in a chart. Ohmi prepares the real code
8// in the app with your own device key (Workshop › Devices › Add a device);
9// the code here is an example, the device key and Wi-Fi details are
10// placeholders. Board package: Raspberry Pi Pico (Earle Philhower).
11// Library Manager: BlueGraysIoT (with its dependencies). The board only
12// joins 2.4 GHz Wi-Fi networks.
13//
14// Pins:
15//   GP16 -> DHT22 OUT (data)
16//   3V3, GND -> DHT22 VCC, GND
17//   ESP32: DHT22 OUT GPIO4
18
19/*
20 * Temperature and humidity · BlueGrays IoT
21 * BlueGrays · bluegrays.com
22 * Do not share this code: it contains your device key and Wi-Fi password.
23 */
24
25#include <BlueGraysIoT.h>
26#include <DHT.h>
27
28const char *DEVICE_KEY = "YOUR_DEVICE_KEY";
29const char *WIFI_NAME = "YOUR_WIFI_NAME";
30const char *WIFI_PASSWORD = "YOUR_WIFI_PASSWORD";
31
32BlueGraysIoT bg(DEVICE_KEY);
33
34DHT dht(16, DHT22);
35unsigned long lastReadMs = 0;
36
37void setup() {
38  Serial.begin(115200);
39  dht.begin();
40  bg.setDeadband("sicaklik", 0.1);
41  bg.setDeadband("nem", 1.0);
42  bg.setDebug(Serial);
43  bg.setLanguage(BG_LANG_EN);
44  bg.begin(WIFI_NAME, WIFI_PASSWORD);
45}
46
47void loop() {
48  bg.loop();  // avoid long delay() calls here
49  if (millis() - lastReadMs >= 2000) {
50    lastReadMs = millis();
51    bg.send("sicaklik", dht.readTemperature());
52    bg.send("nem", dht.readHumidity());
53  }
54}
55FAQ
Can I upload the code on this page straight to my board?
You can, but it will not connect: the device key and Wi-Fi details in it are placeholders. In the app go to Workshop › Devices › Add a device, pick Pico W as the board and the Temperature and humidity template; Ohmi prepares the code with your key, network name and password. Copy that code and upload it. You can see the full code later in Device › Code and key.
How do I upload to the Pico W? Is it MicroPython?
This project runs on Arduino C++, not MicroPython. In Arduino IDE install the "pico" package (Raspberry Pi Pico/RP2040, Earle Philhower) from Boards Manager and pick Raspberry Pi Pico W under Tools › Board. If it is the board's first upload or no port shows up, hold the BOOTSEL button while plugging in the USB cable; Arduino IDE sees the board as a drive and uploads to it. Install BlueGraysIoT with its dependencies from Library Manager.
Does it work with an ESP32?
Yes. Pick ESP32 as the board when you add the device; the code stays the same and only the sensor pin changes: the DHT22's OUT goes to GPIO4, VCC to 3V3 and GND to GND. In Arduino IDE install the "esp32" package from Boards Manager. The circuit and photo on this page were made with a Pico W.
How much history do I see in the chart?
The values are stored on the server and show up in the app as a live value and a chart. How far back you can go depends on your plan; premium keeps a much longer history. The board reads every 2 seconds but only sends when the temperature changes by 0.1 °C or the humidity by 1 point, so the chart stays clean and the board does not keep the server busy for nothing.