
Block Coding If Statement: Arduino Button and LED with If/Else
Block coding if statement for an Arduino button and LED: reading pins, if/else, =, ≠, <, >, nested ifs, on/off toggle, debounce and an LDR night light.
The block coding if statement lets a program pick one of two paths based on a question: "Is the button pressed? If so, turn the LED on; if not, turn it off." In Arduino's C++ this structure is called if/else, and the "if … do … else" block in BlueGrays is its exact counterpart. In this post you'll use an Arduino button LED project to learn how to set a pin as an input and read it, then the if block, comparison operators, nested conditions and how to combine two conditions with "and", block by block and line by line.
So far our programs always did the same thing: the LED turned on, waited, turned off and waited again. They never listened to the outside world. Once conditions come in, the board makes decisions by looking at a button, a light sensor or a distance it measures, and that's where the real fun of robotics coding starts. Every example here comes from a free block project, so you can open its blocks and code on the block coding page or in the app and follow along.
Input and output: which way does a pin work?
Arduino's digital pins do one of two jobs. A pin set as an output drives 5 V (HIGH) or 0 V (LOW); that's how you drive an LED, a buzzer or a relay. A pin set as an input drives nothing and only listens to the voltage on it: on an Arduino Uno it reads anything above about 3 V as HIGH and anything below 1.5 V as LOW. In blocks you make this choice in the setup section: the "set pin 13 as INPUT" block becomes pinMode(13, INPUT); in C++, and "set pin 7 as OUTPUT" becomes pinMode(7, OUTPUT);. To read the pin you use the "read pin 13" block. It looks different from the others: it's not a command you stack, but a rounded value block that plugs into a slot inside another block. Its C++ counterpart is digitalRead(13), which returns HIGH or LOW. Because HIGH equals 1 and LOW equals 0 on Arduino, you can also store the result in a variable like a number. In short, command blocks do something, value blocks give a result, and the condition slot of the if block can only be filled with a result like that.
| Block | C++ equivalent | What it does |
|---|---|---|
| set pin 13 as INPUT | pinMode(13, INPUT); | Puts the pin in listening mode (once, in setup) |
| set pin 7 as OUTPUT | pinMode(7, OUTPUT); | Lets the pin drive a voltage |
| read pin 13 | digitalRead(13) | Returns HIGH (1) or LOW (0) |
| write HIGH to pin 7 | digitalWrite(7, HIGH); | Puts 5 V on the pin, the LED lights up |
| analog read A0 | analogRead(A0) | Returns a number from 0 to 1023 |
| if … do … else | if (…) { … } else { … } | Runs one of two paths depending on the condition |
Wiring: button on 13, LED on 7, pull-down resistor required
In the LED Control with a Push Button (Push) project the button is on D13 and the LED on D7. One leg of the button goes to 5V and the other to D13, and a 10 kΩ pull-down resistor sits between D13 and GND. When the button is released, the resistor pulls the pin to GND and it reads LOW. When you press it, 5V reaches the pin directly and it reads HIGH. Because the resistor is large, only about half a milliamp flows from 5V to GND while the button is pressed. The LED's long leg connects to D7 through a 220 Ω resistor and its short leg goes to GND.
| Part | Connects to | Arduino Uno pin |
|---|---|---|
| Button, leg 1 | Directly | 5V |
| Button, leg 2 (diagonal) | Directly | D13 |
| 10 kΩ resistor (pull-down) | Between D13 and GND | D13 – GND |
| LED long leg (anode) | Through a 220 Ω resistor | D7 |
| LED short leg (cathode) | Directly | GND |
The if block and if/else: light the LED while the button is pressed
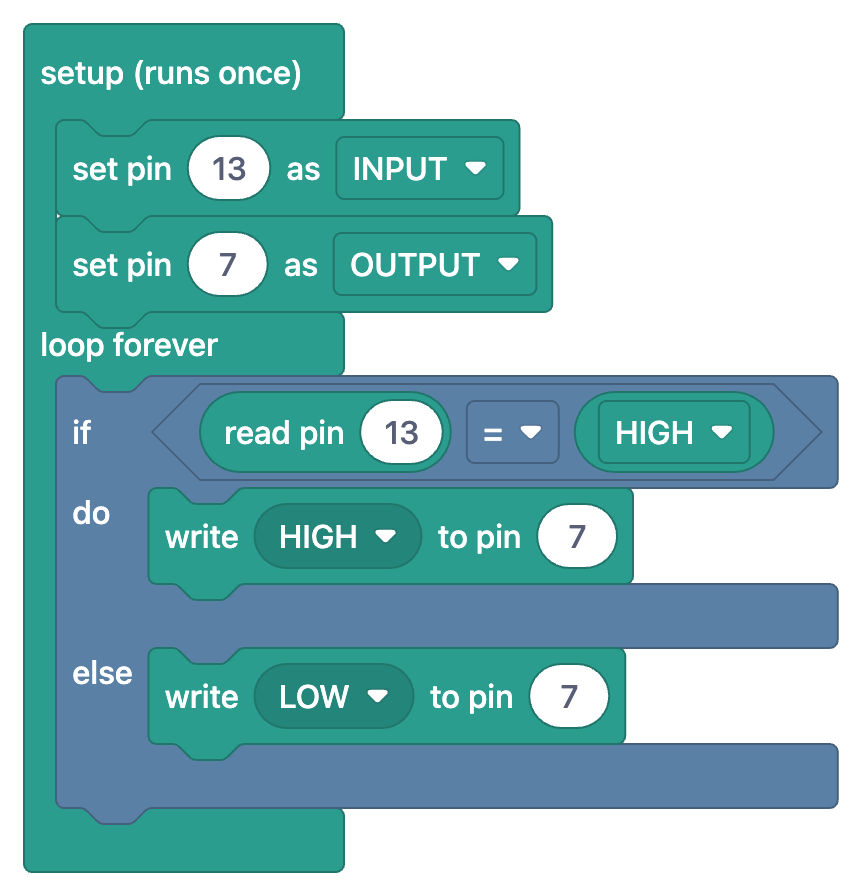
The block version of the project has two sections. In "setup (runs once)" pin 13 is set as INPUT and pin 7 as OUTPUT. In "loop forever" there's a single big block: if … do … else. Its hexagonal condition slot holds the comparison "read pin 13 = HIGH". If the condition is true, the "write HIGH to pin 7" block in the "do" branch runs; if it's false, the "write LOW to pin 7" block in the "else" branch runs.
1void setup() {
2  pinMode(13, INPUT);    // Buton girişi (harici pull-down) / Button input (external pull-down)
3  pinMode(7, OUTPUT);    // LED çıkışı / LED output
4}
5
6void loop() {
7  if (digitalRead(13) == HIGH) {   // Buton basılı mı? / Is the button pressed?
8    digitalWrite(7, HIGH);         // Basılı: LED yanar / Pressed: LED on
9  } else {
10    digitalWrite(7, LOW);          // Bırakıldı: LED söner / Released: LED off
11  }
12}
13
Put the code next to the blocks and the mapping is obvious. The word if matches "if", the condition digitalRead(13) == HIGH in parentheses matches the condition slot, the first pair of curly braces matches the "do" branch, and else with its braces matches the "else" branch. Every block you place in a branch becomes a line inside the matching braces in the code. Since loop() runs tens of thousands of times per second, the board reads the button over and over; the moment you lift your finger, the condition is false on the next pass and the LED goes off. That's why the project is called "Push": the LED stays on only while you hold the button. The "else" branch is optional; an if block with only a "do" branch becomes an if without an else. But if you remove the else branch here, the LED never turns off once it's lit, because no line is left to switch it off. Thinking about both branches for every condition is a good habit.
Comparison blocks: =, ≠, < and >
| Symbol in the block | C++ | Meaning | Example from the projects |
|---|---|---|---|
| = | == | equal to | digitalRead(13) == HIGH (Push button LED) |
| ≠ | != | not equal to | button != lastButton (On/Off button LED) |
| < | < | less than | value < 50 (LDR night light) |
| > | > | greater than | distance > minDistance (HC-SR04 distance) |
On/off with a button: nested ifs and a state variable
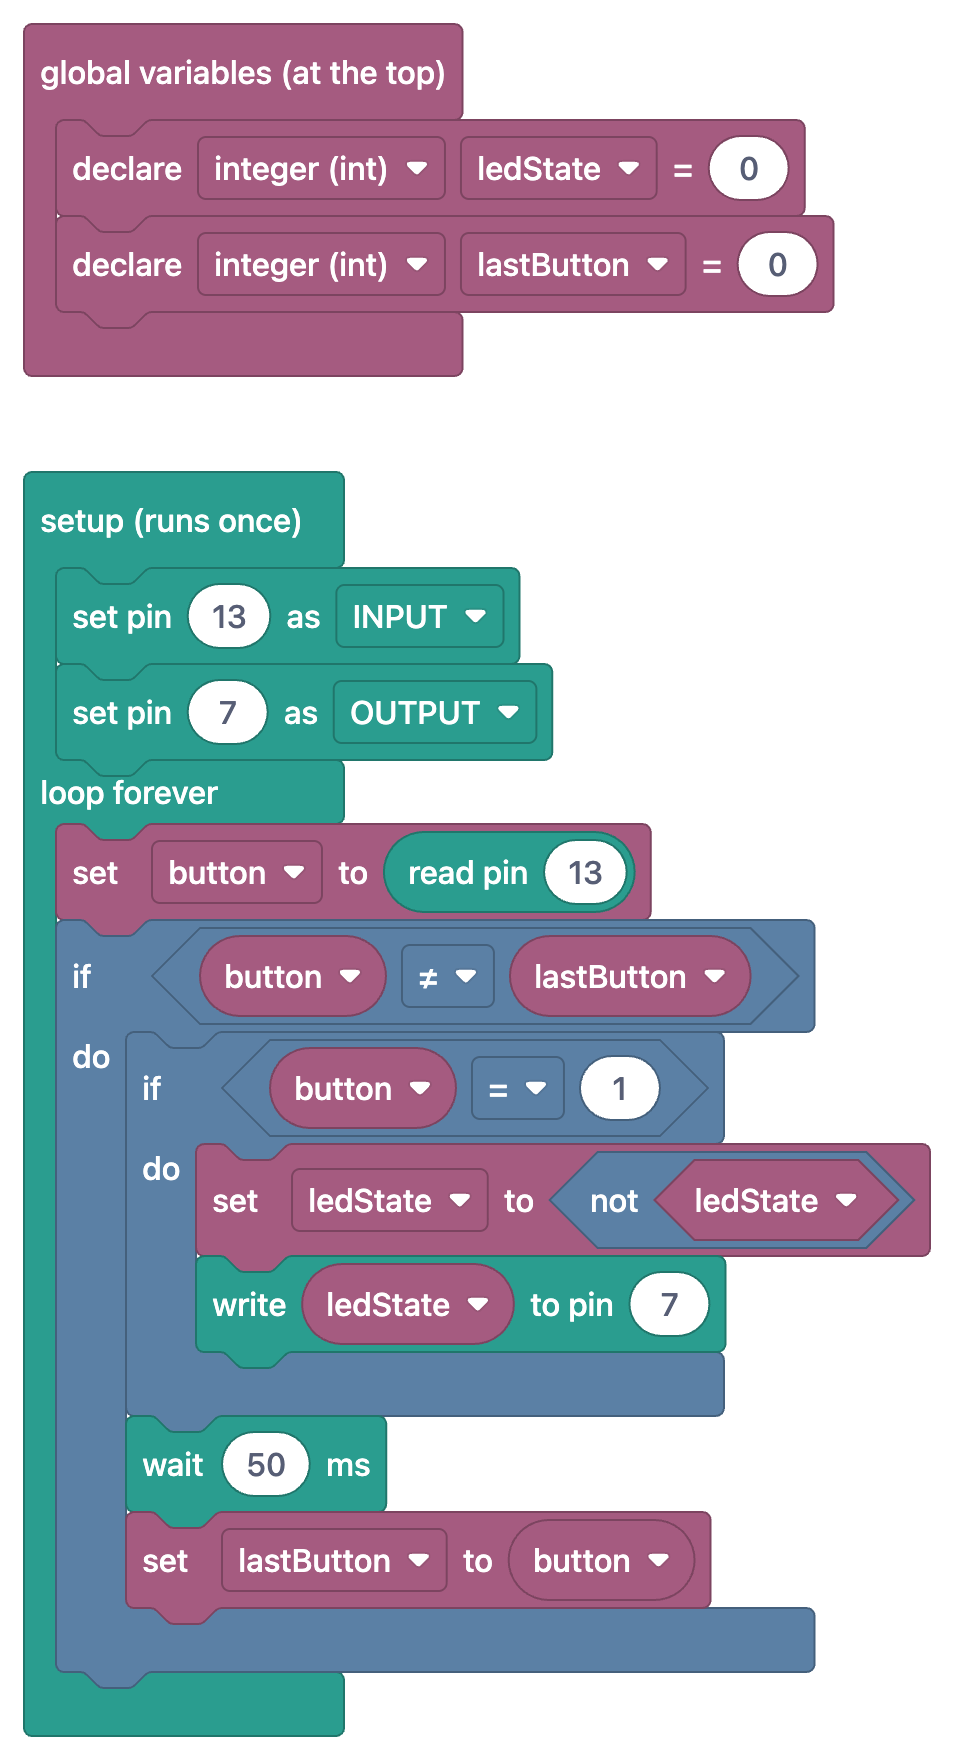
In the Push project the LED stayed on only while you held the button. If you want it to behave like a real light switch, "press once for on, press again for off", the program has to remember two things: whether the LED is on right now, and what the button read on the previous pass. The Toggle an LED with a Button (On/Off) project declares two integers for this in the "global variables (at the top)" section: ledState (0 = off, 1 = on) and lastButton (the previous reading). The circuit is the same as before: button on D13 with an external pull-down, LED on D7.
1int ledState = 0;     // LED durumu: 0 = sönük, 1 = yanık / LED state: 0 = off, 1 = on
2int lastButton = 0;   // Butonun önceki okuması / Previous button reading
3
4void setup() {
5  pinMode(13, INPUT);   // Buton girişi (harici pull-down) / Button input (external pull-down)
6  pinMode(7, OUTPUT);   // LED çıkışı / LED output
7}
8
9void loop() {
10  int button = digitalRead(13);   // Butonu oku / Read the button
11  if (button != lastButton) {     // Buton durumu değişti / Button state changed
12    if (button == 1) {            // Yalnız basış anında (LOW -> HIGH) / Only at the press (LOW -> HIGH)
13      ledState = !ledState;       // Durumu ters çevir / Flip the state
14      digitalWrite(7, ledState);
15    }
16    delay(50);                    // Sıçramayı atlamak için kısa bekleme / Short wait to skip the bounce
17    lastButton = button;          // Bu okumayı sakla / Store this reading
18  }
19}
20| Block | C++ line | Job |
|---|---|---|
| declare integer (int) ledState = 0 | int ledState = 0; | Stores the LED state |
| declare integer (int) lastButton = 0 | int lastButton = 0; | Stores the previous button reading |
| set button to read pin 13 | int button = digitalRead(13); | Reads the current button state |
| if button ≠ lastButton | if (button != lastButton) { | Goes in if the button state changed |
| if button = 1 | if (button == 1) { | Goes in if the change is a press (0 to 1) |
| set ledState to not ledState | ledState = !ledState; | Turns 0 into 1 and 1 into 0 |
| write ledState to pin 7 | digitalWrite(7, ledState); | Sets the LED to the new state |
| wait 50 ms | delay(50); | Skips the contact bounce |
| set lastButton to button | lastButton = button; | Saves this reading for the next pass |
The heart of the program is the pair of nested if blocks. The outer condition button ≠ lastButton is true only on the pass where the button state changes; during the thousands of passes while you hold the button or don't touch it, nothing happens. A change can go two ways: a press (0 to 1) or a release (1 to 0). The inner condition button = 1 picks only the press. So the LED changes once per press and not at all on release. In code, nested ifs show up as braces inside braces. In blocks, the inner if sits in the "do" branch of the outer one, so you can see at a glance which line depends on which condition.
The not ledState block is written !ledState in C++. The exclamation mark takes the logical opposite: the opposite of 0 is 1, and the opposite of any non-zero number is 0. Assigning ledState to its own opposite flips the state on every press. The next block, "write ledState to pin 7", is the line digitalWrite(7, ledState); since HIGH equals 1 and LOW equals 0, the variable's value can be written straight to the pin. Finally, lastButton gets this pass's reading so that the comparison on the next pass is correct. Forget this assignment and lastButton stays 0; while you hold the button, the outer condition is true on every pass and the LED blinks rapidly.
Analog condition: an LDR night light
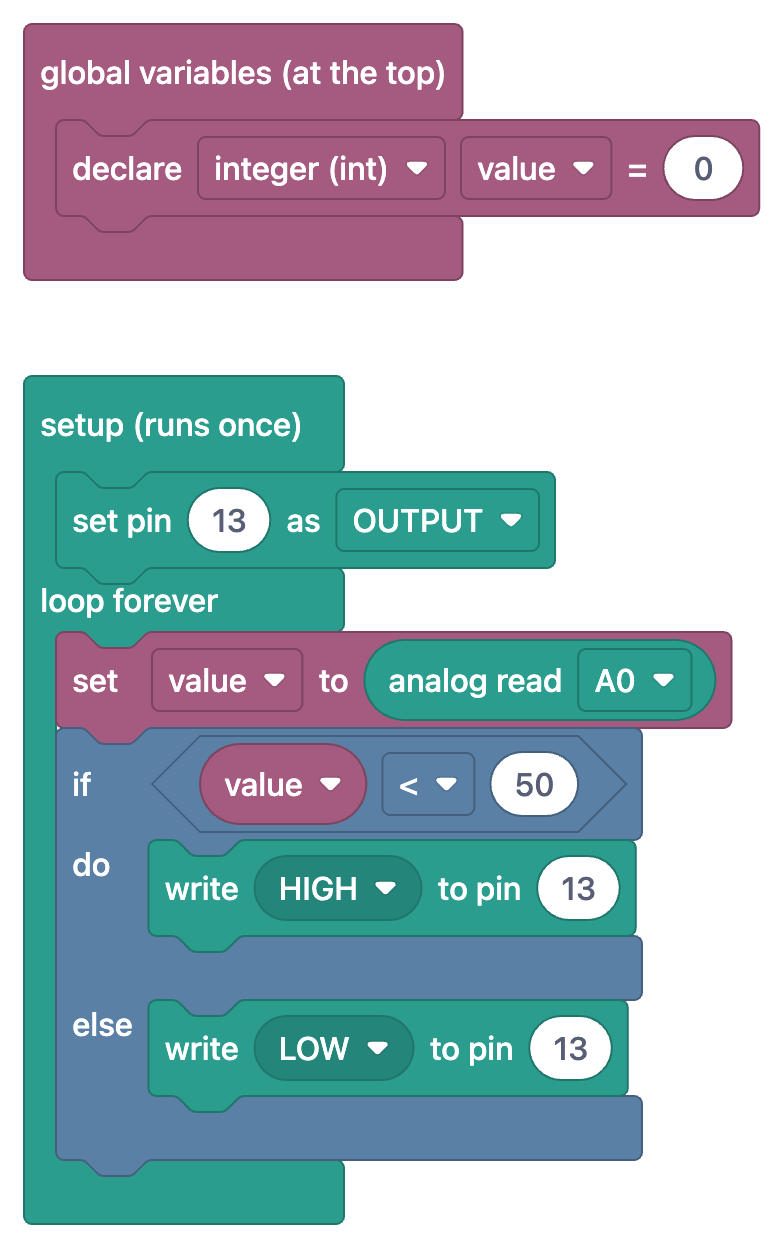
Conditions aren't only about HIGH and LOW. In the Night Light with Ldr project, the "set value to analog read A0" block turns the voltage on A0, where the LDR is connected, into a number between 0 and 1023; in C++ that's the line value = analogRead(A0);. The if block then checks value < 50. If the value is below 50, it counts as dark and the LED on D13 turns on; otherwise it turns off. The structure is the same as the Push project; only the comparison in the condition slot is different.
1int value;   // Işık okuması (0-1023) / Light reading (0-1023)
2
3void setup() {
4  pinMode(13, OUTPUT);   // LED çıkışı / LED output
5}
6
7void loop() {
8  value = analogRead(A0);   // Işık seviyesini oku / Read the light level
9
10  // Eşik 50: altı karanlık sayılır, hassasiyeti bu sayıyla ayarla
11  // Threshold 50: anything below counts as dark. Tune the sensitivity with this number
12  if (value < 50) {
13    digitalWrite(13, HIGH);   // Karanlık: LED yanar / Dark: LED on
14  } else {
15    digitalWrite(13, LOW);    // Aydınlık: LED söner / Bright: LED off
16  }
17}
18
Depending on your LDR and the resistor in the circuit, a threshold of 50 may be too low or too high for your room. To find the right number, first use the Measuring Light Intensity with an LDR project to watch the bright and dark values in the Serial Monitor, then set the threshold between them. If the value hovers right around the threshold the LED can flicker; using two separate thresholds for on and off is a neat fix. You'll find how an LDR works in the LDR light sensor post.
Combining conditions: the and block and &&
Sometimes one condition isn't enough. In the HC-SR04 Distance Measurement (Serial Display) project, the measured distance is printed to the Serial Monitor only if it's between 3 cm and 100 cm. In blocks, two comparisons are joined side by side with an and block: "distance > minDistance and distance < maxDistance". In C++ that line becomes if (distance > minDistance && distance < maxDistance). The && operator makes the result true only if both sides are true; if even one is false, the condition is false. That way meaningless values outside the sensor's range never reach the screen. In C++ "or" is written ||, and one true condition is enough. You can try the truth tables of AND, OR and NOT in the logic gates tool.
The same conditions on ESP32: internal pull-up and inverted logic
The ESP32 LED Control with Push Button (Push) project uses the same if block on an ESP32, with two differences. The LED is on GPIO 5, the button on GPIO 4, and the button pin uses the pull-up input option of the pin mode block. In C++ that's pinMode(BUTTON_PIN, INPUT_PULLUP);: a resistor inside the chip pulls the pin HIGH, so no external resistor is needed. This time the button goes to GND, so the pin reads LOW when pressed, and the condition becomes "read pin BUTTON_PIN = LOW". The ESP32 LED Control with Pushbutton (Toggle) project handles on/off with the elapsed-time block, millis(), instead of a 50 ms wait, and again joins two conditions with an and block. ESP32 pins run at 3.3 V; don't connect the button to 5 V.
Common mistakes and fixes
| Mistake | Symptom | Fix |
|---|---|---|
| No pull-down resistor | The LED flickers by itself and lights up when your hand gets close | Put 10 kΩ between D13 and GND, or use INPUT_PULLUP and invert the logic |
| Single equals in a condition: if (button = 1) | The LED is always on and ignores the button | Use == for comparisons |
| Semicolon at the end of the if line | The code in braces runs on every pass regardless of the condition | Delete the ; after if (…) |
| Using button legs on the same side | The pin always reads HIGH or always LOW | Use diagonal legs |
| lastButton not updated or no wait in the toggle | The LED blinks while held or ends up random | Add lastButton = button and the 50 ms wait |
| Treating HIGH as pressed with INPUT_PULLUP | The LED works backwards and lights when released | With the internal pull-up, LOW means pressed |
| LDR threshold doesn't suit the room | The LED never lights or stays on | Watch the value in the Serial Monitor and pick a new threshold |
Opening blocks and code side by side in the app
Every project in this post is one of the free block projects in the BlueGrays app. Turn on the Show as blocks switch in a project's code section and the code is replaced by the same program as blocks; tap the image to open it full screen. The Understand the blocks tab walks through the program step by step: each step shows only that step's blocks and what they do, so you can follow nested if blocks one at a time. The if/else and digitalRead examples in the Code guide are also shown as blocks. Blocks aren't uploaded to the board directly, and for now you can't build your own programs by arranging blocks; you always copy the project's real C++ code into the Arduino IDE and upload it. If you want to review what you've learned, Daily questions gives you 5 questions every day at levels from A1 to C2.
Now that you know conditions, the next step is handling repetition and counters: in the loops and variables part you'll see how "loop forever" relates to loop() and how the count block relates to a for loop. Until then, you can look at the circuit diagram and code of the push button LED, LDR night light and ESP32 button projects in the BlueGrays app, switch to the block view with Show as blocks and to the step-by-step explanation with Understand the blocks.
Frequently asked questions
What does the if block do in block coding?
The if block lets a program make a decision: if the condition is true, the blocks in the "do" branch run; if it's false, the ones in the "else" branch run. In Arduino projects it's usually used to check whether a button is pressed or whether a sensor value has crossed a threshold. Its C++ counterpart is the if/else statement.
What is the difference between if and else in Arduino?
if runs the code in its braces when the condition in parentheses is true. else is optional and holds the code that runs only when the condition is false. Without an else, nothing happens when the condition is false and the program moves on to the next line.
What is the difference between = and == in Arduino?
A single equals sign (=) assigns a value to a variable, while a double equals sign (==) compares two values. Writing if (x = 1) assigns 1 to x and makes the condition always true; the correct form is if (x == 1). In blocks, the "=" sign in a comparison block is translated to == in the code.
Why does my Arduino LED turn on without pressing the button?
Most likely the button pin is floating, meaning there's no pull-down or pull-up resistor. The pin then reads surrounding noise and randomly looks HIGH or LOW. Put a 10 kΩ resistor between the pin and GND, or use pinMode(pin, INPUT_PULLUP) and wire the button to GND.
How do I toggle an LED on and off with a button on Arduino?
Keep the LED state in one variable (ledState) and the previous button reading in another (lastButton). When the button state changes and the new state is pressed, flip the state with ledState = !ledState and write it to the LED with digitalWrite. Add a short wait, such as 50 ms, to skip contact bounce; the Toggle an LED with a Button (On/Off) project does exactly this.
Can I upload the BlueGrays blocks to my Arduino?
No, the blocks aren't uploaded to the board directly. They match the project's real code one to one and are there to help you understand the program. You always copy the project's C++ code into the Arduino IDE and upload it to the board.
Projects to build after reading this
See all projects
LED Control with a Push Button (Push)
Just like a doorbell: the light stays on as long as you press, and goes off when you let go. The Arduino keeps listening to the button; while it's pressed the LED is on, and the moment you lift your f

Toggle an LED with a Button (On/Off)
Press the button once and the light comes on, press it again and it goes off, just like the light switch in your room. The Arduino notices every press and flips the LED to the opposite state, waiting

Night Light with Ldr
A little night light that turns on by itself when it gets dark and goes off when morning comes. A light sensor measures how bright the room is, and the Arduino switches the LED on when it is dark enou

HC-SR04 Distance Measurement (Serial Display)
The HC-SR04 sensor works just like a bat finding its way in the dark: it sends out a sound you cannot hear, listens for the echo and measures how far away the object in front of it is. The Arduino wri

ESP32 LED Control with Push Button (Push)
The LED lights up when the button is pressed and turns off when released. Shows how the ESP32's digital input pin and internal pull-up resistor are used. The INPUT_PULLUP mode eliminates the need for an external resistor.

ESP32 LED Control with Pushbutton (Toggle)
Each time the button is pressed the state of the LED changes: if it is on it turns off, if it is off it turns on. Classic toggle pattern. With debounce we clean up the mechanical noise of the pushbutton to ensure a single toggle with a single press.

Measuring Light Intensity with an LDR
Want to see how bright your room is as a number? The LDR, a small part that reacts to light, measures the light around it, and the Arduino writes the value to your computer screen every half second. C

LED Blink
The very first hello of electronics: switching a single LED on and off. The Arduino turns the LED on and off at short intervals, so the light blinks quickly. You see in the simplest way how the board