
Block Coding Loops and Variables: Arduino for Loops and Arrays
Block coding loops and variables: loop forever vs loop(), the count block vs the Arduino for loop, arrays and counters, with LED chaser blocks and C++.
Block coding loops and variables are the two building blocks that turn a program from "do this once" into "keep doing this, and do it smartly". A loop runs the same blocks again and again, and a variable remembers a number while those repetitions happen. In the BlueGrays blocks they appear as "loop forever", "count with i", "global variables (at the top)" and "set … to"; in the Arduino code that goes onto the board, their counterparts are loop(), the for loop, an int variable and an assignment line.
In this part we read the blocks of four free projects side by side with their real C++ code: LED Chaser, which lights six LEDs one after another; LED Chaser with Adjustable Speed, which takes its speed from a potentiometer; Knight Rider LED Effect, which sends the light from one end to the other and back; and its potentiometer version, Knight Rider LED Effect with Adjustable Speed. All four use the same circuit: six LEDs on pins D2–D7 and a potentiometer on A0. At the end you'll write your own counter example and go through the three mistakes beginners make most often: counting one too many or one too few, running past the end of an array, and long waits that make buttons go blind.
The "loop forever" block and loop(): why does the board never stop?
A program on your computer closes when its job is done; a program on an Arduino doesn't. The board has no operating system and the processor has nothing else to do. That's why every block project has the same skeleton: whatever sits inside "setup (runs once)" runs a single time when the board powers up or the reset button is pressed, and whatever sits inside "loop forever" repeats from top to bottom without stopping. On the C++ side these are the setup() and loop() functions. When the last line of loop() finishes, the board jumps straight back to the first line; a short loop() with no waits in it can run tens of thousands of times per second. The only ways to stop the board are to cut its power or upload a new program. This endless repetition isn't a flaw, it's the design: reading a button, watching a sensor and blinking an LED are all done again on every pass, so the board keeps reacting to changes around it.
| Block | C++ counterpart | When does it run? |
|---|---|---|
| global variables (at the top) | the lines above setup() | Once when the program starts; the variables stay in memory |
| setup (runs once) | void setup() { ... } | Once at power-up or after a reset |
| loop forever | void loop() { ... } | After setup() ends, nonstop until the power is cut |
Variables in block coding: global variables and the declare block
A variable is a small box you put a number into and call by its name. In the blocks, variables are created inside the purple "global variables (at the top)" block. The "declare integer (int) potValue = 0" block inside it becomes the line int potValue in the code: int is the type, potValue is the name and 0 is the starting value. "At the top" matters: these lines sit at the very top of the file, outside setup() and loop(). A global variable declared this way can be seen from anywhere in the program and doesn't lose its value each time loop() starts over. On the Arduino Uno an int is 2 bytes and holds whole numbers from -32768 to 32767, more than enough for the 0–1023 range of analogRead() and for pin numbers. You may notice that the blocks of LED Chaser with Adjustable Speed say potValue = 0 while its code just says int potValue;. Both give the same result: in C++ a global variable without a starting value begins at zero.
The block that changes a variable later is "set … to". The "set potValue to analog read A0" block turns into potValue = analogRead(A0); in the code. The = sign here isn't equality as in maths; it means "work out the value on the right and put it in the box on the left". A comparison that asks whether two values are equal is written with == in C++, which we saw with the if block in the previous part of the series. When the set block runs, the old value in the box is wiped and the new one is written. Every block that reads the variable now uses that new value: "wait potValue ms" waits for however many milliseconds potValue holds at that moment.
The counting loop: the "count with i" block and the Arduino for loop
To repeat something a fixed number of times you use the green "count with i from 0 to 5 by 1" block. It creates a counter called i, sets it to 0, runs the blocks inside, then adds 1 to i and runs them again, and keeps going until i passes 5. Its Arduino counterpart is the line for (int i = 0; i < 6; i++). Inside the brackets there are three parts separated by semicolons: the start (int i = 0), the condition to keep going (i < 6) and the step done after every pass (i++, meaning add one to i). The most important thing to notice: the end value in the block is inclusive. "From 0 to 5" means 0, 1, 2, 3, 4 and 5, so the loop runs 6 times, not 5, and each of the six LEDs gets one pass. That's why the code says i < 6, which means the same as i <= 5. The pattern "start at zero, keep going while smaller than the number of items" is very common in Arduino code because the 6 tells you the LED count directly.
| Block setting | Equivalent C++ | Values of i | Passes |
|---|---|---|---|
| from 0 to 5 by 1 | for (int i = 0; i < 6; i++) | 0, 1, 2, 3, 4, 5 | 6 |
| from 0 to 5 by 2 | for (int i = 0; i <= 5; i += 2) | 0, 2, 4 | 3 |
| from 4 to 1 by 1 | for (int i = 4; i > 0; i--) | 4, 3, 2, 1 | 4 |
| from 1 to 6 by 1 | for (int i = 1; i <= 6; i++) | 1, 2, 3, 4, 5, 6 | 6 (but there is no ledPins[6]) |
The array block: "array 2 3 4 5 6 7" and ledPins[i]
Instead of declaring six separate variables for six LEDs, you can keep them all in one list. When the purple "array 2 3 4 5 6 7" block is plugged into "declare integer (int) ledPins = …", it becomes the line int ledPins[] = {2, 3, 4, 5, 6, 7}; in the code. The square brackets say it's an array and the curly braces hold its values. You reach an element by its position number, the index, and in C++ the index starts at 0: the first element is ledPins[0] and the last is ledPins[5]. In the blocks this is done by "item i of ledPins", which turns into ledPins[i]. Because the counting loop also starts at 0, the two fit perfectly: on every pass i gives the next index and ledPins[i] gives the pin number stored there. Another nice thing about arrays: to change the order of the LEDs you only swap the numbers in the list, without touching the loop. For more on arrays, see Arduino arrays.
| i (index) | ledPins[i] | LED that lights |
|---|---|---|
| 0 | 2 | LED 1 (D2) |
| 1 | 3 | LED 2 (D3) |
| 2 | 4 | LED 3 (D4) |
| 3 | 5 | LED 4 (D5) |
| 4 | 6 | LED 5 (D6) |
| 5 | 7 | LED 6 (D7) |
LED chaser: blocks and C++ line by line
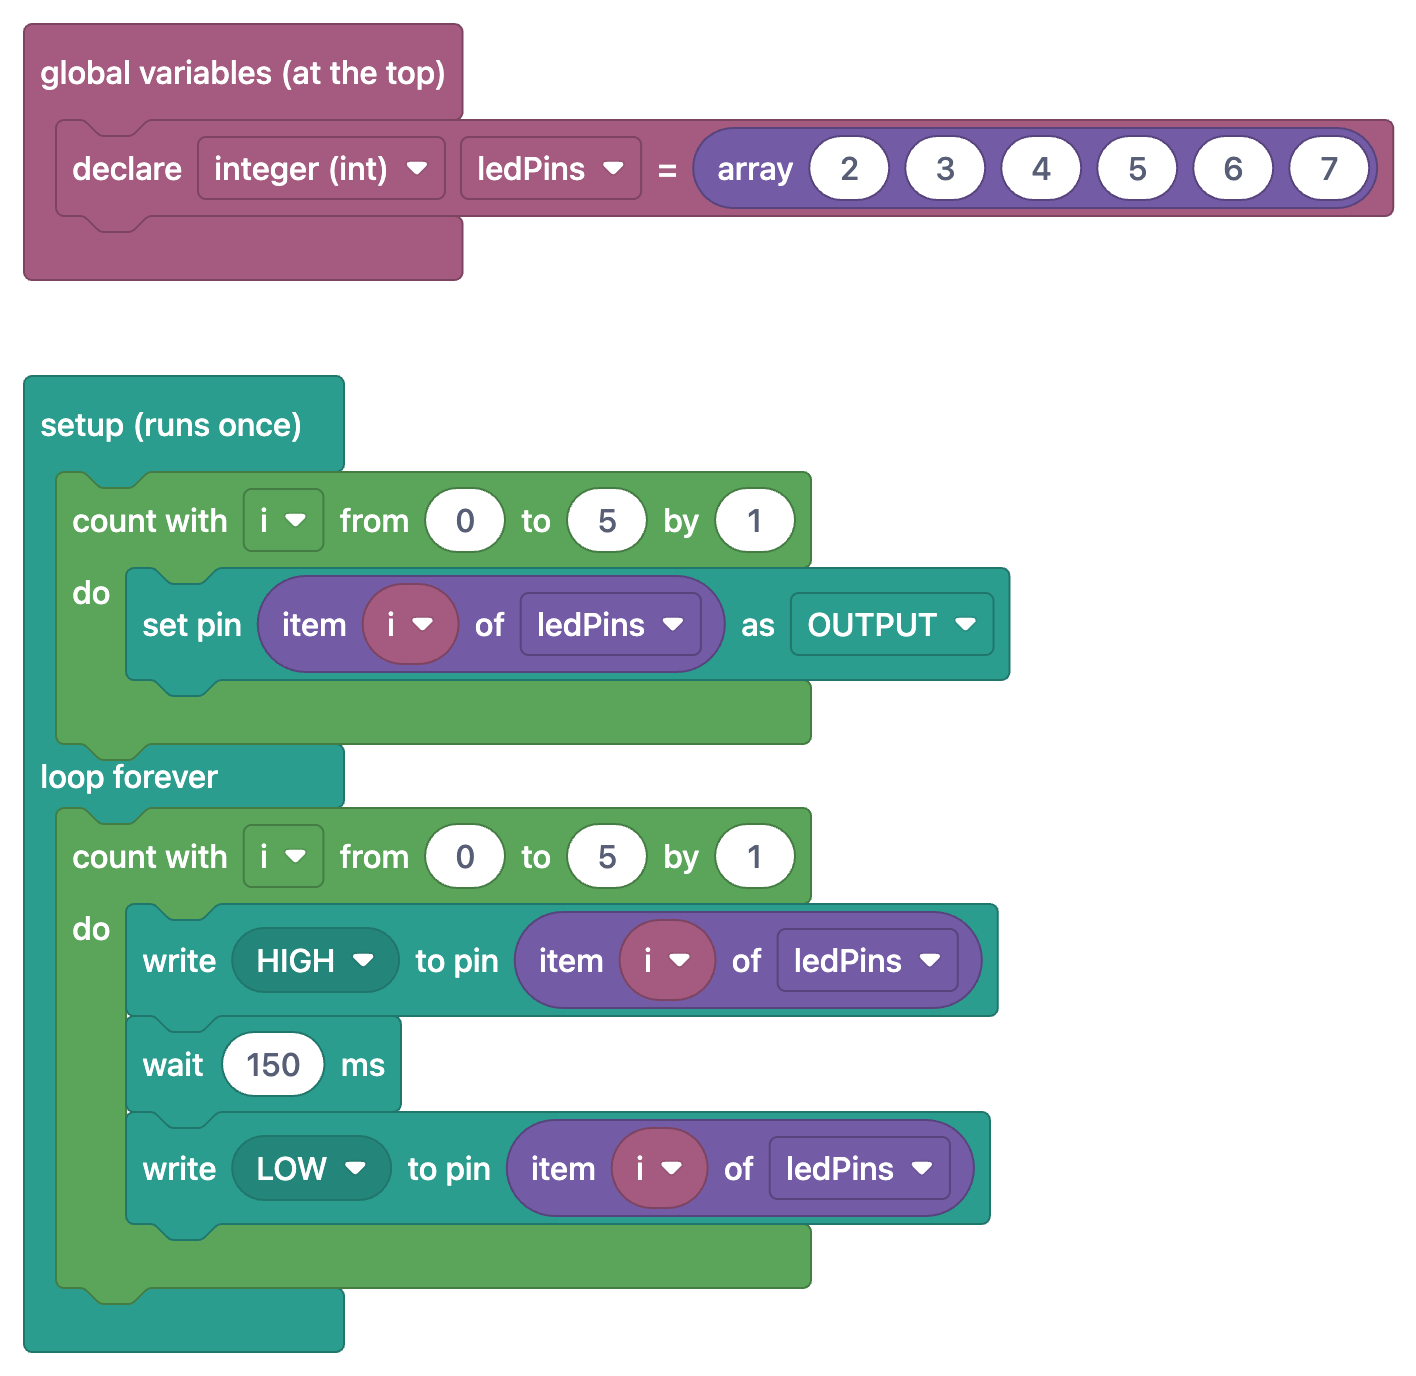
1int ledPins[] = {2, 3, 4, 5, 6, 7};   // LED pinleri, yanma sırasıyla / LED pins in lighting order
2
3void setup() {
4  // Tüm LED pinlerini çıkış yap / Set all LED pins as outputs
5  for(int i = 0; i < 6; i++) {
6    pinMode(ledPins[i], OUTPUT);
7  }
8}
9
10void loop() {
11  // Her LED'i sırayla 150 ms yak / Light each LED in turn for 150 ms
12  for(int i = 0; i < 6; i++) {
13    digitalWrite(ledPins[i], HIGH);
14    delay(150);
15    digitalWrite(ledPins[i], LOW);
16  }
17}| Block | C++ line | What it does |
|---|---|---|
| declare integer (int) ledPins = array 2 3 4 5 6 7 | int ledPins[] = {2, 3, 4, 5, 6, 7}; | Stores the six pin numbers in lighting order |
| setup (runs once) | void setup() { | Everything inside runs once at start-up |
| count with i from 0 to 5 by 1 | for(int i = 0; i < 6; i++) { | Counts i from 0 to 5: 6 passes |
| set pin item i of ledPins as OUTPUT | pinMode(ledPins[i], OUTPUT); | Makes the current pin an output |
| loop forever | void loop() { | Everything inside repeats nonstop |
| write HIGH to pin item i of ledPins | digitalWrite(ledPins[i], HIGH); | Turns the current LED on |
| wait 150 ms | delay(150); | The LED stays on for 150 ms |
| write LOW to pin item i of ledPins | digitalWrite(ledPins[i], LOW); | Turns the LED off; the loop moves to the next LED |
Think of the program as a timeline. When the board starts, the loop in setup makes the six pins outputs one by one from 0 to 5, and that never happens again. Then loop forever begins: the counting loop inside lights the LED on D2, waits 150 ms, turns it off, then does the same for D3, D4, D5, D6 and D7. One round takes 6 × 150 = 900 ms. When the last LED goes off, loop() ends, the board jumps straight back to the top and the light starts again at D2; since there's no gap between rounds, the light seems to flow without stopping. To change the speed you only change one number, the 150: write 50 and the light runs three times faster, write 500 and it strolls along. Making that fixed speed adjustable with a knob takes us to the next project.
LED chaser with adjustable speed: the potentiometer value becomes the wait time
1int ledPins[] = {2, 3, 4, 5, 6, 7};   // LED pinleri, yanma sırasıyla / LED pins in lighting order
2int potValue;                         // Pot değeri = bekleme (ms) / Pot value = delay (ms)
3
4void setup() {
5  // Tüm LED pinlerini çıkış yap / Set all LED pins as outputs
6  for(int i = 0; i < 6; i++) {
7    pinMode(ledPins[i], OUTPUT);
8  }
9}
10
11void loop() {
12  for(int i = 0; i < 6; i++) {
13    potValue = analogRead(A0);        // Hızı oku (0-1023) / Read the speed (0-1023)
14    digitalWrite(ledPins[i], HIGH);
15    delay(potValue);                  // Pot değeri kadar ms bekle / Wait as many ms as the pot value
16    digitalWrite(ledPins[i], LOW);
17  }
18}
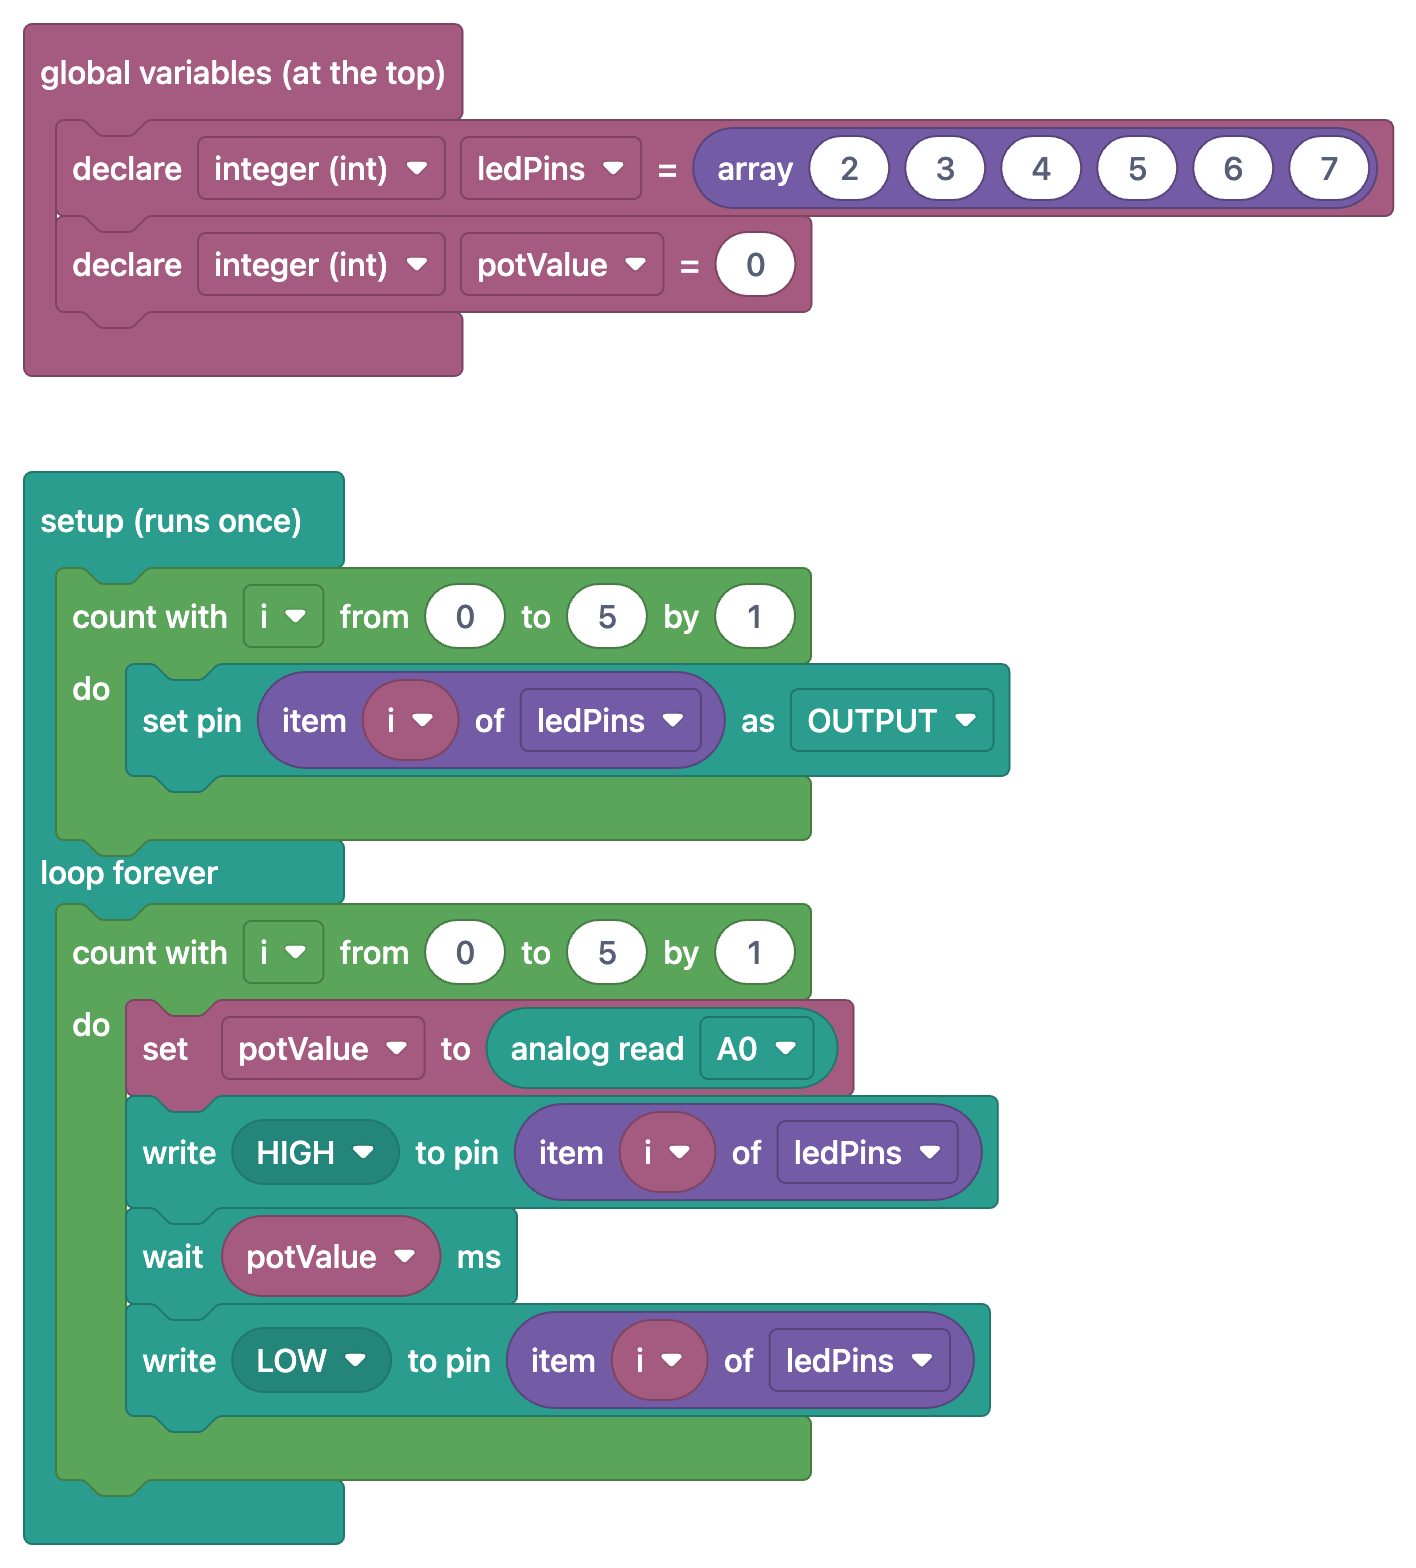
The only difference from the LED chaser is two new blocks. "declare integer (int) potValue = 0" has been added to the global variables, and the counting loop starts with a "set potValue to analog read A0" block. analogRead(A0) turns the voltage on the potentiometer's middle pin into a number from 0 to 1023; that number goes straight into "wait potValue ms", in other words the line delay(potValue). Turn the knob to one end and each LED stays on for about a second (1023 ms), so one round takes around 6 seconds; turn it to the other end and the wait drops to 0, and the LEDs switch so fast that they all seem to glow dimly at the same time. Reading the pot inside the loop, before every LED, is a deliberate choice: the next LED uses the new speed the moment you turn the knob, so you don't wait for the round to finish. You can find out how a potentiometer works in what is a potentiometer.
Knight Rider: two loops counting forward and back
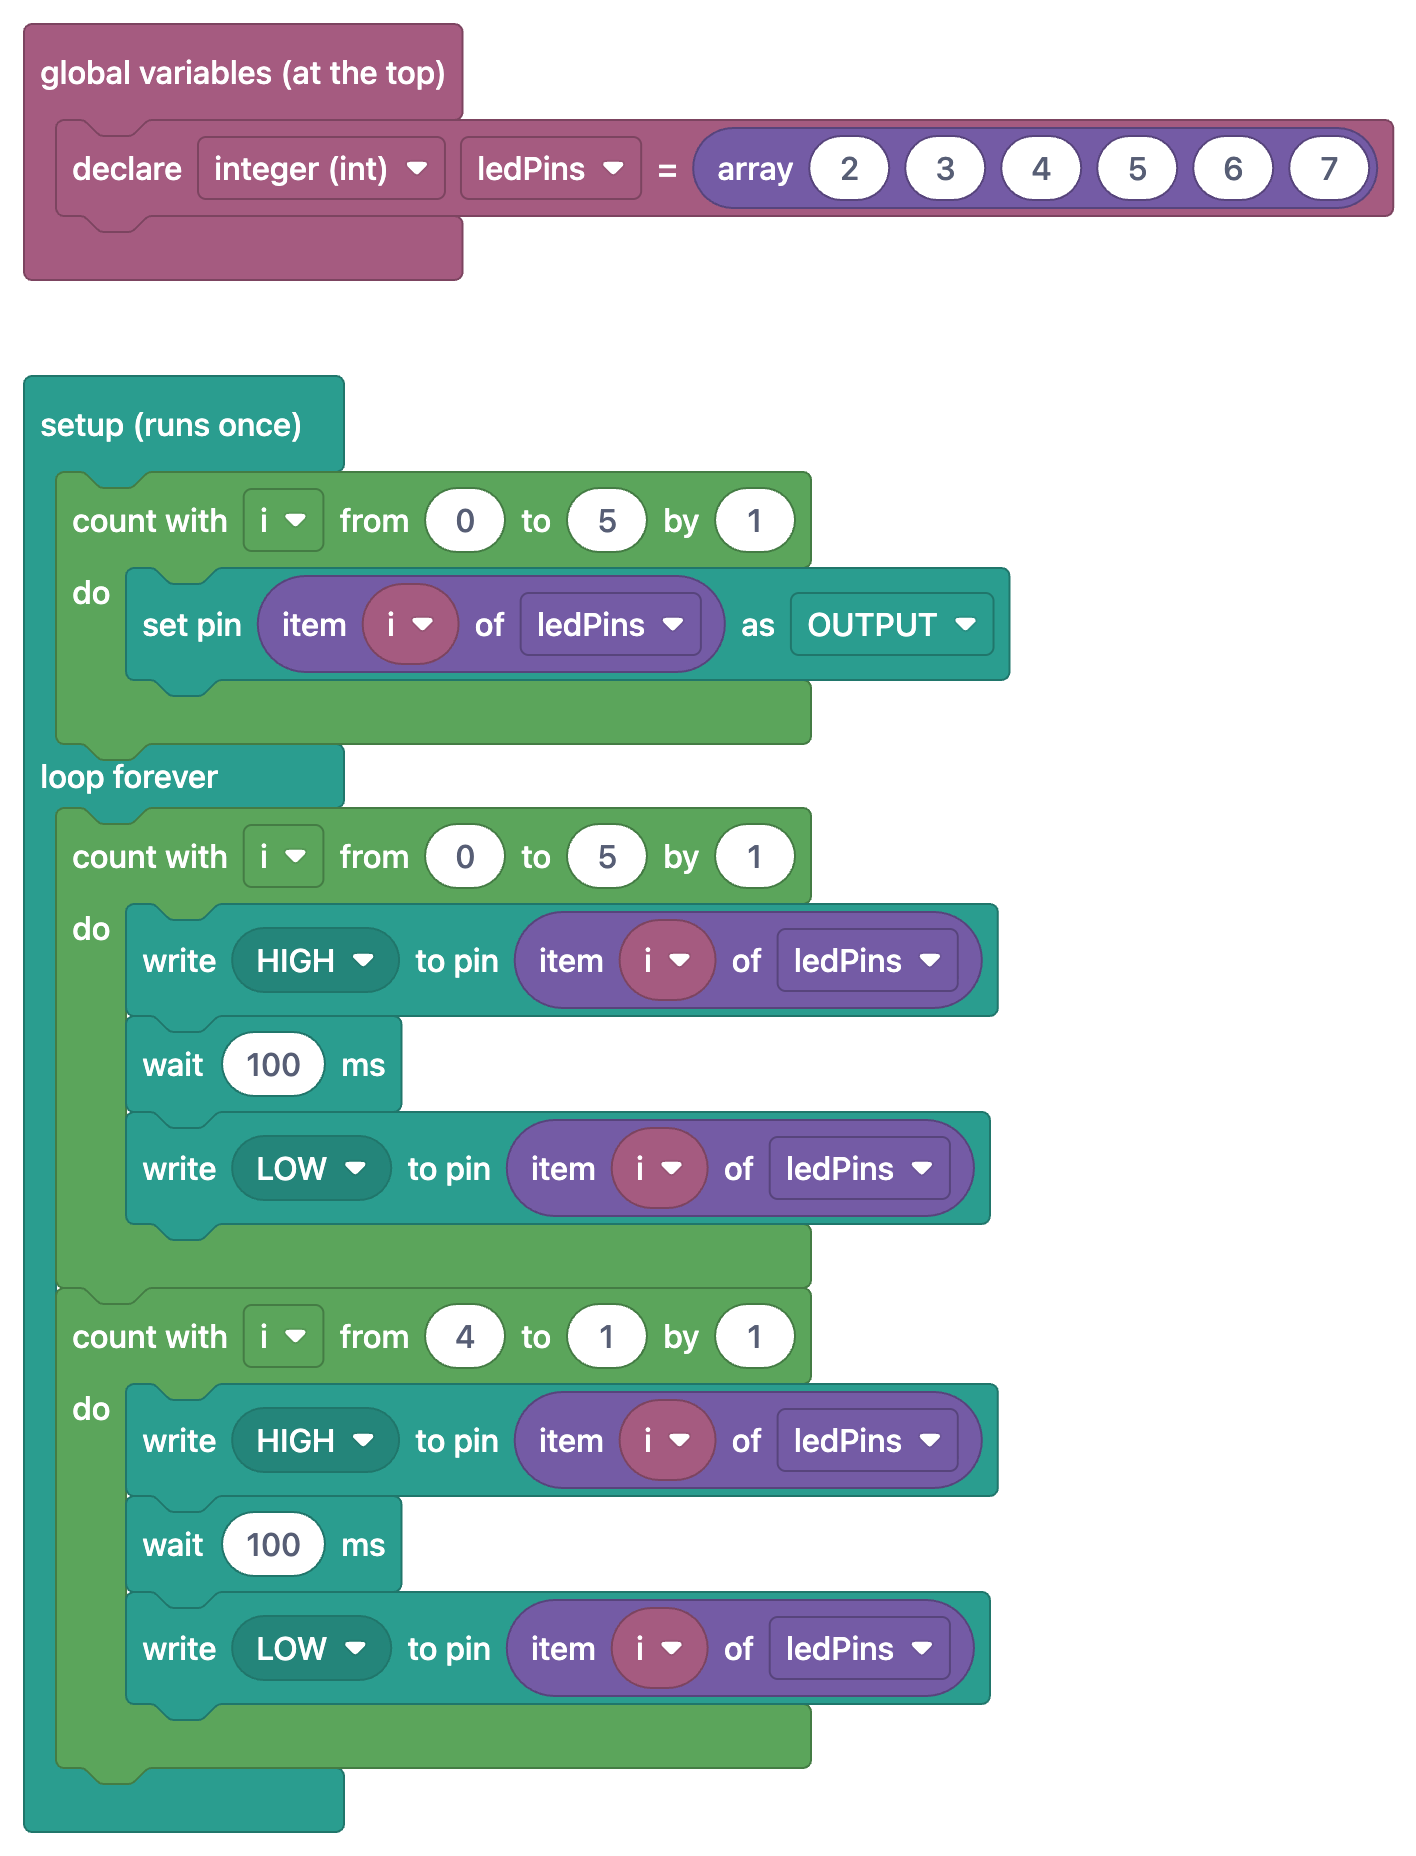
In the Knight Rider effect the light travels from one end to the other and comes back. The blocks of Knight Rider LED Effect have two counting loops one below the other inside loop forever. The first is the familiar "count with i from 0 to 5 by 1" and moves the light from D2 to D7. The second is "count with i from 4 to 1 by 1": since the start is bigger than the end, the block counts backwards and i becomes 4, 3, 2, 1. In the code this is the line for(int i = 4; i > 0; i--); i-- subtracts one from i. Why from 4 to 1 and not from 5 to 0? Because ledPins[5] (D7) is already lit at the end of the forward pass and ledPins[0] (D2) at the start of the next one. Skipping the ends on the way back stops the end LEDs from lighting twice in a row, so the bounce looks smooth. One trip there and back is 6 + 4 = 10 steps of 100 ms, 1 second in total. Knight Rider LED Effect with Adjustable Speed uses the same two loops; it just adds a "set potValue to analog read A0" block at the start of both and uses "wait potValue ms" instead of 100 ms. For more patterns, have a look at Arduino Knight Rider and LED chaser.
Your own counter example: a round counter and the serial port
Now let's write a small example that combines everything: each time the LED chaser finishes a round a counter goes up, and the board prints both the values of i and the round count to the computer. With the blocks from the images you'd build it like this: under the ledPins array in the global variables, add "declare integer (int) rounds = 0". Setup gets a "start serial at 9600 baud" block. Inside the counting loop, before the LED turns on, "serial print" blocks print the text "i = ", then i, then the text " pin = " with the "no line break" option, and finally "item i of ledPins" with the "new line" option. After the counting loop, still inside loop forever, a "set rounds to …" block receives the sum rounds + 1, and the round count is printed with "serial print … new line".
1int ledPins[] = {2, 3, 4, 5, 6, 7};   // LED pinleri / LED pins
2int rounds = 0;                       // tamamlanan tur sayısı / number of finished rounds
3
4void setup() {
5  Serial.begin(9600);                 // seri port 9600 baud / serial port at 9600 baud
6  for (int i = 0; i < 6; i++) {
7    pinMode(ledPins[i], OUTPUT);
8  }
9}
10
11void loop() {
12  for (int i = 0; i < 6; i++) {
13    Serial.print("i = ");             // aynı satırda kal / stay on the same line
14    Serial.print(i);
15    Serial.print("  pin = ");
16    Serial.println(ledPins[i]);       // alt satıra geç / new line
17    digitalWrite(ledPins[i], HIGH);
18    delay(300);
19    digitalWrite(ledPins[i], LOW);
20  }
21  rounds = rounds + 1;                // sayacı bir artır / add one to the counter
22  Serial.print("Tur / Round: ");
23  Serial.println(rounds);
24}
After uploading, open the Serial Monitor in the Arduino IDE and set it to 9600 baud. Every round you'll see six lines, from "i = 0 pin = 2" to "i = 5 pin = 7", followed by a "Tur / Round" line that counts 1, 2, 3. This output is the clearest proof that the end value of the count block is inclusive: "from 0 to 5" produces exactly six values. Notice too that rounds is declared under global variables; it isn't reset each time loop() starts, so it carries its value from round to round. One round takes 6 × 300 = 1.8 seconds, so the int limit of 32767 is reached after roughly 16 hours; if you need to count longer, make the variable an unsigned long. More about the Serial Monitor is in Arduino Serial Monitor.
Circuit: 6 LEDs, 220 Ω resistors and a potentiometer
| Part | Connection (Arduino Uno) | In the code |
|---|---|---|
| LED 1 | D2 → 220 Ω → LED anode (long leg), cathode → GND | ledPins[0] |
| LED 2 | D3 → 220 Ω → anode, cathode → GND | ledPins[1] |
| LED 3 | D4 → 220 Ω → anode, cathode → GND | ledPins[2] |
| LED 4 | D5 → 220 Ω → anode, cathode → GND | ledPins[3] |
| LED 5 | D6 → 220 Ω → anode, cathode → GND | ledPins[4] |
| LED 6 | D7 → 220 Ω → anode, cathode → GND | ledPins[5] |
| Potentiometer (10 kΩ) | One end to 5V, middle pin to A0, other end to GND | analogRead(A0), only in the adjustable speed projects |
A 220 Ω resistor lets about (5 − 2) / 220 ≈ 14 mA flow through a red LED powered from 5 V, which is safe for both the LED and the Arduino pin. If you use LEDs of another colour, check the resistor with the LED resistor calculator. Gather all the cathodes on the breadboard's GND rail and connect that rail to the Arduino's GND pin. If you swap the potentiometer's outer legs nothing breaks; only the direction of the knob is reversed. The LED chaser and Knight Rider projects don't use the potentiometer, and leaving it connected does no harm, so you can try all four projects on the same circuit one after another.
Common mistakes with loops and variables
| Mistake | Symptom | Fix |
|---|---|---|
| Counting one too many: "from 0 to 6" | The loop runs 7 times and the last pass reads ledPins[6], which doesn't exist | The end value is inclusive: for 6 LEDs use 0 to 5 (i < 6 in the code) |
| Starting the index at 1 | The first LED on D2 never lights and the last pass runs past the array | Array indexes start at 0, so start the count block at 0 |
| Running past the end of the array | An unrelated pin switches or the program behaves oddly; C++ doesn't check array bounds | The index must always stay between 0 and the number of items − 1 |
| Declaring the counter inside loop() | The counter goes back to 0 every pass and always prints 1 | Declare the counter in the "global variables (at the top)" block |
| Making the setup loop too short (0 to 4) | The last LED glows very dimly or not at all, because its pin was never made an output | The count range in setup and in loop forever must be the same |
| Mixing up assignment and comparison | if (potValue = 0) is always false and also wipes the value | Assignment is =, comparison is == |
Exploring loop and variable blocks in the BlueGrays app
The four projects in this article and the ones below are completely free in the BlueGrays app, both their blocks and their code. In a project's code section, turn on the Show as blocks switch and the code is replaced by the blocks of the same program; tap the image to open it full screen and zoom into long counting loops comfortably. The Understand the blocks tab walks you through the program step by step, showing only that step's blocks and what they do. Other free projects worth viewing as blocks: LED Police Lights, which runs on a delayTime variable and two counting loops; Traffic Light, which steps through four states inside loop forever; Measuring Light Intensity with an LDR, which keeps its reading in a variable and prints it to the serial port; and Toggle an LED with a Button (On/Off), which remembers the LED state in a variable. Every Arduino example in the Code guide is shown as blocks too, and the Daily questions help you reinforce what you've learned with 5 questions a day from A1 to C2. The full list of block projects is on the block coding page. Blocks aren't uploaded to the board directly; the board always gets the project's real code, so you copy the program you understood through blocks into the Arduino IDE and send it to your board.
Now that you know loops and variables, the next step is to take those numbers from the real world: in part 5 of the series we cover reading sensors with blocks, the serial port and moving to MicroPython on the Pico. Until then, you can look at the LED chaser, Knight Rider and their adjustable speed versions in the BlueGrays app with circuit diagrams and code, switch to the blocks with Show as blocks and to the step-by-step explanation with Understand the blocks, and follow for yourself which line of code each counting loop matches.
Frequently asked questions
What is a loop in block coding?
A loop is a block that runs the blocks inside it over and over. Two kinds stand out in BlueGrays: "loop forever" is the program's main loop and never stops while the board has power, while "count with i" repeats a set number of times. In Arduino code their counterparts are the loop() function and the for loop.
How do you write a for loop in Arduino?
The brackets of a for loop hold three parts separated by semicolons: int i = 0 starts the counter, a condition such as "keep going while i is smaller than 6" decides how long the loop runs, and i++ adds one to the counter after every pass. This loop counts i from 0 to 5 and runs the code inside the curly braces 6 times. In blocks, "count with i from 0 to 5 by 1" does the same job.
How many times does a "from 0 to 5" count block run?
Six times. The end value of the BlueGrays count block is inclusive, so i becomes 0, 1, 2, 3, 4 and 5 in turn. In the code it appears as a for loop that runs while i is smaller than 6, and it visits every index of a six-element array exactly once.
How do you create a variable in block coding?
You place a "declare integer (int) … = …" block inside the "global variables (at the top)" block and give the variable a name and a starting value. This creates a global variable line such as int potValue = 0; at the top of the code. The value is changed later with a "set … to" block.
Can you stop loop() on an Arduino?
loop() never stops on its own; when its last line finishes it starts again right away. To stop the board completely you have to cut the power or upload another program. If you want something to happen only once, put it in setup(), the "setup (runs once)" block, or use a variable to check whether it has already been done.
Why do Arduino array indexes start at 0?
In C and C++ the index says how many steps an element is from the start of the array; the first element is right at the start, so its index is 0. That's why the indexes of the six-element ledPins array run from 0 to 5. Writing ledPins[6] means going past the end of the array, and C++ won't check that for you.
Projects to build after reading this
See all projects
LED Chaser
Lights that switch on one after another, as if they were running. The Arduino lights six LEDs one at a time; each glows for a brief moment and goes out, so the light walks from start to end and then s

Knight Rider LED Effect
The classic scanner light: a dot of light slides from one end of six LEDs to the other and then comes back. The Arduino lights each LED for a tenth of a second before moving on, turns around at each e

LED Chaser with Adjustable Speed
Six LEDs light up one after another, so the light seems to run from one end to the other. Turn the potentiometer knob and the speed of that run changes instantly: one way and the light races along, th

Knight Rider LED Effect with Adjustable Speed
A light runs from one end of six LEDs to the other, turns around and runs back again. Turn the potentiometer knob and you change the speed of that run instantly: with the knob at one end the light alm

LED Police Lights
Just like the lights on a police car: the red LED flashes three times in quick succession, then the blue LED flashes three times, and the pattern keeps repeating without a break. All you need is two L

Traffic Light
A tiny copy of the traffic light you see on the road every day. Red stays on for two seconds, yellow flashes for a moment, green stays on for two seconds, then it goes back to red through yellow again

Measuring Light Intensity with an LDR
Want to see how bright your room is as a number? The LDR, a small part that reacts to light, measures the light around it, and the Arduino writes the value to your computer screen every half second. C

Toggle an LED with a Button (On/Off)
Press the button once and the light comes on, press it again and it goes off, just like the light switch in your room. The Arduino notices every press and flips the LED to the opposite state, waiting