
Arduino Projects With Parts I Have: The Workshop Guide
Arduino projects with parts I have: save your parts in the BlueGrays Workshop to see what you can build, plus a starter kit example and a shopping plan.
The short answer to which Arduino projects can I build with the parts I have: save your parts with their quantities in the Workshop section of the BlueGrays app and let the app do the matching. Workshop compares every project's parts list with what you own and builds two lists: projects where you have every part appear under Projects You Can Build, and projects missing a few parts appear under Projects with Missing Components with a label such as 2 Missing. To scan the full project list the same way, open Projects in Discover, tap Filter and turn on Only Buildable under Workshop Filter.
In this guide you will learn how to save your parts step by step, which projects a typical starter kit really unlocks, how to grow that list by buying one or two parts, and how to turn a classroom cupboard into an inventory. The project and part counts in the tables come from comparing, one by one, the parts lists of the projects live in the app in early November 2026. If you have not decided what to build yet, read which Arduino project should I build; if you have no parts yet, start with the Arduino starter kit guide.
How does Workshop match your parts to projects?
Every BlueGrays project page has a Required Components list, and each row says which part is needed and how many. For example, Traffic Light needs 1 Arduino Uno, 1 breadboard, 3 LEDs, 3 resistors and 7 jumper wires. Workshop compares that list with your saved parts row by row. If you own fewer of a part than the project needs, the difference counts as missing; if every row is covered, the project is buildable. The comparison looks at the part and its quantity, not at resistor values or LED colours. We will look at what that means in practice in the tips section.
| List or filter | What it shows | Label on the card | When to use it |
|---|---|---|---|
| Projects You Can Build | Every part in the Required Components list is in your workshop in the needed quantity | You Can Build It | When you want to build something today |
| Projects with Missing Components | You own some of the parts; the project with the fewest missing comes first | 1 Missing, 2 Missing … plus the percentage of parts you have | Before you go shopping |
| Completed Projects | Projects you have completed | Completed | To see what you have built or return to a project |
| Discover > Projects > Filter > Only Buildable | Narrows the project list to projects whose parts are all in your workshop | Normal project card | To sort buildable projects by difficulty, platform or price |
Saving your parts in Workshop: step by step
- Open Workshop from the bottom bar. Select Parts in the segment at the top; Devices next to it is for your IoT devices, and Favorites is for the projects and components you saved.
- Tap Add Component under the My Components heading. The Select Component screen opens.
- Type the part's name in the search box ("led", "resistor", "buzzer") and pick it from the list. You can select several parts on the same screen; the button at the bottom shows how many, for example Next (5 selected).
- Tap Next and a row opens for every part you selected. Set the Quantity with the plus and minus buttons; the minimum is 1.
- If you like, add a distinguishing note in Custom Name (Optional): "330R", "10K", "Red LED", "Male-Female". The note appears next to the part name in your list.
- Save with Add to Workshop. The parts land in My Components, and the project lists refresh for your new inventory the next time you open them.
There are two ways to change a saved part. The plus and minus buttons on the card in My Components change the quantity instantly; that is the fastest option after you burn out an LED or buy a few more resistors. Tap the card itself to open Edit Component: change the quantity and custom name and tap Save; the Remove from Workshop button for deleting the part entirely is here too. Every card also has a stock label: parts with fewer than 3 pieces show Low Stock, the rest show Sufficient Stock. The Workshop home screen shows the few parts you added most recently; tap See All for the full list.
The second way to add parts is through component pages. When you open a part in the Components list, an Add to Workshop button sits at the bottom of the screen; tap it and the add screen opens with that part already selected, so you only enter the quantity and custom name. A part that is already in your workshop shows an In My Workshop label on its page. The Used in Projects list on the same page shows every project that uses the part, so while saving a new sensor you also see what you can do with it. The chips above the Components list help too: I Have It lists the parts you saved, I Don't Have It lists the rest. That is a handy inventory check: if you spot something you own under I Don't Have It, add it right away. The Used It chip next to them has nothing to do with stock; it shows parts you marked as used before.
Example: which projects does a typical starter kit unlock?
Say you have an Arduino Uno starter kit and saved its contents in Workshop as shown below. It looks like many kits on the market: a board, a breadboard, a bundle of wires, LEDs, resistors in two values, buttons, a buzzer, a light sensor, a potentiometer and an RGB LED. We worked out the results by comparing this kit with the parts lists of the live projects one by one. The numbers will change as new projects are added, but the logic stays the same.
| Part | Quantity | Suggested custom name |
|---|---|---|
| Arduino Uno | 1 | - |
| Breadboard | 1 | - |
| Jumper wire | 40 | Male-Male |
| LED | 10 | Mixed red, yellow, green |
| Resistor | 10 + 10 (two separate rows) | 330R and 10K |
| Push button | 4 | - |
| Buzzer | 1 | - |
| LDR | 1 | - |
| Potentiometer | 1 | 10K |
| RGB LED | 1 | - |
With these 10 items, Projects You Can Build shows 19 projects. 15 of them are free: the circuit diagram, parts list, code and the Understand the code section are open without Premium, and 14 also have a block view. The other 4 are Premium projects. The table below shows 14 of them with the exact part quantities each one needs. Every project in the table also uses 1 Arduino Uno and 1 breadboard.
| Project | Difficulty | Access | Parts needed (besides board and breadboard) |
|---|---|---|---|
| LED Blink | Beginner | Free | 1 LED, 1 resistor (220R), 2 jumper wires |
| LED Police Lights | Beginner | Free | 2 LEDs, 2 resistors (330R), 4 jumper wires |
| Traffic Light | Beginner | Free | 3 LEDs, 3 resistors (330R), 7 jumper wires |
| LED Control with a Push Button (Push) | Beginner | Free | 1 LED, 1 button, 2 resistors (330R + 10k), 7 jumper wires |
| Toggle an LED with a Button (On/Off) | Beginner | Free | 1 LED, 1 button, 2 resistors (330R + 10k), 7 jumper wires |
| Measuring Light Intensity with an LDR | Beginner | Free | 1 LDR, 1 resistor (10k), 3 jumper wires |
| Night Light with Ldr | Beginner | Free | 1 LED, 1 LDR, 2 resistors (330R + 10k), 5 jumper wires |
| Using a Buzzer | Beginner | Free | 1 buzzer, 2 jumper wires |
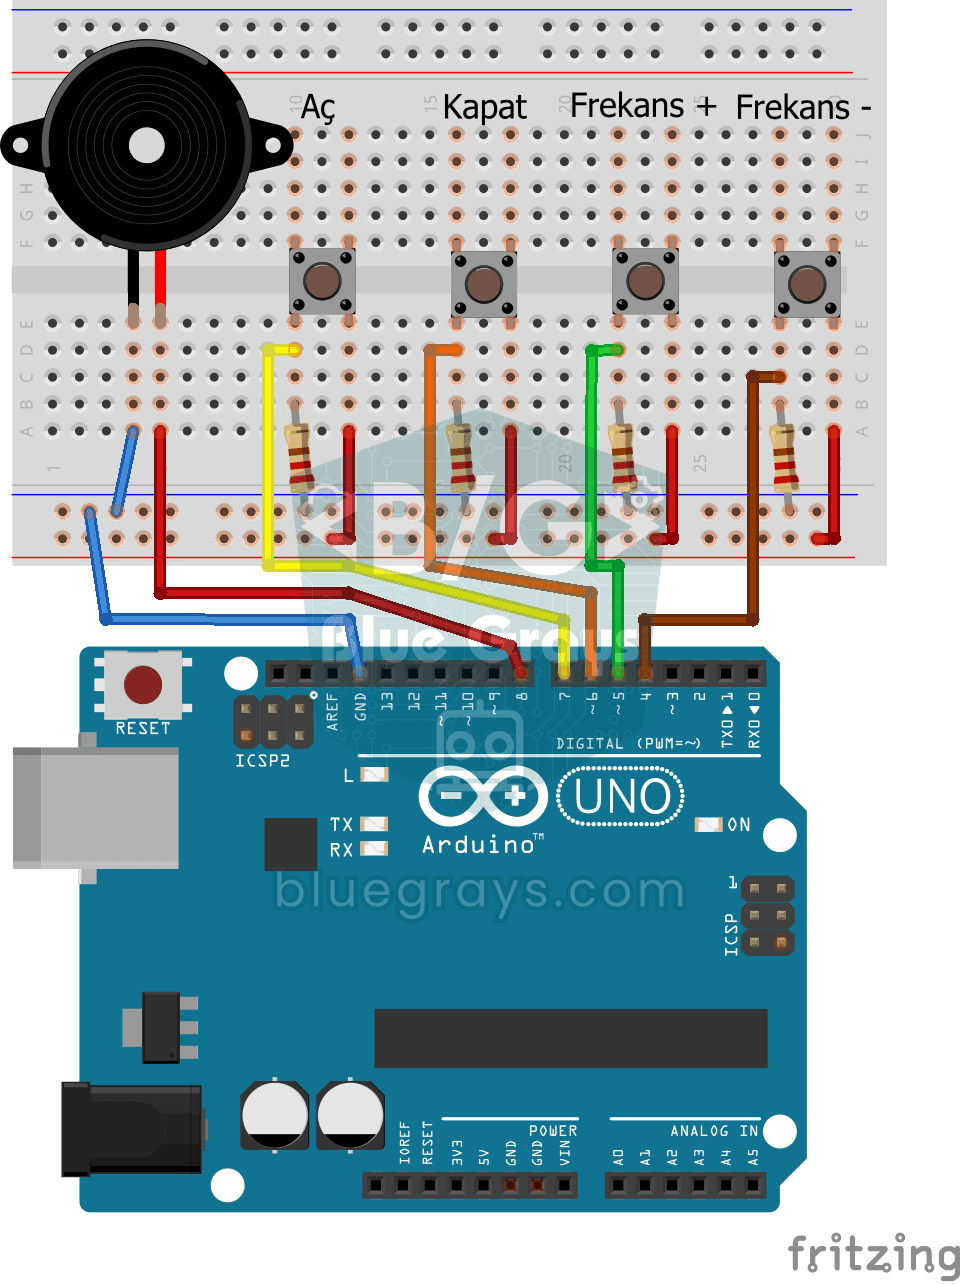
| Frequency Setting with Buzzer | Intermediate | Free | 1 buzzer, 4 buttons, 4 resistors (220R), 11 jumper wires |
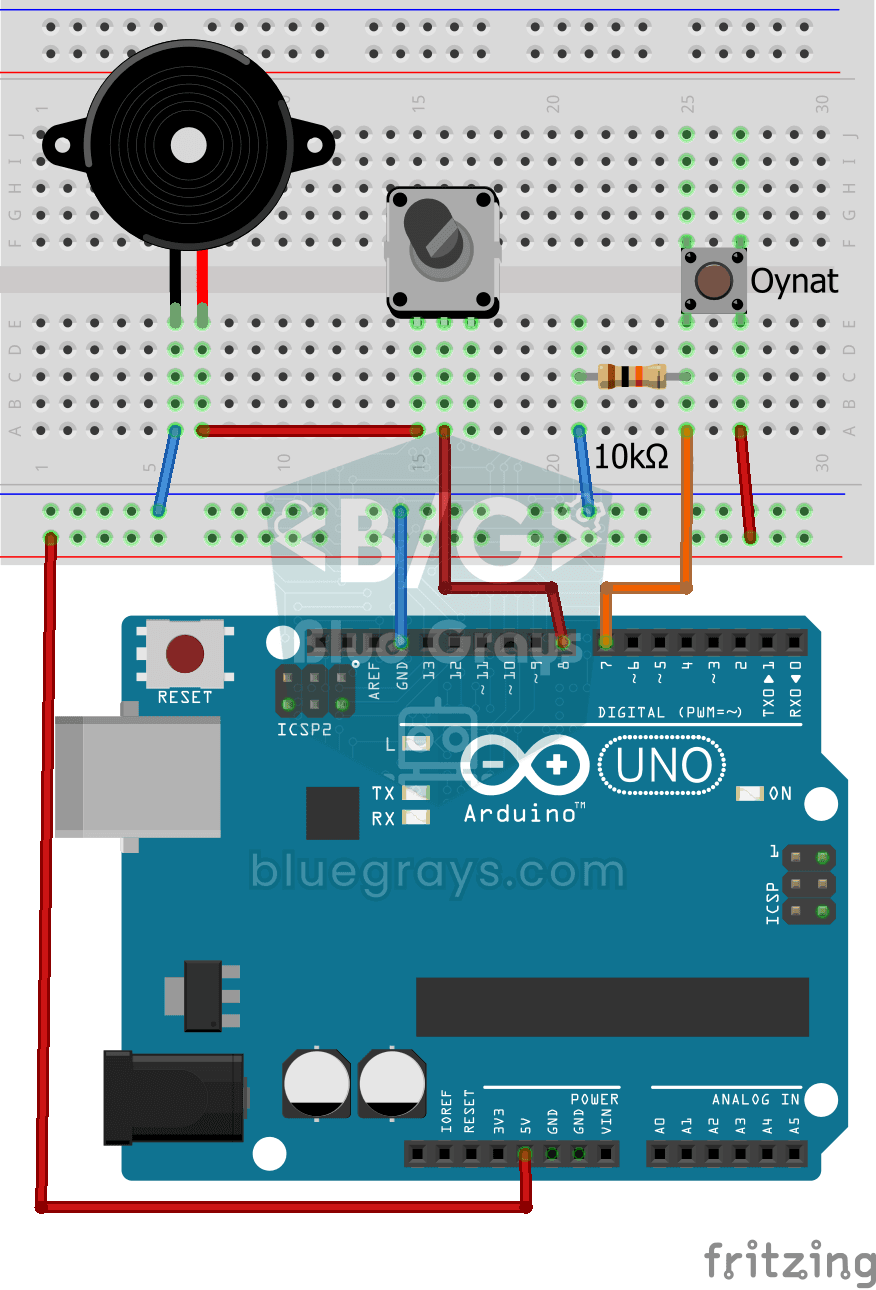
| Turkish National Anthem with Buzzer | Intermediate | Free | 1 buzzer, 1 button, 1 potentiometer, 1 resistor (10k), 8 jumper wires |
| LED Chaser with Adjustable Speed | Intermediate | Free | 6 LEDs, 6 resistors (330R), 1 potentiometer, 16 jumper wires |
| Using an RGB LED | Beginner | Premium | 1 RGB LED, 3 resistors (330R), 4 jumper wires |
| Arduino Birthday Surprise Box (LDR + Buzzer + 3 LEDs) | Beginner | Premium | 1 LDR, 1 buzzer, 3 LEDs, 4 resistors, 14 jumper wires |
| Arduino Cyclone Game: Stop the Light in the Middle (7 LEDs + Button + Buzzer) | Beginner | Premium | 7 LEDs, 7 resistors, 1 button, 1 buzzer, 25 jumper wires |
Five more projects that did not fit in the table can be built with the same kit: the free Two LEDs Blinking Alternately, LED Chaser, Knight Rider LED Effect and Knight Rider LED Effect with Adjustable Speed, plus the Premium Smooth Color Transition with RGB Led. If you want an order, start with a single LED, move to several LEDs, then add a button and a sensor: LED Blink, Traffic Light, the push button LED project, the LDR night light, the running LED and finally the speed-adjustable running LED with a potentiometer. Each step teaches one new thing: digital output, several pins, digital input, analog reading and finally tying an analog value to a behaviour. The buzzer projects fit anywhere in that order as a change of pace.
Planning purchases with Projects with Missing Components
The most useful part of Workshop is that the missing list is really a ready-made shopping list. With the same starter kit, more than 60 projects are only 1 piece away and around 50 are 2 pieces away. Pick the right part and a single purchase can unlock dozens of projects. To see how many projects each part unlocks, we added 1 piece of a different part to the kit each time and compared the results:
| Part added (1 piece) | New projects in Projects You Can Build | Of which free | Example project |
|---|---|---|---|
| Raspberry Pi Pico W | 16 projects | 6 | Raspberry Pi Pico: Controlling an External LED (GP14 + Breadboard) |
| ESP32 | 13 projects | 6 | LED Blink with ESP32 |
| I2C 16x2 LCD | 5 projects | 0 | Digital Voltmeter with LCD Display |
| Keypad | 3 projects | 0 | 3x4 Keypad Operation |
| SG90 servo motor | 2 projects | 0 | Using a Servo Motor |
| 7-segment display | 3 projects | 0 | Displaying Numbers 0-9 on a 7-Segment Display |
| HC-SR04 ultrasonic sensor | 2 projects | 1 | HC-SR04 Distance Measurement (Serial Display) |
| PIR motion sensor | 2 projects | 0 | Motion Detector with Motion Sensor |
The lesson from the table: a second board makes the biggest jump. The first Raspberry Pi Pico W and ESP32 projects also use LEDs, buttons, resistors and a buzzer, so your kit still works and only the board changes. Pico projects are uploaded from Thonny with MicroPython, ESP32 projects from the Arduino IDE. If you want to stay with the Arduino Uno, the I2C 16x2 LCD opens the most doors; it keeps coming back in display, game and measurement projects. We covered the wiring in the I2C LCD display guide. The keypad, servo and 7-segment display unlock fewer projects, but each teaches a new topic: reading a keypad, controlling an angle and showing numbers. The HC-SR04 is the only sensor in the table that also unlocks a free project.
The 10 components used in the most projects
If you want to plan purchases for the long run rather than just the next project, it helps to know how often each part appears. The count below comes from the parts lists of the projects live in early November 2026. A part that appears in several rows of one project was counted once.
| Rank | Component | Number of projects | Note |
|---|---|---|---|
| 1 | Jumper wire | 185 | In almost every project; quantity matters |
| 2 | Breadboard | 133 | The base of solderless builds |
| 3 | Arduino Uno | 111 | The board of Arduino projects |
| 4 | Resistor | 105 | Value changes from project to project |
| 5 | LED | 76 | Usually more than one per project |
| 6 | Buzzer | 50 | Sound, alarm and game projects |
| 7 | ESP32 | 49 | The board of Wi-Fi and Bluetooth projects |
| 8 | Push button | 48 | Input and game projects |
| 9 | I2C 16x2 LCD | 29 | The most used display |
| 10 | Raspberry Pi Pico W | 25 | The board of Pico projects (MicroPython) |
The top eight explain why a good starter kit is full of wires, a breadboard, resistors, LEDs, a buzzer and buttons. Keeping plenty of these is cheap insurance: project parts lists ask for up to 8 resistors, 8 LEDs and 8 buttons. In eleventh place, with 21 projects, is the 0.96 inch I2C OLED display; if you cannot decide between an LCD and an OLED, these two numbers give you a hint. Use this short checklist to build your own shopping order:
- Open the first 10 projects in Projects with Missing Components and note the missing part for each.
- Find the part that repeats most often in your notes; it is usually a board, a display or a sensor.
- Check the Used in Projects list on that part's component page and see whether the projects match your interests.
- Increase quantities of cheap parts such as LEDs, resistors and jumper wires; some 1 Missing labels come only from quantity.
- Add the part to Workshop the day you buy it and check both lists again; newly unlocked projects move to Projects You Can Build.
How Workshop helps in Let's build it together mode
When you start the Let's build it together guide on a project page, the first step is 1. Get the parts ready. It shows the project's parts list, and parts you have in sufficient quantity in your workshop are ticked automatically with In your workshop under them. The counter at the top moves along like "5 / 6 parts ready"; you can tick parts you own but have not saved yourself. The point of this screen is to catch a missing part before you start wiring. We covered the rest of the guide in building your first Arduino project with your phone.
When you tap It works! at the last step, the project is saved as completed and moves to Completed Projects in Workshop. On a Premium account, a project counts as completed only when its parts are in your workshop. If something is missing, the app asks Add the parts to your workshop? and lists how many of which part are missing (for example "1× Buzzer"). Add and complete adds the missing parts to your workshop and completes the project; Not now ends the guide without counting the project as completed. The same check applies to the I made it button on the project page. Completing a project does not remove parts from your workshop; your LEDs and resistors still count for the next project.
For teachers and clubs: turning the classroom cupboard into an inventory
Workshop is useful for a class or club too, as long as you set it up the right way. Say you have a class of 24 students working in 6 groups of 4, with 6 kits in the cupboard. Workshop asks "can this project be built once?", so if you enter the cupboard total you get a misleading list: with 60 LEDs it marks a 7-LED project as buildable, but split into groups each table has 10 LEDs and some groups may not be able to build it at the same time. So enter one group's kit in your workshop. Then Projects You Can Build shows what every group can build at its own table, and the project column of your lesson plan comes straight from there. To get the class total for a project, multiply its Required Components list by the number of groups; for a Traffic Light lesson it looks like this:
| Part | Per group | Class total for 6 groups | Suggested spares |
|---|---|---|---|
| Arduino Uno | 1 | 6 | - |
| Breadboard | 1 | 6 | - |
| LED (red, yellow, green) | 3 | 18 | +6 |
| Resistor (330R) | 3 | 18 | +6 |
| Jumper wire | 7 | 42 | +10 |
Keep the inventory in your own account and do not share one account with students. Sharing login details is not safe, and each student's completed projects, ratings and favourites would get mixed up. Workshop is a preparation tool: it lists the projects you can build with your parts and does not track student progress. If you want to use a project that shows 1 Missing in your lesson, multiply the missing part by the number of groups and order it before the lesson. If students need to open the steps and code of Premium projects, the Premium codes for your class guide explains how educator packs work; for lessons with free projects you do not need them.
Is Workshop free or Premium?
Parts tracking in Workshop (Parts) is a Premium feature; on a free account Parts shows a Premium introduction instead, while Favorites and your first IoT device under Devices on the same screen are free. Saving your parts, seeing buildable projects automatically, the Only Buildable filter and earning badges as you add parts are all part of it. If you want to stay free, the method is the same but manual: compare the Required Components list on free project pages with your own parts. The 15 free projects in this guide are fully open without Premium, with circuit diagram, code and the Understand the code section. The project page guide explains each section of a project page in detail.
Tips: duplicate parts, modules, boards and resistor values
- Adding the same part twice: if you add the same part again with the same custom name, no new row is created; the quantity is added to the existing row. With a different custom name you get a separate row ("LED · Red" and "LED · Green"). For project matching, all rows of the same part are added up: 4 red and 6 green LEDs count as 10 LEDs.
- Resistor values: in the app a resistor is a single component. You can keep 330R and 10K in separate rows with custom names, but matching looks at the total quantity. The Required Components list of each project does state every resistor's value; the most common are 330R, 220R and 10k. On a project marked You Can Build It, check the values in that list. Use the resistor colour code tool to read the bands and the LED resistor tool to find the right resistor for an LED; the basics are in what is a resistor.
- Module or bare sensor? Projects list most sensors by the part's name and note the module version separately; for example, an ESP32 project lists an LDR module as LDR with the note "LDR Module". Save your module under the base part's name: a three-pin DHT11 module is still a DHT11. Displays are different: you add an LCD with an I2C backpack soldered on as an I2C 16x2 LCD, but a few projects list the same hardware as two parts, a 16x2 LCD and an I2C module. Those projects may show as missing even if you can build them; check the parts list and decide yourself.
- Board names: most Arduino projects list an Arduino Uno and Pico projects list a Raspberry Pi Pico W. If you save a Nano or a Pico without Wi-Fi under its own name, these projects show 1 Missing because of the board. A classic Nano uses the same microcontroller as the Uno, so most LED and button projects run on a Nano too, and Pico projects that do not need Wi-Fi run on a plain Pico. Treat projects whose only missing part is the board as buildable.
- Burnt-out or broken parts: if you burn out an LED or break a button, lower the quantity right away. Workshop's suggestions are only as accurate as your records, and the Low Stock label reminds you what to restock.
Saving your parts once and letting the lists guide you saves far more time than searching for what to build with what you have. Enter your board, wires and resistors with their real counts first, start with the free projects in Projects You Can Build, and plan purchases from Projects with Missing Components. If you want to try it, open Workshop in the BlueGrays app and add your board as your first part.
Frequently asked questions
Which Arduino projects can I build with the parts I have?
Save your parts with their quantities in the Workshop section of the BlueGrays app; it shows projects where you own every part under Projects You Can Build. A starter kit with an Arduino Uno, LEDs, resistors, buttons, a buzzer, an LDR and a potentiometer unlocks nearly 20 projects, 15 of them free.
What can you build with an Arduino starter kit?
With LEDs you can build a traffic light, police lights and a running light; with a button, LED control; with an LDR, a night light; and with a buzzer, melodies and frequency experiments. A few more LEDs and wires get you small games such as Cyclone. Most of these projects are beginner level and can be finished in one session.
Is the BlueGrays Workshop free?
Parts tracking in Workshop (Parts) is a Premium feature; on a free account saving parts and project suggestions are not available, while Favorites are free. Free projects are open to everyone. Without Workshop you can still compare the Required Components list on a project page with your own parts.
What does "2 Missing" mean in Projects with Missing Components?
It means 2 pieces of the parts the project needs are not in your workshop in total. That can be two different parts or two of the same part. Open the project and check its Required Components list to see what is missing.
Which part should I buy to build more Arduino projects?
The part that adds the most projects to a starter kit is a second board: a Raspberry Pi Pico W or an ESP32 unlocks 13–16 new projects with the same LEDs and buttons. If you stay with the Arduino Uno, an I2C 16x2 LCD, a keypad and an SG90 servo are good next steps. For your own list, look for the missing part that repeats most often in Projects with Missing Components.
How do I save resistors by value?
Add a separate row for each value and type the value, such as 330R or 10K, in the custom name field. When matching projects, the app looks at the total number of resistors, not their values. So on a project that looks buildable, check the resistor values in the Required Components list on the project page.
Projects to build after reading this
See all projects
LED Blink
The very first hello of electronics: switching a single LED on and off. The Arduino turns the LED on and off at short intervals, so the light blinks quickly. You see in the simplest way how the board

Traffic Light
A tiny copy of the traffic light you see on the road every day. Red stays on for two seconds, yellow flashes for a moment, green stays on for two seconds, then it goes back to red through yellow again

LED Control with a Push Button (Push)
Just like a doorbell: the light stays on as long as you press, and goes off when you let go. The Arduino keeps listening to the button; while it's pressed the LED is on, and the moment you lift your f

Night Light with Ldr
A little night light that turns on by itself when it gets dark and goes off when morning comes. A light sensor measures how bright the room is, and the Arduino switches the LED on when it is dark enou
Frequency Setting with Buzzer
You control the sound of a buzzer with four buttons: one starts the sound, one silences it, and the other two make it higher or lower. Hold the up or down button and the pitch changes step by step, sl

LED Chaser with Adjustable Speed
Six LEDs light up one after another, so the light seems to run from one end to the other. Turn the potentiometer knob and the speed of that run changes instantly: one way and the light races along, th
Turkish National Anthem with Buzzer
Press the button and a small buzzer starts playing the Turkish National Anthem, note by note. The Arduino plays every note at the right pitch and for the right length, performing two verses of the ant
Using an RGB LED
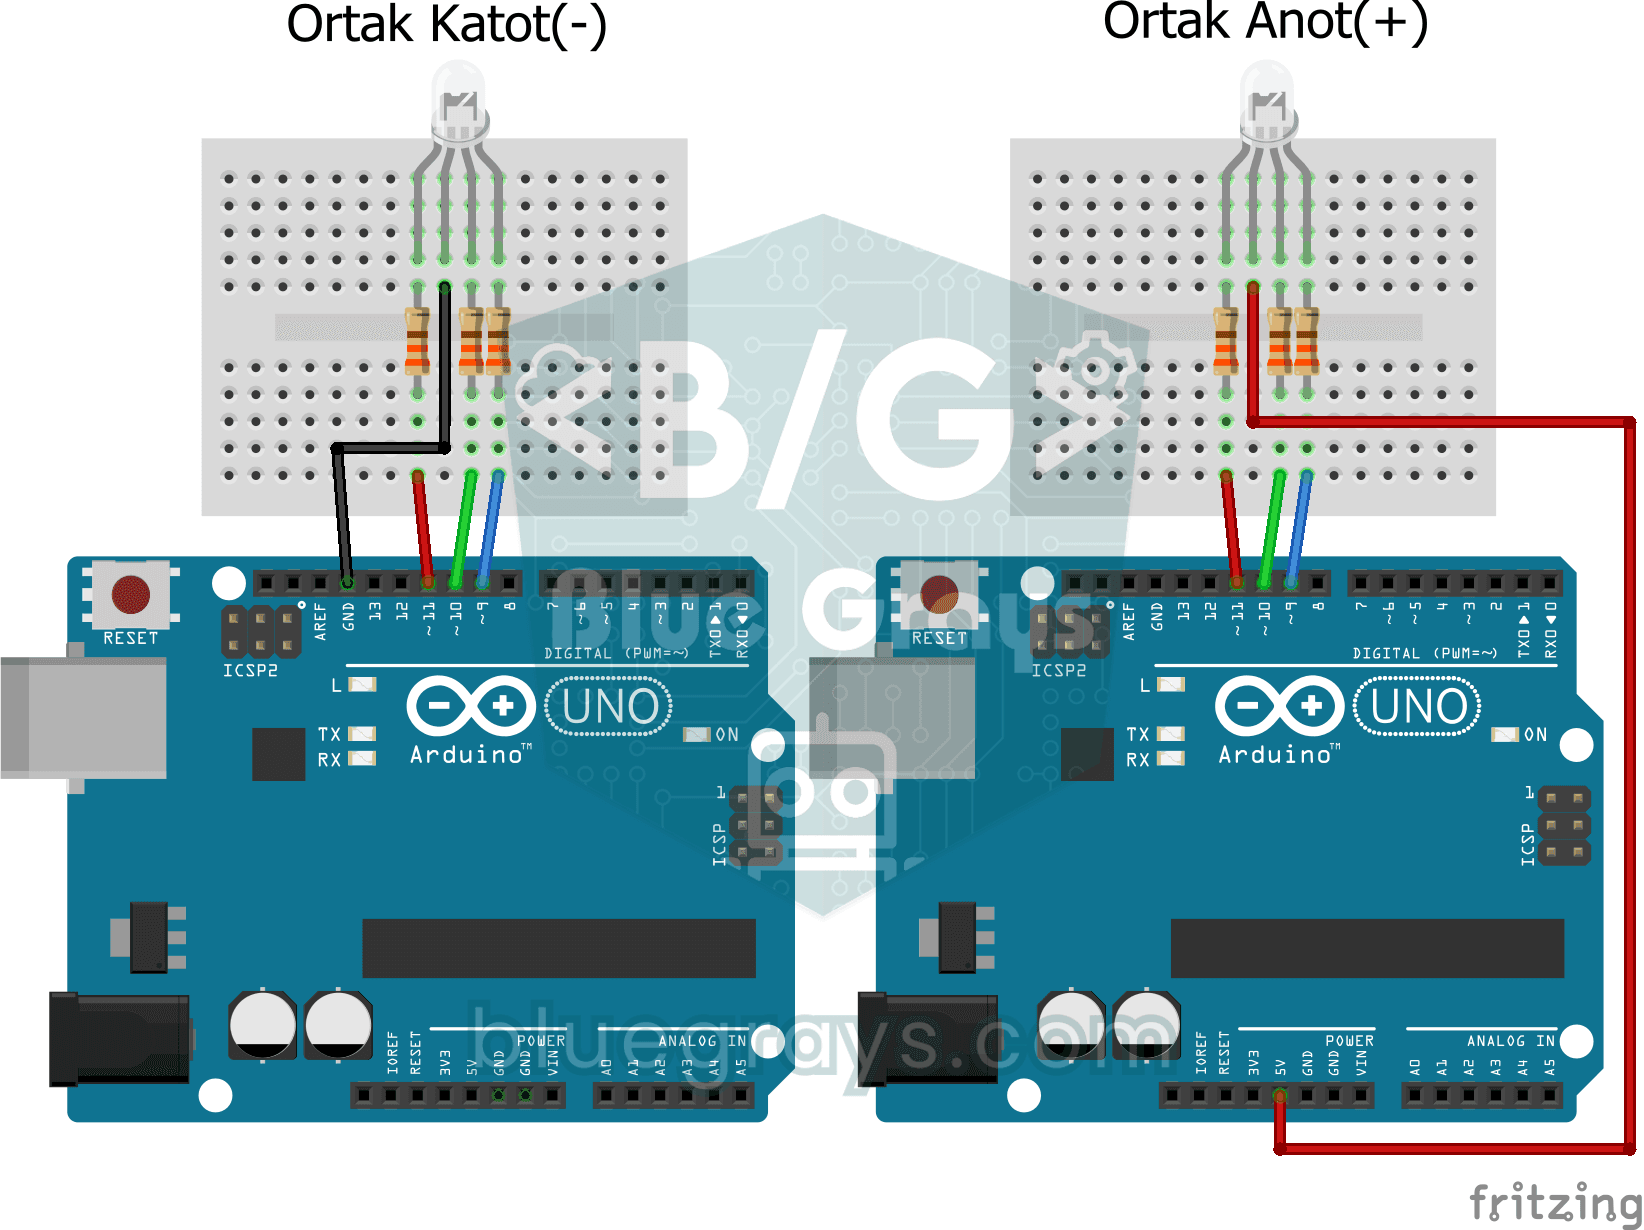
Three colours hide inside a single LED: the RGB LED lights up red, then green, then blue, each colour on for half a second and off for half a second, before the cycle starts again. All you need is one