
Arduino Homework Ideas: An 8-Week Study Plan Between Lessons
Arduino homework ideas: a 10-task menu across no-kit, kit and forum tasks, an 8-week plan at 45 minutes a week, tracking without a class dashboard, parent note.
How far a student gets after a one-hour lesson depends on what they do in the six days before the next one, and the most useful Arduino homework ideas aren't long projects but small tasks spread across three layers. No-kit layer: reading and understanding a project's code on a phone and answering short questions. Kit layer: a small experiment at home that changes one thing in the circuit built in class. Social layer: asking a question on the forum or answering someone else's. Three small tasks a week from these layers, about 45 minutes in total, are enough to make a one-hour lesson stick. And a student who has an educator code can use their free time to look beyond the project from class, at the other projects in the app; that's where out-of-class work really opens up.
In this post you'll find a 10-item homework menu you can give your students, the time each task takes and where it lives in the app, an 8-week out-of-class plan matched to the topic taught in class, alternatives for students without a kit at home, a way to check progress without a class dashboard, a short note you can send to parents and some rules for keeping students motivated without overloading them. The examples assume this: you teach one one-hour Arduino lesson a week, most of your 24 students have a phone, but only some have a kit at home. If your class is different, scale the times and number of tasks to fit.
Why one hour a week isn't enough, and what homework is for
In a one-hour lesson the student builds the circuit, uploads the code, and by the time the LED lights up most of the lesson is gone. There's rarely time left to think about why it lights up or what each line does. If a week later they can't remember the difference between pinMode and digitalWrite, or that the delay is written in milliseconds, the first ten minutes of the next lesson go to review. Out-of-class work isn't meant to teach new topics; its job is to bring the topic from class back two or three times between lessons: once by reading, once by trying, and once by explaining it to someone or answering a question.
That's why the tasks have to be small. A single 90-minute assignment gets pushed to the weekend and many students never start it; three tasks of 10 to 20 minutes fit on the bus, in a break or before dinner. Splitting tasks into three layers also solves the kit problem: a student with no Arduino at home finishes the week with the no-kit and social layers, and a student with a kit adds an experiment. Nobody falls behind just because they don't have the parts.
- No-kit layer (reading and understanding on the phone): Reading the Understand the code tab of the project from class or the next one, solving the Try it yourself task on paper first, answering the Daily questions, finishing a card in the Code guide. A phone or tablet is enough; no board needed.
- Kit layer (a small experiment at home): Rebuilding the circuit from class at home and changing a single value: the delay, the threshold, the buzzer frequency. Keep it to circuits powered from USB that need no soldering.
- Social layer (forum): Asking about the spot where they got stuck in the Question category under Learn > Forum, or replying to someone else's question. Explaining something to another person sticks better than just reading; the forum also shows students a place where they can get help besides you.
The homework menu: 10 tasks, how long they take and where they are in the app
The table below is the menu you pick from each week. The columns show how long a task takes, whether a kit is needed and where in BlueGrays the student should look. Pay attention to the access column: in the 60 free projects (20 per platform) the circuit diagram, code, blocks and Understand the code are open to everyone; give tasks that need Premium to students you've handed an educator code, or to those who have Premium of their own. Daily questions, the Code guide, the Project Finder, the forum and 7 electronics tools are free.
| Task | Time | Kit needed? | Where in the app | Access |
|---|---|---|---|---|
| 1. Read a project's code and write in 2 sentences what it does | 10–15 min | No | Understand the code > What does this code do? and Step by step | Open in free projects, Premium in the others |
| 2. Solve the Try it yourself task on paper first, without the hint | 10 min | No (yes if you want to upload it) | Understand the code > Try it yourself (Hint, Show solution) | Same as Understand the code |
| 3. Daily questions | About 3 min a day | No | Learn > Daily questions (5 questions a day) | Free |
| 4. One Code guide card and its mini test | 10 min | No | Code guide: What does it do?, example, common mistake, mini test | Free |
| 5. Match a project's blocks to its code | 10 min | No | Show as blocks on the project page | In more than 100 projects, most of the free ones |
| 6. Pick the next project and list its parts | 5 min | No | Project Finder (3 questions) and Required Components | Free |
| 7. Save the parts you have at home and see which projects you can build | 10 min (once) | Parts at home | Workshop > Parts and Projects You Can Build | Premium |
| 8. Calculate a resistor in the circuit and check it with the color code | 5–10 min | No | LED resistor, Ohm's law and Color code tools | Free |
| 9. Small home experiment: change one value and write down the result | 15–20 min | Yes | Project page, Build it step by step mode, I made it | Open in free projects |
| 10. Ask a question on the forum or answer one | 10 min | No | Learn > Forum > Question category | Free |
The weekly framework: 3 tasks, about 45 minutes
Even if the content of the tasks changes every week, keeping the schedule fixed pays off. When students know what to do on which day, homework becomes a habit, and you don't have to write new instructions every week. Say your lesson is on Tuesday: the order below brings the topic back to the student one, three and five days after the lesson. Splitting the same 45 minutes over spaced days instead of one sitting keeps the topic fresh until the next lesson.
- Lesson day + 1 (Wednesday), 15 minutes, reading: Read the Understand the code tab of the project from class from start to finish and rewrite the What does this code do? summary in two lines in your own words. Then open the Code guide card for that week's command and finish the mini test.
- Lesson day + 3 (Friday), 20 minutes, doing: Students with a kit rebuild the circuit at home and change one value; students without a kit solve the Try it yourself task on paper or use one of the tools to calculate the circuit's resistor. Either way, three lines go into the notebook: what I changed, what I expected, what happened.
- Across the week, 10 minutes, review and sharing: Daily questions on three different days (about 3 minutes each), or one question or answer on the forum. Spending five minutes the evening before the lesson looking at the next project's parts list also counts here.
An 8-week out-of-class plan: one step beyond whatever you did in class
The plan below follows an order common in beginner programs: digital output, timing, button, analog sensor, sound, distance, temperature and humidity, servo motor. Each row shows the project done in class and that week's three out-of-class tasks. Project names are the names used in the app, each marked free or Premium. The class projects and most of the out-of-class tasks in the first seven weeks work with free projects; tasks marked Premium add depth for classes where you've handed out educator codes.
| Week | In class | Task 1: read (no kit) | Task 2: do or calculate | Task 3: review or share |
|---|---|---|---|---|
| 1 | LED Blink (Free): digital output | LED Blink Understand the code summary and the digitalWrite card | Kit: lower the delay from 1000 to 200. No kit: match the blocks of Two LEDs Blinking Alternately (Free) to the code | Placement test (15 questions), then Daily questions on 2 days |
| 2 | Traffic Light (Free): timing | Traffic Light Try it yourself task, first without the hint, and the delay card | Calculate the resistor for three LEDs with the LED resistor tool. Kit: LED Police Lights (Free) | Daily questions on 3 days |
| 3 | LED Control with a Push Button (Push) (Free): digital input | Toggle an LED with a Button (On/Off) (Free) Understand the code and the digitalRead card | Kit: build the Toggle an LED with a Button (On/Off) circuit and check that the LED changes state on every press. No kit: the Try it yourself task of the same project | One question or answer on the forum |
| 4 | Measuring Light Intensity with an LDR (Free): analog input | The analogRead and if/else cards | Kit: change the threshold in Night Light with Ldr (Free) to match the light in your room. No kit: find the color bands of a 10 kΩ resistor with the Color code tool | Daily questions on 3 days |
| 5 | Using a Buzzer (Free): sound | Frequency Setting with Buzzer (Free) Understand the code and the tone card | Kit: change the frequency in Frequency Setting with Buzzer and note the highest and lowest sound. No kit: the Try it yourself task of the same project | Pick your next project in the Project Finder with Sound and music |
| 6 | HC-SR04 Distance Measurement (Serial Display) (Free): measuring distance | Parking Sensor with HC-SR04 (Premium) Understand the code: how does the measured distance turn into a warning? And the Serial card | Kit: compare measurements at three distances with a ruler. No kit: an LED current calculation with the Ohm's law tool | Share a measurement on the forum or answer a question |
| 7 | Temperature and Humidity with DHT11 (Free): temperature and humidity | Temperature Measurement with NTC and 2x16 Lcd Display (Premium) Understand the code and the variables card | Premium: save the parts at home in the Workshop and pick one from Projects You Can Build. Without a code: pick a free project with the Project Finder | Daily questions on 3 days |
| 8 | Using a Servo Motor (Premium): servo motor | Servo Motor Operation with Potentiometer (Premium) Understand the code and the map card | Build or read a project of their own choice; if stuck, check the Troubleshooting section (Premium) | Describe the project they built on the forum in the Tutorial or Discussion category |
Keep three things in mind when you use the plan. First, out-of-class tasks don't repeat the class project; they step next to it: LED Control with a Push Button (Push) in class, Toggle an LED with a Button (On/Off) at home; Measuring Light Intensity with an LDR in class, Night Light with Ldr at home. The student sees a new behavior with a familiar circuit and works out the difference on their own. Second, if your class has no educator codes, the Premium reading tasks in weeks 6 and 7 can be swapped for free projects: in the Discover > Projects list, choose free ones with the Price filter and give a project on the same topic. Third, the class project in week 8 is Premium; if you don't have codes, close that week with a free project each student picks with the Project Finder.
Alternatives for students without a kit at home
In a class of 24, students with a kit at home are often the minority, and buying one isn't easy for every family. If you tie homework to having a kit, the class splits in two: those with kits move ahead, the others give up on homework from the start. Instead, give students without a kit alternatives that replace the doing task and ask for the same thinking. None of the options below needs a board; some take only a phone, others just pen and paper.
- Predict, then check: Change a value in the code on paper (for example the yellow light's duration in the Traffic Light code) and write down what the LEDs will do. In the next lesson the student uploads the same change to the board and checks the prediction.
- Try it yourself on paper: Reading the task, writing a solution and only then comparing it with Show solution needs no kit. The rule is to try first without looking at the Hint.
- Blocks and code side by side: With Show as blocks turned on, finding the line of code behind each block is a good reading exercise, especially for classes that started with blocks.
- Simulator: A student with a computer can build the circuit in the browser and run the code; the walkthrough is in the Tinkercad Arduino simulation post.
- Get to know the part: Reading that week's part (LDR, buzzer, HC-SR04) among the more than 130 part pages in Discover > Components and writing a three-sentence summary.
- Calculation: Recalculating the resistor used in class with free tools like Ohm's law, LED resistor and Color code; all the tools are covered in the electronics calculator tools post.
- Kit time at school: If you can, open the lab for 20 minutes once a week in a break or after school; students without a kit finish their doing task there with the school's sets.
Checking progress: there's no class dashboard, so how do you check?
Let's be clear from the start: BlueGrays has no dashboard that shows a teacher the progress of a class. You can't see in the app which project a student read or which question they answered, and you can't assign homework. If you handed out educator codes, the My Codes screen only shows which code was used by whom and when it expires. Your evidence comes from the student's own screen and a short oral check. When a student finishes a project at home, they tap I made it; the project then appears in the Completed Projects list, which opens when they tap the completed-project count on their Profile. Set aside five minutes at the start of the lesson and ask one question each to a third of the class every week; in a class of 24 that's eight students, so within three weeks you've talked to everyone once.
| Task | What the student shows | 1-minute check question |
|---|---|---|
| Understand the code summary | The two-sentence summary in their notebook | "What happens if you change the 1000 in this line to 200?" |
| Try it yourself | Their own solution, on paper or in code | "What did you try before tapping Show solution?" |
| Code guide card | Arduino card progress (x/18) on the My level screen | "Which two values does digitalRead return?" |
| Home experiment | A short video or photo on the phone, the Completed Projects list | "Which value did you change, what did you expect, what happened?" |
| Daily questions | Their day streak, if they want to | "Tell us about a question you got wrong this week." |
| Forum | The title of the topic they started or answered | "What did you learn from the answer you got?" |
What does an educator code change outside class?
The free version covers the core of out-of-class work: 60 complete projects (20 per platform), Daily questions, the Code guide, the forum, the Project Finder and 7 tools. An educator code, though, means out-of-class time isn't limited to the project from class. While Premium is active, a student who redeems the code sees the steps, code and circuit diagram of every one of the 200+ projects, and the Understand the code tab and Troubleshooting section open in each of them. So in their free time they can read the code of a parking sensor, an RFID card reader or a clock with an LCD that caught their eye, and check the troubleshooting steps when they get stuck. On top of that come the Workshop (projects you can build with the parts you have at home), 11 Premium tools and Practice, where they can answer as many Daily questions as they like. Students don't need to add a card; entering the code on the Redeem Code screen is enough. We explained how the packages work in the Premium codes for your class post.
Your choice of package directly affects out-of-class work. A monthly code gives 30 days of Premium from the day it's redeemed; in an 8-week course the student's Premium ends halfway through, and if you give a second code the time adds up. A yearly code lasts 365 days: when the 8-week course ends, the student still has about 10 months left and can keep exploring every project in their free time, summer holidays included. If you transfer the code after the course (yearly packages give 6 transfers per code), the previous student's Premium ends at that moment; so decide on purpose whether the remaining time stays with the student or goes to a new one. We worked out which option makes sense when in the monthly or yearly post.
A short note for parents
When you give out-of-class tasks, parents will want to know three things: how long they take, whether a kit is needed at home and what information the app shares. Fill in the text below with your school or course details and send it as a message or email. Replace the parts in square brackets; if you're not handing out educator codes, remove the two points about the code.
- Subject: Out-of-class work for the Arduino lesson
- Hello, in the Arduino lesson at [school or course name] we work for one hour a week. To make the topics stick, I'm asking students to do three short tasks between lessons, about 45 minutes a week in total.
- Most tasks are done on a phone: reading a project's code, answering short questions, finishing a study card. No kit is needed at home; students who have one can do a small optional experiment.
- Home experiments only run on the computer's USB connection (5 volts). No circuit that plugs into a wall socket is ever given as homework.
- The app we use is BlueGrays (iOS and Android). I've given students a [monthly or yearly] Premium code. Using the code requires no card or payment details, and it does not renew automatically. If the account already has an active store subscription, the code can't be used; please let me know in that case.
- When the code is redeemed, I can see the student's name, username, email address and profile photo. I can't see which projects they look at or their quiz results in the app.
- The forum in the app is public; I've asked students not to share personal details such as their school name or phone number there.
- These tasks are not graded and there's no penalty for a week that gets missed. For questions: [contact details].
Balancing workload and motivation
- Cap the time: Keep the weekly total under 45 minutes. A student who wants more can pick extra tasks from the menu, but the required part doesn't grow.
- One required, two optional: Make the reading task required for everyone and let students choose the other two from the menu. Being able to choose creates more ownership than giving everyone the same task.
- Light weeks during exams: That week, only Daily questions. Students keep the routine without extra load.
- Don't make streaks mandatory: When a streak breaks, some students quit altogether. The free version gives one rest day a week, Premium two; remind students of this early on.
- Don't leave stuck students alone: The If you get stuck section in Understand the code, Troubleshooting with Premium and the forum are the first stops. A rule like "Tried for 20 minutes and still stuck? Stop, we'll look at it together in class" prevents frustration.
- Give fast students depth: A student who finishes early can find a harder project in the Project Finder with I'm comfortable, challenge me. A harder version of the same topic keeps the class together better than a new topic.
- Make it visible: In the first five minutes of each lesson, let two students show what they did at home in 30 seconds. Attention motivates more than points do.
You don't need much preparation to start: at the end of your next lesson, write the menu on the board, hand out the three tasks for the first week, and do the five-minute check at the start of the following lesson. To deepen the reading tasks, the Understand the code and Try it yourself post helps, and for the social layer, the asking questions on the forum post. Every project in the plan is in the BlueGrays app with its circuit diagram, code and Understand the code steps; opening the app together with your students once in class when you give the first task is all it takes.
Frequently asked questions
What are good Arduino homework ideas?
The tasks that work best are short and come in three kinds: reading a project's code and writing in two sentences what it does, a small home experiment that changes one value in a circuit, and asking or answering a question on a forum. You can add no-kit tasks like short quiz questions and resistor calculations. Three tasks a week, about 45 minutes in total, is enough for most students.
What can a student do without an Arduino kit at home?
They can read code on a phone, solve the Try it yourself task on paper, answer the daily questions and finish cards in the code guide. With a computer they can build the circuit in a browser simulator such as Tinkercad. Opening a short kit session at school once a week also lets them finish the hands-on task.
How long should Arduino homework take?
For a one-hour weekly lesson, a total of 45 minutes a week is a good upper limit. Splitting it into three parts of 10 to 20 minutes works better than one long assignment. In exam weeks you can lighten the load to just the short daily questions.
Can a teacher see students' progress in the app?
No, BlueGrays has no class dashboard and no homework assignment. If you handed out codes from an educator package, you only see which code was used by whom and when it expires. For checking, use the Completed Projects list on the student's own screen and a short oral check at the start of the lesson.
Can students still use the app after the educator code ends?
Yes, the free sections stay open: 60 complete projects (20 per platform), daily questions, the code guide, the forum and 7 tools. The steps, code and Understand the code sections of the other projects that were open during Premium are locked again. Because a yearly code lasts 365 days from the day it's redeemed, a student still has months left after a short course.
Should out-of-class Arduino work be graded?
It's fairer to use it as evidence of participation and for a portfolio rather than as a grade on its own, since kits and time at home aren't the same for everyone. A short oral check at the start of the lesson shows you whether a student really understood. Not turning game elements like rankings and streaks into grades protects motivation.
Projects to build after reading this
See all projects
LED Blink
The very first hello of electronics: switching a single LED on and off. The Arduino turns the LED on and off at short intervals, so the light blinks quickly. You see in the simplest way how the board

Traffic Light
A tiny copy of the traffic light you see on the road every day. Red stays on for two seconds, yellow flashes for a moment, green stays on for two seconds, then it goes back to red through yellow again

Toggle an LED with a Button (On/Off)
Press the button once and the light comes on, press it again and it goes off, just like the light switch in your room. The Arduino notices every press and flips the LED to the opposite state, waiting

Night Light with Ldr
A little night light that turns on by itself when it gets dark and goes off when morning comes. A light sensor measures how bright the room is, and the Arduino switches the LED on when it is dark enou
Frequency Setting with Buzzer
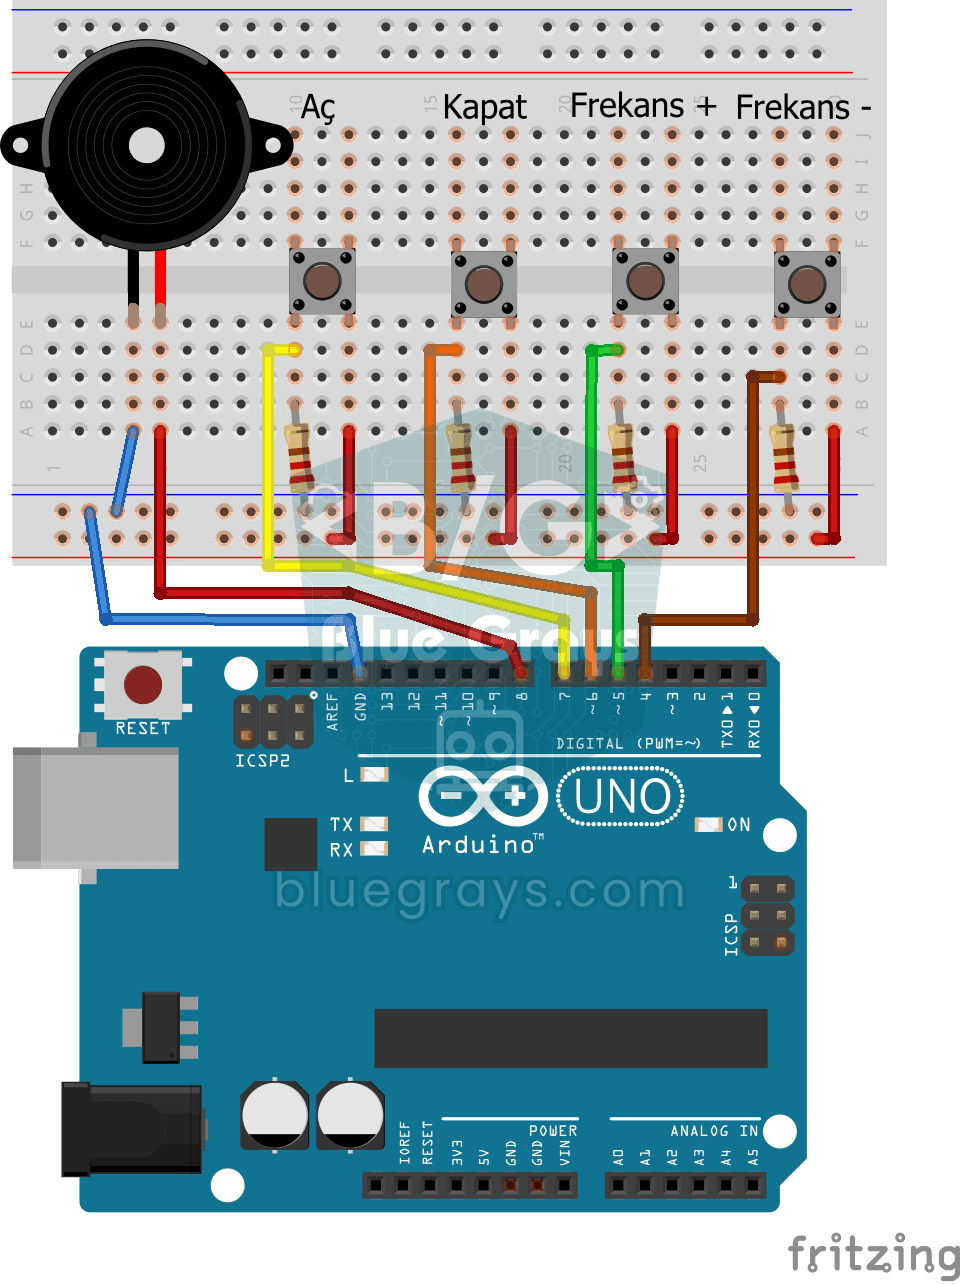
You control the sound of a buzzer with four buttons: one starts the sound, one silences it, and the other two make it higher or lower. Hold the up or down button and the pitch changes step by step, sl

HC-SR04 Distance Measurement (Serial Display)
The HC-SR04 sensor works just like a bat finding its way in the dark: it sends out a sound you cannot hear, listens for the echo and measures how far away the object in front of it is. The Arduino wri

Temperature and Humidity with DHT11
How warm is your room, and is the air humid or dry? The DHT11 sensor measures temperature and humidity, and the Arduino writes the values on a two-line LCD screen, refreshing every couple of seconds.
Parking Sensor with HC-SR04
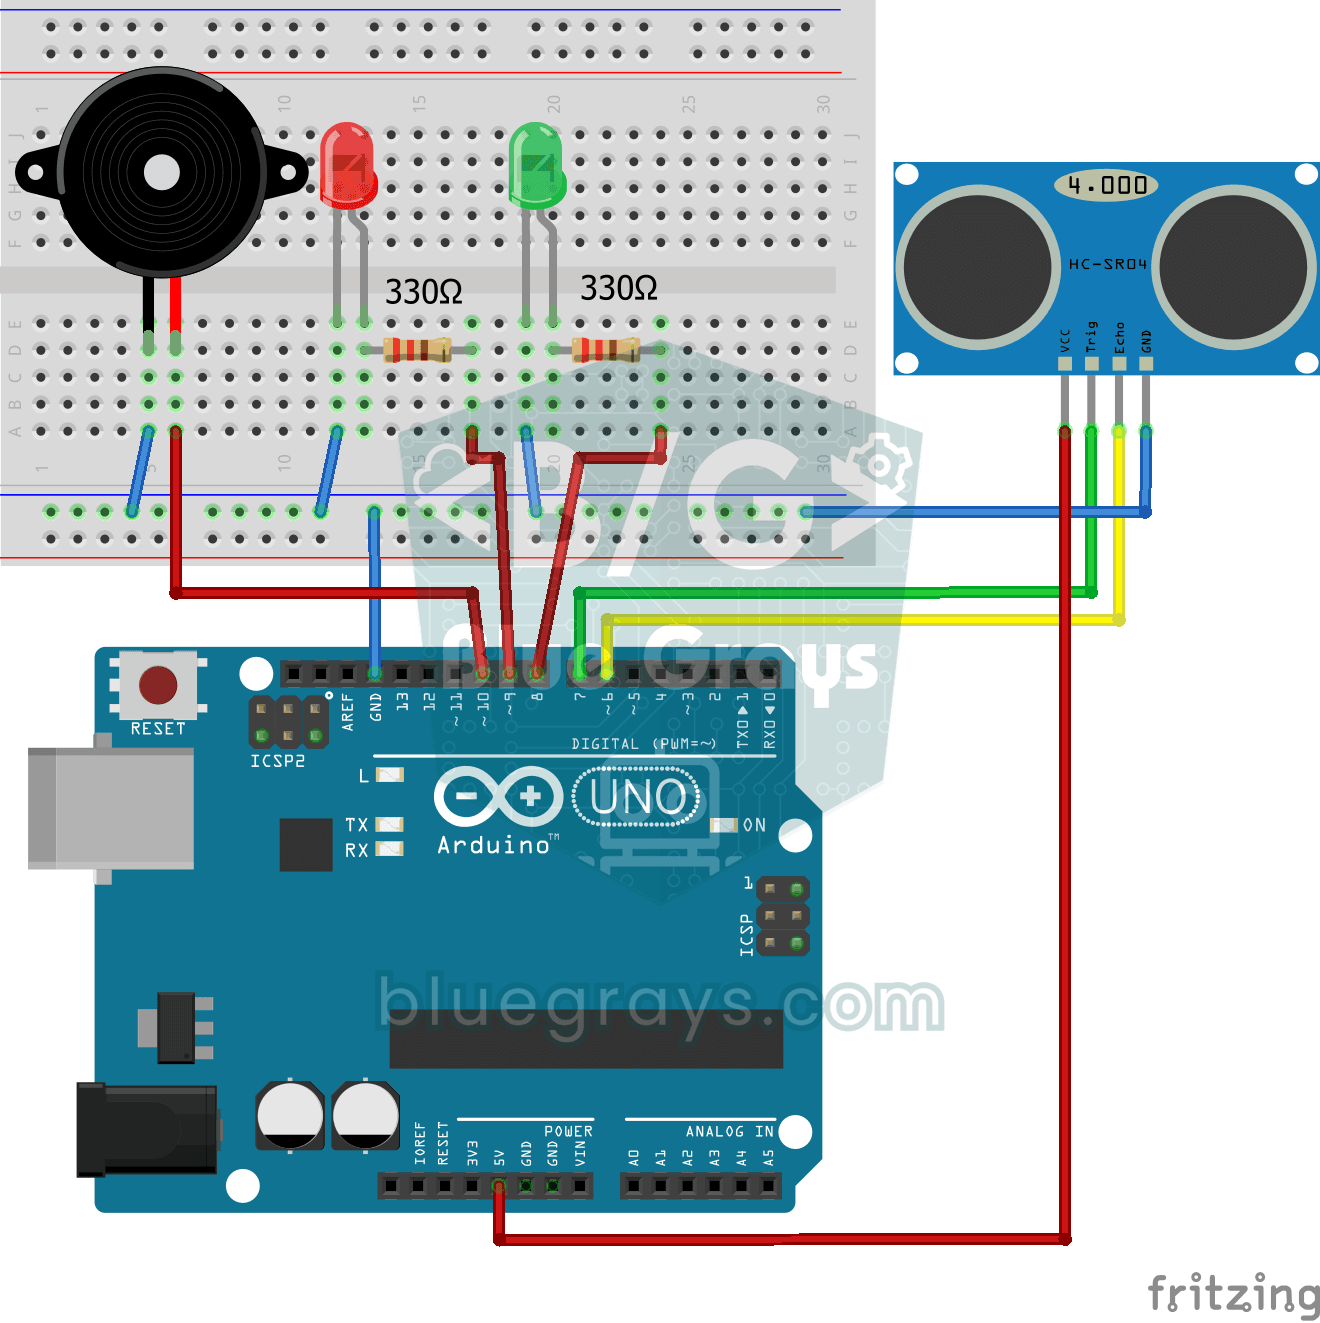
A mini version of a car's parking sensor: the closer something gets, the faster the beeps. The distance sensor measures the object in front of it; if it is more than 20 centimetres away the green LED