
Arduino Code Explained Step by Step: Understand, Then Change It
Arduino code explained step by step with BlueGrays: the summary, steps, If you get stuck, Try it yourself tasks, a 15-minute routine and a real button project.
Understand the code is the tab in the Source Code section of every BlueGrays project page that explains the ready-made Arduino code step by step. To work out what the code you copied and uploaded actually does, follow this order: first read the What does this code do? summary, then find each code snippet from the Step by step section in the full code along with its explanation, check If you get stuck if the circuit doesn't behave as expected, and finally use the Try it yourself task to change one thing in the code and see the result on the board. These four sections are the shortest route from "it works but I don't know why" to "I know what happens if I change this line".
In this post we cover the Understand the code tab from start to finish using the real content of a real project: project number 10, Toggle an LED with a Button (On/Off). It is free, rated Beginner and also has a block view, so anyone can open the explanation for both the code and the blocks. You'll find the sections of the tab, a method for matching the code to the explanation, a 15-minute study routine, a strategy for solving Try it yourself tasks, which change teaches which concept, the Understand the blocks view, the difference between If you get stuck and Troubleshooting, and ideas for teachers using it in class.
Where is the Understand the code tab and who can use it?
When you open a project and scroll to the Source Code section, you'll see a two-tab selector at the top: Code and Understand the code. The Code tab shows the full program, and that's where the Copy and Copy Link buttons are. Switch to Understand the code and the annotated version of the same program opens. Every one of the 200+ projects has this tab, and it works the same way for Arduino, ESP32 and Raspberry Pi Pico projects. Access is simple: in the 60 free projects (20 per platform), Understand the code is open to everyone, so even with a free account you see the summary, all the steps, If you get stuck and the Try it yourself task with its solution. In Premium projects a lock card sits in place of the tab: "Unlock the step-by-step code walkthrough with Premium." That means you can use the method in this post on LED Blink, Traffic Light, LED Police Lights and the button projects without paying anything.
The sections: what each one is for
| Section | What it shows | How to use it |
|---|---|---|
| What does this code do? | A 2–3 sentence summary: what the program does, in what order and why it keeps repeating | After reading it, explain the program in one sentence without looking; if you can't, read it again |
| Step by step | Numbered steps, each with a title, a short code snippet and an explanation (5–6 steps in most projects) | Read the steps in order and find each snippet in the full code |
| Code snippet | Only the lines that step talks about, without the rest of the program | Look at the numbers and pin numbers in it; those are usually the parts you can change |
| If you get stuck | Common symptoms in that project and their fixes (usually 4–5) | If the circuit doesn't behave as expected, look for your symptom here first |
| Try it yourself | A short task asking for one change in the code | Predict the result first, then make the change and upload |
| Hint | One sentence right under the task telling you where to look | Read it if your prediction fails; it points the way without giving the answer |
| Show solution | A SOLUTION box that opens on tap: which line becomes what, and the result | Open it last and compare with your own; close it again with Hide solution |
The order of the sections is deliberate: the big picture first, then the pieces, then the mistakes, and finally your own experiment. Code snippets are not the whole program, only the lines that step explains; the closing brace of a block opened in one step may appear in the next. That's why reading all the steps in order works better than glancing at one. The hint is visible right under the task text, while the solution stays hidden until you tap Show solution. This layout gives you room to think before you see the answer.
Example: Understand the code in the Toggle an LED with a Button project
The project uses one push button and one LED. One side of the button goes to 5V and the opposite side to pin 13 of the board; the same pin is pulled to GND through a 10 kΩ resistor. The LED's long leg goes to pin 7 and its short leg to GND through a 330 Ω resistor. The Understand the code summary describes the program like this: each time you press the button, the LED flips its state once, turning on if it was off and off if it was on; even if you hold the button down, the LED changes only once, and a 50 ms wait ignores button bounce. Here is the full program, with comments in two languages.
1int ledState = 0;     // LED durumu: 0 sönük, 1 yanık / LED state: 0 = off, 1 = on
2int lastButton = 0;   // Butonun önceki okuması / Previous button reading
3
4void setup() {
5  pinMode(13, INPUT);   // Buton girişi, harici pull-down / Button input, external pull-down
6  pinMode(7, OUTPUT);   // LED çıkışı / LED output
7}
8
9void loop() {
10  int button = digitalRead(13);   // Butonu oku / Read the button
11  if (button != lastButton) {     // Buton durumu değişti / Button state changed
12    if (button == 1) {            // Yalnız basış anında (LOW -> HIGH) / Only at the press (LOW -> HIGH)
13      ledState = !ledState;       // Durumu tersine çevir / Flip the state
14      digitalWrite(7, ledState);  // Yeni durumu LED'e yaz / Write the new state to the LED
15    }
16    delay(50);                    // Sıçramayı atlamak için kısa bekleme / Short wait to skip the bounce
17    lastButton = button;          // Bu okumayı sakla / Store this reading
18  }
19}| Step | Code snippet | Gist of the explanation | Concept it teaches |
|---|---|---|---|
| 1. Variables that remember the LED and the button | int ledState = 0; int lastButton = 0; | ledState holds the LED's current state and lastButton the previous button reading; since they are declared outside the functions, they keep their values on every loop pass | Global variable |
| 2. setup(): preparing the pins | pinMode(13, INPUT); pinMode(7, OUTPUT); | D13 is an input, D7 an output; INPUT is enough because the circuit has an external 10 kΩ pull-down, otherwise the pin would float | Input, output, pull-down |
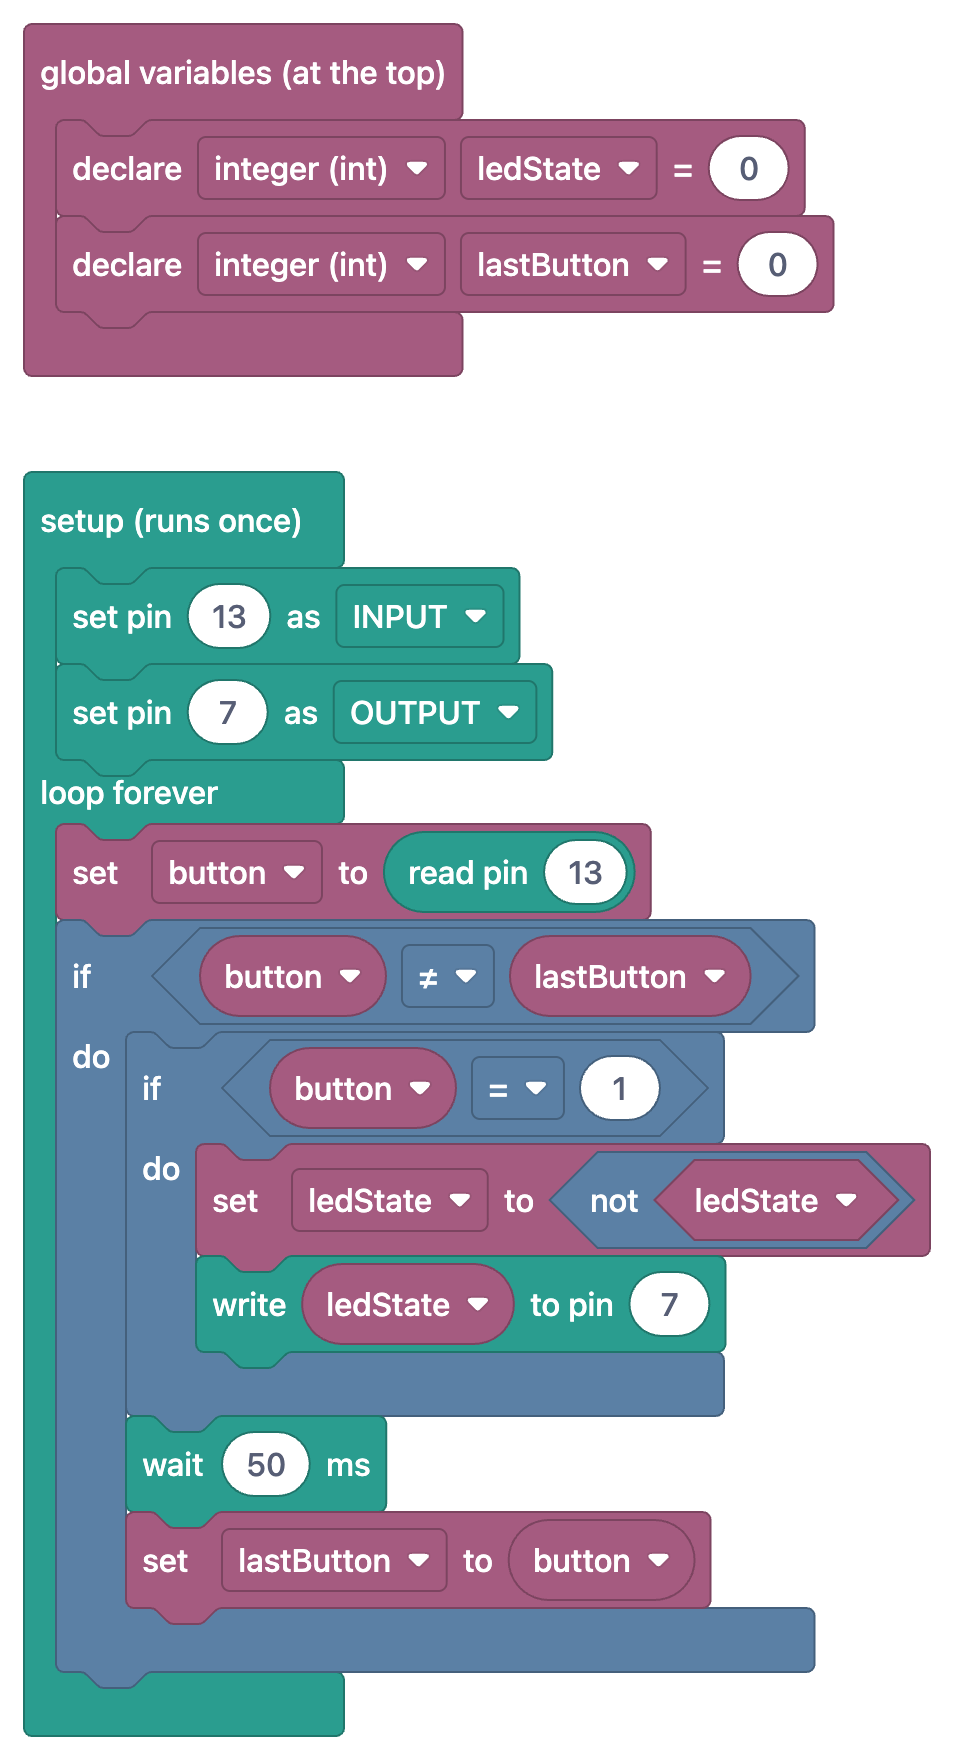
| 3. loop(): read the button, catch the change | int button = digitalRead(13); if (button != lastButton) { if (button == 1) { | If the reading equals the previous one, nothing happens; if it changed and is now 1, the button has just been pressed | Edge detection (LOW to HIGH transition) |
| 4. Flip the state, write it to the LED | ledState = !ledState; digitalWrite(7, ledState); | The ! operator turns 0 into 1 and 1 into 0; the new value is written to the LED | Toggle (on/off) |
| 5. 50 ms wait and storing the last reading | delay(50); lastButton = button; | A mechanical button chatters for a few milliseconds; waiting 50 ms ignores it, then the reading is stored for the next pass | Debounce |
What to watch for while reading the steps is that the explanation tells you not only what happens, but also what would happen without that line. Step 1 points out that ledState starts at 0, so the LED is off when the board powers up. That leads to a good question: if you set it to 1, does the LED start on? It doesn't, because that line only changes the variable; setup() writes nothing to the LED, so it starts off, and on the first press ledState goes back to 0, so it stays off. The value of a variable and the real state of a pin are two different things. Step 2 links the use of INPUT on the button to the 10 kΩ resistor in the circuit: when the button isn't pressed, the resistor pulls the pin to GND and it reads 0. Remove the resistor and the pin floats and reads random values; the "LED turns on and off by itself" symptom in If you get stuck matches exactly that.
Steps 3 and 5 should be read together. The comparison in step 3 only works if lastButton is updated after every change, and that update is the lastButton = button line in step 5. Once you match the two steps, the core idea of the program becomes clear: the code doesn't check whether the button is pressed, it checks whether its state has changed. While you hold it down, every pass reads 1, but lastButton is also 1, so the comparison is false and the LED doesn't change. The ! operator in step 4 is a two-line on/off switch. Step 5 ends with a warning: if the wait is too short, the LED may sometimes change more than once per press. That suggests your first experiment before the task: drop 50 to 5, press a few times and watch whether the LED occasionally flips twice; the result depends on the quality of the button. For more on debouncing, see how to connect a button to Arduino.
The If you get stuck section of this project lists five symptoms: the LED never lights up; the LED changes by itself without touching the button; nothing happens when you press the button; the button behaves as if it's always pressed; the code won't upload. Each symptom comes with a concrete check. For the "always pressed" symptom, for example, it explains that when the button legs are inserted the wrong way, D13 stays connected to 5V all the time and you need to rotate the button 90 degrees. The Try it yourself task is this: make the LED change when you release the button rather than when you press it. The hint reminds you that the button variable becomes 1 at the moment of pressing and 0 at the moment of release. The solution is a one-character change: the if (button == 1) line becomes if (button == 0). This small task tests whether you really understood the edge detection idea from step 3.
How to read it: summary, matching, testing
- Read the summary, write it in one sentence: Read What does this code do?, then write the program in one sentence in your notebook without looking at the phone. For the button project: "Each press turns the LED on or off once."
- Match the code to the steps from top to bottom: Open the code in the Arduino IDE (Copy Link in Source Code makes this easy), find each step's snippet in the full code and add the step number next to the line as a comment. The steps follow the order of the code: global variables, setup(), loop().
- Mark unmatched lines: If a line isn't covered by any step (usually only closing braces are left), think about why it isn't explained; if it isn't a brace, search the explanations for it again.
- Test it on the circuit: Upload the code and test the behaviour from the summary one by one. Three tests are enough for the button project: a single press, holding it down and quick repeated presses. Say out loud what will happen before each test.
The matching step is the one people skip most, yet it pays off the most. When you write step numbers next to the lines, the skeleton of the code becomes visible: which line runs once and which runs continuously, where each variable is read and where it is written. In the button project lastButton appears in two places: it's declared in step 1 and updated in step 5. Seeing that with your own eyes sticks far better than reading "a variable is a box". If you want to study variables, loops and functions separately, see Arduino programming basics.
A 15-minute Understand the code routine
| Minutes | What you do | Where |
|---|---|---|
| 0–2 | Read the What does this code do? summary and write the program in one sentence | Phone, Understand the code |
| 2–6 | Find each snippet from Step by step in the full code and add the step numbers to the lines as comments | Phone + Arduino IDE |
| 6–8 | Upload the code and test the behaviour from the summary one by one | Computer + circuit |
| 8–9 | Read the Try it yourself task, predict the result and write it down | Phone + notebook |
| 9–12 | Make the single change, upload and watch the result | Arduino IDE + circuit |
| 12–13 | If your prediction failed, read the Hint and try once more | Phone |
| 13–15 | Compare with Show solution, then try a second change of your own choosing | Phone + Arduino IDE |
This routine is for a project whose circuit is already built. If you're building the circuit for the first time, give it an extra 10–15 minutes or leave the Understand the code routine for the next day. The last two minutes are the most valuable part: making your own small change after seeing the solution tests the idea you understood, not the answer you memorised. In the button project you could, for instance, move the LED to another pin or raise the 50 ms wait to 300 ms and see what happens to quick presses. One project a day at this pace means finishing five free projects in a week while genuinely understanding them. For a longer plan, see the 30-day Arduino roadmap.
A strategy for solving Try it yourself tasks
Try it yourself tasks are short but carefully chosen: each one asks for a single change, and the result is something you can see or hear. Sticking to this order while solving them doubles what you learn:
- Predict: Read the task and say which line of the code you'll touch and what you'll see after the change. Writing the prediction down stops the "I knew that all along" illusion later.
- Change: Change only one thing. If you change two lines at once, you can't tell which change caused what.
- Upload: Upload the code to the board and wait for the message saying the upload is done. If you get a compile error, check the semicolons and brackets in the line you changed.
- Observe: Compare the result with your prediction. For timing tasks, count the seconds; for sound tasks, listen to the old and new sound one after the other.
- Check the hint: If your prediction failed or you couldn't find which line to touch, read the hint. Because the hint is visible right under the task, covering it with your hand on the first read helps.
- Open the solution last: Tap Show solution only after you've made your own attempt. If the solution matches yours, think about why it's right; if it differs, think about why the two approaches give different results.
Another benefit of this order is that it makes mistakes useful. Say that in the task for Traffic Light you want to stretch the yellow after green to 1.5 seconds, but you change the first delay(300) line by mistake. Instead of what you expected, you'll see the yellow after red get longer. That mistake teaches you that the code has two separate yellow phases and that loop() runs line by line, far better than the solution would. The solution of the task says exactly that: the delay(300) line at the very end of loop() becomes delay(1500), while the yellow after red stays at 0.3 seconds.
Types of change: which one teaches which concept?
Look at the tasks in the free projects and you'll see that each falls into one of a few types. Recognising the type also makes it easier to set your own task in a new project. The examples in the table come from real Try it yourself tasks in free projects; the pin change row is an experiment you can do yourself in the same project.
| Type of change | Example | Concept it teaches | Watch out |
|---|---|---|---|
| Change a number | LED Blink: set both delay lines to delay(1000); Using a Buzzer: raise the frequency from 400 Hz to 1000 Hz | Units (ms, Hz) and how one value shapes the behaviour | Times are in milliseconds: 1500 = 1.5 s. The frequency task needs a passive buzzer |
| Change a pin | In the button toggle project, move the LED from D7 to D8: change the wire and the pinMode(7, OUTPUT) and digitalWrite(7, ledState) lines | The link between code and circuit; a pin number appearing in more than one place | Move the wire with USB unplugged; change the number everywhere in the code |
| Change a condition | Button toggle: button == 0 instead of button == 1; Night Light with Ldr: threshold from 50 to 300 | Comparison, threshold, edge detection | When the threshold changes, the behaviour doesn't shift gradually but switches at a specific point |
| Invert the behaviour | LED Control with a Push Button (Push): the LED is normally on and turns off when you press | HIGH and LOW logic, inverting a condition | Change either the condition or the written values, not both |
| Loop limit | LED Police Lights: the red LED flashes 5 times instead of 3, for (int i = 0; i < 5; i++) | for loop, counter, number of repetitions | Change only the first for line; blue keeps flashing 3 times |
| Add a floor to an expression | LED Chaser with Adjustable Speed: delay(potValue + 50) instead of delay(potValue) | Using a reading inside a calculation, lower limit | The wait now ranges from 50 to 1073 ms, so the light stays easy to follow even at top speed |
Understand the blocks: the same explanation with blocks
Projects with a block view have a Show as blocks switch in the Source Code section. Turn it on and the same program appears as blocks in the app's language instead of code, and the tab next to it changes from Understand the code to Understand the blocks. In this view the summary, If you get stuck and the task stay the same; what changes is the Step by step section: each step shows its own blocks instead of the code snippet, and tapping the image opens it full screen. More than 100 projects have a block view, including more than 30 of the free ones. The blocks are for reading only; they can't be edited in the app or uploaded to the board, and what goes onto the board is always the real code.
The best way to use Understand the blocks is to switch back and forth between the two views. In the button project, the blocks of step 3 are a "set button to read pin 13" block plus two nested "if" blocks; in code that's the int button = digitalRead(13); line and two nested ifs. The "set ledState to not ledState" block in step 4 is exactly the ledState = !ledState; line. Read the block first and say what it does, then turn the switch off and look at the code snippet for the same step. Matching blocks to code like this is the most solid way to move from block coding to text-based code; to start the topic from the beginning, see what block coding is and the if block.
If you get stuck vs Troubleshooting
| Feature | If you get stuck | Troubleshooting |
|---|---|---|
| Where? | Inside the Understand the code tab, after Step by step | A separate section on the project page |
| Format | Symptom and fix pairs; 5 in the button project | An ordered checklist starting with "If your project is not working, check the steps below."; 10 steps in the button project |
| When? | You know the symptom: "the LED changes by itself" | You don't know what's wrong and want to check everything from the start |
| Focus | Typical mistakes specific to that project's code and circuit | General checks such as power, uploading, pin numbers, connections and GND |
| Access | Open to everyone in free projects, with Premium in Premium projects | Available in more than 170 projects, unlocked with Premium |
In practice the order is this: when the circuit doesn't work, describe the symptom in one sentence and look for it in If you get stuck. If your symptom is listed, the fix is usually a single wire, resistor or line. If it isn't listed, or the suggested fix didn't help, go through the Troubleshooting steps in order; you're likely to catch a basic check you skipped (board power, the right port, a common GND). If you're stuck at the upload stage, Arduino code not uploading helps, and for compile errors there's Arduino compile errors.
For teachers: using Understand the code in class
- Shared reading on the projector: At the start of the lesson, mirror your phone screen, read the What does this code do? summary together and have the class sum up the program in one sentence. Then show the same steps as blocks with Show as blocks turned on; for students who started with blocks, this is a bridge.
- One group per step: In a 5-step project, split the class into 5 groups; each group reads one step, finds the snippet in the full code and explains it to the class in two minutes. While a group explains, the others ask "what would happen without this line?".
- Prediction slip: Write the Try it yourself task on the board; each group writes its prediction on a slip of paper before making the change, then changes the code and uploads it. Discussing the gap between prediction and result teaches more than doing the task itself.
- Exit question: In the last two minutes of the lesson, everyone answers one question. Examples for the button project: what would happen when holding the button if there were no lastButton? What changes if you delete delay(50)? Why might the LED change by itself if you remove the 10 kΩ resistor?
When planning access, keep this in mind: since Understand the code is open to everyone in free projects, your students can use this method with LED Blink, Traffic Light, LED Police Lights and the two button projects without paying anything. In Premium projects Understand the code unlocks with Premium; if you want to move your class on to Premium projects, you can hand out codes from the educator packages instead of having each student subscribe, as explained in an Arduino app for the classroom. If you want to share a circuit you designed yourself, you can open a Tutorial topic in the Forum; it doesn't come with Understand the code steps or a block view, so you write the explanation in the topic text yourself and add the code with Add code (teaching with your own project). The app also has no panel showing you which tasks each student solved; you check the task in class, by looking at the working circuit or through a photo.
Common mistakes and easy fixes
- Opening the solution straight away: If you tap Show solution as soon as you read the task, you learn the answer but not the idea. The rule: prediction first, then an attempt, then the hint, and the solution last.
- Copying without reading the steps: Grabbing the code with Copy and uploading it works, but if you move on to the next project without reading Step by step, you start from zero every time. After uploading, at least read the summary and the steps.
- Treating a code snippet as the whole program: Snippets are only that step's lines; paste one on its own into the IDE and it won't compile. Always make changes in the full code.
- Changing several things at once: If you change two lines together and get an unexpected result, you can't tell which one is responsible. One change per upload.
- Changing a pin number in only one place: Changing pinMode and forgetting digitalWrite or the wire is one of the most common mistakes. Before changing it, mark every place the number appears in the code.
- Skipping If you get stuck and asking on the forum right away: The answer is often already in that project's If you get stuck list. Check there first, then Troubleshooting; if it's still unsolved, ask on the forum with a photo of your circuit and your code.
- Finishing the task and stopping there: If you don't make your own small change after comparing with the solution, what you learned stays tied to that one task. Pick a number, a pin or a condition yourself.
Once you've used Understand the code in this order on a few projects, ready-made code stops being a closed box: you can say in advance which line controls what and what will happen if you change it. Toggle an LED with a Button is a good place to build this habit, because a short piece of code shows a global variable, edge detection, a toggle and debouncing all at once. If you'd like to try it, open this project in the BlueGrays app and start with the task in the Understand the code tab; the same sections are there in all 60 free projects.
Frequently asked questions
What is Understand the code in BlueGrays?
Understand the code is the tab in the Source Code section of a BlueGrays project page that explains the project's code step by step. It has a summary, numbered steps (each with a code snippet and an explanation), an If you get stuck section and a Try it yourself task with a hint and a solution. Every project has it.
Is Understand the code free?
In the 60 free projects (20 per platform), Understand the code is open to everyone; with a free account you see the summary, the steps, If you get stuck and the task with its solution. In Premium projects the tab unlocks with Premium.
How do I understand ready-made Arduino code step by step?
First sum up what the code does in one sentence, then split it from top to bottom and note what each part does: global variables, setup() and loop(). Pay attention to numbers and pin numbers, then change a single value and watch the result on the board. Understand the code gives you this order ready-made for each project.
How do I see the solution to a Try it yourself task?
Tap the Show solution button under the task; a SOLUTION box opens and tells you which line becomes what. You can close it again with Hide solution. Making your own attempt first and opening the solution last teaches you more.
What is Understand the blocks?
In projects with a block view, turning on the Show as blocks switch renames the Understand the code tab to Understand the blocks. In the Step by step section, each step then shows its own blocks instead of the code snippet. More than 100 projects have a block view.
Are If you get stuck and Troubleshooting the same thing?
No. If you get stuck is a list of symptom and fix pairs specific to the project inside Understand the code; Troubleshooting is a separate, ordered checklist on the project page. Troubleshooting is available in more than 170 projects and unlocks with Premium.
Projects to build after reading this
See all projects
Toggle an LED with a Button (On/Off)
Press the button once and the light comes on, press it again and it goes off, just like the light switch in your room. The Arduino notices every press and flips the LED to the opposite state, waiting

LED Control with a Push Button (Push)
Just like a doorbell: the light stays on as long as you press, and goes off when you let go. The Arduino keeps listening to the button; while it's pressed the LED is on, and the moment you lift your f

Traffic Light
A tiny copy of the traffic light you see on the road every day. Red stays on for two seconds, yellow flashes for a moment, green stays on for two seconds, then it goes back to red through yellow again

LED Blink
The very first hello of electronics: switching a single LED on and off. The Arduino turns the LED on and off at short intervals, so the light blinks quickly. You see in the simplest way how the board

LED Police Lights
Just like the lights on a police car: the red LED flashes three times in quick succession, then the blue LED flashes three times, and the pattern keeps repeating without a break. All you need is two L

Night Light with Ldr
A little night light that turns on by itself when it gets dark and goes off when morning comes. A light sensor measures how bright the room is, and the Arduino switches the LED on when it is dark enou
Using a Buzzer
Ever wondered how a doorbell or an alarm makes its sound? The Arduino makes a small buzzer beep at short intervals: beep, pause, beep, pause. You see how sound is made with electricity and take the fi

LED Chaser with Adjustable Speed
Six LEDs light up one after another, so the light seems to run from one end to the other. Turn the potentiometer knob and the speed of that run changes instantly: one way and the light races along, th