
Block Coding Lesson Plan: 8-Week Arduino Robotics Course
Block coding lesson plan for teachers: 8 weeks of 40-minute Arduino lessons with free block projects, a materials list for 24, a sample lesson and a rubric.
Robotics coding means writing programs that let a board sense its surroundings, make a decision and make something happen: a button or a light sensor senses, the Arduino decides, and an LED, a buzzer or a motor responds. The easiest way to teach that loop in a classroom is to start with block coding and move to the real code of the same program once students have the logic down. This post is a ready-to-use block coding lesson plan for teachers, robotics clubs and parents running a workshop at home: 8 weeks, one 40-minute lesson a week, each built around a free block project in BlueGrays.
Each week of the plan has a goal, a free BlueGrays project, the new block students meet that week and its counterpart in real code. After that you get a materials list for a class of 24, a minute-by-minute sample lesson, an assessment rubric, differentiation ideas for fast and slow groups, a no-hardware option with simulators and safety notes. The plan is built around the Arduino Uno, with an optional week on the Raspberry Pi Pico and MicroPython.
What is robotics coding and why start with blocks?
Robotics courses make people think of robot cars straight away, but every robot rests on the same three jobs: sensing, deciding and acting. Reading a button is sensing, asking "is the button pressed?" is deciding, and lighting an LED or sounding a buzzer is acting. Once a student understands these three steps with an LED and a button, moving the same logic to motors and a distance sensor is mostly a matter of swapping parts. That is why this plan starts with LEDs and buttons rather than motors, and reaches the robot's "eyes" with the HC-SR04 distance sensor in the last week.
Why start with blocks? For 10 to 14-year-olds, the biggest enemy of the first lessons is semicolons, curly braces and capitalisation; students end up thinking about why the code won't compile instead of what the program does. Blocks remove those errors, so attention goes straight to the logic. Staying in blocks isn't the goal, though: in the real world the Arduino is programmed in C++ and the Pico in MicroPython. The blocks in BlueGrays were made for exactly this bridge; each block maps one-to-one to a line of the real code that goes onto the board. Students read the blocks first, then look at the code of the same program and match each block to its line. You can see every block project and how it works on the block coding page.
The 8-week block coding lesson plan
Each lesson is planned for 40 minutes with groups of 2 or 3. Every project in the table is completely free in BlueGrays, blocks and code included, so students don't need Premium. The order is deliberate: output (LED) first, then timing, variables and repetition, then input (button) and conditions, keeping state, an analog sensor, arrays and loops, and finally sound and distance. Each week adds a single new idea on top of the previous one.
| Week | Goal | Free BlueGrays project | New block / concept | In real code |
|---|---|---|---|---|
| 1 | What a program is, digital output | LED Blink | setup (runs once), loop forever, set pin … as OUTPUT, write HIGH / LOW to pin …, wait … ms | setup(), loop(), pinMode(), digitalWrite(), delay() |
| 2 | Order of commands and timing | Two LEDs Blinking Alternately, Traffic Light | Sequencing the same blocks on different pins, changing the wait times | Line order; 2000 ms = 2 s |
| 3 | Variables and counted repetition | LED Police Lights | global variables (at the top), declare integer (int) delayTime = 60, the repeat-3-times block | int delayTime = 60; for (int i = 0; i < 3; i++) |
| 4 | Input and conditions | LED Control with a Push Button (Push) | set pin … as INPUT, read pin …, the if / else block, = comparison | pinMode(13, INPUT), digitalRead(), if / else, == |
| 5 | Remembering a state (toggle) | Toggle an LED with a Button (On/Off) | set … to …, ≠ comparison, not, wait 50 ms | ledState = !ledState; !=; button debounce |
| 6 | Analog sensor and threshold | Measuring Light Intensity with an LDR, Night Light with Ldr | Analog read block (A0), serial start and print blocks, < comparison | analogRead(A0) 0–1023, Serial.begin(9600), Serial.println(), if (value < 50) |
| 7 | Arrays and loops | LED Chaser, LED Chaser with Adjustable Speed | Array block (2 3 4 5 6 7), count-with-i loop from 0 to 5, item i of ledPins | int ledPins[] = {2, 3, 4, 5, 6, 7}; for (int i = 0; i < 6; i++) |
| 8 | Sound and distance: the robot's senses | Using a Buzzer, HC-SR04 Distance Measurement (Serial Display) | Tone and stop-tone blocks, microsecond wait, pulse length block, and | tone(), noTone(), delayMicroseconds(10), pulseIn(), && |
| Optional | Pico and MicroPython | Pico external LED (GP14) | Pin block for GP14 as output, LED on / off blocks, wait 0.5 seconds | Pin(14, Pin.OUT), led.on(), time.sleep(0.5), while True: |
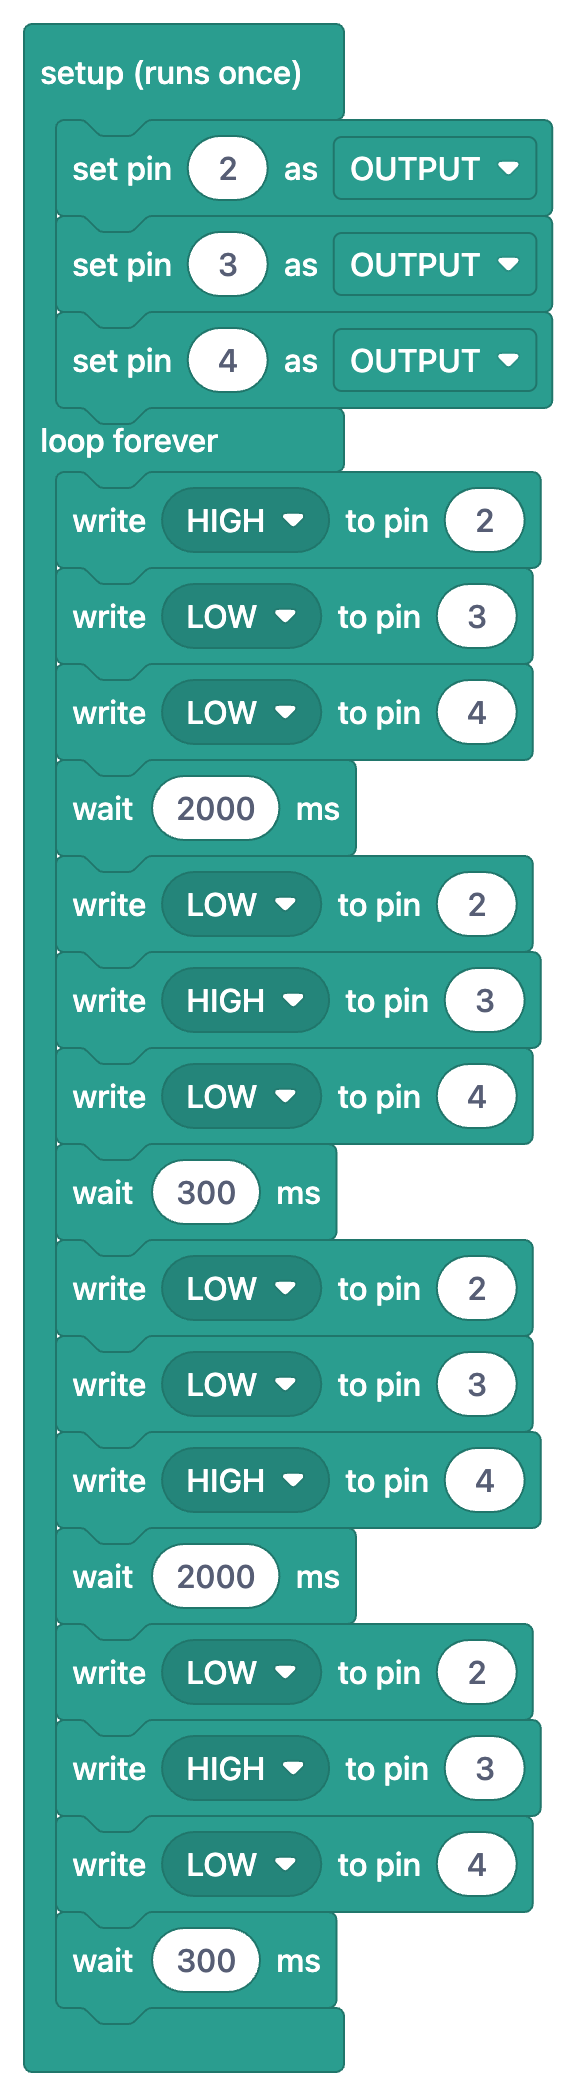
As you run the plan, make it a rule that students change one value at the end of every lesson. In week 1, seeing the LED slow down when the 100 ms wait in LED Blink becomes 1000 ms gives them the "I'm in charge of the program" feeling in the very first lesson. In week 3, raising the delayTime variable in LED Police Lights from 60 to 200 shows them that one number affects six blocks at once; it's the shortest way to explain why variables exist. In week 6, tuning the threshold of 50 in Night Light with Ldr to the light in your classroom teaches them that sensor values depend on the environment. In week 7, give each group a 10 kΩ potentiometer for LED Chaser with Adjustable Speed; changing the LED speed by hand usually becomes the favourite moment of the week.
Materials list for a class of 24
Split 24 students into groups of 3 and you get 8 groups; preparing 9 kits, one of them a spare, is enough. If you prefer pairs, scale the numbers up to 12 groups. Nothing needs soldering; every part plugs into a breadboard. Rather than buying parts one by one, compare the contents of a ready-made starter kit with this list; we cover what the typical kits include in the Arduino starter kit guide.
| Item | Per group | For the class (8 groups + 1 spare) | Week used |
|---|---|---|---|
| Arduino Uno or compatible board | 1 | 9 | All |
| USB cable (USB A-B for the Uno) | 1 | 9 | All |
| Breadboard (400 or 830 holes) | 1 | 9 | All |
| Male-to-male jumper wires | 20 | about 200 | All |
| 5 mm LEDs (mixed red, yellow, green, blue) | 8 | about 80 | 1–7 |
| 220 Ω resistors | 8 | about 80 | 1–7 |
| 10 kΩ resistors | 2 | about 25 | 4–6 |
| Push buttons (4-pin) | 2 | about 20 | 4–5 |
| LDR (light sensor) | 1 | 10 | 6 |
| Buzzer (passive, so the pitch can change) | 1 | 10 | 8 |
| HC-SR04 ultrasonic distance sensor | 1 | 10 | 8 |
| 10 kΩ potentiometer (optional) | 1 | 10 | 7 |
| Raspberry Pi Pico + micro USB cable (optional) | 1 | a few | Pico week |
Sample lesson: week 5, toggling an LED with a button
The flow below is for a 40-minute lesson, and you can reuse the same skeleton every week: warm-up, reading the blocks together, prediction, circuit, real code, changing one value, exit question. The example uses the week 5 project, Toggle an LED with a Button (On/Off), because the idea that "a program can remember something" is one of the turning points in robotics coding.
| Time | Stage | What happens |
|---|---|---|
| 0–5 min | Warm-up | Question: press a light switch once and the lamp turns on, press again and it turns off. How does the switch remember? Write a few answers on the board. |
| 5–12 min | Reading the blocks together | Open the project on the projector with Show as blocks on. Read the blocks aloud from top to bottom and discuss what the ledState and lastButton variables hold. |
| 12–15 min | Prediction | Each group writes down: what does the LED do if I hold the button? What would change without the wait 50 ms block? |
| 15–25 min | Building the circuit | Button to D13 and through 10 kΩ to GND (pull-down), LED through 220 Ω to D7. Roles: builder, checker, reader. |
| 25–32 min | Uploading the real code | Switch the toggle off, copy the code into the Arduino IDE and upload it to the board. Test the predictions. |
| 32–37 min | Changing one value | Change delay(50) first to 0, then to 300, and watch how the LED behaves with quick presses. Groups that want to can change the LED pin in both the code and the circuit. |
| 37–40 min | Exit question | One question, on paper: what does the line ledState = !ledState do, and which block matches it? |
1int ledState = 0;     // LED durumu: 0 = kapalı, 1 = açık / LED state: 0 = off, 1 = on
2int lastButton = 0;   // Önceki buton okuması / Previous button reading
3
4void setup() {
5  pinMode(13, INPUT);   // Buton girişi (harici pull-down) / Button input (external pull-down)
6  pinMode(7, OUTPUT);   // LED çıkışı / LED output
7}
8
9void loop() {
10  int button = digitalRead(13);   // Butonu oku / Read the button
11  if (button != lastButton) {     // Buton durumu değişti / Button state changed
12    if (button == 1) {            // Yalnız basış anında (LOW -> HIGH) / Only at the press (LOW -> HIGH)
13      ledState = !ledState;       // Durumu tersine çevir / Flip the state
14      digitalWrite(7, ledState);
15    }
16    delay(50);                    // Sıçramayı atlamak için kısa bekleme / Short wait to skip the bounce
17    lastButton = button;          // Bu okumayı sakla / Store this reading
18  }
19}
20
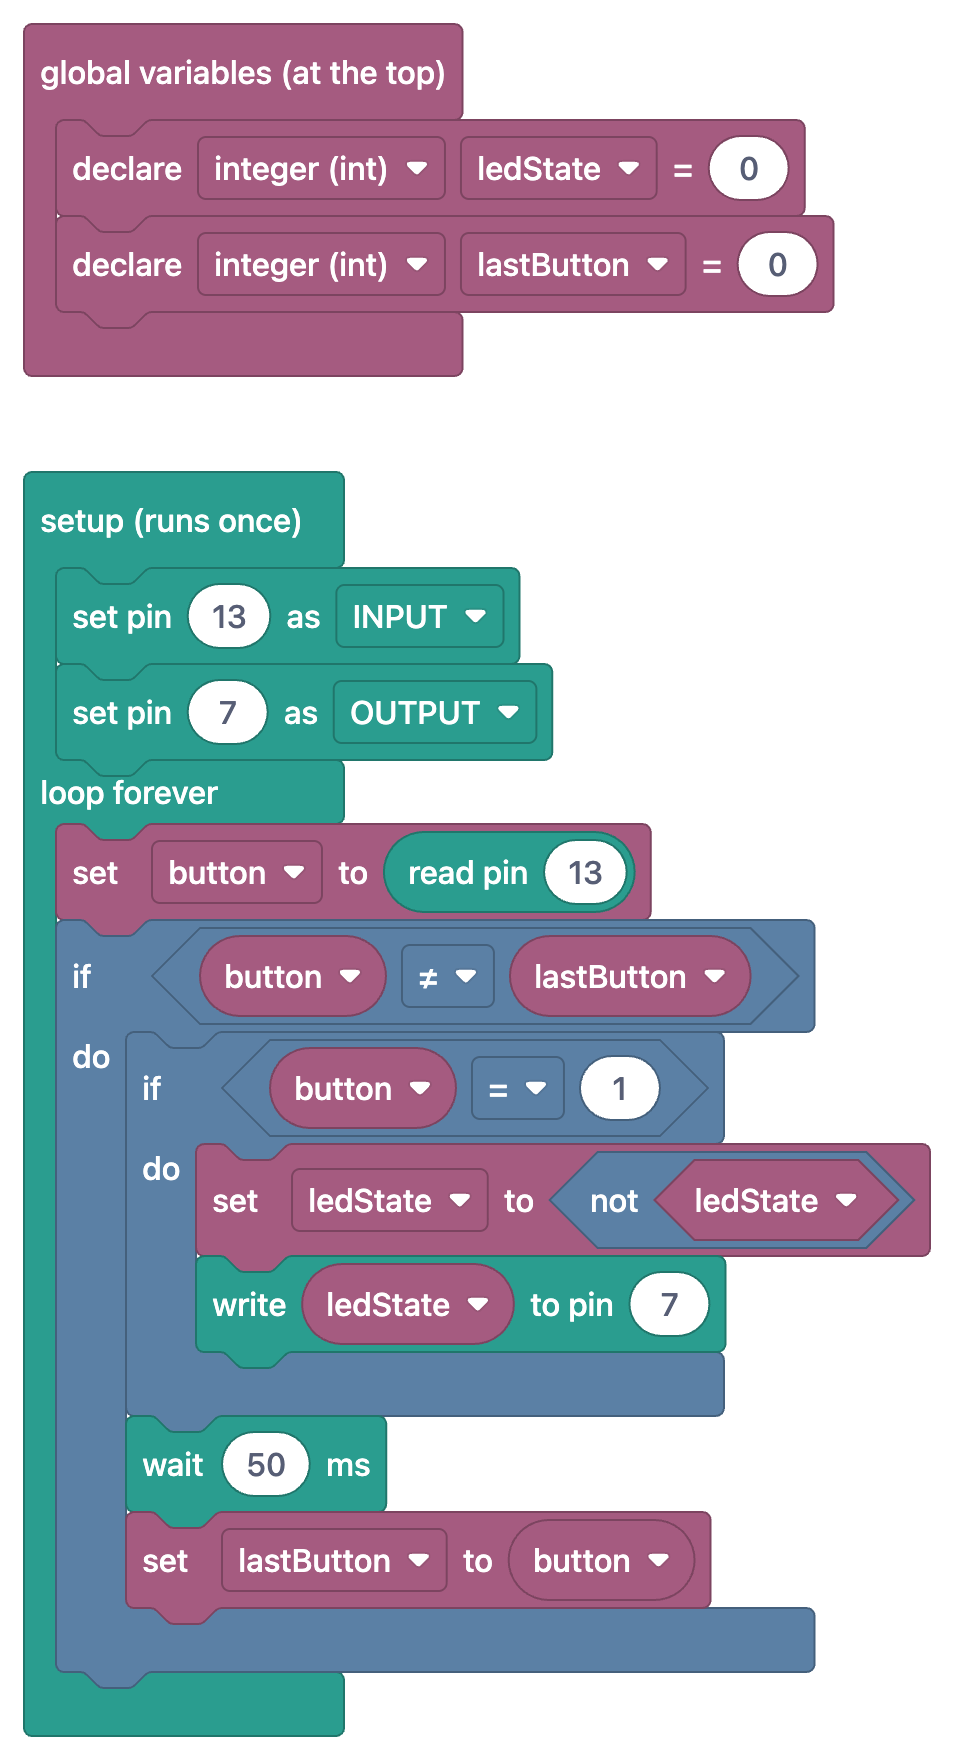
Put the blocks and the code side by side and the matching is very clear: the two "declare integer (int)" blocks inside "global variables (at the top)" are the first two lines of code, "setup (runs once)" becomes setup() and "loop forever" becomes loop(). The "set button to read pin 13" block is the line int button = digitalRead(13), the "≠" comparison is !=, and "not ledState" is !ledState. During the prediction stage most groups say "if I hold the button, the LED will blink"; when they try it, they see the LED change only once, because the outer "if" only runs when the button state changes. The moment a wrong prediction gets corrected is the most instructive minute of the lesson. When delay(50) becomes 0, they notice that some presses flip the LED twice, so it looks as if nothing happened; that is a perfect lead-in to explaining button bounce. For groups curious about why the button goes to GND through 10 kΩ, show them the button wiring guide.
How to use BlueGrays in class
- Open the project: Students open the week's project on their own phone or a tablet. The block badge in the project list marks block projects, and the filter can show only those. Every project comes with a parts list and a circuit diagram.
- Show as blocks: Turning on this toggle in the code section replaces the code with the blocks of the same program. Tap the image and it opens full screen, which is ideal for reading together on the projector. The blocks appear in the app's language.
- Understand the blocks: This tab walks through the program step by step; each step shows only that step's blocks and what they do. It works like a teaching assistant for groups that need more time.
- Switch to the real code: Turn the toggle off and the code of the same program appears. Students copy it into the Arduino IDE (Thonny for the Pico) and upload it to the board.
- Code guide: Examples for commands such as digitalWrite, if/else and for live here, and every example also comes as blocks. Students learn to check here before asking you when they forget a command.
- Daily questions: Five questions a day, levelled from A1 to C2, with a weekly ranking and badges. You can suggest it for a few minutes of revision a day between lessons.
No hardware? Teaching with a simulator
If the kits haven't arrived yet or you teach remotely, browser-based simulators such as Tinkercad Circuits and Wokwi are a good alternative. Both include the Arduino Uno, breadboard, LEDs, resistors and buttons, plus a wide range of sensors; you build the circuit on screen and run it by pasting in the project's real code. The flow stays the same: students read the blocks in BlueGrays, paste the code into the simulator, change a value and watch the result. Tinkercad also has its own block editor, so some teachers spend the first weeks entirely there. Still, seeing a real LED light up and plugging wires into a breadboard does wonders for motivation, so it works better to put the simulator before the hardware rather than in place of it. For setup and a first circuit, see the guides on Arduino simulation in Tinkercad and Wokwi simulation.
Assessment: a rubric for block coding lessons
In robotics lessons the process matters as much as the result: the group that lit the LED and the group that figured out why it wouldn't light may well have learned the same thing. It's easier to use the rubric below by focusing on one criterion per lesson; by the end of the 8 weeks it's enough for every student to have been observed at least once on each of the six criteria. The exit questions feed into the table too.
| Criterion | 1 – Beginning | 2 – Developing | 3 – Secure |
|---|---|---|---|
| Building the circuit | Builds with help, frequent wiring mistakes | Builds from the diagram, finds one or two mistakes alone | Barely needs the diagram, spots a classmate's mistake |
| Reading blocks | Reads block names, can't explain the order | Explains what the program does in general | Explains each block and why the order matters |
| Predicting and testing | Doesn't predict or test | Predicts and records the result | Finds the reason when a prediction fails |
| Matching blocks to code | Can't match a block to a line of code | Finds the pin, write and wait blocks in the code | Also matches if, for and variable lines |
| Changing values | Changes a value, can't explain the effect | Changes it and explains the effect | Plans the change, finds errors from the compiler message |
| Teamwork | Often drops their role | Does their role | Rotates roles, helps other groups |
Differentiation for fast and slow groups
- Fast groups, extra task: add a fourth phase to the Traffic Light code (for example red and yellow together) or recalculate its timings for a real junction. They change the code themselves in the Arduino IDE and use the blocks as a reference.
- Fast groups, combining: in week 8, try merging HC-SR04 Distance Measurement (Serial Display) and Using a Buzzer into one program that sounds the buzzer when the distance drops below 20 cm, a simple parking sensor. This is the first real step from reading blocks to writing your own code.
- Fast groups, switching platform: groups with a Pico open the Pico external LED project and compare the MicroPython version with the C++ code from week 1.
- Slow groups, pre-built circuit: hand out the circuit already built, or put a large printout of the diagram on the table. These groups spend their time reading the blocks and predicting.
- Slow groups, step by step: let them go through the program with the Understand the blocks tab and say in one sentence what happens at the end of each step. Changing one value is a perfectly good goal for that day.
- Mixed pairing: make sure each group has at least one "reader"; putting a student who's quick at wiring but slow at reading with one who's the opposite moves both forward.
Moving from blocks to text: when and how
There's no fixed week for the switch; the right moment is when a student can look at the blocks and say what the program will do before running it. In this plan most classes reach that point in week 4 or 5. Even so, meeting code starts on day one: because the real code goes onto the board in every lesson, students see the setup(), loop() and digitalWrite() lines from week 1. The switch slowly shifts from "look at the blocks, upload the code" to "read the code, check the blocks if needed". The sequence below makes that shift easier:
- Put the blocks and the code side by side and find the line that matches each block together (weeks 1–3).
- Hide the blocks, read only the code and predict what the program will do; then check with Show as blocks (weeks 4–5).
- Change values only in the code: wait time, pin number, threshold. If you get a compile error, read the first line (weeks 5–6).
- Write a new line of code: for example add one more LED to the LED Chaser array and raise the loop limit from 6 to 7 (week 7).
- Combine two projects into a small program of your own; when you get stuck, check the examples and blocks in the Code guide (week 8 and beyond).
Safety tips
The From Blocks to Code series at a glance
- Part 1: What block coding is and how a block program turns into real code.
- Part 2: Blinking an LED with block coding: the first program, blocks and C++ side by side.
- Part 3: The if block and a button: conditions and their if/else counterpart.
- Part 4: Loops and variables: loop forever and loop(), counting and for, arrays, counters.
- Part 5: Reading sensors with blocks and MicroPython: serial port, LDR, HC-SR04 and the Pico.
- Part 6: This post, which turns everything you've learned into an 8-week block coding lesson plan for the classroom.
That wraps up the series; if you'd like to refresh the logic once more before starting in class, go back to the beginning with what block coding is. You can look at every project in the plan in the BlueGrays app with its circuit diagram, parts list and code; switch to the block version of the same program with Show as blocks, or to the step-by-step explanation with Understand the blocks, and run the lesson comfortably from the projector.
Frequently asked questions
What is robotics coding?
Robotics coding means writing programs that let a board sense its surroundings with sensors, make decisions and respond with parts such as LEDs, buzzers or motors. Schools usually start with boards like the Arduino and block coding, then move on to text-based languages such as C++ or MicroPython.
What age should kids start learning robotics coding?
Children aged 9 to 10 and up who read comfortably can start together with an adult. At that age, block coding and breadboard circuits that need no soldering are the best starting point. Around age 12, most students are ready to read real code.
How do I write a block coding lesson plan?
Give each lesson a single new idea and order them as output, timing, variables, input, conditions, sensors and loops. Keep the same skeleton every lesson: warm-up, reading the blocks together, prediction, circuit, real code, changing one value and an exit question. The 8-week plan in this post follows that structure.
What materials do I need for an Arduino class?
Per group, an Arduino Uno or compatible board, a USB cable, a breadboard, jumper wires, LEDs, 220 Ω and 10 kΩ resistors, a button, an LDR, a buzzer and an HC-SR04 distance sensor are enough. For a class of 24 in groups of 3, prepare 8 kits plus one spare.
Can you teach robotics coding without an Arduino?
Yes, browser-based simulators such as Tinkercad Circuits and Wokwi let you build the circuit on screen and run the code. Lighting a real LED is a big motivation boost, though, so the simulator works best as preparation for the hardware.
When should students move from block coding to Arduino code?
When a student can look at the blocks and say what the program will do, it's time; in this plan most classes reach that point in week 4 or 5. First read the blocks and code side by side, then change values only in the code, and finally write new lines.
Projects to build after reading this
See all projects
LED Blink
The very first hello of electronics: switching a single LED on and off. The Arduino turns the LED on and off at short intervals, so the light blinks quickly. You see in the simplest way how the board

Traffic Light
A tiny copy of the traffic light you see on the road every day. Red stays on for two seconds, yellow flashes for a moment, green stays on for two seconds, then it goes back to red through yellow again

LED Police Lights
Just like the lights on a police car: the red LED flashes three times in quick succession, then the blue LED flashes three times, and the pattern keeps repeating without a break. All you need is two L

LED Control with a Push Button (Push)
Just like a doorbell: the light stays on as long as you press, and goes off when you let go. The Arduino keeps listening to the button; while it's pressed the LED is on, and the moment you lift your f

Toggle an LED with a Button (On/Off)
Press the button once and the light comes on, press it again and it goes off, just like the light switch in your room. The Arduino notices every press and flips the LED to the opposite state, waiting

Night Light with Ldr
A little night light that turns on by itself when it gets dark and goes off when morning comes. A light sensor measures how bright the room is, and the Arduino switches the LED on when it is dark enou

LED Chaser
Lights that switch on one after another, as if they were running. The Arduino lights six LEDs one at a time; each glows for a brief moment and goes out, so the light walks from start to end and then s

HC-SR04 Distance Measurement (Serial Display)
The HC-SR04 sensor works just like a bat finding its way in the dark: it sends out a sound you cannot hear, listens for the echo and measures how far away the object in front of it is. The Arduino wri