
What Is Block Coding? How Block Programs Become Real Code
What is block coding and how does block-based coding work? Block colors, setup and loop, and an LED Blink example that turns blocks into C++ and MicroPython.
Block coding is a way of building a program by stacking colorful, puzzle-like blocks instead of typing it line by line. Each block is a single instruction, such as "set the pin as output", "turn the LED on" or "wait 100 ms". Because blocks only snap together where they fit, mistakes like a missing semicolon, an unclosed bracket or a misspelled command simply can't happen, and you can focus on the logic of the program. That's why block-based coding is widely seen as the gentlest way into programming for kids and beginners.
But block coding is not a toy language. Behind every block program that goes to an Arduino or a Raspberry Pi Pico there is real code, and the board always runs that code. In this article you'll see what blocks are, what their colors tell you and how a block program turns into real C++ or MicroPython code, step by step, using free BlueGrays projects. At the end you'll also find the strengths and limits of block coding and how it fits together with tools like Scratch, mBlock and Tinkercad.
What is block coding and why is it called "block"?
In block coding every instruction is a piece with notches and bumps on its edges. The bump at the bottom of one block sits in the notch of the block below, so the instructions run from top to bottom in order. Some blocks have an open mouth inside them: these are container blocks that hold other blocks. Others have white oval slots where you plug in a number or another value block. Since the shape of each piece decides what can go where, it's almost impossible to build a program that breaks the rules. Most of today's block editors follow the path opened by MIT's Scratch and Google's open-source Blockly library. The blocks in BlueGrays are Blockly-based too; we designed the block set ourselves for electronics projects and show it in the app's language. Keep in mind that blocks are not a new programming language. Instructions, order, conditions, loops and variables are exactly the same concepts as in text code; blocks just make them visible.
How does a block program turn into real code?
Block editors use a code generator behind the scenes: every block type has a template in text code, and as the blocks are stacked those templates are joined in order. BlueGrays is a bit stricter: the blocks of every project are built to match the real code that goes onto the board one to one. Every line in the blocks has a counterpart in the code, and every line of code has a counterpart in the blocks. In Arduino and ESP32 projects that code is C++; in Raspberry Pi Pico projects it is MicroPython. To read a block program you only need to know these five parts:
- setup (runs once): the section that runs only once when the board powers up or resets. It matches the setup() function in Arduino, and it's usually where pins are set as INPUT or OUTPUT.
- loop forever: the section that runs from top to bottom again and again as long as the board is on. In Arduino it's the loop() function, in MicroPython a while True: loop.
- Command blocks: blocks like "write HIGH to pin 9" or "wait 100 ms" that are stacked inside the containers and each do one job. Most of them are a single line of text code.
- Value blocks: numbers like 9 or 100 in the white ovals, and rounded blocks that return a result, such as "read pin 13". They plug into the slots of command blocks and become the value inside the brackets in the code.
- Dropdowns: options like OUTPUT / INPUT or HIGH / LOW. They match the OUTPUT / INPUT and HIGH / LOW constants in the code, and since the menu only offers valid options, they can't be misspelled.
Blocks and code side by side: the LED Blink project
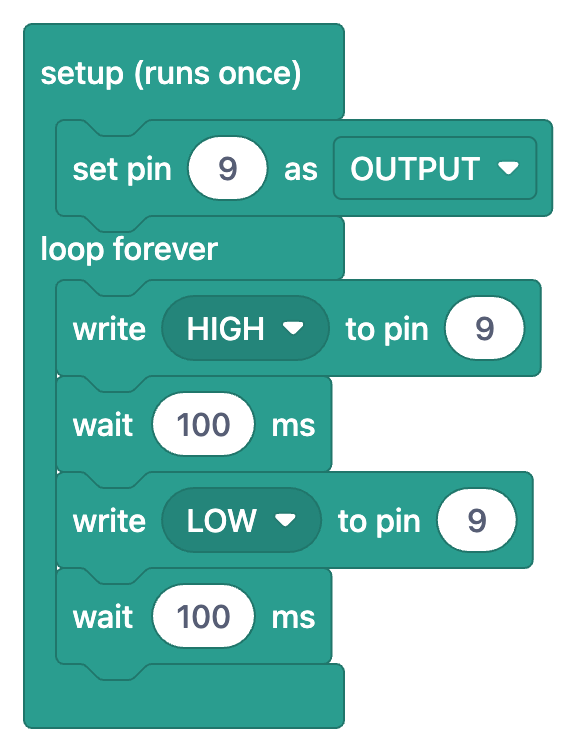
Enough theory, let's look at a real example. In the LED Blink project an LED and a resistor are connected to pin 9, and the LED blinks five times per second. In the table below we translate the blocks from the image above into code one by one. Each row is one block, and each block is one line of code:
| Block | C++ code | What it does |
|---|---|---|
| setup (runs once) | void setup() { … } | Its contents run once when the board starts |
| set pin 9 as OUTPUT | pinMode(9,OUTPUT); | Makes pin 9 an output that can drive the LED |
| loop forever | void loop() { … } | Its contents repeat as long as the board runs |
| write HIGH to pin 9 | digitalWrite(9,HIGH); | Puts 5 V on the pin, the LED turns on |
| wait 100 ms | delay(100); | Pauses the program for 100 milliseconds |
| write LOW to pin 9 | digitalWrite(9,LOW); | Sets the pin to 0 V, the LED turns off |
| wait 100 ms | delay(100); | Waits 100 ms with the LED off |
1void setup() {
2  pinMode(9,OUTPUT);     // LED pini çıkış / LED pin as output
3}
4
5void loop() {
6  digitalWrite(9,HIGH);  // LED'i yak / Turn the LED on
7  delay(100);            // 100 ms bekle (1000 ms = 1 sn) / Wait 100 ms (1000 ms = 1 s)
8  digitalWrite(9,LOW);   // LED'i söndür / Turn the LED off
9  delay(100);            // 100 ms bekle / Wait 100 ms
10}
The code has a few things you don't see in the blocks: the word void, curly braces and semicolons. These are C++ syntax rules, and in blocks the shape itself takes care of them. The mouth of a container block stands in for the curly braces, and blocks sitting one under another stand in for the order of the lines. If you changed the 100 in the value slot to 1000, the code would say delay(1000) and the LED would blink once per second. If you picked LOW instead of HIGH from the menu, HIGH would become LOW. Thanks to this one-to-one match, after a few projects you start reading the code without looking at the blocks. You'll find the circuit and the step-by-step build of this same project in part 2 of the series: blinking an LED with block coding.
What do the block colors mean?
In block editors color is not decoration; it shows which category a block comes from. When you first look at a program, the colors let you read it as "a variable is declared here, a decision is made here, there's a loop here". These are the categories you'll see in the block images of BlueGrays projects:
| Color | Category | Example blocks from the images | Code |
|---|---|---|---|
| Teal | Program structure, pin input/output, waiting | setup (runs once), loop forever, set pin … as OUTPUT, write HIGH to pin …, read pin …, wait … ms | setup(), loop(), pinMode(), digitalWrite(), digitalRead(), delay() |
| Dark teal | Pico pin and timing blocks | pin led : GP LED_PIN, OUTPUT; turn on (on) / turn off (off) pin led; wait 0.5 seconds | Pin(…, Pin.OUT), led.on(), led.off(), time.sleep() |
| Dusty rose | Variables | global variables (at the top), declare integer (int) … = …, set … to … | int ledState = 0; ledState = …; |
| Blue-gray | Logic | if … do, ≠ and = comparisons, not … | if, !=, ==, ! |
| Green | Loops | count with i from 0 to 5 by 1 | for (int i = 0; i < 6; i++) |
| Purple | Arrays | array 2 3 4 5 6 7, item i of ledPins | int ledPins[] = {2, 3, 4, 5, 6, 7}; ledPins[i] |
Shapes give you hints too. Condition and comparison blocks have pointed, hexagon-like ends and fit into the condition slot of an "if" block, while number and variable blocks have rounded ends. There's one detail in the table worth noticing: in the "count with i from 0 to 5 by 1" block the upper limit is included, so i takes the values 0, 1, 2, 3, 4 and 5. In code this is written with the condition i < 6, and the loop runs six times. The LED Chaser project lights six LEDs one after another with exactly this block; we cover loop and array blocks in detail in the loops and variables part of the series.
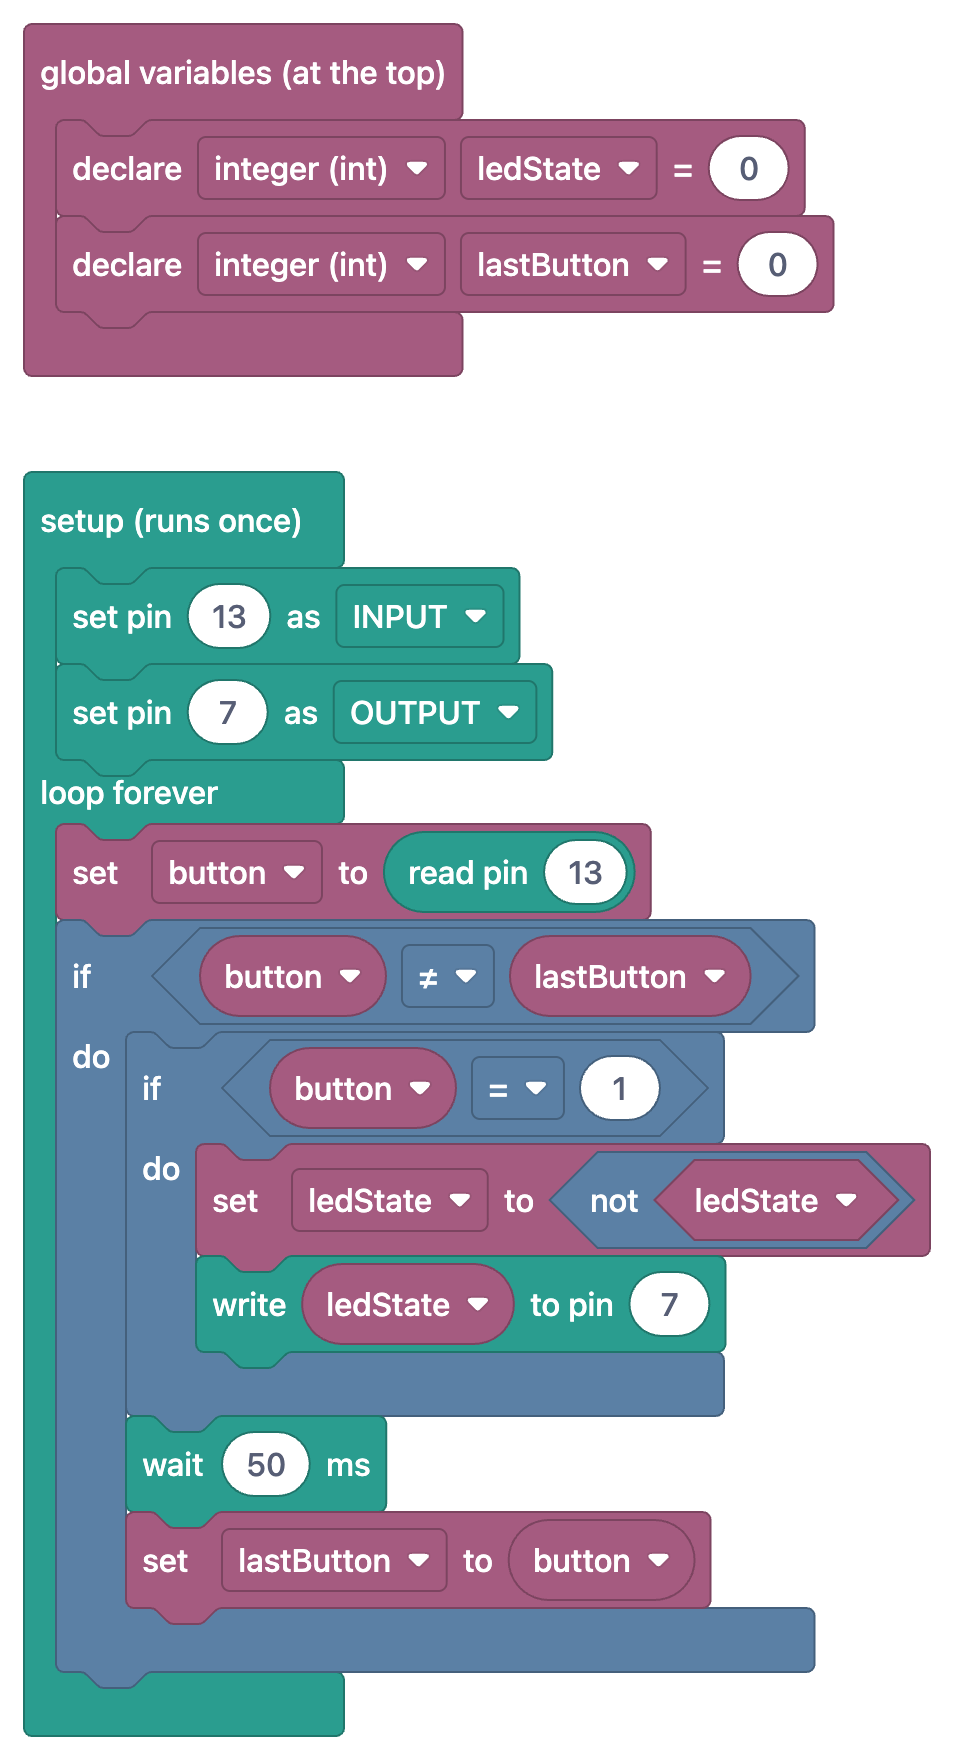
The nested "if" blocks in this image become nested if lines in the code. The "if button ≠ lastButton" block is the line if (button != lastButton) and runs when the button's state changes. The "if button = 1" inside it catches only the moment of the press. The "set ledState to not ledState" block is the line ledState = !ledState;, which turns 0 into 1 and 1 into 0. The "write ledState to pin 7" block that follows is digitalWrite(7, ledState);. You can see the whole project on the Toggle an LED with a Button (On/Off) page; we unpack the link between the "if" block and if/else in the buttons and conditions part of the series.
C++ on Arduino and ESP32, MicroPython on the Pico
The same block logic is translated into different languages on different boards. In Arduino and ESP32 projects the blocks map to C++ code, and the setup and loop forever blocks become setup() and loop(). For example, the blocks of the LED Blink with ESP32 project have the same structure as LED Blink; only the pin is 5 and the delay is 500 ms. In Raspberry Pi Pico projects the blocks turn into MicroPython. There is no setup() function here: whatever is inside the setup block becomes lines that run once at the top of the file, and the loop forever block becomes a while True: loop.
1from machine import Pin
2import time
3
4# ============ PIN ============
5LED_PIN = 14                    # Boştaki herhangi bir GPIO / Any free GPIO
6led = Pin(LED_PIN, Pin.OUT)     # led adlı pin, ÇIKIŞ / pin named led, OUTPUT
7
8print("== BlueGrays: Pico Harici LED Blink ==")
9print("LED pin: GP" + str(LED_PIN))
10print("500ms yakip 500ms sonduruyor / 500ms on 500ms off")
11
12# ============ ANA DÖNGÜ / MAIN LOOP ============
13while True:
14    led.on()                    # LED'i yak / Turn the LED on
15    print("[LED] ACIK / ON")
16    time.sleep(0.5)             # 0.5 saniye bekle / Wait 0.5 s
17
18    led.off()                   # LED'i söndür / Turn the LED off
19    print("[LED] KAPALI / OFF")
20    time.sleep(0.5)             # 0.5 saniye bekle / Wait 0.5 s
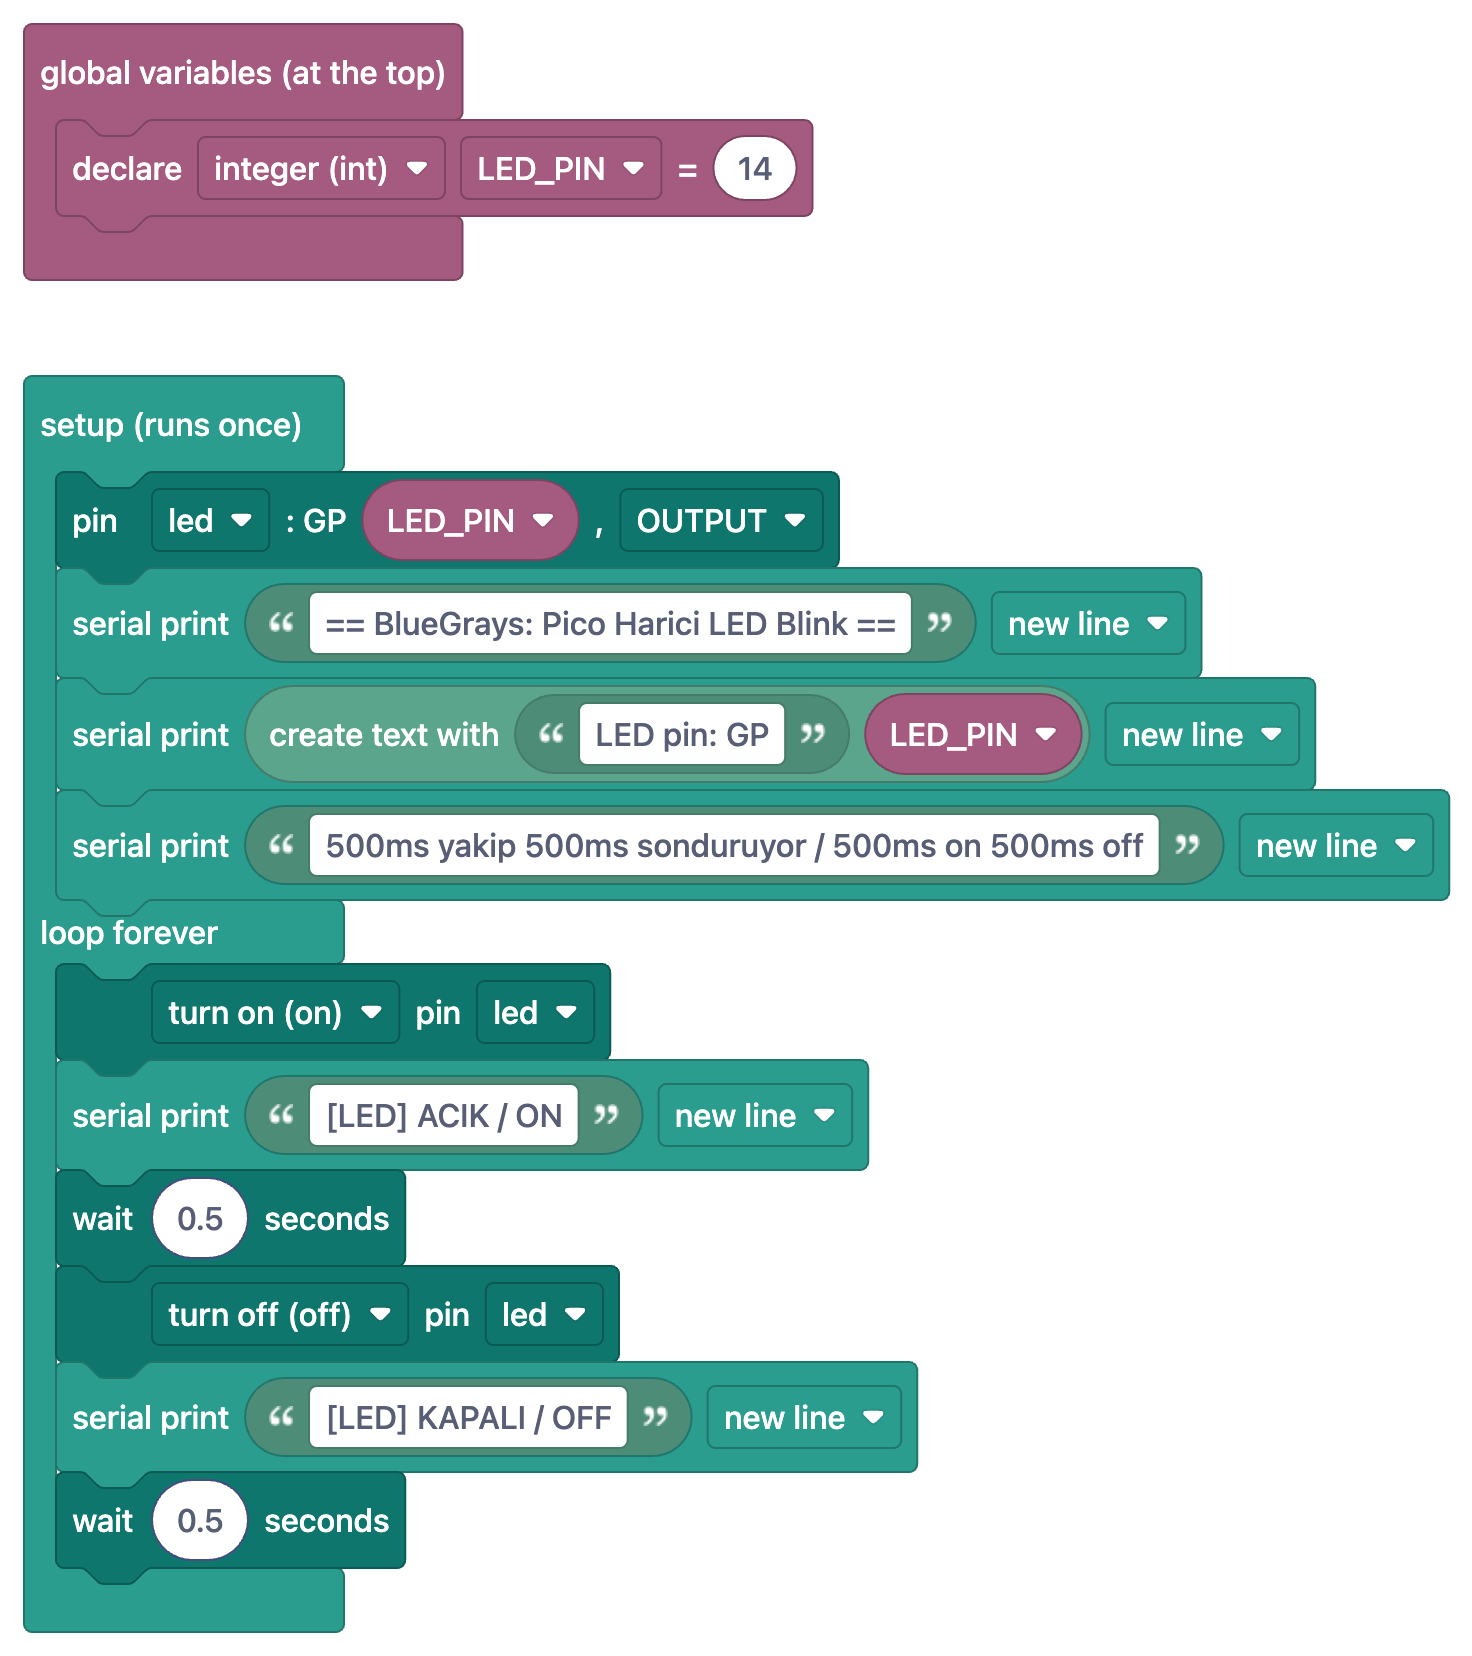
You can follow the match line by line. The "declare integer (int) LED_PIN = 14" block inside "global variables (at the top)" is the line LED_PIN = 14; since Python doesn't write types, the (int) part doesn't appear in the code. The "pin led : GP LED_PIN, OUTPUT" block becomes led = Pin(LED_PIN, Pin.OUT). "turn on (on) pin led" is led.on(), "wait 0.5 seconds" is time.sleep(0.5) and "serial print" is a print() line. The "create text with" block puts the text "LED pin: GP" and the value of LED_PIN side by side with +. Watch out: on Arduino the delay is in milliseconds (100 ms), in MicroPython in seconds (0.5), and the blocks show this difference with separate "wait … ms" and "wait … seconds" blocks. For the circuit, see the Raspberry Pi Pico external LED page; if you're new to the Pico, reading what is the Raspberry Pi Pico first will make things easier.
Advantages and limits of block coding
| Topic | Advantage | Limit |
|---|---|---|
| Syntax errors | No semicolon, bracket or upper/lower case mistakes | Logic errors still happen: a wrong pin or a wrong delay is wrong in blocks too |
| Readability | Colors and shapes show the structure of a program at a glance | Long programs take up a lot of screen space as blocks; text code stays more compact |
| Learning speed | You reach your first program in minutes and concepts become concrete | If you never leave blocks, text-code skills like reading error messages don't develop |
| Scope | Core building blocks like pins, waits, conditions, loops, variables and serial are ready | Not every library or hardware detail has a block; advanced projects need text code |
| Link to the board | The same logic looks familiar on Arduino, ESP32 and Pico | The board always runs text code, so sooner or later you need to know it |
Block coding isn't the answer to everything; it's a bridge. In the first weeks it's a very powerful way to grasp the logic of a program, and the real goal is to cross that bridge at some point and look at text code with confidence. Seeing blocks and code side by side speeds up that move, because in every new project you see the same blocks turn into the same lines again and again. After meeting the "loop forever" block in ten projects, the word loop() won't feel strange anymore. When you're ready for text code, Arduino programming basics walks you through everything from variables to functions with examples.
Who is block coding for?
- Kids and families: kids aged 9-10 and up who read comfortably can start together with an adult. With the blocks on the screen and an LED lighting up on the breadboard, coding stops being abstract.
- Teachers and robotics clubs: explaining a project with blocks first and then moving to its code brings different levels together in the same lesson. The lesson plan we prepared for this is in the last part of the series: a robotics coding lesson plan with block coding.
- Arduino beginners: if you just got your board and the first sketches look confusing, blocks are the fastest way to see what each line does. To get to know the board itself, start with what is Arduino.
- Anyone who finds code hard to read: understanding a program someone else wrote is a skill in itself. Looking at the blocks of a ready-made project to grasp its structure makes it easier to see what a long piece of code does where.
Compared with Scratch, mBlock, Tinkercad and MakeCode
Most tools that come to mind for block coding are editors that run on a computer or in the browser, and each one shines in its own area. What they have in common is that you drag the blocks and build your own program. BlueGrays answers a different need: it shows the blocks of ready-made, tested projects side by side with the circuit diagram, the parts list and the real code. You can't arrange your own blocks into a program in the app (for now); instead you read how a program that is known to work is built. That's why these tools don't compete; they complement each other. For example, you can compare a traffic light sequence you built in mBlock with the blocks of the Traffic Light project, and if you don't have a board yet, simulate the circuit in Tinkercad. For details, see the mBlock with Arduino and Tinkercad Arduino simulation guides.
| Tool | Who arranges the blocks? | Where it shines |
|---|---|---|
| Scratch | You, on a computer | A first step into coding with animations, stories and games |
| mBlock | You, on a computer | Programming boards like Arduino with Scratch-style blocks and viewing the generated code |
| Tinkercad Circuits | You, in the browser | Building a circuit virtually and simulating it with block or text code |
| MakeCode | You, in the browser | Switching between blocks, JavaScript and Python for boards like the micro:bit |
| BlueGrays | Ready-made, matched to the project's code | Reading the blocks of tested projects side by side with real code, circuit diagram and parts list |
How to use block coding in the BlueGrays app
- Pick a project with the block badge in Discover › Projects. You can also use the filter to show only projects with blocks. More than 100 projects in the app come with blocks, most of them Arduino projects and the rest ESP32 and Raspberry Pi Pico projects.
- In the project's code section, turn on the Show as blocks switch. The blocks of the same program replace the code; tap the image to open it full screen and zoom in comfortably.
- Switch to the Understand the blocks tab. The program is explained step by step: each step shows only that step's blocks and what they do.
- If you wonder what a command does, check the Code guide. Every example there is shown with blocks as well as with Arduino and MicroPython commands.
- Turn the switch off to get back to the real code. Copy it, paste it into the Arduino IDE (Thonny for the Pico) and upload it to your board.
- Reinforce what you've learned with the Daily questions: 5 questions every day at levels from A1 to C2, a weekly leaderboard and badges.
Both the blocks and the code of 31 projects are completely free; in the other projects the blocks unlock with Premium, just like the code. Some of the free projects that make a good first step: LED Blink, Two LEDs Blinking Alternately, Traffic Light, LED Chaser, LED Blink with ESP32 and Raspberry Pi Pico Onboard LED Blink. You can see all the projects with blocks by platform on the block coding page, where you can also compare an example project's blocks and code side by side.
From Blocks to Code series: the roadmap
- What block coding is and how a block program becomes real code (this article)
- The first program: blinking an LED with block coding, blocks and C++ side by side
- Buttons and conditions: the "if" block and if/else
- Loops and variables: loop forever, count, arrays and counters
- Reading sensors with blocks, the serial port and MicroPython on the Pico
- For teachers: a robotics coding lesson plan with block coding
In the next part of the series we build the LED Blink project from this article from scratch, with the circuit, the blocks and the C++ code side by side, in blinking an LED with block coding. Until then, you can open the projects mentioned here in the BlueGrays app with their circuit diagrams and code, and switch with one tap to the block version of the same program with Show as blocks or to a step-by-step explanation with Understand the blocks.
Frequently asked questions
What is block coding?
Block coding is a way of building programs by stacking colorful blocks that fit together like puzzle pieces instead of typing commands. Each block is one instruction, and the blocks run from top to bottom in order. Since syntax errors are impossible, kids and beginners can focus on the logic of the program.
What is the difference between block-based and text-based coding?
The concepts are the same: instructions, order, conditions, loops and variables exist in both. The difference is in the writing; text code needs semicolons, brackets and exact spelling, while in blocks the shape of the pieces takes care of that. For long and complex programs, text code is more practical.
What age is block coding for?
Kids aged 9-10 and up who read comfortably can start together with an adult, and there are picture-based block tools for younger children. There's no upper age limit; adults who are new to Arduino also benefit a lot from blocks in their first projects.
Which programs are used for block coding?
The best known are Scratch, mBlock, Tinkercad Circuits and MakeCode, where you drag blocks on a computer and build your own program. In the BlueGrays app you read the blocks of ready-made, tested Arduino, ESP32 and Pico projects side by side with their real code. These tools complement each other.
Can you program an Arduino with blocks?
Yes, but the board always runs text code. Tools like mBlock translate the blocks into Arduino code behind the scenes and upload it. In BlueGrays the blocks match the project's C++ code one to one; to upload, you copy the code and paste it into the Arduino IDE.
How do you move from block coding to text coding?
The most effective way is to look at the blocks and the code of the same program side by side. After following which line each block becomes in a few projects, you start reading code without the blocks. Then try making small changes directly in the code, for example changing the delay or the pin number.
Projects to build after reading this
See all projects
LED Blink
The very first hello of electronics: switching a single LED on and off. The Arduino turns the LED on and off at short intervals, so the light blinks quickly. You see in the simplest way how the board

Two LEDs Blinking Alternately
Two LEDs blink quickly in turn: when one lights up the other goes off, as if they were tossing a ball back and forth. The Arduino keeps each light on for a fifth of a second and then hands over to the

Traffic Light
A tiny copy of the traffic light you see on the road every day. Red stays on for two seconds, yellow flashes for a moment, green stays on for two seconds, then it goes back to red through yellow again

LED Chaser
Lights that switch on one after another, as if they were running. The Arduino lights six LEDs one at a time; each glows for a brief moment and goes out, so the light walks from start to end and then s

Toggle an LED with a Button (On/Off)
Press the button once and the light comes on, press it again and it goes off, just like the light switch in your room. The Arduino notices every press and flips the LED to the opposite state, waiting

LED Blink with ESP32
Teaches basic GPIO output usage with ESP32. We achieve a blinking effect by turning an LED on and off from a digital pin. ESP32 version of the classic blink project on Arduino UNO; the basic blink commands in the Arduino environment are the same, but the ESP32's pin layout and 3.3 V GPIO levels differ from those of the Arduino UNO.
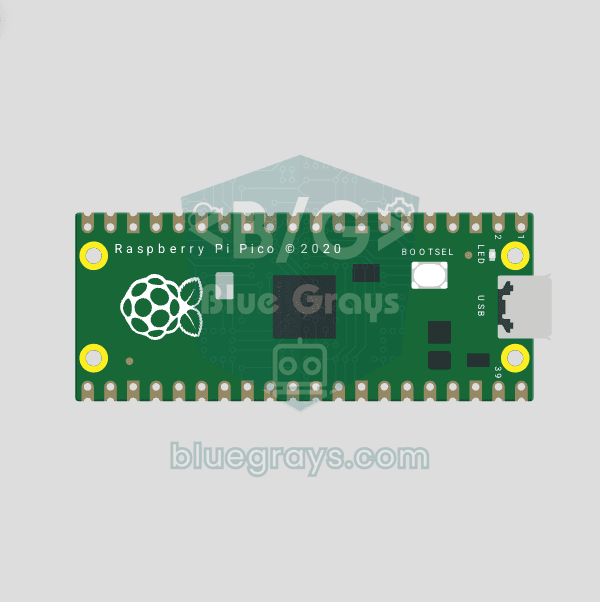
Raspberry Pi Pico Onboard LED Blink (Pico and Pico W)
The opening project of the Raspberry Pi Pico series! We blink the green onboard LED to verify the board works — a classic "Hello World" first experiment. NO external components, just Pico and USB cable. Code is written in MicroPython (the official language backed by Raspberry Pi Foundation). Learn machine.Pin class, Pin.OUT mode, led.on()/off() methods, and time.sleep() in Thonny IDE. Follow every toggle live in the Serial (REPL) output. Also perfect to verify
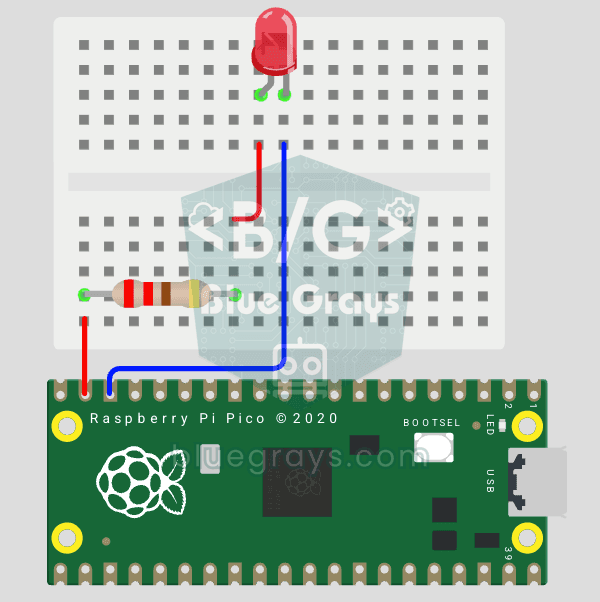
Raspberry Pi Pico: Controlling an External LED (Breadboard)
The next step after Pico’s built-in LED: connecting an external LED to the breadboard and controlling it via the GP14 pin. In this project, you’ll learn how to use any of the Pico’s general-purpose GPIO pins as an output, the LED’s polarity (long leg = anode/+, short leg = cathode/–), and why a current-limiting resistor (220Ω) is required. If you don’t include the resistor, excessive current will flow through the LED and it may burn out. The circuit is very simple: Pico GP14 → 220Ω resistor → LE