
Differentiated Instruction in an Arduino Class: 3 Tiers, 1 Lesson
Differentiated instruction for an Arduino class: a 10-minute pre-assessment, basic/developing/advanced tasks per project, grouping, fair rubric, 40-min plan.
Differentiated instruction in an Arduino class doesn't mean planning three separate lessons: the whole class builds the same project, but every project is split into three tiers. The basic tier gets the project running and changes one value, the developing tier adds a new behaviour to the project, and the advanced tier changes how the program is structured. You find out which student starts on which tier with a 10-minute pre-assessment in the first lesson, and the groups aren't fixed either: they change with the stage of the lesson. That way the student who has never seen code ends the lesson with a working traffic light, the student who has built robots is busy rewriting the same traffic light without delay(), and both of them can still talk about the same circuit.
This post covers every part of that template: three questions and a mini task for the pre-assessment, a table that turns the score into a tier, ready-made basic/developing/advanced tasks for four free BlueGrays projects, when each of four grouping strategies works, an extension menu for fast students, a scaffolding list for students who need support, an assessment approach that measures everyone from their own tier, and a minute-by-minute 40-minute lesson flow. The examples all rest on the same assumption: a class of 24 students, 12 Arduino Uno kits, pair work and a 40-minute lesson. We covered classroom logistics (kit boxes, help queue, packing up) in the post on teaching Arduino to a large class and the weekly topic order in the 8-week robotics coding plan; here the focus is only on how to open the same lesson up to different levels.
What differentiation means in an Arduino lesson, and what it doesn't
Differentiation means everyone reaches the same goal by different routes and to different depths. In an Arduino lesson the goal is usually a concept: digital output, timing, conditions, analog input. If the goal of the traffic light lesson is the idea that "the order and duration of commands decide how the program behaves", the basic-tier student learns it by changing one delay() value and the advanced-tier student by rebuilding the timing with millis(). Both have learned the same idea, one at the surface and one in depth. Differentiation can change three things: the task itself (what gets done), the support (how much help there is) and the product (how the student shows what they learned). The template in this post uses all three together.
Differentiation is not: giving the fast student more of the same work (lighting ten LEDs instead of five isn't depth, it's just the same task taking longer), sending the slower student to an easier project (then the class can't talk about the same thing), or labelling students as the "weak group" and the "strong group" for the whole year. With Arduino that label is also misleading, because skill grows along three separate strands: building circuits, reading code and debugging. A student who has built a robot may wire a circuit with their eyes closed yet never have read the code; a student who has never seen a circuit but has had Python lessons at school may understand an if block before anyone else. That's why tiers are given to tasks, not to students, and a student can move up a tier in any lesson.
A 10-minute pre-assessment in the first lesson
The pre-assessment isn't for marks, it's for assigning tasks in the first week; tell your students that from the start. It's done individually and on paper, so students who work in pairs don't end up in each other's shadow. It takes 10 minutes in total, and scoring 24 sheets after the lesson takes you about 10 minutes. Each item gets 0, 1 or 2 points, for a total out of 8.
- Concept question (2 min): "Why do we put a resistor in between when we connect an LED to an Arduino?" A student who says it limits the current gets 2, a half answer such as "so the LED doesn't burn" gets 1, a blank gets 0.
- Code reading question (2 min): Write four lines on the board: digitalWrite(2, HIGH); delay(1000); digitalWrite(2, LOW); delay(1000); Question: "What does this code do? What changes if you write delay(200) instead of delay(1000)?" Explaining both correctly gets 2, only one gets 1.
- Experience statement (1 min): "What have you built before?" Nothing is 0; block coding or a step-by-step project from a kit is 1; a project where they wrote or changed their own code is 2.
- Mini task (4 min): Hand out a printed drawing of an LED circuit with two mistakes in it: the LED is reversed and the resistor is missing. The student circles the mistakes and writes how to fix them. Finding both gets 2, finding one gets 1.
- Collect (1 min): Collect the sheets. Don't tell anyone their score before the next lesson; tiers are handed out quietly in the first lesson using task cards.
| Total score | What it typically looks like | Starting tier | Focus of the first week |
|---|---|---|---|
| 0–3 | Resistor question blank, can't read the code line by line, has never built a project | Basic | Pre-built circuit, Show as blocks on, change one value and observe the result |
| 4–6 | Knows the resistor limits the current, predicts the delay change, finds one mistake | Developing | Build the circuit from the diagram, add a button or an LED to the project |
| 7–8 | Finds both mistakes, explains the code, has written their own code before | Advanced | Change the program's structure (millis(), arrays, functions), mentoring when needed |
| Contradictory (e.g. statement 2, others 0) | Says "I built a robot" but struggles with the circuit and code questions; probably assembled a kit by following instructions | Developing | Watch closely in the first lesson and correct the tier within two lessons |
You can back up the paper assessment with two tools in BlueGrays. The first is the Placement test in the Daily questions section: this 15-question test places the student on one of six levels (A1 First Light, A2 Circuit Builder, B1 Sensor Explorer, B2 Project Maker, C1 System Designer, C2 Workshop Master). As a rough mapping you can treat A1–A2 as the basic tier, B1–B2 as developing and C1–C2 as advanced. The second is the third question of the Project Finder, How much experience do you have?: its three options (This will be my first project, I've built a few projects, I'm comfortable, challenge me) match the three tiers almost one to one and show how the student sees themselves. You can set both as homework before the first lesson; the gap between their result and the paper score tells you whom to watch closely. We explained the placement test questions and the level system in detail in the daily questions post.
Same project, three tiers: a template with four free projects
The rule of the template is simple. The basic tier gets the project running, changes one value and observes the result; most of the time this is the Try it yourself task in the project's Understand the code tab. The developing tier adds a new behaviour to the project: a button, an LED, a condition or Serial Monitor output. The advanced tier changes the structure of the program: millis() instead of delay(), an array and a loop instead of repeated lines, holding a state between two thresholds. The four projects below are completely free in BlueGrays with the circuit diagram, code, blocks and Understand the code; no student in the class needs Premium.
| Project | Basic tier | Developing tier | Advanced tier |
|---|---|---|---|
| Traffic Light (LEDs on D2, D3, D4) | Try it yourself: raise the yellow after green from 0.3 seconds to 1.5 seconds (the last delay(300) line becomes delay(1500)), then make red last 5 seconds | Add a pedestrian button: wire the button between D7 and GND and use pinMode(7, INPUT_PULLUP); if the button was pressed, red lasts 6 seconds instead of 2 | Rewrite the same light with millis() so nothing blocks; the button is read at all times and no press is missed in any phase |
| Toggle an LED with a Button (On/Off) (button D13, LED D7) | Try it yourself: make the LED change when the button is released, not when it's pressed (the line if (button == 1) becomes if (button == 0)) | Add a second LED (D8, 330 Ω); each press lights only the first, only the second, both, then neither, in turn (a counter from 0 to 3) | Write debouncing with millis() instead of delay(50); detect a press longer than 1 second separately and switch both LEDs off |
| Night Light with Ldr (LDR on A0, LED on D13) | Try it yourself: raise the threshold from 50 to 300, slowly cover the LDR with your hand and watch when the LED turns on | Print the reading with Serial.println(); measure the bright and dark values in the classroom and choose the threshold from that measurement (Measuring Light Intensity with an LDR helps) | Write a two-threshold (hysteresis) version: on below 250, off above 350; the LED stops flickering for values in between |
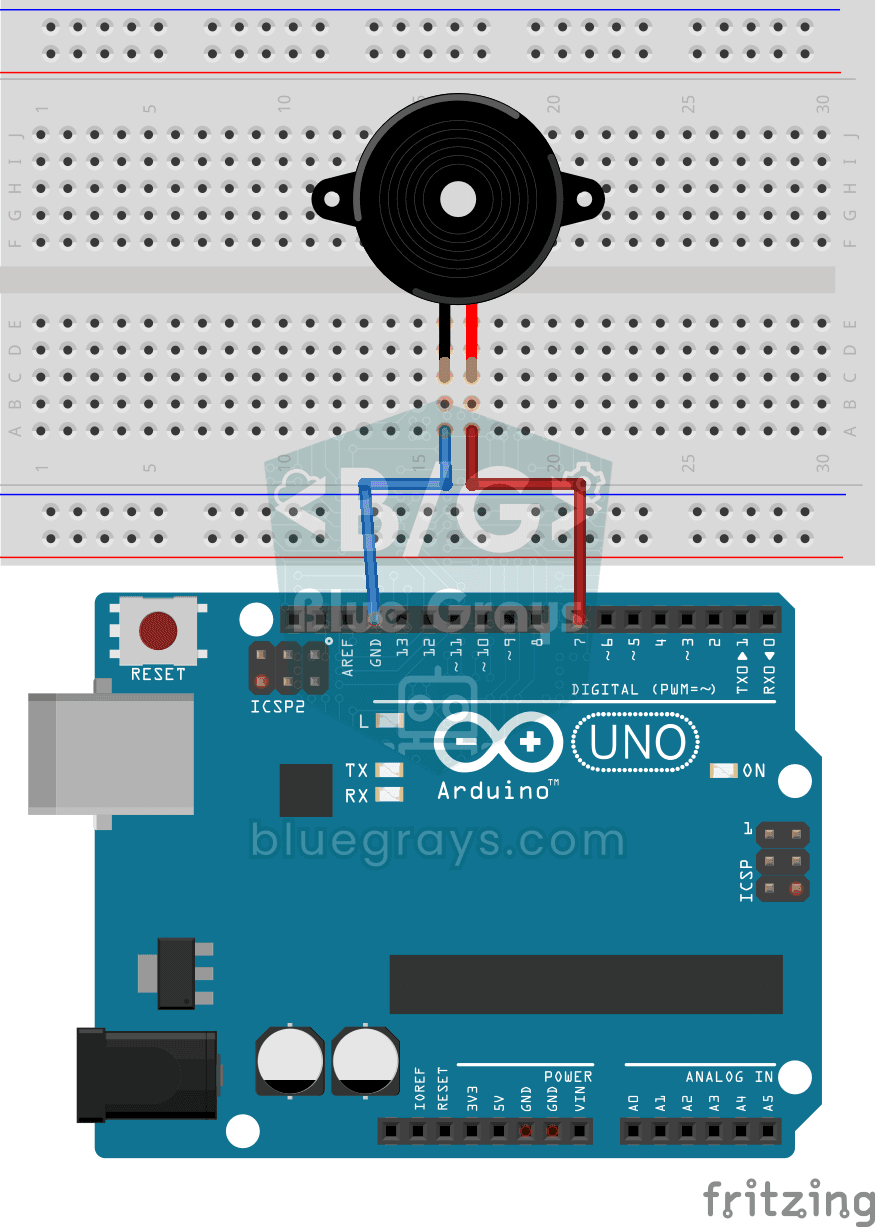
| Using a Buzzer (buzzer on D7) | Try it yourself: raise the frequency from 400 Hz to 1000 Hz and listen to the difference (needs a passive buzzer) | Make a two-tone siren: 600 Hz and 900 Hz in turn, 400 ms each; then play with the durations to make it sound like an emergency siren | Put the notes and durations in two arrays and play a short 8-note melody with a for loop; move the melody into a single function |
Use the table as tier cards: print the three cards for each project on A5 paper and give each pair the card for their tier, but leave the other two cards in the middle of the table. A pair that finishes the basic card is free to pick up the developing card; a pair struggling with the advanced card is equally free to go back to the developing one, and that doesn't count as failure. For the circuit and code details of the pedestrian button task in the developing tier, see the Arduino traffic light post, and for the non-blocking timing behind the advanced tier, the millis() and delay() post. All tiers are built on the same base circuit, so the class talks about one diagram and the advanced student can tell their basic-tier classmate, "look, I don't have the delay() line you changed".
| Extra materials | Per pair | Class total (12 pairs + spares) | Which tier, which project? |
|---|---|---|---|
| Push button | 1 | 14 | Developing and advanced tiers, Traffic Light |
| LED + 330 Ω resistor | 1 + 1 | 14 + 14 | Developing and advanced tiers, Toggle an LED with a Button (On/Off) |
| Passive buzzer | 1 | 13 | All tiers, Using a Buzzer (the frequency doesn't change on an active buzzer) |
| Tier cards (A5) | 3 cards × 4 projects | 36 cards per project | All |
| Step cards (A5) | 1 deck | 5–6 decks | Basic tier |
| Pre-built half circuit | — | 2–3 breadboards | Basic tier, pairs who get stuck |
Grouping strategies: which one, and when?
In a mixed-ability class one grouping method isn't enough for the whole lesson. With flexible grouping the groups change with the stage of the lesson: mixed groups explain things to each other when a new concept is introduced, pairs at a similar level move at their own pace during tier tasks, and experts circulate at the end. The table below sums up where each of four strategies works and where it backfires.
| Strategy | How it's set up | When it works | Watch out |
|---|---|---|---|
| Homogeneous (same tier) | Two students from the same tier share one kit | During tier tasks, when everyone needs to move at their own pace | If it stays the same for long it turns into a label; review it every 2–3 lessons |
| Heterogeneous (mixed) | A basic-tier student next to an advanced or developing one | When introducing the project, building the circuit, reading the blocks together | The advanced student may do everything; the least experienced one touches the keyboard and the wires |
| Expert table | 2–3 advanced students sit at one table and stuck pairs bring their questions there | In the second half of the tier tasks, when your help queue gets long | The expert only explains and doesn't touch wires or keyboard; rotate the role so their own work moves on too |
| Pair programming | One is the driver (keyboard and wires), the other the navigator (reads the diagram and code); roles swap every 10 minutes | In code writing and debugging tasks, especially in the developing and advanced tiers | The navigator only talks and doesn't take over the screen; you announce the role swap on a timer |
Pair programming suits an Arduino lesson very well because the work has two hands: while one student deals with the circuit and the Arduino IDE, the other keeps the project's diagram and code open on a phone. The navigator guides with "the long leg of the red LED goes to the D2 row" or "look at the delay at the end of loop", and the driver carries it out. Swapping roles every 10 minutes stops the basic-tier student in a mixed pair from finishing the lesson without ever touching the keyboard. Set up the groups after the first pre-assessment, but refresh them every 2–3 lessons based on which colour of card students are picking up; a pair that moved up a card can start the next lesson with a new partner.
An extension menu for fast students
Telling a student who finishes early to "help your classmate" is easy, but on its own it isn't an extension; that student should also learn something new in that lesson. An extension menu means the student knows what to do the moment they finish and doesn't need to come to you. Write the menu in the corner of the board or on the back of the advanced tier card.
- Try it yourself, but without hints: Solve the Try it yourself task at the end of each project's Understand the code tab without touching the Hint and Show solution buttons, then compare your solution with the one in the app. After that, write a new task on the same project for your classmates. We explained how the tasks work in the Understand the code post.
- Code guide cards: In the Code guide, cards such as millis(), arrays and tone() are the groundwork for the advanced tier tasks. Each card ends with a mini quiz and a See it in projects section, so the student sees the command in other projects sorted from easy to hard. You'll find how the guide is organised in the Arduino commands guide post.
- Moving on to Premium projects: For a student who has finished the free projects, the next step is the Premium projects with sensors, displays and motors. The student doesn't need their own card or subscription for this; one of the educator codes described below is enough.
- Designing their own project: Have them design a project that combines two free projects: for example, Traffic Light plus Night Light with Ldr gives a traffic light that blinks yellow at night. The student first writes the goal, parts list, pin table and test plan on paper, then builds it. The student can share the finished project with photos and code as a Tutorial topic via Learn > Forum > New Post; the topic is public, not a private class post.
- Mentor role: Sitting at the expert table is a job, not a reward: the mentor only asks questions and explains, and doesn't touch the wires. Spending one lesson mentoring and the next on their own advanced task lets a fast student move forward both by explaining and by doing.
- A level-up goal: On the Daily questions side, when a student's level reaches 100% and they've answered enough questions at that level, the level-up exam unlocks; getting 9 out of 10 right moves them up a level. Setting a "move up one level" goal at the start of term is an extension that carries on outside the lesson too.
You don't have to buy codes for the whole class to open Premium projects to a few fast students. The Educator Packages screen in the Profile has packages of 5, 10 or 50 codes, monthly or yearly. Payment is one-off and doesn't renew automatically; the student enters the code on the Redeem Code screen and becomes Premium without adding a card to their Apple or Google account. Unused codes don't expire, and on the My Codes screen you see who used which code. Every code in a yearly package has 6 transfers and every code in a monthly package has 1: if the need shifts to another student during the term, you can cancel a used code and create a new one with the remaining time. In the 10-code package the cost per student is about 20% lower than in the 5-code one; you'll see the current price for your country on the same screen. Tell your students one thing up front: when a student redeems a code, their name, username, email and profile photo are shared with the educator who gave it. We covered the packages in detail in the bulk Premium codes for a class post.
Students who need support: lighten the load, not the goal
For a student who needs support, the aim isn't to give them an easier project but to remove unnecessary load from their path while they reach the same idea in the same project. If a student who has never seen a circuit tries to learn the breadboard's internal connections, which way round the LED goes, choosing a port in the Arduino IDE and the code all in the first lesson, they end the lesson having learned none of them. Scaffolding means you temporarily carry some of that load; as the student progresses, you take the scaffolding away piece by piece.
- Pre-built circuit: Give the basic-tier pair the circuit already built, or a half circuit with only the breadboard part ready. That way the first 15 minutes don't go on wiring and the student's energy goes to the question "which line changes what?". In the second lesson they build half of the circuit themselves, in the third all of it.
- Show as blocks and Understand the blocks: The Show as blocks switch on the project page shows the same program as blocks; while it's on, the Understand the code tab becomes Understand the blocks and explains the program block by block, step by step. The blocks are for reading and the project's real code is still what goes onto the board, but a student who reads the "if value < 50" block has no trouble finding the if (value < 50) line in the code.
- Step cards: Split the circuit and the task into 5–6 cards with one step per card: "Plug the long leg of the red LED into the D2 row", "Put the 330 Ω resistor between the LED's short leg and the GND row". The student turns the card over when it's done. Cards make progress visible and cut down the "what do I do now?" questions.
- Let's build it together mode: The Let's build it together mode in the app splits the project into four steps: Get the parts ready, Build the circuit, Upload the code, Run and test. In this mode the screen stays on and the student can carry on from the step where they stopped. For a basic-tier pair who leave the phone on the table it works like a ready-made deck of step cards. Details of the mode are in the first Arduino project post.
- Short goals: Split the 40 minutes into three small goals and write them on the board: "1. The LEDs light up in order", "2. I changed the yellow duration", "3. I explained my change in one sentence". A student who ticks each goal sees at the end of the lesson what they've achieved.
- The If you get stuck section: The If you get stuck section of the Understand the code tab lists common symptoms and their fixes. Teaching basic-tier students to look there first, then ask a classmate and only then come to you is the first step towards solving problems on their own.
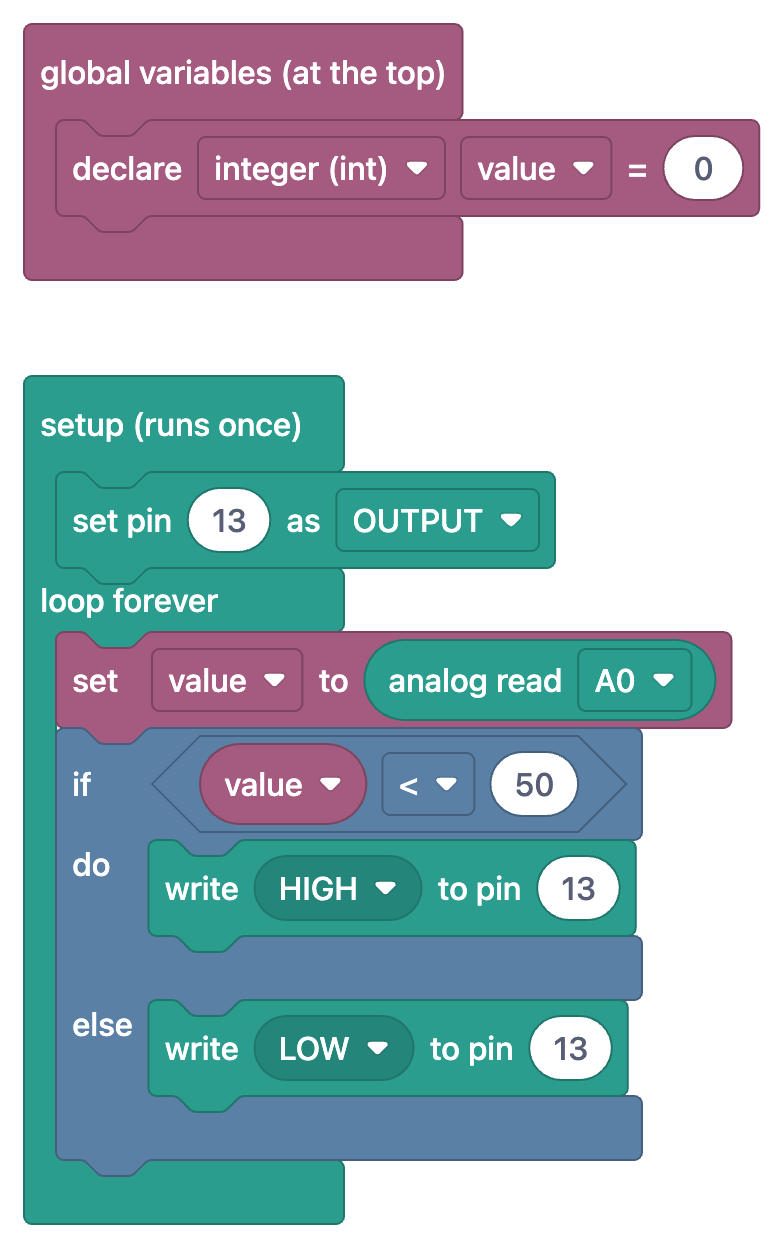
For a basic-tier pair, a successful lesson looks like this: in the Night Light with Ldr project the circuit comes pre-built, the students read the blocks and say "if the value is less than 50, the LED turns on" in their own words, set the threshold to 300 and upload it, cover the LDR with their hands to see that the LED now turns on earlier, and on the exit question write "the higher the threshold, the less darkness it takes to turn the LED on". That's less code than the hysteresis task in the advanced tier, but it reaches the same idea: the program compares a measurement with a number and decides. In the next LDR lesson the same pair can read the value in the Serial Monitor and choose the threshold themselves, which moves them into the developing tier on their own.
Fair assessment: everyone is measured from their own tier
In a differentiated lesson, marking everyone against the same criteria is unfair in two ways: the basic-tier student gets a low mark because they never write millis(), and the advanced student gets the top mark without ever being stretched. The fix is to split assessment in two. The first part is the process criteria that are the same in every tier: predicting and testing, explaining what they did, finding the mistake. The second part is whether the student reached the goal of their own tier and how far they've come since the first pre-assessment. The table below shows what the same criterion looks like at the "goal reached" level in each tier. For detailed criteria, a submission form and a portfolio, see the Arduino lesson assessment rubric post.
| Criterion | Basic tier: goal reached | Developing tier: goal reached | Advanced tier: goal reached |
|---|---|---|---|
| Circuit | Compares the pre-built or half circuit with the diagram and says whether it's correct | Connects the added button or LED to the right pin using the diagram | Chooses the pin for the new part and writes the pin table |
| Code change | Changes one value and uploads it | Adds a new condition or output and fixes compile errors on their own | Changes the program's structure (millis(), arrays, functions) |
| Predict and test | Writes down a prediction before the change | Tries more than one case (e.g. pressing the button in different phases) | Looks for the program's edge cases and writes a test plan |
| Explanation | Says what the changed line does in one sentence | Explains to a classmate how the added part works | Explains why they chose this structure and how it differs from the delay() version |
| Debugging | Fixes one problem using the If you get stuck section | Locates the mistake with the Serial Monitor or an LED | Helps another pair find their mistake without fixing it for them |
An example for working out a mark: out of 100 points, give 40 to the process criteria that are the same in every tier (prediction, explanation, debugging), 40 to the goal of the student's own tier and 20 to progress. The progress score looks at whether the student moved up a tier during the term and how much they improved the weak strand from their pre-assessment (circuits, reading code or debugging). Let's say a student who scored 2 on the pre-assessment started picking up developing-tier cards halfway through the term: they get full marks for progress. A student who scored 8 and finished advanced-tier tasks all term without ever being stretched earns the progress points only by trying something new, for example mentoring or designing their own project. Make it a shared baseline that by the end of term everyone can do the basic tier of every project on their own; that way the tier is neither the ceiling nor the floor of the mark.
A 40-minute differentiated lesson flow: Traffic Light
The flow below uses the Traffic Light project and is planned for the first lesson after the pre-assessment. Let's say that after the pre-assessment 5 of the 12 pairs got the basic card, 4 the developing card and 3 the advanced card. While reading the project, two pairs share a table in a mixed seating (one basic pair and one developing or advanced pair); for building and tier tasks each pair goes back to its own kit. The start and end of the lesson are the same for everyone, and the middle splits into three tiers.
| Minutes | Everyone | Basic tier | Developing tier | Advanced tier |
|---|---|---|---|---|
| 0–4 | Warm-up question: why does the yellow light at a junction stay on for such a short time? Tier cards handed out in envelopes | — | — | — |
| 4–10 | Project on the projector with Show as blocks on. Two pairs share a table in mixed seating and read the blocks and pin table (D2 red, D3 yellow, D4 green) together | — | — | — |
| 10–20 | Each pair builds the circuit at its own kit; the less experienced partner holds the wires | Compares the pre-built circuit with the diagram and uploads the code | Builds the circuit from the diagram and uploads the code | Builds the circuit without looking at the diagram, uploads the code, then checks against the diagram |
| 20–32 | Tier tasks (pair programming, role swap at minute 26) | Try it yourself: yellow 1.5 s; then red 5 s. A prediction is written before each change | Pedestrian button on D7, INPUT_PULLUP; if pressed, red 6 s | Non-blocking version with millis(); expert table from minute 28 |
| 32–36 | Sharing: one pair from each tier shows what they changed in 1 minute | Compares their prediction with the result | Shows what happens when the button is pressed during yellow | Shows how the button behaves in the delay() and millis() versions |
| 36–40 | Exit question and packing up | Their tier's exit question | Their tier's exit question | Their tier's exit question |
The exit questions each ask for a one-sentence answer and decide the tier assignments for the next lesson. Basic: "If you change the delay(2000) line to delay(5000), which light stays on and for how many seconds?" Developing: "What does your program do if you press the button right while yellow is on, and why?" Advanced: "Why does pressing the button sometimes not work in the version that uses delay()?" A basic-tier student who answers correctly is invited to try the developing card next lesson; if the advanced answer is vague, that student stays on the advanced card for one more lesson.
- Pre-assessment sheets scored and each student's starting tier noted.
- The project's three tier cards printed, with enough copies for the middle of each table.
- Pre-built or half circuits and step cards ready for the basic tier.
- Extra materials for the developing and advanced tiers (button, LED, 330 Ω, passive buzzer) set aside per pair.
- Mixed table pairings written down for the reading stage; 2–3 advanced students chosen for the expert table.
- Extension menu written in the corner of the board, short goals on the board.
- Exit questions ready on separate slips for the three tiers; the next lesson's tier assignments will be updated from these slips.
A mixed-ability class, set up well, isn't a problem but a resource: the advanced student goes deeper by explaining, and the basic-tier student stays part of the class by talking about the same project. When you plan your next lesson you can start with one of the four projects in the table; all of them have their circuit diagram, code, blocks and Understand the code section free in the BlueGrays app, and you can draw your tier cards straight from their Try it yourself tasks.
Frequently asked questions
How do you differentiate instruction in an Arduino class?
The whole class builds the same project, but the tasks are split into three tiers: the basic tier changes one value, the developing tier adds a new behaviour and the advanced tier changes the program's structure. You decide which tier each student starts on with a short pre-assessment and review the tier every lesson.
How should I group students in a mixed-ability Arduino class?
Use flexible grouping instead of one method: mixed pairs for the introduction and circuit building, same-level pairs for tier tasks and an expert table at the end. For code writing tasks, pair programming with a role swap every 10 minutes works well.
What should students who finish early do in an Arduino lesson?
Give them deeper work, not more of the same: solving the Try it yourself task without hints, rewriting the program with millis() or arrays, designing their own project that combines two projects, or mentoring at the expert table. You can give a student an educator code to move on to Premium projects.
How can a student with no coding experience take part in an Arduino lesson?
Give them a pre-built circuit, have them read the blocks and ask them to change a single value. Show as blocks and Understand the blocks walk through the same program step by step, and the Let's build it together mode splits the project into four steps. In the second and third lessons you reduce the scaffolding so they build the circuit themselves.
How do you pre-assess students before an Arduino unit?
A 10-minute paper check in the first lesson is enough: a concept question, a code reading question, an experience statement and spotting the mistakes in a faulty circuit drawing. Each item scores 0–2; 0–3 starts on the basic tier, 4–6 on developing and 7–8 on advanced. The 15-question Placement test in BlueGrays can be used as support.
How do you grade a differentiated Arduino lesson fairly?
Split the mark in two: process criteria that are the same in every tier (prediction, explanation, debugging) and the student's goal and progress in their own tier. For example, 40 points for process, 40 for the tier goal and 20 for progress. That way the basic-tier student isn't penalised and the advanced student doesn't get full marks without effort.
Projects to build after reading this
See all projects
Traffic Light
A tiny copy of the traffic light you see on the road every day. Red stays on for two seconds, yellow flashes for a moment, green stays on for two seconds, then it goes back to red through yellow again

Toggle an LED with a Button (On/Off)
Press the button once and the light comes on, press it again and it goes off, just like the light switch in your room. The Arduino notices every press and flips the LED to the opposite state, waiting

Night Light with Ldr
A little night light that turns on by itself when it gets dark and goes off when morning comes. A light sensor measures how bright the room is, and the Arduino switches the LED on when it is dark enou
Using a Buzzer
Ever wondered how a doorbell or an alarm makes its sound? The Arduino makes a small buzzer beep at short intervals: beep, pause, beep, pause. You see how sound is made with electricity and take the fi

Measuring Light Intensity with an LDR
Want to see how bright your room is as a number? The LDR, a small part that reacts to light, measures the light around it, and the Arduino writes the value to your computer screen every half second. C

LED Control with a Push Button (Push)
Just like a doorbell: the light stays on as long as you press, and goes off when you let go. The Arduino keeps listening to the button; while it's pressed the LED is on, and the moment you lift your f

LED Chaser
Lights that switch on one after another, as if they were running. The Arduino lights six LEDs one at a time; each glows for a brief moment and goes out, so the light walks from start to end and then s

HC-SR04 Distance Measurement (Serial Display)
The HC-SR04 sensor works just like a bat finding its way in the dark: it sends out a sound you cannot hear, listens for the echo and measures how far away the object in front of it is. The Arduino wri