
App to Learn Arduino: A 30-Day Beginner Roadmap From Zero
Learn Arduino with an app in 30 days: what to buy, what each part of the app does, free projects week by week, key commands and a 30-minute daily routine.
If you're looking for an app to learn Arduino, start with one fact: no phone app programs an Arduino board on its own. The code is uploaded to the board from a computer over a USB cable, using the Arduino IDE (or Thonny on a Raspberry Pi Pico). Everything else about learning, though, works well on a phone: picking which project to start with, reading the circuit diagram, understanding what the code does line by line, working out resistor values and reviewing what you learned every day. So yes, you can learn Arduino with an app: the phone becomes your teacher and notebook, and the computer is where you talk to the board.
This post is a 30-day roadmap for anyone starting from zero with the BlueGrays app: what you need to buy, what each section of the app is for, which free projects to build in which order over four weeks, the commands you learn each week, how to split 30 minutes a day and where people get stuck most often. The whole plan is built on free projects; a separate section explains, without overselling it, when Premium might actually be useful.

What does the app do, and what does the computer do?
Splitting the work in two from the start sets the right expectations. To put a program on the ATmega328P microcontroller of an Arduino Uno, the code has to be compiled and transferred to the board over USB; the Arduino IDE does that, and it needs a computer running Windows, macOS or Linux. In BlueGrays, the Source Code section of a project lets you grab the code with Copy, or use Copy Link to get a link that opens the code on your computer, so you avoid the missing semicolons and wrong capital letters that come with typing it by hand. The Show as blocks switch shows the same program as blocks, but those blocks are for reading only: you can't edit blocks in the app or upload blocks to the board.
| Task | On the phone (BlueGrays) | On the computer |
|---|---|---|
| Choosing a project | Project Finder, the Projects list and filters | Not needed |
| Understanding the parts and the circuit | Required Components, a zoomable Circuit Diagram | Not needed |
| Understanding the code | Understand the code, Show as blocks, Code guide | Read it line by line in the IDE if you like |
| Changing the code | Reading the Try it yourself task and its hint | Arduino IDE (Thonny on the Pico) |
| Uploading to the board | Not possible | USB cable + Arduino IDE |
| Watching sensor values | Not possible | Serial Monitor in the Arduino IDE |
| Doing calculations | Tools: Color code, LED resistor, Ohm's law | Not needed |
| Reviewing and testing yourself | Daily questions, My level | Not needed |
| Asking questions | Forum | Not needed |
What do you need before you start?
The 30-day plan doesn't need a big kit. The list below covers every free project on the roadmap, and most of these parts already come in ready-made starter kits. We recommend the Arduino Uno as your board: it runs on 5 V, the Arduino IDE recognises it without installing an extra package, and most tutorials written for beginners are based on it. A Nano works too, but its pin layout is different, so you'll have to map the connections in the diagram to your own board's pins. The last column shows the day each part first appears in the plan; you don't have to buy everything at once.
| Item | Qty | What for? | First used on day |
|---|---|---|---|
| Arduino Uno (or Nano) | 1 | The board that runs your program | 1 |
| USB cable (USB-B for the Uno, data-capable) | 1 | Uploading code and powering the board | 1 |
| Computer (Windows, macOS or Linux) | 1 | Uploading code with the Arduino IDE | 1 |
| Breadboard (400 or 830 holes) | 1 | Building circuits without soldering | 1 |
| Male-to-male jumper wires | 20 | Connections | 1 |
| LEDs (red, yellow, green) | 6–8 | Outputs, traffic light, LED chaser | 1 |
| 220 Ω resistors | 8 | Limiting LED current | 1 |
| 10 kΩ resistors | 4 | Button and LDR circuits | 8 |
| Push buttons | 2 | Digital input | 8 |
| Buzzer (passive preferred) | 1 | Sound with tone() | 12 |
| LDR (photoresistor) | 1 | Analog reading | 15 |
| HC-SR04 distance sensor | 1 | Measuring distance and the week 4 project | 22 |
| DHT11 temperature and humidity sensor (optional) | 1 | Reading data from a sensor module | 25 |
The sections of the app: what is each one for?
BlueGrays runs on iOS and Android in 10 languages. The bottom tabs are Discover, Learn, Tools, Workshop and Profile; you reach projects and components from the Projects and Components sections at the top of the Discover tab, the daily questions and code guide from Learn › Lessons, and the forum from Learn › Forum. The table below sums up which section you'll use for what over the 30 days, and whether it's free.
| Section | What is it for? | Free? |
|---|---|---|
| Project Finder | Asks 3 questions about what you want to build, the board you have and your experience; suggests the best match plus a warm-up project with the same parts | Yes |
| Projects | 200+ projects; search plus filters for difficulty, platform, price and projects with blocks | The list is open to everyone; 60 projects (20 per platform) are completely free, the rest are Premium |
| Understand the code | A "What does this code do?" summary, a Step by step explanation, If you get stuck and a Try it yourself task | Open in free projects, Premium in the others |
| Show as blocks | Shows the code as blocks (in 100+ projects); for reading only | Open in most free projects |
| Let's build it together | A 4-step guide: get the parts ready, build the circuit, upload the code, run and test; picks up where you left off | Open in free projects |
| Components | 130 part pages with a description and a Used in Projects list | Mostly open, some pages are Premium |
| Workshop | Save the parts you own; see Projects You Can Build and projects with missing parts | Parts tracking (Parts) is Premium; Favorites and 1 IoT device are free |
| BlueGrays IoT | Control an ESP32 or Raspberry Pi Pico W from your phone via Workshop › My devices › Add new device; there are 8 ready templates, Ohmi, the app mascot, prepares the code with your device key, you upload it once from the Arduino IDE with the BlueGraysIoT library, and then you get switches, live values and charts on your phone. Needs 2.4 GHz Wi-Fi | Free: 1 device, 1 chart, 24-hour history; Premium: 10 devices, 20 charts, 30 days |
| Tools | 18 electronics calculators: resistor color code, LED resistor, Ohm's law, 555 timer and more | 7 tools are free; 11 are Premium, most showing a sample calculation |
| Daily questions | A new set of about 3 minutes every day, 6 levels, a placement test, My mistakes and a weekly ranking | The core is free; a few extras are Premium |
| Code guide | 36 cards: 18 Arduino C++, 18 MicroPython; syntax, example, common mistake and a mini test | Yes |
| Forum | Categories such as Question, Idea and Tutorial; add photos and code, accepted answers | Yes |
If you don't know where to start on day 1, open Project Finder: answer "Arduino Uno / Nano" to the board question and "This will be my first project" to the experience question. The WARM UP FIRST · FREE card on the results screen shows a free warm-up project you can start with the same parts. If you don't have a board yet, there's an "I don't have a board yet" option too. Project Finder isn't an alternative to the plan in this post but a companion to it: it will help again in week 4 when you choose your own project.
The 30-day Arduino roadmap
The plan adds exactly one new idea each week: first the board does something (output), then it listens to the world (input), then it measures in-between values and repeats things (analog, serial port, loops), and finally you combine what you've learned. Give each project two days: on the first day build the circuit and get it running, on the second finish Understand the code and do the Try it yourself task. Days 7, 14 and 21 are review days with no new project. Every project in the table is free in BlueGrays with its circuit diagram, code and blocks, and most names in the commands column also have their own card in the Code guide.
| Days | Goal | Free projects | Commands that week | Daily questions |
|---|---|---|---|---|
| 1–7 | Program skeleton, digital output, timing | LED Blink, Two LEDs Blinking Alternately, Traffic Light | setup(), loop(), pinMode, digitalWrite, delay | Day 1: Placement test (15 questions), then a set of about 3 minutes daily; set your Daily reminder |
| 8–14 | Digital input, making decisions, sound | LED Control with a Push Button (Push), Toggle an LED with a Button (On/Off), Using a Buzzer | digitalRead, if / else, ==, !, tone / noTone | Set the question preference to Arduino; clear My mistakes at the weekend |
| 15–21 | Analog sensor, serial port, repetition and arrays | Measuring Light Intensity with an LDR, Night Light with Ldr, LED Police Lights, LED Chaser | analogRead, Serial.begin / println, int variables, for, arrays | Open the Topic card for questions you got wrong; use Practice on a free day |
| 22–30 | Distance sensor, combining two projects, sharing | HC-SR04 Distance Measurement (Serial Display), optionally Temperature and Humidity with DHT11, your own project | pulseIn, delayMicroseconds, else if, your own function | Keep your streak; try the level-up exam if it has unlocked (9 out of 10 correct) |
Week 1 (days 1–7): LEDs, timing and the program skeleton
Day 1 is the hardest, because most of the work is setup: install the Arduino IDE, connect the board over USB, pick the board and port from the Tools menu and upload the code of the LED Blink project. If the LED blinks, your first goal is done. On day 2 open Understand the code in the same project: setup() runs once, loop() runs over and over; pinMode makes a pin an output, digitalWrite writes HIGH or LOW to it, and delay waits in milliseconds. Do the Try it yourself task, then lower the delay value from 1000 to 200 and watch the difference. Days 3–4 are Two LEDs Blinking Alternately: the same commands on two pins; see how the behaviour changes when you change the order of the lines. Days 5–6 are Traffic Light: three LEDs in a sequence with timings such as red 2000 ms, yellow 300 ms and green 2000 ms. On day 7 don't open a new project; give the traffic light your own timings and solve the mini tests on the pinMode, digitalWrite and delay cards in the Code guide.
Week 2 (days 8–14): buttons, decisions and sound
This week the board starts listening to the world. LED Control with a Push Button (Push) lights the LED for as long as you hold the button: digitalRead reads whether the pin is HIGH or LOW, and if / else decides what to do. If you see a resistor next to the button in the diagram, here's why: when the button isn't pressed, a floating pin reads random values, and the resistor pulls it to a defined level. The how to connect a button to Arduino guide explains this with the difference between pull-up and pull-down. Toggle an LED with a Button (On/Off) goes one step further: one press turns it on, the next turns it off. For that the program has to remember the LED state in a variable (ledState = !ledState) and filter out button bounce with a short wait such as 50 ms. Days 12–13 are Using a Buzzer: tone() plays a sound at a given frequency and noTone() silences it. Day 14 is a review day: try a small change that makes a beep when you press the button.
Week 3 (days 15–21): analog sensor, serial port and loops
Up to now everything was either HIGH or LOW. With Measuring Light Intensity with an LDR you see in-between values for the first time: analogRead(A0) returns a number between 0 and 1023, and thanks to the serial port you open with Serial.begin(9600) you can watch that number in the Serial Monitor on your computer. Cover the LDR with your hand and watch the number drop. Night Light with Ldr compares the same value with a threshold: when the room gets dark, the LED turns on. Tuning that threshold to the light in your own room is the most instructive job of the week. Days 18–19 are LED Police Lights: keeping the delay time in an int variable and repeating the same flash several times with a for loop. Days 20–21 are LED Chaser: storing the pin numbers of six LEDs in an array and lighting them one after another with a for loop. If you see garbage characters in the Serial Monitor, check the baud rate; the Serial Monitor guide is this week's helper.
Week 4 (days 22–30): combine two projects into your own
The last week opens with a new sensor: HC-SR04 Distance Measurement (Serial Display) measures how long the sensor's sound pulse takes to come back with pulseIn, converts it to centimetres and prints it to the Serial Monitor. On days 22–23 build and understand this project. If you want a bit more practice with sensor modules, add the optional Temperature and Humidity with DHT11 project; sensors like this are usually read with a library, so check the installing Arduino libraries guide if you need it. Days 24–29 are the real work: combining two projects you've already built into a small project of your own. The most natural combination is the HC-SR04 with the buzzer: a mini parking sensor whose beeps get faster as an obstacle gets closer. On day 30 you share your project in the forum. Here are the steps:
- Pick two free projects and get each of them working on its own first (here HC-SR04 Distance Measurement (Serial Display) and Using a Buzzer).
- From the Understand the code steps of both projects, note which lines do what: one measures distance, the other makes sound.
- Check for pin conflicts: if both projects use the same pin, move one to a free pin and write a small pin table like the one below.
- Build the combined circuit with the USB cable unplugged; then merge the pinMode lines in setup() into one sketch, take the measurement in loop() and turn the result into sound with if / else if / else.
- Print the distance to the Serial Monitor and adjust the 10 cm and 30 cm thresholds based on your own tests.
- Once it works, take a photo of the circuit and share it in the forum under Tutorial or Idea; attach your code with Add code.
| Part | Pin | Arduino Uno |
|---|---|---|
| HC-SR04 | VCC | 5V |
| HC-SR04 | GND | GND |
| HC-SR04 | TRIG | D9 |
| HC-SR04 | ECHO | D10 |
| Buzzer | + | D8 |
| Buzzer | − | GND |
| Red LED | Long leg (through 220 Ω) | D7 |
| Red LED | Short leg | GND |
1// Gün 24-29 örneği: HC-SR04 + buzzer = mini park sensörü / Day 24-29 example: HC-SR04 + buzzer = mini parking sensor
2const int TRIG_PIN = 9;     // HC-SR04 TRIG / HC-SR04 TRIG
3const int ECHO_PIN = 10;    // HC-SR04 ECHO / HC-SR04 ECHO
4const int BUZZER_PIN = 8;   // buzzer (+) bacağı / buzzer (+) leg
5const int LED_PIN = 7;      // kırmızı LED, 220 ohm ile / red LED, with 220 ohm
6
7// Mesafeyi cm olarak ölçer, yankı yoksa -1 döner / Measures distance in cm, returns -1 if there is no echo
8long readDistanceCm() {
9  digitalWrite(TRIG_PIN, LOW);
10  delayMicroseconds(2);
11  digitalWrite(TRIG_PIN, HIGH);                       // 10 µs tetik darbesi / 10 µs trigger pulse
12  delayMicroseconds(10);
13  digitalWrite(TRIG_PIN, LOW);
14  long duration = pulseIn(ECHO_PIN, HIGH, 30000UL);   // en fazla 30 ms bekle / wait at most 30 ms
15  if (duration == 0) return -1;                       // yankı yok / no echo
16  return duration / 58;                               // µs -> cm / µs -> cm
17}
18
19void setup() {
20  pinMode(TRIG_PIN, OUTPUT);
21  pinMode(ECHO_PIN, INPUT);
22  pinMode(BUZZER_PIN, OUTPUT);
23  pinMode(LED_PIN, OUTPUT);
24  Serial.begin(9600);                                 // Seri Monitör'de 9600 seç / select 9600 in the Serial Monitor
25}
26
27void loop() {
28  long cm = readDistanceCm();
29  Serial.print("cm: ");
30  Serial.println(cm);
31
32  if (cm > 0 && cm < 10) {                            // çok yakın: sürekli ses / very close: continuous tone
33    digitalWrite(LED_PIN, HIGH);
34    tone(BUZZER_PIN, 1000);
35    delay(100);
36  } else if (cm > 0 && cm < 30) {                     // yakın: kesik bip / close: short beeps
37    digitalWrite(LED_PIN, HIGH);
38    tone(BUZZER_PIN, 1000, 80);                       // 80 ms bip / 80 ms beep
39    delay(80 + cm * 10);                              // yaklaştıkça bipler sıklaşır / beeps get faster as you get closer
40    digitalWrite(LED_PIN, LOW);
41  } else {                                            // uzak ya da ölçüm yok: sessiz / far or no reading: silent
42    noTone(BUZZER_PIN);
43    digitalWrite(LED_PIN, LOW);
44    delay(100);
45  }
46}
47
What's new in this code is moving the distance measurement into a function of your own called readDistanceCm(), which keeps loop() short and readable. Closer than 10 cm there's a continuous tone, between 10 and 30 cm the beeps get faster with distance, and further away it stays silent. The line delay(80 + cm * 10) shortens the pause as the obstacle gets closer: 330 ms at 25 cm, 200 ms at 12 cm. When you share it in the forum, a photo of the circuit (up to 5 images per post), the code and a one-sentence "what it does" are enough; if you also say what you'd like to improve, the comments will be more useful. If you asked a question and found the answer, close the topic with Mark as Solved.
A 30-minute daily study routine
| Minutes | What to do | Where |
|---|---|---|
| 0–3 | Solve the Daily questions set | Phone |
| 3–8 | Read the project's "What does this code do?" summary and the Step by step section | Phone, Understand the code |
| 8–18 | Let's build it together: tick the parts you have, build the circuit with USB unplugged | Phone + breadboard |
| 18–23 | Open the code on your computer with Copy Link, paste it into the Arduino IDE and upload | Computer |
| 23–28 | Try it yourself: change one value, upload again, watch the result | Computer + phone |
| 28–30 | Tap I made it and write one sentence about what you'll do tomorrow | Phone |
Arduino, ESP32 or Raspberry Pi Pico?
This plan is built on the Arduino Uno because it's the board with the fewest surprises for a beginner. The projects in the app reflect that: of the 200+ projects, more than 110 are for Arduino, around 50 for ESP32 and more than 30 for the Raspberry Pi Pico. The free projects, though, are split evenly: of the 60 free projects, 20 are for Arduino, 20 for ESP32 and 20 for the Raspberry Pi Pico. Our practical advice: finish the first 30 days with an Arduino Uno, then move to the ESP32 if you want Wi-Fi or Bluetooth. If you want to control an ESP32 from your phone, your first device is free with BlueGrays IoT in the app; the guide to controlling an ESP32 from your phone walks you through the steps. Most commands stay the same, and you start with a familiar project such as ESP32 Traffic Light. If you choose the Python route, the 18 MicroPython cards in the code guide and the MicroPython preference in the daily questions make life easier. The ideas of pins, inputs, outputs, conditions and loops are the same on all three boards; you'll find the differences in voltage, memory and wireless in Arduino vs ESP32, and the Pico's MicroPython setup in what is the Raspberry Pi Pico.
| Board | Approx. projects in the app | Software and language | When to choose it | First free project |
|---|---|---|---|---|
| Arduino Uno / Nano | 110 | Arduino IDE, C++ | You're starting from zero and want the basics with LEDs, sensors, motors and displays | LED Blink |
| ESP32 | 50 | Arduino IDE + ESP32 board package, C++ | Control from your phone over Wi-Fi or Bluetooth, IoT; pins are 3.3 V | LED Blink with ESP32 |
| Raspberry Pi Pico | 30+ | Thonny, MicroPython | You want to learn Python or use Python at school | Raspberry Pi Pico Onboard LED Blink (Pico and Pico W) |
What can you do for free, and when does Premium make sense?
The whole 30-day plan in this post is free: the circuit diagram, parts list, code, blocks and Understand the code section of every project on the roadmap are open. On top of that you get 7 electronics tools (Color code, LED resistor, Ohm's law and others), the core of the daily questions, the 36-card code guide, the forum and Project Finder, and you can browse the list and showcase of all other projects. In other words, you can study regularly for a month and build a small project of your own without Premium. The point where Premium makes sense usually comes after day 30, when you head towards a specific topic and the free projects start to run out. Individual Premium is offered as a monthly or yearly subscription, and you'll see the current price for your country on the subscription screen in the app. It's worth considering if one of these applies to you:
- You have a specific goal (a robot car, a clock with a display, phone control over Wi-Fi) and need the steps, code and diagrams of those projects.
- When you get stuck, you want to use the Troubleshooting list on the project page and the Understand the code section in Premium projects.
- You want the 11 Premium tools, such as series/parallel resistors, voltage divider or 555 timer, and to keep your results on all your devices with Saved calculations.
- You want to save your parts in Workshop › Parts and see the projects you can build with what you have.
- If none of these apply, there's no rush: spend the first month with the free projects and decide once you know what you actually need.
Common sticking points and where to look in the app
| Where you're stuck | Likely cause | Where to get help |
|---|---|---|
| Code won't upload, no port shows up | Charge-only cable, board or port not selected, missing driver | The hint in step 3 of Let's build it together; Arduino code not uploading |
| exit status 1, compilation error | Missing semicolon or wrong capitalisation when typing by hand | Copy or Copy Link in Source Code; compilation errors |
| The LED doesn't light | LED in backwards, wrong pin, resistor in the wrong row | Zoom into the Circuit Diagram and compare row by row; the LED resistor tool |
| The button switches on and off by itself | Floating pin or button bounce | If you get stuck in Understand the code; the button guide |
| Garbage characters in the Serial Monitor | Baud rate doesn't match Serial.begin in the code | The Serial.begin / print / println card in the code guide |
| I copied the code but don't understand it | The habit of uploading without reading | Step by step, Try it yourself and Show as blocks |
| I don't know what a part does | You're seeing the part for the first time | The Components page and Used in Projects |
| I don't know what to build next | The plan is over or the next topic doesn't interest you | Project Finder, Surprise me; Projects You Can Build in Workshop |
| Nothing worked | A missed connection or a faulty part | Ask in the forum under Question with a photo of the circuit and your code |
The secret to learning Arduino isn't doing a lot at once but truly understanding one small step every day: light the LED, read why it lights, change one value and review it the next day with three minutes of questions. By the end of these 30 days you'll have used the core commands from pinMode to your own function, read data from a sensor and shared a project of your own built from two others. If you'd like to carry the plan around on your phone, download BlueGrays and open the LED Blink project on day 1; every project on this roadmap is waiting there for free.
Frequently asked questions
Can you program an Arduino from your phone?
Not on the path in this post: BlueGrays doesn't program the board, and the code is uploaded from a computer with the Arduino IDE over a USB cable. The phone is for choosing projects, understanding the diagram and the code, doing calculations and reviewing. You only need to set up the computer once on day 1; after that you copy and upload the code for each project.
How long does it take to learn Arduino?
If you spend 30 minutes a day, you can use core commands such as pinMode, digitalWrite, digitalRead, analogRead, Serial and for in about a month. Designing and coding your own idea from scratch takes a few months of regular projects. Consistency matters more than intensity.
Do I need to know how to code to learn Arduino?
No. The first projects work with a handful of commands, and you can read step by step what each one does in the Understand the code section of the project page. If you've never written code, looking at the program as blocks with Show as blocks first makes the logic easier to grasp.
Is BlueGrays free?
The app is free to download, and 60 projects (20 per platform) are completely free with their circuit diagram, code, blocks and Understand the code section. The daily questions, code guide, forum, Project Finder and 7 electronics tools are free too. The other projects, the Premium tools and parts tracking in Workshop (Parts) require BlueGrays Premium.
What do I need to get started with Arduino?
An Arduino Uno, a data-capable USB cable, a computer, a breadboard, jumper wires, a few LEDs, 220 Ω and 10 kΩ resistors, a button, a buzzer and an LDR are enough for the first three weeks. Add an HC-SR04 distance sensor for week 4. Most of these come in ready-made starter kits.
Should I start with Arduino or Raspberry Pi Pico?
Choose the Arduino Uno if you want to get into electronics with C++ and as few surprises as possible, and the Raspberry Pi Pico if you want to learn Python. BlueGrays has many more Arduino projects; Pico projects run on MicroPython with Thonny. Pins, inputs, outputs and loops work the same way on both, so one makes moving to the other easier.
Projects to build after reading this
See all projects
LED Blink
The very first hello of electronics: switching a single LED on and off. The Arduino turns the LED on and off at short intervals, so the light blinks quickly. You see in the simplest way how the board

Two LEDs Blinking Alternately
Two LEDs blink quickly in turn: when one lights up the other goes off, as if they were tossing a ball back and forth. The Arduino keeps each light on for a fifth of a second and then hands over to the

Traffic Light
A tiny copy of the traffic light you see on the road every day. Red stays on for two seconds, yellow flashes for a moment, green stays on for two seconds, then it goes back to red through yellow again

LED Control with a Push Button (Push)
Just like a doorbell: the light stays on as long as you press, and goes off when you let go. The Arduino keeps listening to the button; while it's pressed the LED is on, and the moment you lift your f

Toggle an LED with a Button (On/Off)
Press the button once and the light comes on, press it again and it goes off, just like the light switch in your room. The Arduino notices every press and flips the LED to the opposite state, waiting

Measuring Light Intensity with an LDR
Want to see how bright your room is as a number? The LDR, a small part that reacts to light, measures the light around it, and the Arduino writes the value to your computer screen every half second. C
Using a Buzzer
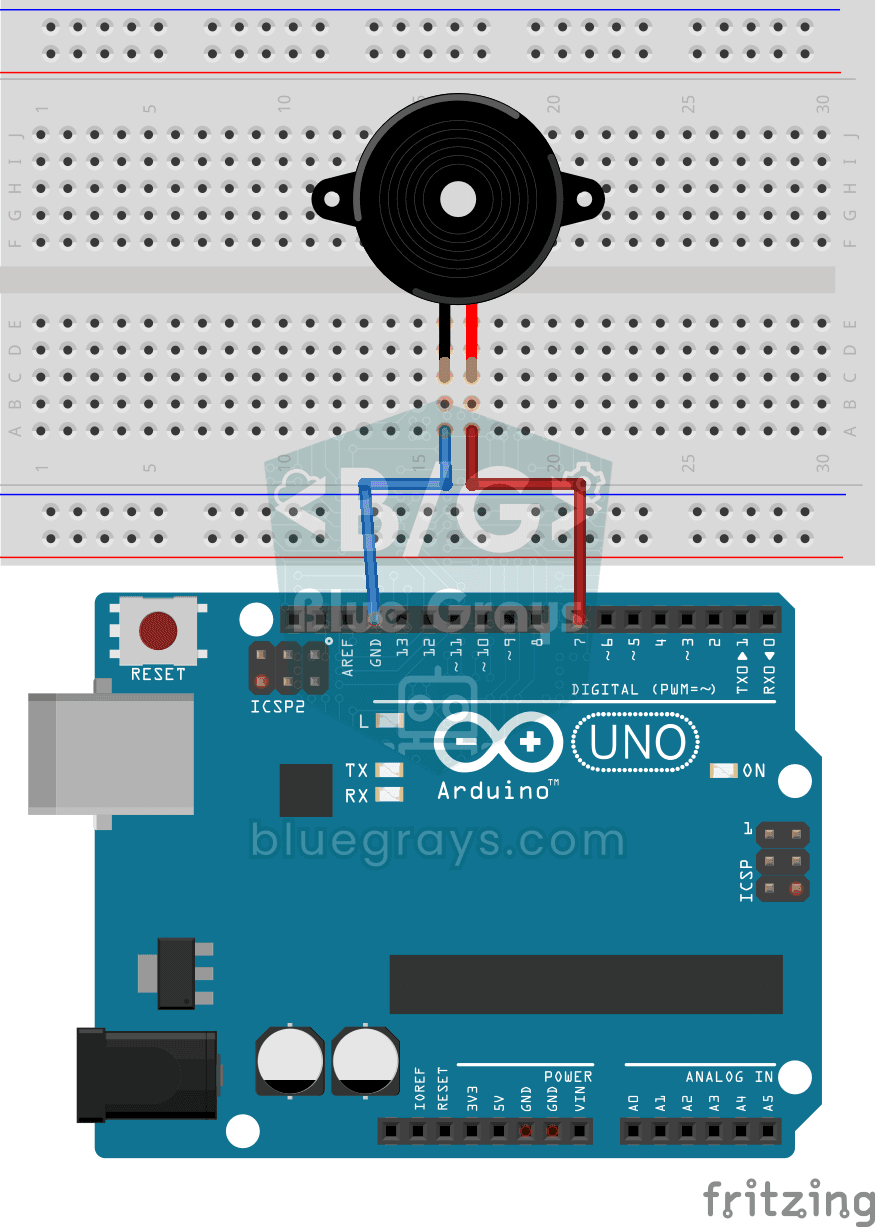
Ever wondered how a doorbell or an alarm makes its sound? The Arduino makes a small buzzer beep at short intervals: beep, pause, beep, pause. You see how sound is made with electricity and take the fi

HC-SR04 Distance Measurement (Serial Display)
The HC-SR04 sensor works just like a bat finding its way in the dark: it sends out a sound you cannot hear, listens for the echo and measures how far away the object in front of it is. The Arduino wri