
Arduino Workshop Plan: 5 Days for Summer Camps and Holiday Clubs
Arduino workshop plan for 5 days of 3 hours: pair work, day-by-day projects, an hour-by-hour schedule, a parts list for 8 groups, prep checklist and showcase.
When you build a 5-day Arduino workshop plan, give each day one new idea and save the last day for the participants' own mini project: day 1 LEDs and timing, day 2 buttons and conditions, day 3 sensors, day 4 sound and motion, day 5 a mini project and a showcase. Every day follows the same skeleton: warm-up, short lesson, build, break, challenge, sharing. The plan in this article is written for an intensive camp of 3 hours a day, 15 hours in total, and assumes 12–16 participants working in pairs; those numbers are an assumption, so scale them up or down for your group.
Unlike a weekly term plan, an intensive camp leaves no time to forget, but it does bring fatigue. That is why the program is built on short lessons and lots of building rather than long explanations. Below you will find a day-by-day program table, an hour-by-hour flow for a sample day, a parts list for 8 groups, a prep checklist that starts two weeks ahead, mini project options for day 5, a 3-minute presentation template, adaptations by age, ideas for after the camp and safety rules. If you are teaching one lesson a week over a term, the 8-week robotics coding plan suits that rhythm better.
The camp at a glance: 5 days, 3 hours, pairs
The most common mistake in an intensive camp is cramming too much into the first day. The program therefore moves from simple to complex: first output (lighting an LED), then input (reading a button), then analog measurement (light and distance), then motion and sound (servo and buzzer), and finally a mini project that combines everything. Each day builds on the one before; the parking sensor on day 3 uses the LED from day 1, the condition from day 2 and the distance measurement from the same day. The reason for pairs is simple: in groups of three one person often ends up watching, and when people work alone, whoever gets stuck has to wait. In a pair one person builds the circuit while the other reads the diagram and the code, and they swap roles at the break.
| Topic | Assumption in this plan | If you change it |
|---|---|---|
| Length | 5 days, 3 hours a day (e.g. 10:00–13:00), including a 15-minute break | With 2 hours a day, shorten the challenge and sharing, not the build time |
| Participants | 12–16 people | Above 20, add a second assistant |
| Groups | Pairs, 6–8 groups | Solo work only with adult groups and only if you have enough kits |
| Board | Arduino Uno or a compatible board | If you use a Nano, set up the breadboard layout together on day 1 |
| Prior knowledge | None; participants writing code for the first time | With an experienced group, merge days 1 and 2 and add a sensor day |
| Computers | One computer per group, one computer and a projector for the instructor | With fewer computers, two groups take turns on one machine and building takes longer |
| Staff | 1 instructor, plus 1 assistant for 16 people | Without an assistant, keep the daily challenge shorter |
Day-by-day program: themes, projects and end-of-day results
Every project in the table is ready in the BlueGrays app with its parts list, circuit diagram and code. The projects for the first two days are completely free; participants do not need Premium. From day 3 onwards, Premium projects such as the parking sensor, the servo and the mini project options come into play. If you use them, every participant needs Premium, and the most practical way to do that is an educator package; we explained how it works in detail in the guide to Premium codes for a class. If you would rather stay with free projects, the tip below has a Premium-free variant of the plan.
| Day | Theme | BlueGrays projects | Concepts | End-of-day result |
|---|---|---|---|---|
| 1 | Light and timing | LED Blink, Traffic Light, LED Chaser | setup() and loop(), pinMode(), digitalWrite(), delay(), arrays and the for loop | Each pair has set its own traffic light timings and changed the speed of the 6-LED running light |
| 2 | Buttons and conditions | LED Control with a Push Button (Push), Toggle an LED with a Button (On/Off) | digitalRead(), if/else, pull-down resistor, state variable, button bounce | Two separate circuits: one that lights while held, one that switches on with one press and off with the next |
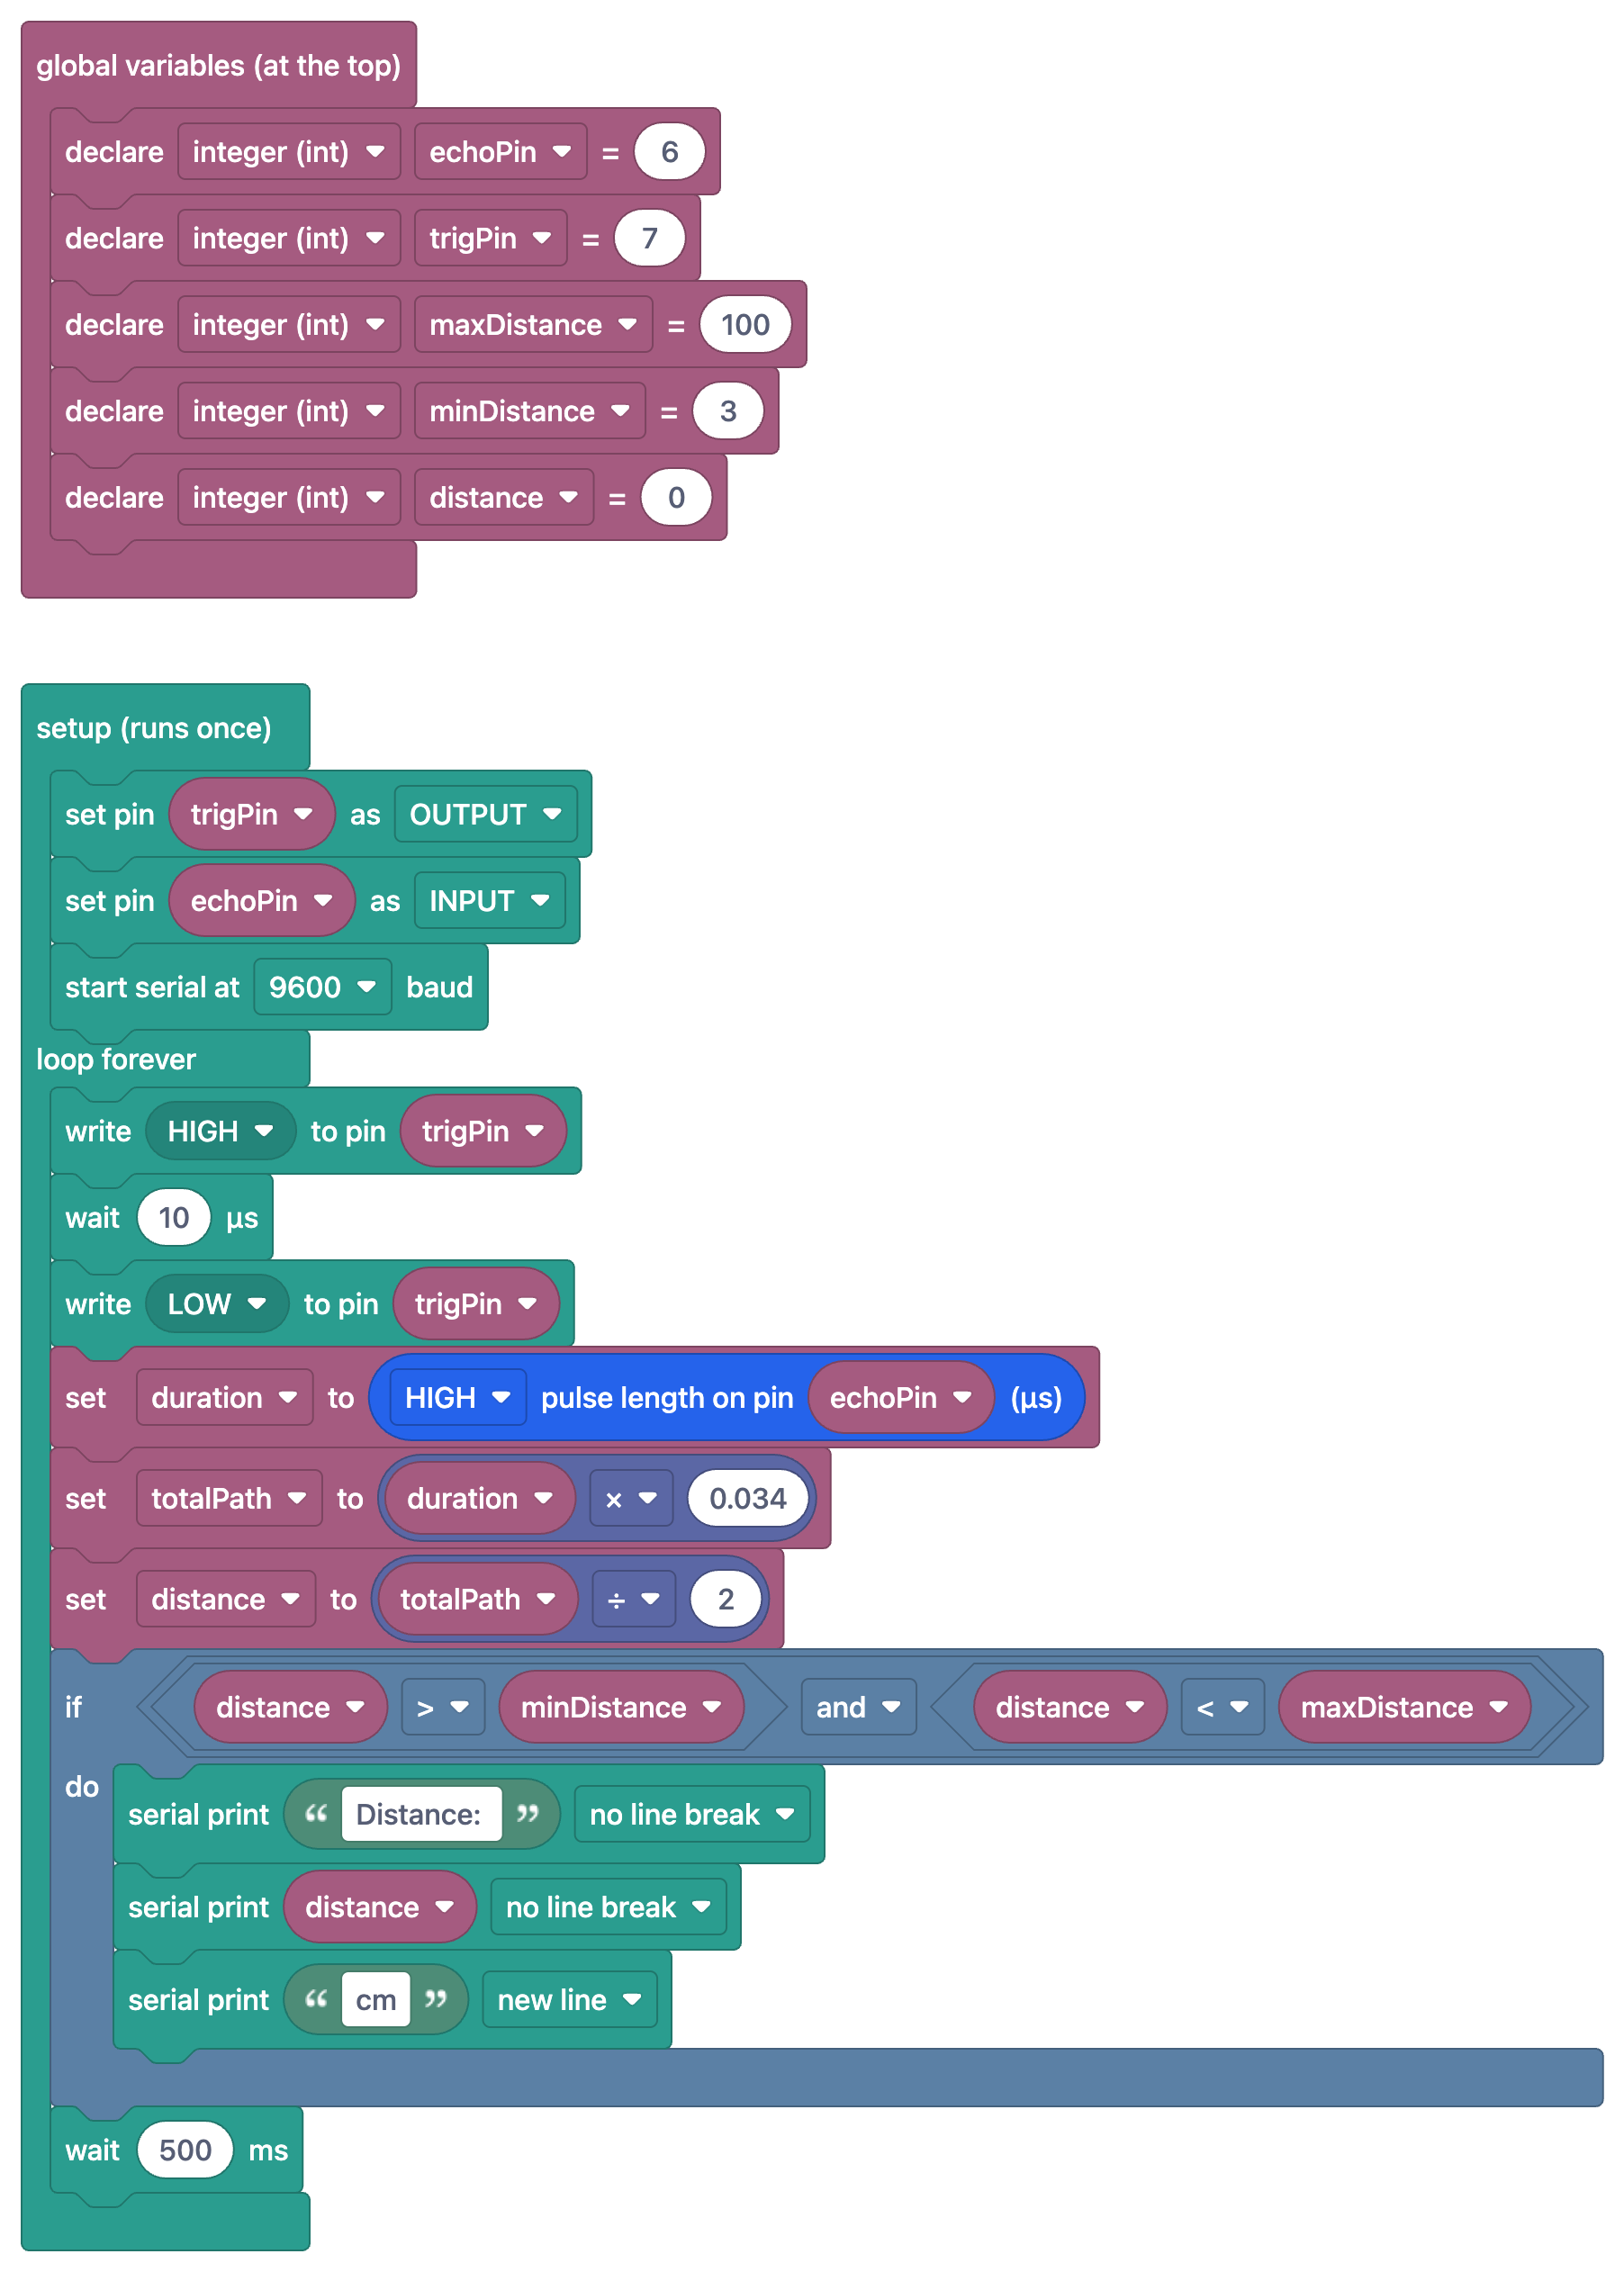
| 3 | Sensors: light and distance | Night Light with Ldr, HC-SR04 Distance Measurement (Serial Display), Parking Sensor with HC-SR04 (Premium) | analogRead() and the 0–1023 range, threshold, Serial Monitor, ultrasonic measurement and the distance formula | A lamp that lights in the dark and a warning beep that speeds up as you get closer |
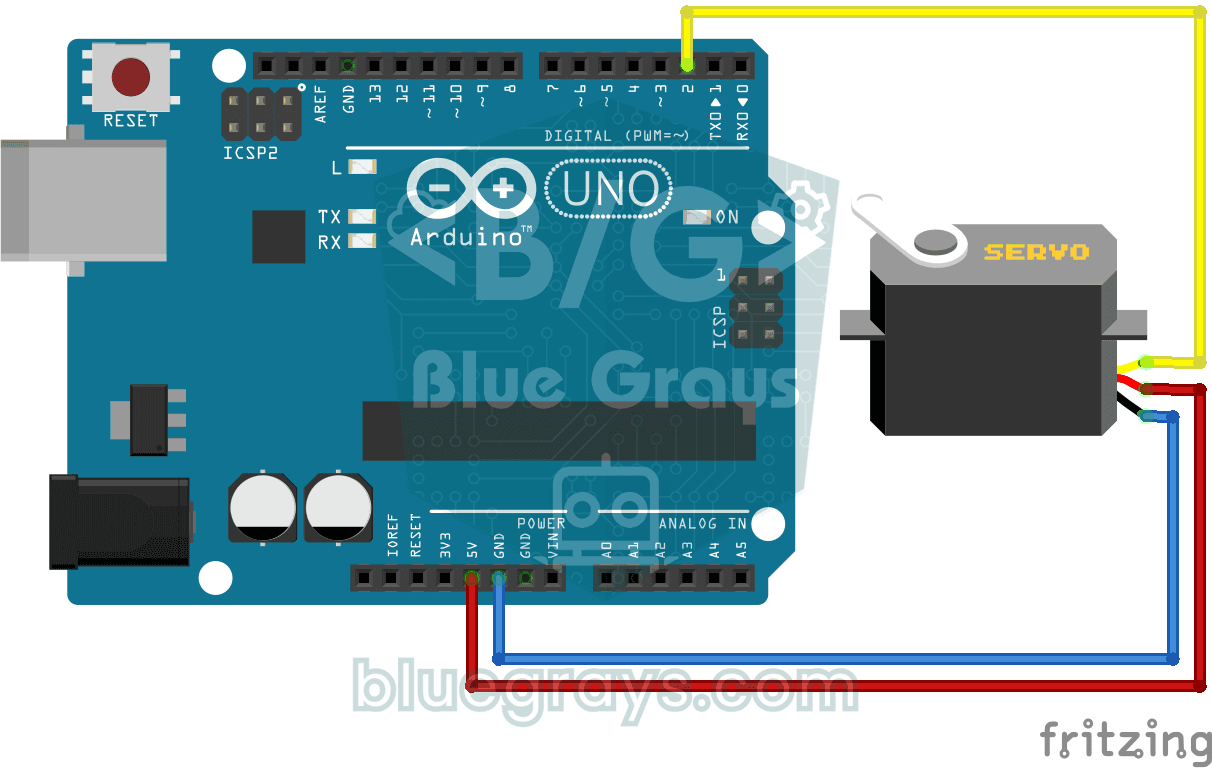
| 4 | Sound and motion | Using a Buzzer, Using a Servo Motor (Premium), Servo Motor Operation with Potentiometer (Premium) | tone() and noTone(), frequency, the Servo library, angle, analog control with a potentiometer | A servo turned to any angle with a potentiometer and their own beep rhythm; mini project choice at the end of the day |
| 5 | Mini project and showcase | One project from the options table below | Combining, planning, debugging, presenting | A working mini project and a 3-minute presentation |
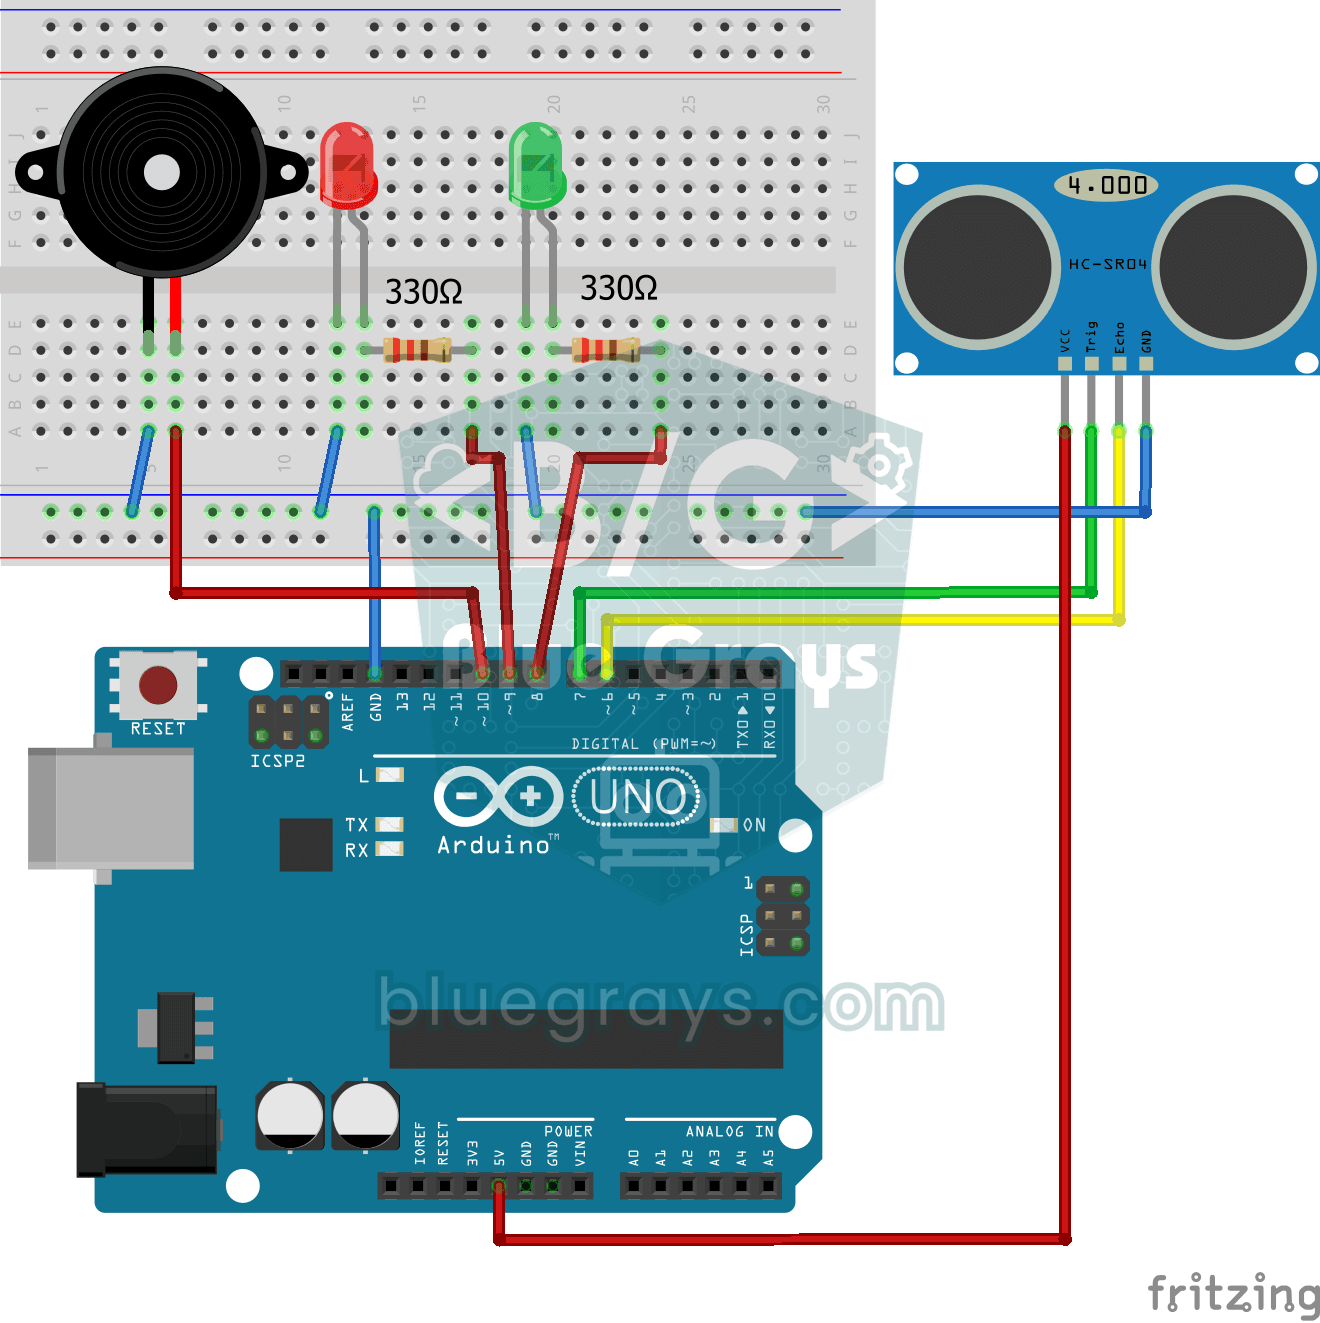
On the first two days participants change a single number at the end of each project and predict the result first. In Traffic Light the red and green lights stay on for 2000 ms and the yellow light for 300 ms; the pairs rewrite these timings for a real junction. In LED Chaser six LEDs on pins 2–7 light up one after another at 150 ms intervals; pulling that number down to 50 and up to 500 makes it visible what the array and the for loop are doing. On day 2 LED Control with a Push Button (Push) and Toggle an LED with a Button (On/Off) use the same circuit, and the only difference is in the code. That comparison is the shortest way to explain the idea that "a program can remember something", and every sensor project on the following days relies on it. Day 3 is measurement day. In Night Light with Ldr the LED on pin 13 lights up when the LDR value read on A0 drops below 50; the pairs cover the sensor with their hands, watch the value in the Serial Monitor and tune the threshold to the light in their own room. HC-SR04 Distance Measurement (Serial Display) prints the distance between 3 and 100 cm every half second, while Parking Sensor with HC-SR04 turns the same measurement into a warning with two LEDs on pins 8 and 9 and a buzzer on pin 10: when an obstacle is closer than 20 cm, the beeps get faster. On day 4 Using a Servo Motor moves the servo to 0, 90 and 180 degrees, and Servo Motor Operation with Potentiometer turns the same servo by hand with a potentiometer. The last half hour of the day is set aside for choosing the day 5 project. Close the sharing part of each day with that day's exit question; the answers show you what to repeat in the next morning's warm-up:
- Day 1: What changed in the traffic light when you wrote delay(500) instead of delay(2000)? Why?
- Day 2: Is the difference between the button that lights while held and the one that toggles with each press in the circuit or in the code?
- Day 3: Does the LDR value get smaller in the dark or in the light? How did you choose the threshold for your night light?
- Day 4: Where does the servo turn when you write 90? Why does the servo follow the potentiometer when you turn it?
- Day 5: Point out the parts in your project that sense, decide and respond, one by one.
Educator package: how many codes, and when to hand them out?
For a 5-day camp a monthly educator package is enough. Each monthly code adds 30 days of Premium to the account that redeems it, and the time starts on the day the code is used. If you hand the codes out on day 1, the camp ends after 5 days and participants have about 25 days left to keep going at home. The package is a one-time purchase and does not renew automatically, and participants do not need to add a card to their Apple or Google account. Unused codes have no expiry date, so leftover codes carry over to your next camp. To compare monthly and yearly packages by course length, read monthly or yearly educator package; you will find the current price for your country on the Educator Packages screen in the app.
| Participants | Suggested package | How the codes are used | Leftover codes |
|---|---|---|---|
| 12 | 1 × 10-code + 1 × 5-code monthly | 12 participants + 1 for your own account | 2 codes for the next camp |
| 14 | 1 × 10-code + 1 × 5-code monthly | 14 participants + 1 for your own account | No spare; if someone new signs up, add another 5-code package |
| 16 | 2 × 10-code monthly | 16 participants + 1 for your own account | 3 codes for the next camp |
- Start with your own code: Redeem one code on your own account before the camp; do not finalise the program until you have opened the Premium projects and built the circuits yourself.
- Day 1, hand them out at the break: On the My Codes screen, send each participant a code with Copy Code or the share option. When a participant taps the shared link, the Redeem Code screen opens in their app with the code already filled in; without the link, they go to Profile > Redeem Code and type the code in the BG-XXXX-XXXX-XXXX format.
- Check straight away: In My Codes each code should show Active along with the name of the person who used it. If you sort out account and login problems on day 1, nobody waits when you switch to Premium projects on day 3.
- Be transparent: When a code is redeemed, the participant's name, username, email and profile photo are shared with the educator who gave the code. Tell participants and parents this from the start.
- Know the exceptions: An account with an active Premium subscription through the App Store or Google Play cannot redeem a code; that participant already has Premium, so keep their code as a spare. If someone drops out on day 1, the monthly code's single transfer lets you pass the remaining time on to a newcomer.
An hour-by-hour flow for one day: day 3 as an example
The flow below is written for a 3-hour day from 10:00 to 13:00, and you can use the same skeleton every day; only the projects and the challenge change. Day 3 was chosen as the example because it combines a free project and a Premium project on the same day. The short lesson never goes beyond 20 minutes; participants spend at least 100 of the 180 minutes building circuits and changing code with their own hands.
| Time | Stage | What happens? |
|---|---|---|
| 10:00–10:15 | Warm-up | One pair shows its solution to yesterday's challenge. Question: why does your phone screen dim in the dark? Answers go on the board. |
| 10:15–10:35 | Short lesson | Night Light with Ldr is opened on the projector. With Show as blocks turned on, analogRead and the threshold comparison are read together, then matched to the same lines in the code. |
| 10:35–11:20 | Build 1 | Pairs build the LDR night light, note the bright and dark values in the Serial Monitor and change the threshold to match their own readings. |
| 11:20–11:35 | Break | Roles swap: whoever built the circuit now reads the code. Circuits can stay on the table, the USB cable is unplugged. |
| 11:35–12:15 | Build 2 | Distance is measured with HC-SR04 Distance Measurement (Serial Display) and readings at 10, 20 and 50 cm are compared with a ruler. Pairs that are ready move on to the Parking Sensor with HC-SR04 circuit. |
| 12:15–12:40 | Challenge | Lower the parking sensor's warning distance from 20 cm to 10 cm; fast pairs connect the LDR night light to the distance reading and build a lamp that only lights when it is dark and someone comes close. |
| 12:40–12:55 | Sharing | Each pair gets 1 minute: what did we build, which number did we change, what happened? One pair describes something that did not work and how they found the problem. |
| 12:55–13:00 | Wrap-up | Parts are counted back into the boxes, and tomorrow's topic is announced in one sentence. |
Two app features make the build sections easier. The first is the Let's build it together mode on the project page: it walks through preparing the parts, building the circuit, uploading the code and running and testing it step by step, keeps the screen on and reminds the pair which step they were on. The second is getting the code onto the computer: the code on the phone can be taken with Copy, or Copy Link sends a link that opens the code on the computer. A pair that gets stuck first checks the If you get stuck section in the project's Understand the code tab, and only then raises a hand. This small rule shortens the help queue and teaches participants to find their own mistakes; we covered every section of the project page in the project page guide.
Parts list: per group and for 8 groups plus a spare
Splitting 16 participants into pairs gives 8 groups; with one spare kit you prepare 9 kits. For a camp of 12 people, 6 groups and 7 kits are enough. No part needs soldering. The per-group numbers in the table are a little generous, because LEDs plugged in backwards and broken jumper wires are very common in the first days. If you are thinking of buying ready-made starter kits, compare their contents with this list; we described what kits usually include in the Arduino starter kit article.
| Item | Per group | 8 groups + 1 spare | Used on day |
|---|---|---|---|
| Arduino Uno or compatible board | 1 | 9 | All |
| USB cable (USB A-B for the Uno, data capable) | 1 | 10 | All |
| Breadboard (830 holes) | 1 | 9 | All |
| Male-to-male jumper wires | 30 | about 280 | All |
| Male-to-female jumper wires | 6 | about 60 | 3–5 (HC-SR04, servo) |
| 5 mm LEDs (mixed red, yellow, green) | 10 | about 100 | 1, 3, 5 |
| 220 Ω or 330 Ω resistors | 10 | about 100 | 1, 2, 3, 5 |
| 10 kΩ resistors | 4 | about 40 | 2, 3, 5 |
| Push buttons (4 legs) | 4 | about 40 | 2, 5 |
| LDR (light sensor) | 1 | 10 | 3, 5 |
| HC-SR04 ultrasonic distance sensor | 1 | 10 | 3, 5 |
| Buzzer (passive, for different tones) | 1 | 10 | 3, 4, 5 |
| SG90 servo motor | 1 | 10 | 4, 5 |
| 10 kΩ potentiometer | 1 | 9 | 4 |
| I2C 16x2 LCD display (optional) | – | 2–3 | 5 (memory game) |
| Cardboard box, tape, scissors | – | one per group | 5 (box projects) |
| Multimeter | – | 2 | Troubleshooting |
Pre-camp preparation checklist
Split the preparation into three time points. If installation and drivers are left for the first hour of the camp, day 1 is half gone; the goal is that every computer has uploaded code at least once before participants arrive. You can copy and print the list below; each item starts with when to do it:
- 2 weeks before: Confirm the number of participants, work out the groups and the number of kits, and order missing parts. Buy extra LEDs, resistors and jumper wires in case of shipping delays.
- 2 weeks before: Count the computers. Each one needs the Arduino IDE; on school computers this may require admin rights, so talk to the IT staff. The installation steps are in the Arduino IDE installation article.
- 2 weeks before: Send the information letter to parents: dates and times, an invitation to the day 5 showcase, the fact that circuits run only on the 5 V from USB, that redeeming a code shares the participant's name, username, email and profile photo with the educator, and that Premium starts on the day the code is entered and lasts 30 days.
- 1 week before: Buy the educator package and redeem your own code. Build every Premium project once yourself and note where problems come up.
- 1 week before: Check the USB chip on clone boards; install the driver on the computers for boards with a CH340 chip. The Servo library comes with the Arduino IDE; for the memory game, install the LiquidCrystal_I2C library from the Library Manager.
- 1 week before: Pack the kits into numbered boxes and stick a contents list on each one. Test the USB cables one by one and mark them: some cables are charge-only, so the board's light comes on but no port appears in the Arduino IDE. Do not use cables participants bring from home; fixes for port and driver errors are in the Arduino upload error article.
- 1 week before: Ask participants to install the app and create an account, so handing out codes on day 1 takes just a few minutes.
- 1 day before: Plug a board into each computer, upload the LED Blink code, watch the LED blink and label the port number on the side of the computer.
- 1 day before: Check the projector, extension leads and socket positions; 9 computers may all need charging at once.
- 1 day before: Print the day-by-day program table and the safety rules and put them on the wall. Write the day 5 mini project options on a separate sheet.
- 1 day before: Check the number of codes on the My Codes screen and prepare a sheet to match them with your participant list: name, group number, code status.
- First morning: Put the spare box on your desk: extra LEDs, resistors, jumper wires, one board and two tested USB cables.
Day 5: mini project options
The mini project takes up the first two hours of day 5, and the last hour is for the showcase. Pairs make their choice at the end of day 4, so you can fill in any missing part the evening before. Every option combines at least two concepts from the first four days. Suggest an Advanced project, or adding their own features to a ready-made project, to fast pairs, and one of the Beginner box projects to pairs that are struggling. The times in the table are estimates and include the box and decoration.
| Project | Difficulty | Parts | Estimated time | Which days does it combine? |
|---|---|---|---|---|
| Parking Sensor with HC-SR04 | Intermediate | HC-SR04, 2 LEDs, 2 resistors, buzzer | 60 min | 1, 3, 4 |
| Arduino Touchless Trash Can (HC-SR04 + SG90 Servo + LED) | Beginner | HC-SR04, SG90 servo, LED, 220 Ω resistor, cardboard box | 90 min | 3, 4 |
| Arduino Birthday Surprise Box (LDR + Buzzer + 3 LEDs) | Beginner | LDR, 10 kΩ resistor, buzzer, 3 LEDs, 3 resistors, box | 75 min | 1, 3, 4 |
| Arduino Cyclone Game: Stop the Light in the Middle (7 LEDs + Button + Buzzer) | Beginner | 7 LEDs, 7 resistors, push button, buzzer | 75 min | 1, 2, 4 |
| Arduino Memory Game (4 LEDs + 4 Buttons + Buzzer) | Advanced | 4 LEDs, 4 buttons, buzzer, I2C 16x2 LCD | 90 min | 1, 2, 4 |
| Simple Piano with Buzzer and Button | Advanced | 8 push buttons, 8 × 10 kΩ resistors, buzzer | 90 min | 2, 4 |
Showcase and a 3-minute presentation template
The showcase is the most memorable part of the camp, and it lets participants explain what they learned in their own words. Line the tables up along one wall and place a card in front of each pair with the project name and group number. When parents or other classes arrive, the pairs give a 3-minute presentation in turn and then take 1 minute of questions; for 8 groups that adds up to about 35 minutes. Give each pair 10 minutes before the presentations to fill in the template. Do not ask them to recite the code; ask them to explain one number they changed and what it did.
| Time | Part | What do they say? |
|---|---|---|
| 0:00–0:30 | Problem | What does this project solve or do? One sentence. |
| 0:30–1:15 | Circuit | Which parts are there, which one senses, which one responds? |
| 1:15–2:00 | Code | One condition or number in the code: what did we change and what happened? |
| 2:00–2:40 | Live demo | The project runs and someone from the audience tries it. |
| 2:40–3:00 | Next step | What would we add if we had one more day? |
Adapting the plan for different ages and levels
The skeleton of the program stays the same for every group; what changes is the pace, the depth of the explanations and what you expect on day 5. Use the table once you know your participants; experience can vary a lot within the same age group. In a mixed-level group, pair an experienced participant with a newcomer, but do not let the experienced one keep the keyboard all the time.
| Group | Pace and explanation | What changes? | Day 5 suggestion |
|---|---|---|---|
| Middle school | 15-minute short lesson; one main project a day, the second project becomes the challenge | On the projector, blocks are read first with Show as blocks, then the code; concepts like variables and thresholds are explained with everyday examples | Box projects and the Cyclone game |
| High school | 20-minute short lesson; every project in the table | The code is read first and blocks are used for checking; the distance formula and Ohm's law are shown with calculations | Parking sensor and memory game; adding features to a ready-made project |
| Adults | 20–25-minute short lesson; days 1 and 2 go faster | The time saved goes to timing without waiting using millis() or to a display project; participants bring their own ideas | Piano, memory game or a project they design themselves |
After the camp: how to keep going at home
The biggest risk of an intensive camp is that the excitement of the last day fades within a week. At the closing, show participants three ways to keep going at home. The Project Finder asks three questions: what they want to build, which board they have and how experienced they are; it then suggests the best match and a free warm-up project they can start with the same parts. Daily questions opens a new set every day, takes about 3 minutes and starts at the right level after a 15-question placement test. The Code guide offers 36 cards for Arduino C++ and MicroPython; the See it in projects link at the end of each card lists the projects that use that command, from easy to hard. The educator code you handed out stays valid after the camp, and Premium projects remain open until the code's 30 days run out. We explained how to use the Understand the code and Try it yourself sections of the camp projects at home in the Understand the code and Try it yourself guide.
Safety and classroom rules
- Every circuit runs on the 5 V from USB. Nothing is plugged into the mains; the 220 V lamp projects in the app are not part of this camp.
- Unplug the USB cable before changing a circuit and plug it back in once it is built.
- Never connect the 5V pin directly to GND; the board heats up and the computer may shut down the USB port.
- Always connect an LED with a resistor. If a part gets hot or you smell burning, pull the USB cable first, then call the instructor.
- If the board restarts when the servo is connected, the servo is drawing too much current; you can find the cause and the fix in the Arduino keeps resetting article.
- Food and drinks stay away from the parts table. Component legs and jumper ends are sharp, so handle them carefully.
- Ask before touching another pair's circuit. When you get stuck, check the If you get stuck section first, then ask for help.
- At the end of each day, count the parts in your box against the contents list and hand the box in by its number.
By the end of the five days participants have built the whole chain with their own hands, from lighting an LED to a small system that makes decisions with a sensor; more importantly, they know where to look when a circuit does not work. Run the program as it is for your first camp, and for the second one adjust it based on which day ran long and which project people liked most. The best preparation is to open the BlueGrays app on your own phone, look through the circuit diagrams, parts lists and code of the camp projects, and build the first day's project once from start to finish.
Frequently asked questions
What do you teach in a 5-day Arduino workshop?
A typical sequence is LEDs and timing, buttons and conditions, light and distance sensors, sound and servos, and on the last day a mini project that combines them. Adding one new idea per day lets participants make progress without getting worn out. A showcase on the last day is a good way to close and present what they learned.
How many hours a day is enough for an Arduino summer camp?
Three hours a day with a 15-minute break is a good balance for most groups. That is enough time for a short lesson, two build sections, a challenge and sharing. The same program works with 2 hours a day, but the challenge and sharing get shorter.
How many Arduino kits do I need for a workshop?
With pairs, one kit per group is enough; for 16 participants you prepare 8 kits plus one spare, 9 in total. Each kit contains an Arduino Uno, a USB cable, a breadboard, jumper wires, LEDs, resistors, buttons, an LDR, an HC-SR04, a buzzer and a servo. Buying extra LEDs, resistors and jumper wires covers the breakage and losses of the first days.
Do participants need coding experience for an Arduino workshop?
No, this program is designed for people writing code for the first time. On day 1 they only learn how to light an LED and how to change the delay. For experienced participants the first two days can be merged and a sensor day added.
Should I choose a monthly educator package for a 5-day camp?
Yes, a monthly package is enough for a 5-day camp. Each code gives 30 days of Premium from the day it is redeemed; if you hand them out on day 1, participants can keep going at home for about 25 more days after the camp. Unused codes have no expiry date, so leftover codes carry over to the next camp.
Can you run an Arduino workshop without computers?
You need a computer to upload code to an Arduino; ideally there is one computer per pair. With fewer computers two pairs can take turns on one machine, and phones or tablets can be used to read the diagram, parts list and code. In that case building takes longer, and the daily program should drop one project.
Projects to build after reading this
See all projects
LED Blink
The very first hello of electronics: switching a single LED on and off. The Arduino turns the LED on and off at short intervals, so the light blinks quickly. You see in the simplest way how the board

Traffic Light
A tiny copy of the traffic light you see on the road every day. Red stays on for two seconds, yellow flashes for a moment, green stays on for two seconds, then it goes back to red through yellow again

LED Control with a Push Button (Push)
Just like a doorbell: the light stays on as long as you press, and goes off when you let go. The Arduino keeps listening to the button; while it's pressed the LED is on, and the moment you lift your f

Toggle an LED with a Button (On/Off)
Press the button once and the light comes on, press it again and it goes off, just like the light switch in your room. The Arduino notices every press and flips the LED to the opposite state, waiting

Night Light with Ldr
A little night light that turns on by itself when it gets dark and goes off when morning comes. A light sensor measures how bright the room is, and the Arduino switches the LED on when it is dark enou

HC-SR04 Distance Measurement (Serial Display)
The HC-SR04 sensor works just like a bat finding its way in the dark: it sends out a sound you cannot hear, listens for the echo and measures how far away the object in front of it is. The Arduino wri
Parking Sensor with HC-SR04
A mini version of a car's parking sensor: the closer something gets, the faster the beeps. The distance sensor measures the object in front of it; if it is more than 20 centimetres away the green LED
Using a Servo Motor
The arm of a small servo motor turns to three positions in turn: all the way to the start, right to the middle and all the way to the end, waiting two seconds at each stop. The Arduino tells the motor