
Block Coding to Arduino C++: Cheat Sheet with MicroPython
Block coding to Arduino C++ cheat sheet: 34 rows of blocks with their C++ and MicroPython code, common mistakes, a 4-step method and one program in three forms.
The quickest way to move from block coding to Arduino C++ is to keep a one-page table next to you that shows which line of real code each block becomes. The short answer: blocks are not a new language, they are a visual form of Arduino C++ lines. The "set pin 13 as OUTPUT" block is the line pinMode(13, OUTPUT);, the "wait 1000 ms" block is delay(1000); and the "if … do" block is an if statement. The table below puts the real labels of the blocks in the BlueGrays app next to their Arduino C++ code and their MicroPython code on the Raspberry Pi Pico.
This page is not a lesson, it is a reference sheet. You can print the table, keep it by your desk and check which line matches which block while you look at a project. After the table you will find the most common mistakes people make when switching, a four-step method for leaving blocks behind, and the same program written as blocks, C++ and MicroPython. The example compiles in the Arduino IDE and runs on the Pico with Thonny.
Before you read the table: four differences between the three
Blocks, C++ and MicroPython express the same idea, but the writing rules differ. These four differences are where you will stumble most. The first is structure: an Arduino C++ program has two parts called setup() and loop(), which appear in blocks as "setup (runs once)" and "loop forever". MicroPython has no separate setup; the file runs once from top to bottom and the repeating part goes inside a while True: loop. The second is types: in C++ every variable has a written type (int, float, bool), in blocks that is the "declare integer (int)" option, and in Python no type is written at all.
The third difference is number ranges. On the Arduino Uno an analog reading is 0–1023 and PWM is 0–255; on the ESP32 an analog reading goes up to 0–4095; on the Pico MicroPython gives both readings and PWM duty in the 0–65535 range. That is why you cannot copy a threshold from one board to another as it is. The fourth difference is the time unit: delay() takes milliseconds, time.sleep() takes seconds. Half a second is delay(500) in C++ and time.sleep(0.5) in MicroPython. Keep these four rules in mind and most rows of the table fall into place on their own.
- The numbers in the table are examples: where a block says 13, your project may use 7, and the number in the code line changes with it.
- The pins in the MicroPython column are Pico GP numbers (GP14, GP15, GP26). They do not have to match the Uno pin numbers; check the circuit diagram.
- Rows marked "No Pico block" mean that block is not used in Pico projects; MicroPython code that does the same job is still given.
- The ESP32 is also programmed in Arduino C++; the C++ column applies to it too, only the analog range and some pin numbers differ.
Block, Arduino C++ and MicroPython reference table
The table is split into 12 groups: program structure, pins, time, conditions, loops, variables, math, serial port, analog and PWM, sound, servo and sensor. The text in the Block column is the label printed on the blocks in the app, and "…" and "?" mark the slot where another block plugs in. When a row holds more than one block they are separated by a dot.
| Group | Block (label in the app) | Arduino C++ | MicroPython (Pico) |
|---|---|---|---|
| Structure | setup (runs once) | void setup() { … } | The lines before while True: |
| Structure | loop forever | void loop() { … } | while True: (body indented 4 spaces) |
| Structure | global variables (at the top) | Top of the file, before setup() | The first lines after the imports |
| Structure | to blinkTwice | void blinkTwice() { … } · call: blinkTwice(); | def blinkTwice(): · call: blinkTwice() |
| Pins | set pin 13 as OUTPUT | pinMode(13, OUTPUT); | led = Pin(15, Pin.OUT) |
| Pins | set pin 2 as INPUT_PULLUP | pinMode(2, INPUT_PULLUP); | btn = Pin(14, Pin.IN, Pin.PULL_UP) |
| Pins | write HIGH to pin 13 · write LOW to pin 13 | digitalWrite(13, HIGH); · digitalWrite(13, LOW); | led.value(1) · led.value(0) |
| Pins | read pin 2 | digitalRead(2) → HIGH (1) or LOW (0) | btn.value() → 1 or 0 |
| Pins (Pico only) | pin led : GP 14, OUTPUT · turn on (on) / turn off (off) pin led | Same as pinMode() + digitalWrite() | led = Pin(14, Pin.OUT) · led.on() / led.off() |
| Time | wait 1000 ms · wait 0.5 seconds (Pico) | delay(1000); · delay(500); | time.sleep_ms(1000) · time.sleep(0.5) |
| Time | wait 10 µs | delayMicroseconds(10); | time.sleep_us(10) |
| Time | milliseconds since start | millis() (unsigned long) | time.ticks_ms() |
| Conditions | if … do … else if … else … | if (…) { … } else if (…) { … } else { … } | if …: · elif …: · else: |
| Conditions | ? = ? (≠, <, ≤, >, ≥) | == != < <= > >= | == != < <= > >= |
| Conditions | ? and ? · ? or ? · not ? | && · || · !x | and · or · not x |
| Loops | repeat 3 times do | for (int i = 0; i < 3; i++) { … } | for i in range(3): |
| Loops | count with i from 0 to 5 by 1 | for (i = 0; i <= 5; i++) (5 included, 6 rounds) | for i in range(0, 6): (6 not included) |
| Loops | repeat while | while (…) { … } | while …: |
| Loops | break out of loop | break; | break |
| Variables | declare integer (int) delayTime = 60 | int delayTime = 60; | delayTime = 60 (no type written) |
| Variables | declare decimal (float) voltage = 0.0 | float voltage = 0.0; | voltage = 0.0 |
| Variables | set x to 0 · change x by 1 | x = 0; · x += 1; (or x++;) | x = 0 · x += 1 (there is no x++) |
| Variables | array 2 3 4 · item 0 of ledPins | int ledPins[] = {2, 3, 4}; · ledPins[0] | ledPins = [2, 3, 4] · ledPins[0] |
| Math | 1 + 1 (also −, ×, ÷) | + - * / · with two ints 7 / 2 = 3 | + - * / · 7 / 2 = 3.5, integer division 7 // 2 = 3 |
| Math | remainder of 10 ÷ 3 | 10 % 3 | 10 % 3 |
| Math | map x : 0 – 1023 → 0 – 255 | map(x, 0, 1023, 0, 255) | Not built in; write an arduino_map() function |
| Math | constrain 50 low 0 high 100 | constrain(50, 0, 100) | min(max(50, 0), 100) |
| Serial port | start serial at 9600 baud | Serial.begin(9600); | Not needed, print() goes over USB |
| Serial port | serial print … new line · no line break | Serial.println(x); · Serial.print(x); | print(x) · print(x, end="") |
| Analog and PWM | analog read A0 | analogRead(A0) → 0–1023 (0–4095 on the ESP32) | ADC(26).read_u16() → 0–65535 |
| Analog and PWM | PWM write 128 to pin 9 · PWM led : GP 14, frequency 1000 Hz (Pico) | analogWrite(9, 128); (0–255) | led = PWM(Pin(14)) · led.freq(1000) · led.duty_u16(32768) (0–65535) |
| Sound | play 440 Hz on pin 8 · stop sound on pin 8 | tone(8, 440); · noTone(8); | No Pico block: bz = PWM(Pin(16)) · bz.freq(440) · bz.duty_u16(32768) · stop: bz.duty_u16(0) |
| Servo | attach servo myServo to pin 9 · turn servo myServo to 90 degrees | #include <Servo.h> · Servo myServo; · myServo.attach(9); · myServo.write(90); | No Pico block: s = PWM(Pin(16)) · s.freq(50) · s.duty_ns(1500000) (about 90°) |
| Sensor | HIGH pulse length on pin 12 (µs) | pulseIn(12, HIGH) | machine.time_pulse_us(Pin(12, Pin.IN), 1) |
Some rows look one to one at first glance but need care. In "count with i from 0 to 5" the 5 is included and the loop runs 6 times; that is why C++ uses <= instead of <, and Python needs range(0, 6) because range leaves out its end number. The division block is a trap too: when you divide two integers C++ drops the remainder and 7 / 2 gives 3, while Python gives 3.5. For C++-style integer division in Python you use //. The map() function behind the "map x" block does not come built into MicroPython; in the example below a two-line arduino_map() function does the same calculation.
How do nested blocks turn into code?
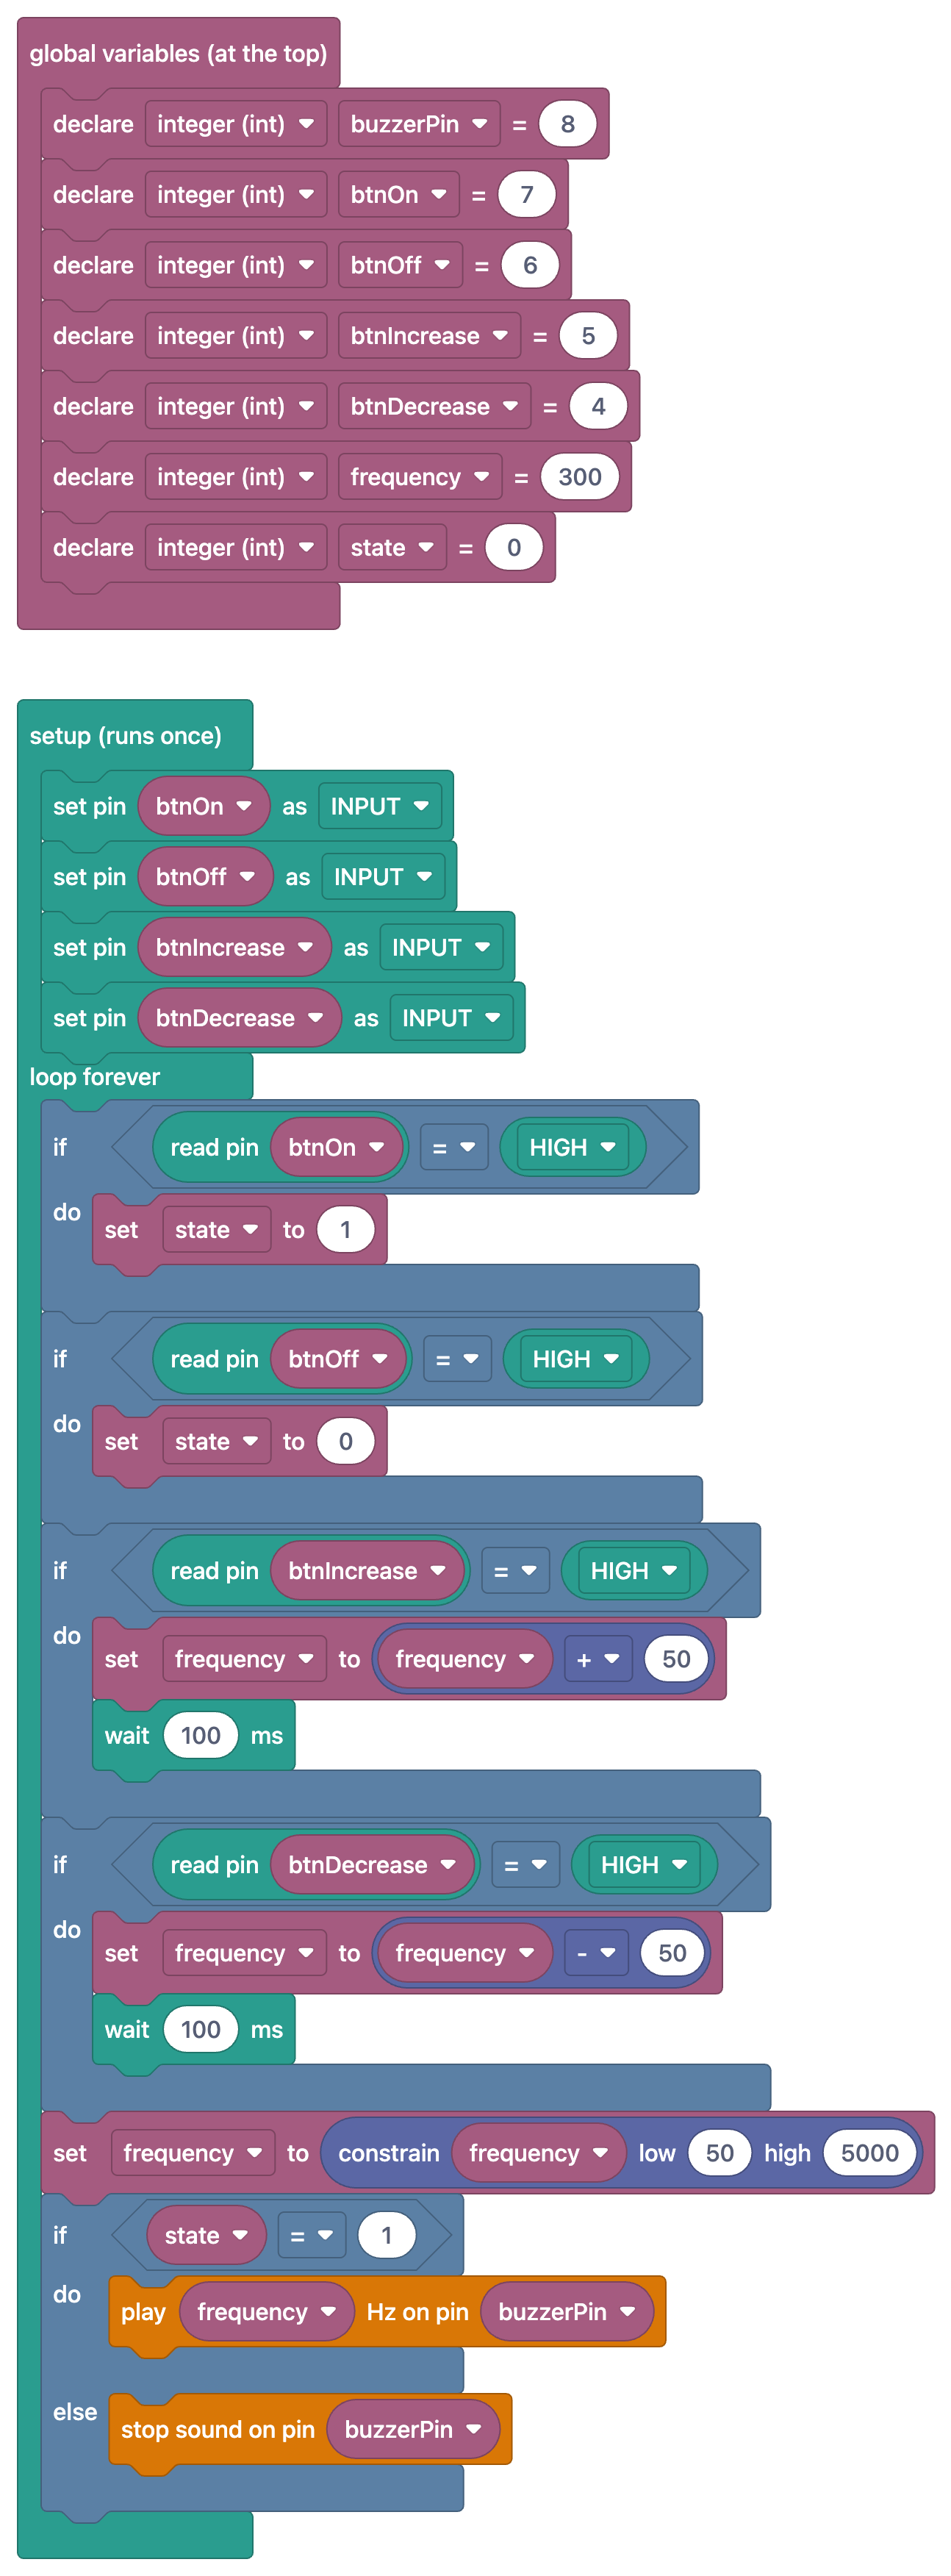
Knowing single blocks is not enough; the real skill is turning nested blocks into one line. For that, tell two shapes apart. Blocks stacked under one another with a notch on the edge are commands, and each one becomes a line of code. Oval or pointed blocks that plug into another block's slot are values; in code they sit inside parentheses, to the right of an equals sign or inside a condition. The rows below come from the free Frequency Setting with Buzzer project: four buttons switch the tone on and off and raise or lower its frequency, which is kept between 50 and 5000 Hz.
| Block (Frequency Setting with Buzzer) | C++ line | Reading rule |
|---|---|---|
| set state to 1 | state = 1; | Every command block stacked under another is one line and ends with a semicolon. |
| if (read pin btnOn = HIGH) do … | if (digitalRead(btnOn) == HIGH) { … } | An oval value block goes inside the parentheses; the = comparison in the block becomes == in code. |
| set frequency to (frequency + 50) | frequency = frequency + 50; | The inner block is worked out first and its result is handed to the outer block. |
| set frequency to (constrain frequency low 50 high 5000) | frequency = constrain(frequency, 50, 5000); | The empty slots of a block are the comma-separated arguments in code. |
| play frequency Hz on pin buzzerPin | tone(buzzerPin, frequency); | The order in code is fixed: pin first, then value. The word order of a block can change from language to language. |
| if (state = 1) do … else … | if (state == 1) { … } else { … } | Blocks in the "do" mouth go into the first { }, blocks in the "else" mouth go into else { }. |
Build one habit while you read this table: translate the innermost block first, then work outwards. In "set frequency to (constrain frequency low 50 high 5000)" the innermost part is constrain(frequency, 50, 5000), and the outer set block wraps it as frequency = …. A value block cannot be a line on its own; if you leave it with a semicolon the compiler may not complain, but the result is stored nowhere.
Common mistakes when switching from blocks to code
The block editor does not let you make most of these mistakes; the shapes of the pieces stop them from snapping into the wrong place. Code removes that protection, so almost everyone meets the mistakes below in the first weeks. The error messages are in English, but there are only a few patterns, and after seeing them a couple of times you will recognise them.
| Mistake | Symptom | Fix |
|---|---|---|
| No semicolon at the end of a line | "expected ';' before …"; the compiler often points to the line below | End every statement with ;. Do not put ; after if, for and while lines. |
| Missing or extra curly brace | "expected '}' at end of input" or code running in the wrong place | Every { needs a }. Ctrl+T (auto format) in the Arduino IDE fixes indentation and makes a missing brace easy to spot. |
| Writing = in a condition | if (state = 1) is always true and also sets state to 1; SyntaxError in Python | Compare with ==, assign with =. The = comparison in a block is always == in code. |
| Putting a decimal into an int | int volt = 3.7; stores 3; 5 / 2 gives 2 | Use float for decimals and write one number as 5.0 when dividing. |
| Expecting the wrong value from digitalRead | if (digitalRead(2) == 5) never runs; logic is inverted with a pull-up button | digitalRead only returns HIGH (1) or LOW (0). With INPUT_PULLUP a pressed button reads LOW. |
| Mixing up upper and lower case | 'digitalwrite' was not declared in this scope; NameError in Python | digitalWrite, pinMode and Serial must be spelled exactly. In Python True and False start with a capital letter. |
| Translating a counting loop one short | A loop that runs 6 times in blocks runs 5 times in code; the last LED never lights | "from 0 to 5" includes the end: i <= 5 in C++, range(0, 6) in Python. |
| Shifting Python indentation | IndentationError or a line that falls outside the loop | Start every line under while and if with the same 4 spaces; do not mix tabs and spaces. |
| Treating Python time as milliseconds | time.sleep(500) waits for over 8 minutes | Write time.sleep(0.5) or time.sleep_ms(500). |
| Carrying C++ habits into Python | SyntaxError from x++, && or a ; at the end of a line | Python uses x += 1, and, or; there is no end-of-line mark. |
Leaving blocks behind: a 4-step method
Trying to switch in one go is tiring. The four steps below move from reading to writing in small steps. One or two projects per step are enough; you are ready for the next step when you can do the current one without looking at the table.
- Read side by side. Open a project's blocks and code at the same time and match each block to its line in the code with your finger. Keep the table next to you in this step. Goal: being able to link every line of code to a block.
- Hide the blocks and guess. Look at the blocks first, then turn the block view off and write the C++ for those blocks on paper without looking at the code. Then compare with the real code. Try it the other way round as well: read the code and guess the blocks.
- Change a value in the code. Get the code onto your computer and change just one number: raise the wait from 100 to 500, or the threshold from 400 to 600. Upload it and see the difference with your own eyes. If you get a compile error, go back to the mistakes table above.
- Write a new line. Add a line that is not in the blocks: a Serial.println() that prints the value to the Serial Monitor, a second LED or an if that works with a button. Now you are no longer translating blocks, you are writing code directly.
Each step has a matching lesson in the series. For the first step, the block-to-line table in blinking an LED with blocks is a good start. For working with conditions and loops in steps two and three, see the if block and loops and variables. If you are moving to MicroPython on the Pico, from blocks to MicroPython also covers setting up Thonny. To spread the switch over several weeks in class, the 8-week robotics coding plan gives you a ready-made order.
Opening blocks and code side by side in the BlueGrays app
You will use this table most while moving back and forth between the blocks and the code of a real project. The BlueGrays app has a block view for more than 100 projects; in over 30 free projects the blocks are open too, and in Premium projects the blocks unlock with Premium. Blocks are for reading: you cannot edit blocks in the app and blocks are not uploaded to the board. What goes to the board is always the real code; you take it with Copy, or with Copy Link to open it on your computer, and paste it into the Arduino IDE, or into Thonny for the Pico.
- Show as blocks: turn on this switch next to the source code on a project page and the same program appears as a block image in the app's language. Tap the image to open it full screen; switching it off and on is exactly how you practise steps one and two.
- Understand the blocks: with the block view on, the "Understand the code" tab takes this name. The program is split into steps, each with the part it covers and an explanation. The "Try it yourself" task at the end is a ready-made exercise for step four.
- Code guide: each of the 36 cards in the Learn section (18 Arduino C++, 18 MicroPython) shows its example three ways with the Blocks, Arduino and MicroPython tabs. If you want a row of the table in more detail, open the matching card.
- Projects with blocks: this option under Filter in Discover > Projects lists only projects that have a block view, which makes picking a project for the switch easier.
We covered how the code guide works in the code guide post, and the "Understand the code" and "Try it yourself" sections in the understand the code guide. For each command explained one by one, the Arduino commands list works well alongside this table.
One program three ways: a night light that dims with the light
To see the table in action, let us build a small program. An LDR measures the light; while the room is bright the LED stays off, and as it gets darker the LED slowly brightens. The program uses variable, analog read, condition, map, PWM, serial and wait blocks, so more than half of the table shows up in one example. The idea is based on the free Night Light with Ldr project; there the LED is simply on or off, here PWM dims it. For the LDR wiring you can also look at the circuit diagram of the Measuring Light Intensity with an LDR project.
| Connection | Arduino Uno | Raspberry Pi Pico |
|---|---|---|
| LDR leg 1 | 5V | 3V3(OUT), physical pin 36 |
| LDR leg 2 + one end of the 10 kΩ resistor (midpoint) | A0 | GP26 / ADC0, physical pin 31 |
| Other end of the 10 kΩ resistor | GND | GND, physical pin 38 |
| LED long leg (through a 220 Ω resistor) | D9 (PWM pin) | GP15, physical pin 20 |
| LED short leg | GND | GND, physical pin 18 |
| Light reading / PWM range | 0–1023 / 0–255 | 0–65535 / 0–65535 |
First the block version. With the labels from the app, the program is made of the blocks below; each item matches one or more lines of the C++ code that follows:
- global variables (at the top): declare integer (int) lightValue = 0 and declare integer (int) brightness = 0
- setup (runs once): start serial at 9600 baud, then set pin 9 as OUTPUT
- loop forever: set lightValue to (analog read A0)
- if (lightValue < 400) do: set brightness to (map lightValue : 0 – 400 → 255 – 0); else: set brightness to 0
- PWM write brightness to pin 9
- serial print "Light: " no line break, serial print lightValue no line break, serial print " PWM: " no line break, serial print brightness new line
- wait 200 ms
1// ─────────────────────────────────────────
2//   BlueGrays · bluegrays.com
3//   Işığa göre kısılan gece lambası / Dimming night light
4// ─────────────────────────────────────────
5
6int lightValue = 0;   // LDR okuması / LDR reading (0-1023)
7int brightness = 0;   // LED parlaklığı / LED brightness (0-255)
8
9void setup() {
10  Serial.begin(9600);   // Seri port 9600 baud / Serial at 9600 baud
11  pinMode(9, OUTPUT);   // LED, PWM pini D9 / LED on PWM pin D9
12}
13
14void loop() {
15  lightValue = analogRead(A0);   // Az ışık = küçük değer / Little light = small value
16
17  if (lightValue < 400) {
18    // Karanlık arttıkça LED parlar / The darker it gets, the brighter the LED
19    brightness = map(lightValue, 0, 400, 255, 0);
20  } else {
21    brightness = 0;   // Oda aydınlık, LED kapalı / Room is bright, LED off
22  }
23
24  analogWrite(9, brightness);   // PWM 0-255 / PWM 0-255
25
26  Serial.print("Light: ");
27  Serial.print(lightValue);
28  Serial.print("  PWM: ");
29  Serial.println(brightness);
30
31  delay(200);   // 0,2 sn bekle / Wait 0.2 s
32}
331# ─────────────────────────────────────────
2# BlueGrays · bluegrays.com
3# Işığa göre kısılan gece lambası / Dimming night light
4# ─────────────────────────────────────────
5from machine import Pin, ADC, PWM
6import time
7
8ldr = ADC(26) # GP26 = ADC0 / GP26 = ADC0
9led = PWM(Pin(15)) # LED, GP15 / LED on GP15
10led.freq(1000) # PWM frekansı 1000 Hz / PWM frequency 1000 Hz
11
12THRESHOLD = 25600 # Uno'daki 400'ün karşılığı / Same as 400 on the Uno
13
14
15def arduino_map(x, in_min, in_max, out_min, out_max):
16 # Arduino map() ile aynı hesap / Same math as Arduino map()
17 return (x - in_min) * (out_max - out_min) // (in_max - in_min) + out_min
18
19
20while True:
21 light_value = ldr.read_u16() # 0-65535 / 0-65535
22
23 if light_value < THRESHOLD:
24 # Karanlık arttıkça LED parlar / The darker it gets, the brighter the LED
25 brightness = arduino_map(light_value, 0, THRESHOLD, 65535, 0)
26 else:
27 brightness = 0 # Oda aydınlık, LED kapalı / Room is bright, LED off
28
29 led.duty_u16(brightness) # PWM 0-65535 / PWM 0-65535
30
31 print("Light:", light_value, " PWM:", brightness)
32
33 time.sleep(0.2) # 0,2 sn bekle / Wait 0.2 s
34Compare the two programs line by line and every difference from the table shows. setup() in C++ becomes the lines before while True in Python, and Serial.begin() is gone. analogRead(A0) becomes ADC(26).read_u16() and the range grows from 0–1023 to 0–65535, which is why the threshold is 25600 instead of 400. Instead of analogWrite(9, …) a PWM object is created first and brightness is set with duty_u16() between 0 and 65535. Because map() is not built in, an arduino_map() function is written; the // integer division inside it matches integer division in C++. One print() replaces four separate Serial.print() calls, and delay(200) becomes time.sleep(0.2).
Moving from block coding to Arduino C++ is less about memorising something new and more about recognising the written form of blocks you already know. Keep this table next to you, read side by side first in every project, then hide the blocks and write it yourself. If you want to see these rows in real projects, open a project with a block view in the BlueGrays app and switch between the two forms of the same program with Show as blocks.
Frequently asked questions
What should I learn after block coding: C++ or Python?
Choose by the board you have. Most Arduino Uno and ESP32 projects are written in Arduino C++, while MicroPython is common on the Raspberry Pi Pico. The logic of the blocks is the same in both, so once you know one, moving to the other takes much less time.
How long does it take to move from block coding to Arduino code?
It varies from person to person, but someone who works on a few projects a week can usually read short programs and make small changes within a few weeks. Reading code next to the blocks first, then changing a single value and finally adding new lines makes the switch easier.
Can I program an Arduino Uno with Python?
The Arduino Uno cannot run MicroPython; it is programmed in C++ with the Arduino IDE. For MicroPython you need a more powerful board such as the Raspberry Pi Pico. You can, however, send commands to an Uno over the serial port from a Python program running on your computer.
Can I edit blocks in BlueGrays and upload them to the board?
No. The blocks in BlueGrays are for reading and understanding the code; you cannot edit blocks in the app and they are not uploaded to the board. What you upload is always the project's real code, using the Arduino IDE or Thonny.
Is a block program real code?
Blocks are a visual form of real code; each block matches one or more lines of code. In BlueGrays projects with a block view, the blocks and the Arduino C++ or MicroPython code you upload describe the same program.
Why does digitalRead return 1 or 0, and is HIGH the same as 1?
Yes, in Arduino HIGH equals 1 and LOW equals 0, and digitalRead only returns one of these two values. A button wired with INPUT_PULLUP reads LOW while pressed and HIGH when released. In MicroPython pin.value() also gives 1 or 0.
Projects to build after reading this
See all projects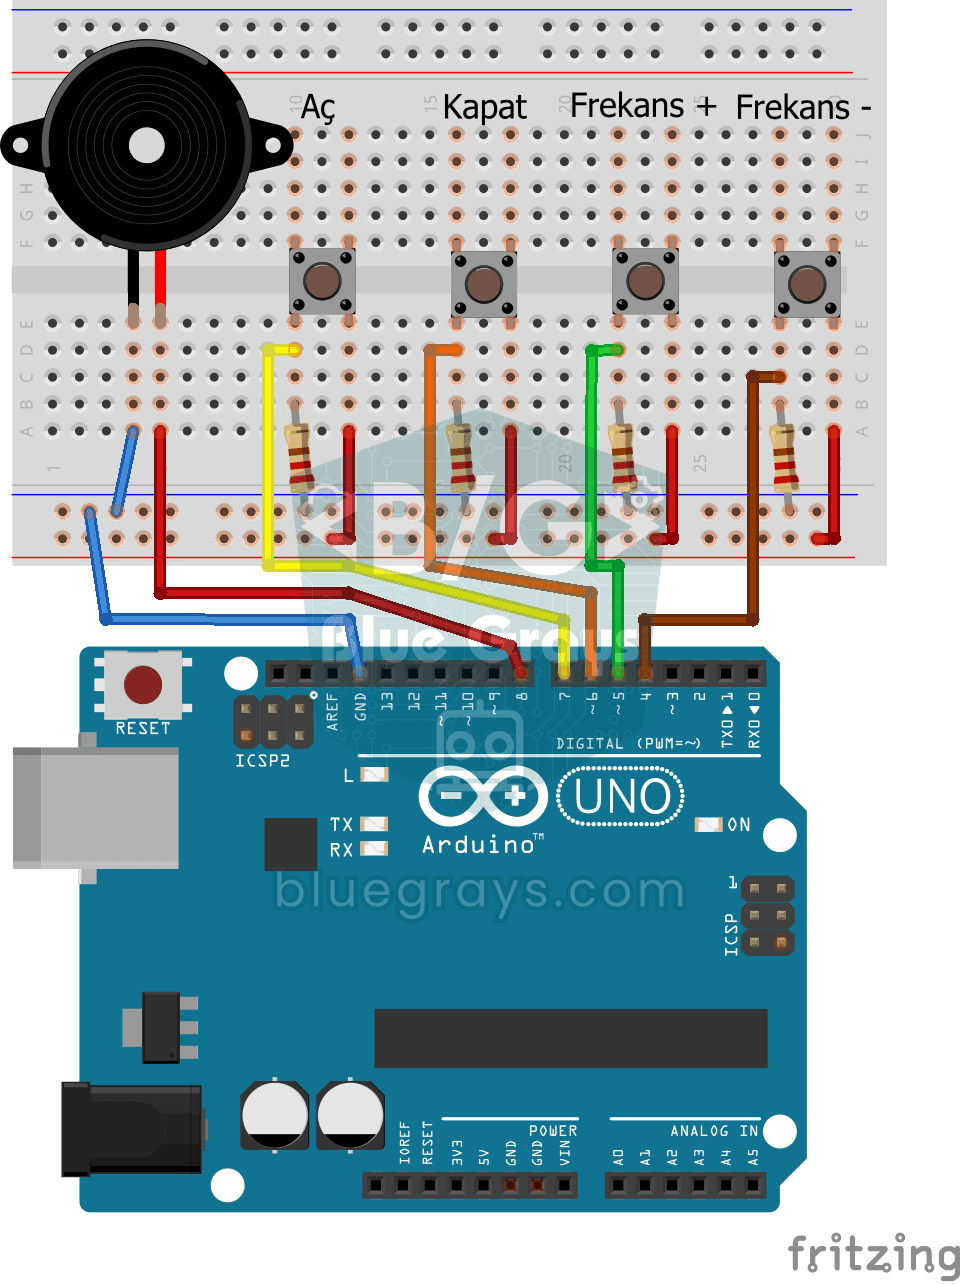
Frequency Setting with Buzzer
You control the sound of a buzzer with four buttons: one starts the sound, one silences it, and the other two make it higher or lower. Hold the up or down button and the pitch changes step by step, sl

Night Light with Ldr
A little night light that turns on by itself when it gets dark and goes off when morning comes. A light sensor measures how bright the room is, and the Arduino switches the LED on when it is dark enou

Measuring Light Intensity with an LDR
Want to see how bright your room is as a number? The LDR, a small part that reacts to light, measures the light around it, and the Arduino writes the value to your computer screen every half second. C

LED Control with a Push Button (Push)
Just like a doorbell: the light stays on as long as you press, and goes off when you let go. The Arduino keeps listening to the button; while it's pressed the LED is on, and the moment you lift your f

Toggle an LED with a Button (On/Off)
Press the button once and the light comes on, press it again and it goes off, just like the light switch in your room. The Arduino notices every press and flips the LED to the opposite state, waiting

LED Chaser with Adjustable Speed
Six LEDs light up one after another, so the light seems to run from one end to the other. Turn the potentiometer knob and the speed of that run changes instantly: one way and the light races along, th

HC-SR04 Distance Measurement (Serial Display)
The HC-SR04 sensor works just like a bat finding its way in the dark: it sends out a sound you cannot hear, listens for the echo and measures how far away the object in front of it is. The Arduino wri
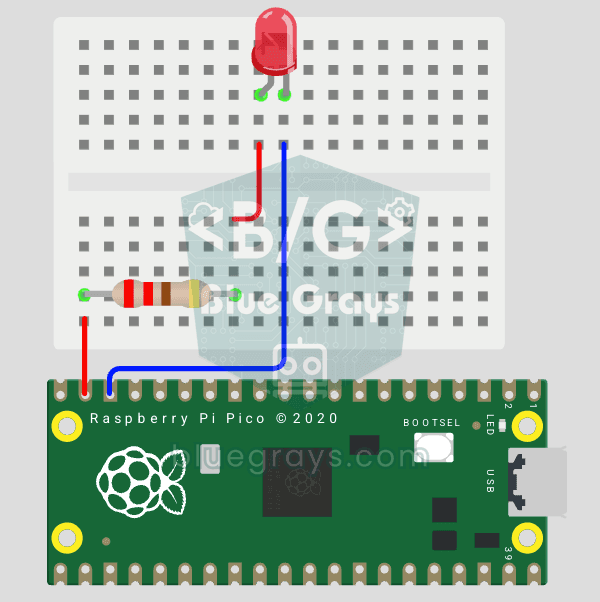
Raspberry Pi Pico: Controlling an External LED (Breadboard)
The next step after Pico’s built-in LED: connecting an external LED to the breadboard and controlling it via the GP14 pin. In this project, you’ll learn how to use any of the Pico’s general-purpose GPIO pins as an output, the LED’s polarity (long leg = anode/+, short leg = cathode/–), and why a current-limiting resistor (220Ω) is required. If you don’t include the resistor, excessive current will flow through the LED and it may burn out. The circuit is very simple: Pico GP14 → 220Ω resistor → LE