
Failed to Read from DHT Sensor: Causes and Fixes for DHT11/DHT22
Failed to read from DHT sensor or nan? Fix the wrong pin or type, missing pull-up, read interval, ESP32 and long-cable issues, with a diagnostic sketch.

Failed to read from DHT sensor! repeating in the Serial Monitor, or nan where your temperature and humidity should be, is the most common problem with DHT11 and DHT22 sensors. The good news: the sensor is almost never dead. The cause is usually one of six things: the pin number in the code doesn't match the wiring, the sensor type is wrong (DHT22 instead of DHT11 or the other way round), a bare sensor has no pull-up resistor, the sensor is read too often or right after power-up, the ESP32 has power or timing issues, or the cable is too long.
In this guide you'll first see exactly what the error message means, then the correct wiring and a symptom-cause-fix table. After that we'll go through each cause one by one and write a diagnostic sketch that detects the sensor type on its own and measures the success rate, a reading sketch that survives errors, and a MicroPython script for the Raspberry Pi Pico that tells the error types apart. Finally we'll look at when to drop the DHT and move to an I2C sensor such as the AHT20 or SHT31.
What does "Failed to read from DHT sensor" mean?
This message doesn't come from the library itself but from the DHTtester example that ships with the Adafruit DHT library. The example prints it when readTemperature() or readHumidity() returns NaN (Not a Number) instead of a value. The library returns NaN in two cases: when the sensor doesn't answer the start signal at all (timeout), or when the checksum of the 40 bits it received doesn't match (corrupted data). The first usually points to the wiring, the pin, the type or the power supply; the second to timing, noise and long cables.
To see why this happens so often, look at the protocol. The Arduino wakes the sensor by holding the data line LOW for a while; the sensor answers with 80 µs LOW and 80 µs HIGH, then sends 40 bits: 16 bits of humidity, 16 bits of temperature and an 8-bit checksum. Every bit starts with a 50 µs LOW; if the HIGH that follows lasts about 26–28 µs the bit is 0, and if it lasts about 70 µs it's 1. So the microcontroller has to measure differences of a few tens of microseconds without missing any; a loose wire, a weak pull-up or an interrupt that gets in the way easily upsets that balance.
| Property that affects reading | DHT11 | DHT22 (AM2302) |
|---|---|---|
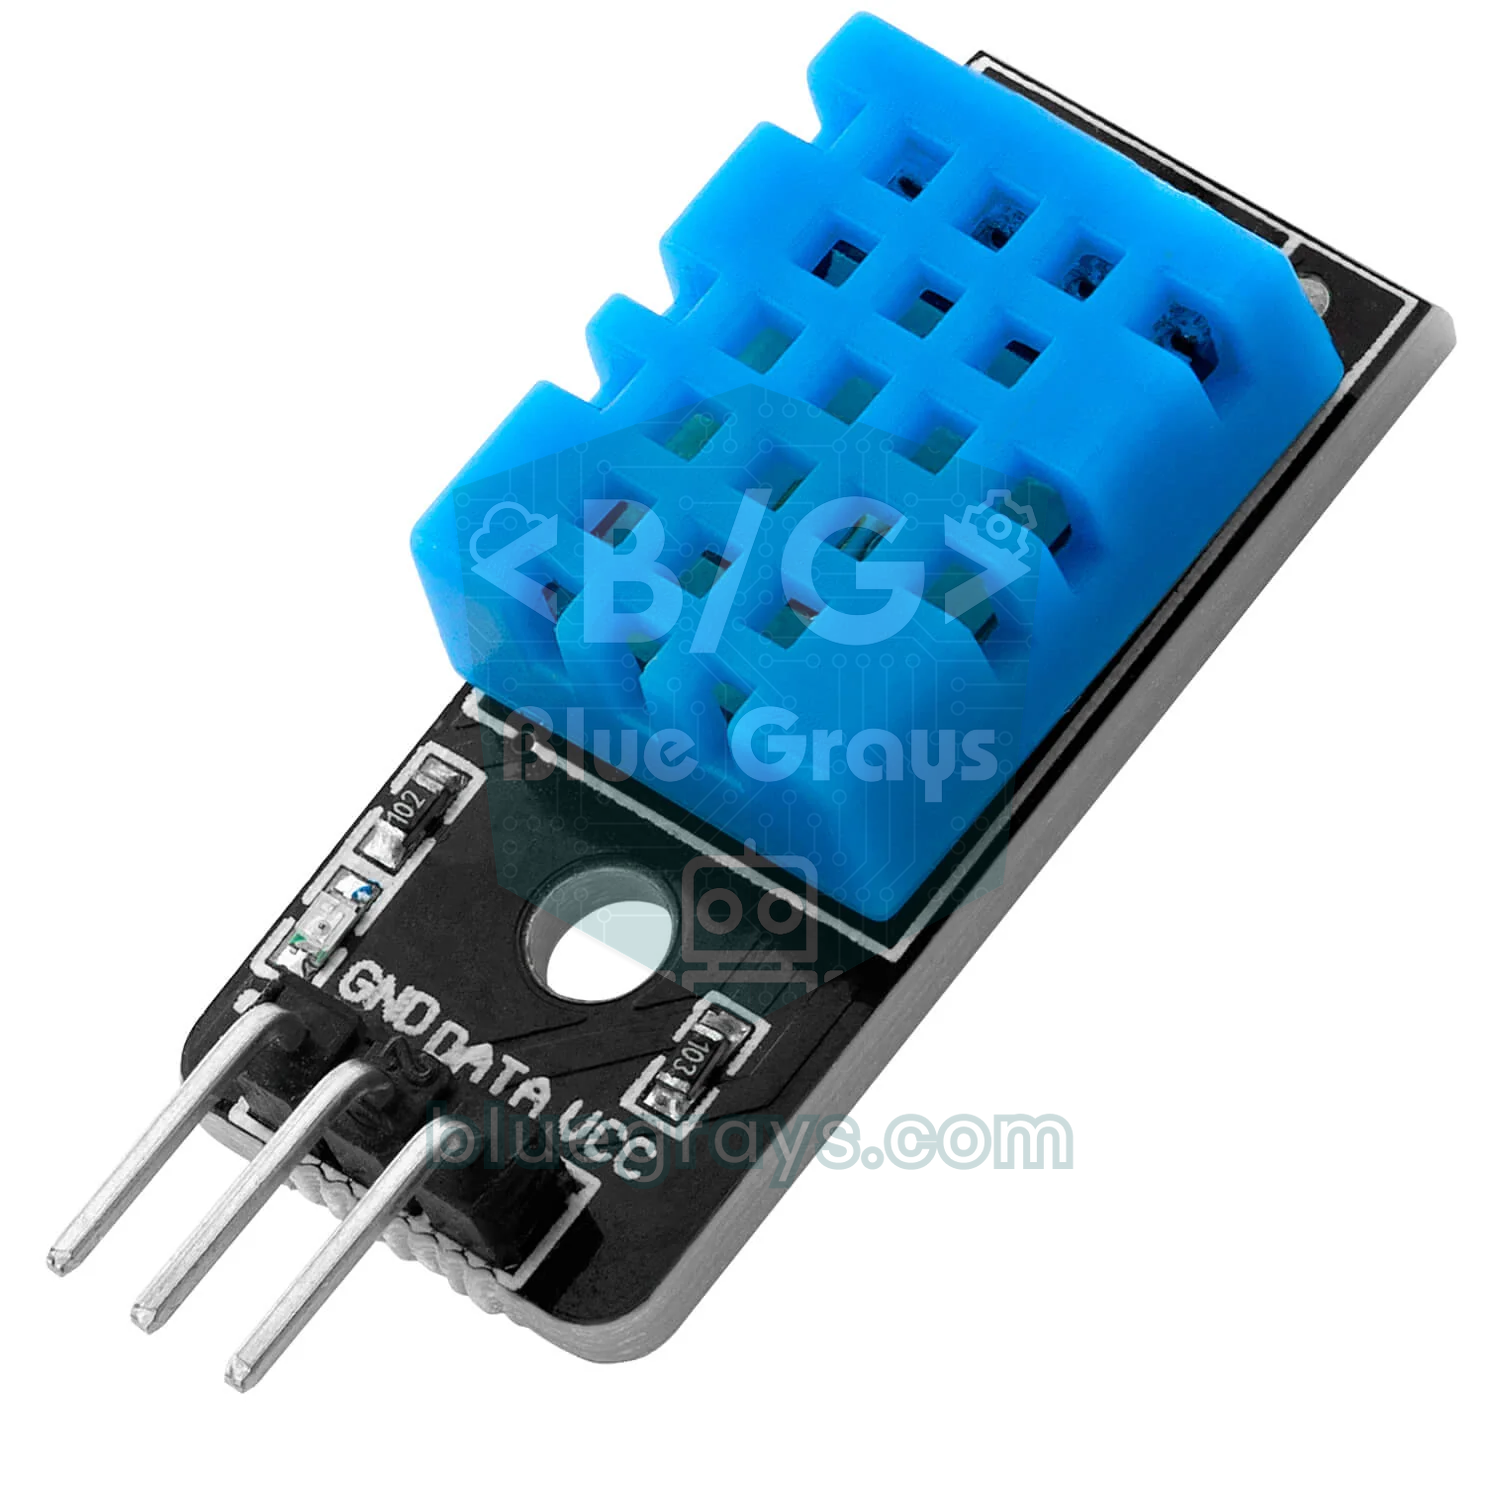
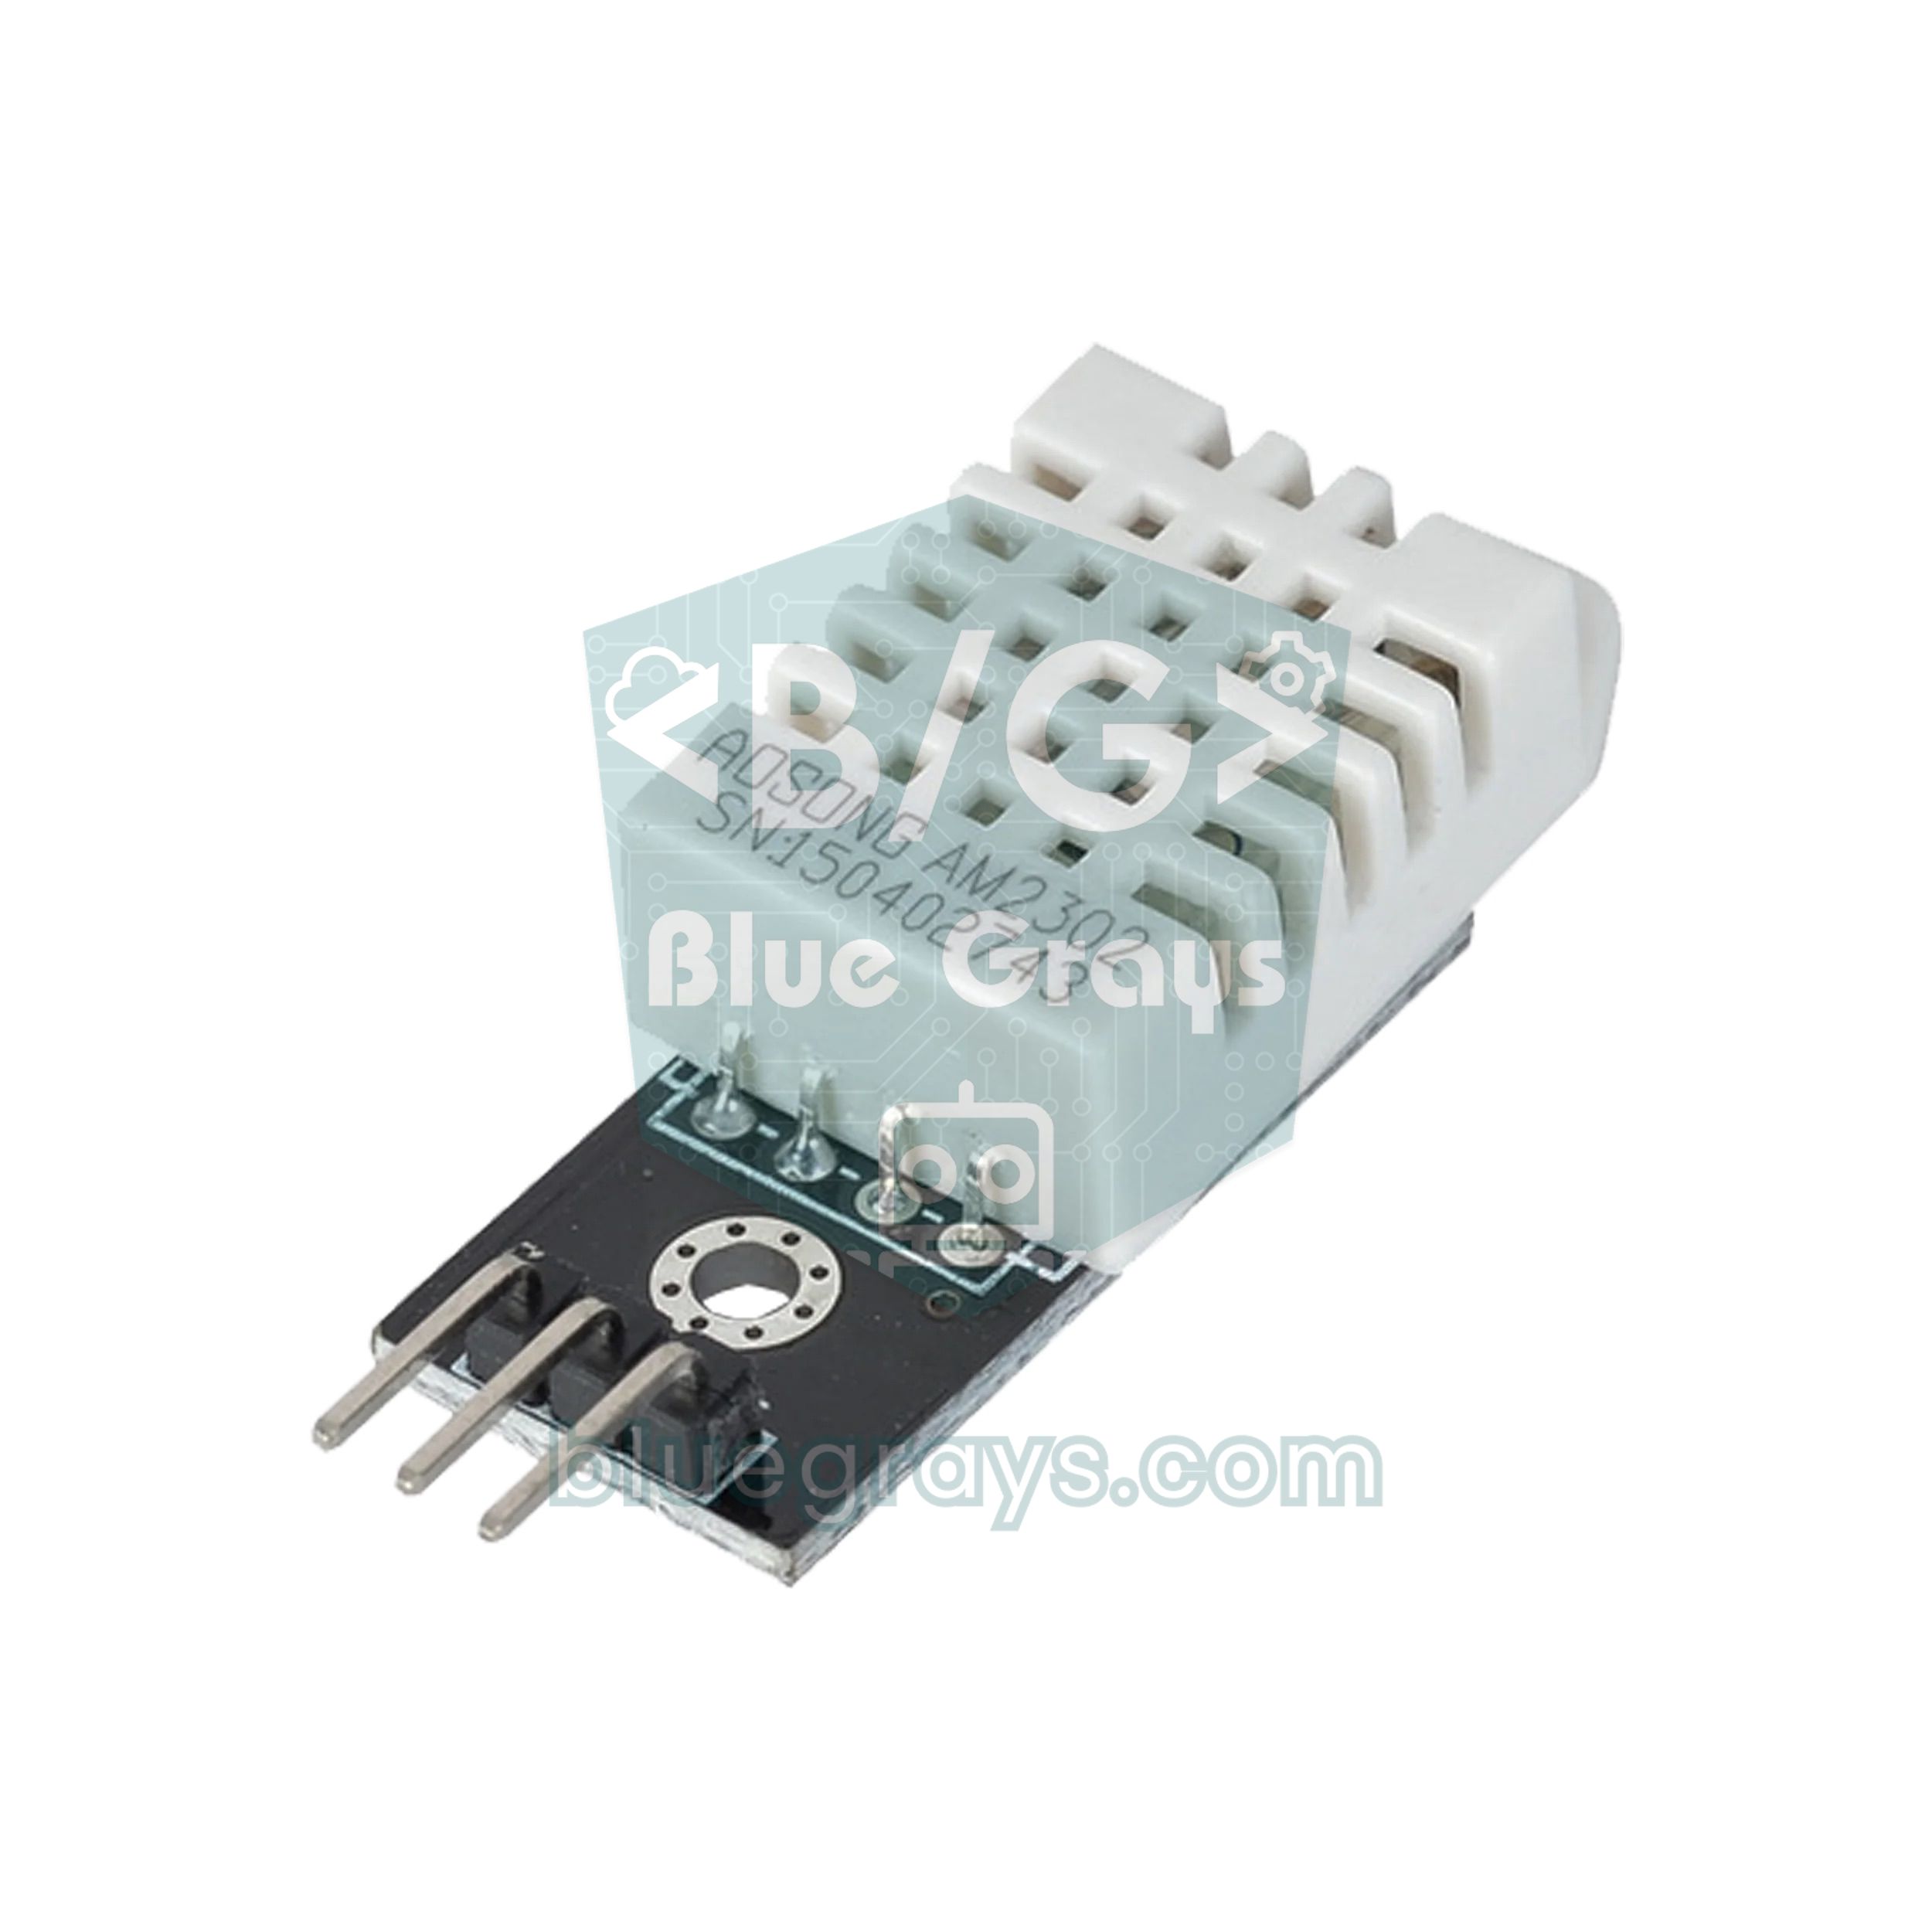
| Body colour | Blue | White |
| Supply | 3–5.5 V | 3.3–6 V |
| Library start pulse | 20 ms LOW | 1.1 ms LOW |
| Shortest read interval | 1 second | 2 seconds |
| Wait after power-up | At least 1 second | At least 1 second, 2 to be safe |
| Type in the code | DHT11 | DHT22 |
Correct wiring: Arduino Uno, ESP32 and Pico
| DHT pin | Arduino Uno | ESP32 | Raspberry Pi Pico |
|---|---|---|---|
| VCC (+) | 5V | 3V3 | 3V3 (OUT) |
| DATA (OUT, S) | D2 | GPIO 4 | GP15 |
| GND (−) | GND | GND | GND |
| Pull-up (bare sensor only) | 10 kΩ between DATA and 5V | 10 kΩ between DATA and 3V3 | 10 kΩ between DATA and 3V3 |
| Powering the sensor from a pin (reliable reading sketch) | D7 | GPIO 25 | Not used |
Symptom, cause and fix table
The table below matches the most common symptoms with their causes. Find your symptom and try the fix in that row first; the details are in the sections after the table:
| Symptom | Likely cause | Fix |
|---|---|---|
| Every reading is nan, no values at all | A different pin in the code, data wire in the wrong place or no power to the sensor | Compare the pin number with the wiring, measure between VCC and GND with a multimeter |
| Sensor is a DHT11, always nan | DHT22 defined in the code; the 1.1 ms start pulse is too short for a DHT11 | Write DHT11 in the code |
| No error but the values are nonsense (e.g. 0.1 °C and 16 %) | Sensor is a DHT22, DHT11 defined in the code | Write DHT22 in the code |
| Works sometimes, nan other times | No pull-up on a bare sensor, loose breadboard or jumper | Fit a 4.7–10 kΩ resistor between DATA and VCC, secure the wires |
| Only the first reading is nan | The sensor is read right after power-up | Wait 2 seconds after begin() |
| After one error, nan for 2 seconds | Reading too often; the library repeats the last result for calls within 2 s | Leave at least 2 seconds between readings |
| Occasional nan on the ESP32 | Wi-Fi and tasks disturbing the timing, long cable at 3.3 V | Retry, keep the last good value, shorten the cable |
| ESP32 never reads | GPIO 34–39 chosen, or a 5 V module pulling the data line to 5 V | Use a bidirectional pin such as GPIO 4 and power the module from 3V3 |
| Errors on a long cable (3 m or more) | Cable capacitance slows the signal edges and the voltage drops | Power from 5 V, use a 4.7 kΩ pull-up, choose twisted-pair cable |
| nan after hours, fixed by a reset | The sensor has locked up | Power the sensor from a GPIO and power-cycle it after a run of errors |
1. Wrong pin or wrong sensor type
On an Arduino Uno, #define DHTPIN 2 means digital pin 2, i.e. D2; not A2, and not the second leg on the board. On the ESP32 the numbers are GPIO numbers and usually match the labels on the dev board. ESP8266 boards (NodeMCU, Wemos D1 mini) have a trap: the pin labelled D4 is actually GPIO 2; in the code you must write either D4 or 2, and if you write 4 the library talks to a different pin. On the ESP32, GPIO 34–39 are input-only and therefore unsuitable for a DHT, whose data line is used as both output and input. GPIO 6–11 are reserved for the flash memory and crash the board if you use them.
The type is just as important as the pin. If you write DHT11, the library wakes the sensor with a 20 ms LOW pulse; if you write DHT22, with a 1.1 ms pulse. A DHT11 needs at least 18 ms, so reading a DHT11 as a DHT22 usually gets no answer at all and the result is nan. The reverse is sneakier: the DHT22 also answers the long pulse, but the library decodes the bytes in DHT11 format. There's no error message, just nonsense values: in a room at 23.5 °C and 65 % humidity you'll see 0.1 °C and 16 %. A blue body means DHT11, a white one DHT22; the white AM2302 with a cable is also a DHT22.
2. Pull-up resistor: module or bare sensor?
The DHT's data line is open-drain: the sensor only pulls the line LOW, and a pull-up resistor provides the HIGH level. On 3-pin modules soldered to a small board, this resistor (usually 10 kΩ, sometimes 4.7 kΩ) is already there. On the 4-pin bare sensor you have to fit it yourself between DATA and VCC; the datasheet suggests about 5 kΩ, and in practice anything from 4.7 to 10 kΩ works well. The library sets the pin to INPUT_PULLUP while reading, but the microcontroller's internal pull-up is around 20–50 kΩ and far too weak. On a short wire it's sometimes enough, which is exactly why "works sometimes, nan other times" almost always means a missing pull-up. You'll find the idea explained in pull-up and pull-down resistors, and how to read a resistor's value from its colours in the Resistor Colour Code tool.
3. Read interval and start-up time
A DHT11 can take at most one new reading per second, a DHT22 one every two seconds. The Adafruit library protects this for you: if less than 2 seconds have passed since the last reading, it doesn't ask the sensor at all and returns the last result again. Here's the detail most people miss: if that last result was an error, every call for the next 2 seconds also returns nan. A sketch that reads every 100 ms turns one failed reading into a block of 20 nan lines. The fix is simple: leave at least 2 seconds between readings, and in the same loop read the temperature first and then the humidity; the second call reuses the same measurement.
Start-up is another trap. According to the datasheet the sensor is unstable for the first second after power is applied and won't accept commands. If you read straight after dht.begin() in setup(), the first value is often nan. Waiting 2 seconds after begin() removes the problem completely. If you deliberately want to skip the library's 2-second cache, use readTemperature(false, true); the second parameter forces a new reading.
4. DHT on the ESP32: 3.3 V and timing
Two problems come up most often on the ESP32. The first is voltage: if you power a 3-pin module from 5 V, the module's pull-up resistor pulls the data line to 5 V as well, and the ESP32's pins only tolerate 3.3 V. Power the module from the 3V3 pin; the DHT11 and DHT22 both work at that voltage. If you need 5 V because of a long cable, connect the data line through a logic level converter. The second is timing: the library disables interrupts while reading, but on the ESP32 this only affects the core your code runs on. The Wi-Fi stack on the other core and flash memory waits can still corrupt the occasional reading. In a Wi-Fi project it's normal for a few readings in 100 to fail, so on the ESP32 you should always retry and keep the last good value.
If the error rate is high, avoid reading the sensor at Wi-Fi's busiest moments, for example in the middle of a web request, and look for brownout symptoms: a 3.3 V rail that sags when Wi-Fi starts also drops the sensor's supply. The DHTesp library, written for the ESP32 and ESP8266, tunes the timing for these chips and gives more stable results on some boards.
5. Long cables and interference
When you move the sensor to the other side of the room or outdoors, the error rate goes up. There are two reasons: the capacitance of a long cable slows the rising edge of the signal and blurs the difference between 26 µs and 70 µs that separates 0 and 1 bits, and a thin cable also drops voltage. For cables longer than a few metres, power the sensor from 5 V, lower the pull-up to 4.7 kΩ and run the data line as a twisted pair with GND; one pair of an Ethernet cable is ideal for this. The datasheet suggests a pull-up of about 5 kΩ for cables up to 20 metres, but with jumper wires you should expect trouble beyond 3–5 metres. If you only need temperature over a longer distance, the DS18B20 copes much better with long cables.
Diagnostic sketch to test the sensor (Uno and ESP32)
The sketch below uses pin D2 on an Arduino Uno and GPIO 4 on an ESP32; it detects the board by itself. At start-up it tries to read the sensor first as a DHT22, then as a DHT11, and picks the type that gives physically possible values (−40 to 80 °C, 0 to 100 %). Then it reads every 2.5 seconds and prints the success rate. Open the Serial Monitor at 115200 baud:
1// DHT teşhis kodu: tipi bulur, başarı oranını ölçer (Uno ve ESP32) / DHT diagnostic: finds the type, measures the success rate (Uno and ESP32)
2#include <DHT.h>
3
4#if defined(ESP32)
5const int DHT_PIN = 4;                       // ESP32: GPIO 4 (34-39 olmaz / never 34-39)
6#else
7const int DHT_PIN = 2;                       // Uno ve Nano: D2 / Uno and Nano: D2
8#endif
9
10DHT asDht22(DHT_PIN, DHT22);
11DHT asDht11(DHT_PIN, DHT11);
12DHT *sensor = nullptr;                       // bulunan tip / detected type
13unsigned long okCount = 0, failCount = 0;
14
15bool plausible(float t, float h) {           // fiziksel olarak mümkün mü? / physically possible?
16  return !isnan(t) && !isnan(h) && t > -40 && t < 80 && h >= 0 && h <= 100;
17}
18
19bool tryRead(DHT &d) {
20  float t = d.readTemperature(false, true);  // force: 2 sn önbelleğini atla / force: skip the 2 s cache
21  float h = d.readHumidity();                // aynı ölçümü kullanır / reuses the same reading
22  return plausible(t, h);
23}
24
25void detect() {
26  for (int i = 0; i < 2 && !sensor; i++) {   // önce iki kez DHT22 gibi dene / first try twice as DHT22
27    if (tryRead(asDht22)) sensor = &asDht22;
28    delay(2500);
29  }
30  if (!sensor && tryRead(asDht11)) sensor = &asDht11;  // sonra DHT11 gibi / then as DHT11
31  if (sensor == &asDht22) Serial.println(F("DHT22 / AM2302 bulundu / found"));
32  else if (sensor == &asDht11) Serial.println(F("DHT11 bulundu / found"));
33  else Serial.println(F("Yanit yok: pin, kablo, besleme, pull-up / no reply: pin, wiring, power, pull-up"));
34}
35
36void setup() {
37  Serial.begin(115200);
38  asDht22.begin();
39  asDht11.begin();
40  delay(2000);                               // açılıştan sonra bekle / wait after power-up
41  detect();
42}
43
44void loop() {
45  delay(2500);                               // DHT22 için en az 2 sn / at least 2 s for the DHT22
46  if (!sensor) {
47    detect();                                // bulunana kadar yeniden dene / retry until found
48    return;
49  }
50  float t = sensor->readTemperature(false, true);
51  float h = sensor->readHumidity();
52  if (isnan(t) || isnan(h)) failCount++;
53  else okCount++;
54  Serial.print(F("T: "));
55  Serial.print(t, 1);
56  Serial.print(F(" C  H: %"));
57  Serial.print(h, 1);
58  Serial.print(F("  Basari / success: %"));
59  Serial.println(100.0 * okCount / (okCount + failCount), 0);
60}
Here's how to read the result: if it prints Yanit yok / no reply, the sensor isn't answering as either type; check the pin, power and pull-up in the order above. If a type was found, look at the success rate. On an Arduino Uno with a short cable it should be 100 %. On an ESP32 using Wi-Fi, anything above 95 % is acceptable. Below 90 %, the problem is most likely the pull-up, a loose connection or a long cable. If you swap the sensor and see the same rate, the problem isn't the sensor but the circuit.
Error-tolerant reading: retries and power-cycling the sensor
In a real project a single nan must never reach the display, a database or a relay decision. The sketch below reads every 3 seconds, keeps using the last valid value after a failed reading and power-cycles the sensor after five errors in a row. For that, the sensor's VCC goes to a GPIO (D7 on the Uno, GPIO 25 on the ESP32) instead of 5V or 3V3. A DHT draws at most 2.5 mA, so a pin can power it easily, and sensors that lock up after hours of running recover this way without a reset. The sketch only uses delay() while restarting the sensor; the rest of the time the loop stays available for other tasks.
1// Güvenilir DHT okuma: son iyi değer, hata sayacı, sensörü kapatıp açma / reliable DHT reading: last good value, error counter, sensor power cycle
2#include <DHT.h>
3
4#if defined(ESP32)
5const int DHT_PIN = 4;
6const int DHT_POWER_PIN = 25;                // sensörün VCC'si bu pinden / the sensor's VCC comes from this pin
7#else
8const int DHT_PIN = 2;
9const int DHT_POWER_PIN = 7;
10#endif
11#define DHT_TYPE DHT22                       // DHT11 kullanıyorsan DHT11 yaz / write DHT11 for a DHT11
12
13DHT dht(DHT_PIN, DHT_TYPE);
14const unsigned long READ_EVERY_MS = 3000;    // 3 sn'de bir oku / read every 3 s
15const int MAX_FAILS = 5;                     // 5 hata = 15 sn / 5 errors = 15 s
16unsigned long lastRead = 0;
17float lastTemp = NAN, lastHum = NAN;         // son geçerli değerler / last valid values
18int failStreak = 0;
19
20void powerCycleSensor() {
21  pinMode(DHT_PIN, OUTPUT);
22  digitalWrite(DHT_PIN, LOW);                // veri hattından beslenmesin / no power through the data line
23  digitalWrite(DHT_POWER_PIN, LOW);          // sensörü kapat / switch the sensor off
24  delay(1000);
25  digitalWrite(DHT_POWER_PIN, HIGH);         // yeniden aç / switch it back on
26  dht.begin();                               // veri pinini yeniden hazırlar / sets the data pin up again
27  delay(2000);                               // açılış süresi / start-up time
28}
29
30void setup() {
31  Serial.begin(115200);
32  pinMode(DHT_POWER_PIN, OUTPUT);
33  digitalWrite(DHT_POWER_PIN, HIGH);
34  dht.begin();
35  delay(2000);
36}
37
38void loop() {
39  if (millis() - lastRead >= READ_EVERY_MS) {
40    lastRead = millis();
41    float t = dht.readTemperature();
42    float h = dht.readHumidity();
43    if (isnan(t) || isnan(h)) {
44      failStreak++;
45      Serial.print(F("Okuma hatasi / read error #"));
46      Serial.println(failStreak);
47      if (failStreak >= MAX_FAILS) {
48        Serial.println(F("Sensor yeniden baslatiliyor / power-cycling the sensor"));
49        powerCycleSensor();
50        failStreak = 0;
51      }
52    } else {
53      failStreak = 0;
54      lastTemp = t;
55      lastHum = h;
56    }
57    if (!isnan(lastTemp)) {                  // ekranda hep son iyi değer / always show the last good value
58      Serial.print(F("T: "));
59      Serial.print(lastTemp, 1);
60      Serial.print(F(" C  H: %"));
61      Serial.println(lastHum, 1);
62    }
63  }
64  // diğer işler burada bekletilmeden çalışır / other tasks run here without waiting
65}Testing with the Raspberry Pi Pico (MicroPython)
The Pico's MicroPython firmware has a built-in dht module for the DHT11 and DHT22, so there's no library to install. Its nice feature is that it tells the two error types apart: if the sensor doesn't answer at all you get OSError: [Errno 110] ETIMEDOUT, and if data arrives but the checksum doesn't match you get checksum error. The first points to the wiring, the pin and the power supply; the second to interference, a weak pull-up and long cables. Connect the sensor to 3V3, GND and GP15 and run the script in Thonny:
1# DHT testi (Raspberry Pi Pico, MicroPython): hata türlerini ayırır / DHT test: tells the error types apart
2import dht
3import time
4from machine import Pin
5
6sensor = dht.DHT22(Pin(15))       # GP15; DHT11 için dht.DHT11 / dht.DHT11 for a DHT11
7time.sleep(2)                     # açılış süresi / start-up time
8ok = 0
9fail = 0
10
11while True:
12    try:
13        sensor.measure()
14        t = sensor.temperature()
15        h = sensor.humidity()
16        ok += 1
17        print("T: {:.1f} C  H: {:.1f} %".format(t, h))
18    except OSError as e:          # ETIMEDOUT: sensör cevap vermedi / the sensor did not answer
19        fail += 1
20        print("Cevap yok / no reply:", e)
21    except Exception as e:        # checksum error: veri bozuk geldi / the data arrived corrupted
22        fail += 1
23        print("Bozuk veri / corrupted data:", e)
24    print("Basari / success: {}%".format(100 * ok // (ok + fail)))
25    time.sleep(2.5)               # DHT22 için en az 2 sn / at least 2 s for the DHT22
When should you switch to an AHT20 or SHT31?
If the error rate stays high after all these checks, or you need more accurate readings, it may be time to drop the DHT. Sensors such as the AHT20, SHT31 and BME280 talk over I2C: the sensor handles the timing itself and the microcontroller just reads the finished result. That's why they stay stable on the ESP32 even with Wi-Fi on, and they can share the same two wires with an OLED display. The only place the DHT still has an edge is that it can be run a few metres away on a single wire; I2C is designed for short cables.
| Sensor | Interface | Temperature accuracy | Humidity accuracy | When to choose it |
|---|---|---|---|---|
| DHT11 | Single wire | ±2 °C | ±5 % | School experiments, rough room monitoring |
| DHT22 (AM2302) | Single wire | ±0.5 °C | ±2–5 % | Where you need a cable of a few metres |
| AHT20 | I2C (0x38) | ±0.3 °C | ±2 % | A cheap, stable replacement for the DHT |
| SHT31 | I2C (0x44 or 0x45) | ±0.3 °C | ±2 % | Accurate readings, outdoors, condensation with the built-in heater |
| BME280 | I2C or SPI | ±1 °C | ±3 % | When you also need air pressure |
In short: for indoor projects where the sensor sits close to the board, the AHT20 is the easiest switch; the details are in AHT10 and AHT20. In greenhouses, bathrooms or outdoors where humidity goes above 90 %, the SHT31, whose heater can clear condensation, lasts longer. If you also want pressure, the BME280 gives you all three readings in one sensor. To see all temperature sensors side by side, have a look at the temperature sensor comparison.
To sum up, behind "failed to read from DHT sensor" there's almost always the pin, the type, the pull-up, the read interval, the power supply or the cable, and the diagnostic sketch shows which one in a few minutes. You'll find the basics of using the sensor in DHT11 temperature and humidity sensor. Once your sensor reads reliably, you can move on to the DHT11 temperature and humidity, ESP32 DHT22 with LCD and ESP32 temperature logger projects in the BlueGrays app, with circuit diagrams and ready-made code.
Frequently asked questions
Why does my DHT11 return nan?
nan means the library didn't get a valid answer from the sensor. The most common causes are a pin number that doesn't match the wiring, the type defined as DHT22, no pull-up resistor on a bare sensor, and reading more often than every 2 seconds. Running the diagnostic sketch narrows it down in a few minutes.
How do I fix "Failed to read from DHT sensor!" on a DHT22?
Make sure the type in the code is DHT22, the pin is right and you wait at least 2 seconds between readings. A bare sensor needs a 4.7–10 kΩ resistor between DATA and VCC. On the ESP32, power the sensor from 3V3 and don't use GPIO 34–39.
Does a DHT22 need a pull-up resistor?
A bare 4-pin sensor does; fit a 4.7–10 kΩ resistor between DATA and VCC. 3-pin modules already have one on the board. The microcontroller's internal pull-up is too weak, so relying on it alone leads to intermittent errors.
Can a DHT11 or DHT22 run on 3.3 V?
Yes, the DHT11 works from 3 to 5.5 V and the DHT22 from 3.3 to 6 V, and powering them from 3V3 is recommended on the ESP32 and Pico. At 3.3 V keep the cable short, because the voltage drop on a long cable corrupts readings. For a cable of several metres, a 5 V supply with a logic level converter is safer.
How often can you read a DHT22?
A DHT11 can be read at most once a second and a DHT22 once every two seconds. For calls closer than 2 seconds apart, the Adafruit library returns the last result without asking the sensor; if that result was an error, the nan repeats too. For room monitoring, reading every 5–60 seconds is more than enough.
What is a better alternative to the DHT22?
For more stable and accurate readings, the I2C AHT20 or SHT31 are good choices; they handle their own timing, so they work fine on the ESP32 even with Wi-Fi on. In very humid places the SHT31 with its heater is preferred, and the BME280 if you also need pressure. If you only need temperature over a long cable, use a DS18B20.
Projects to build after reading this
See all projects
Temperature and Humidity with DHT11
How warm is your room, and is the air humid or dry? The DHT11 sensor measures temperature and humidity, and the Arduino writes the values on a two-line LCD screen, refreshing every couple of seconds.

ESP32 DHT22 Temperature and Humidity (with LCD Display)
This project measures ambient temperature and humidity using a DHT22 sensor and displays the data in real time on a 16x2 I2C LCD. Data is read from the sensor using the one-wire protocol via the Adafruit DHT library. This project serves as the foundation for IoT weather stations, smart home automation, or environmental monitoring systems in greenhouses. Communication with the DHT22 is established via the ESP32's GPIO 4 pin.

ESP32 Temperature Data Logger (DHT22 + DS1307 RTC + microSD + OLED)
Build a timed temperature and humidity logger with the ESP32! A DHT22 sensor reads temperature and humidity once a minute, and each reading is saved to a microSD card in CSV format with a real-time stamp from the DS1307 RTC module. The OLED display shows the latest temperature, humidity, timestamp and total number of records live, in large text.

Dot Matrix Clock, Calendar and Weather Station (MAX7219, DS1307)
A scrolling-text board for your desk or wall that shows the time, the date and the room's weather in turn.

Smart Irrigation Station
A gardener that waters your plants on its own, so they don't dry out while you're on vacation.
Temperature Measurement with NTC and 2x16 Lcd Display
Measure the temperature around you with a sensor that looks like a tiny bead. This part, called an NTC, lets electricity through more easily as it warms up; the Arduino reads that change, turns it…

ESP32 HTTPClient + Weather API (with LCD Screen)
In this project the ESP32 makes a REST API call over the internet to a weather API (wttr.in) using HTTPClient.h. The JSON response is parsed with ArduinoJson v7, and the city, temperature, humidity, weather and wind are shown on an I2C LCD. wttr.in needs no API key; just type the name of any city.