
First Arduino Lesson Plan: Introductions, Rules and an LED
First Arduino lesson plan: a 40-minute intro lesson with a demo opener, first LED, exit ticket, student survey, class agreement and a note for parents.
The short answer for a first Arduino lesson plan: don't lecture in the first lesson; get to know the class and give everyone a success. The lesson has three goals: curiosity (open with a working circuit and connect it to devices students already know), order (three basic rules and a class agreement discussed on day one) and a first success (before the bell, every group, or every student if there are no kits, makes an LED blink and changes how it blinks by their own decision). Split the 40 minutes like this: 5 minutes of demo, 7 minutes of introductions and a "microcontrollers around us" chat, 5 minutes of rules, 5 minutes for the app and accounts, 13 minutes for the first LED, 5 minutes for the exit ticket and packing up. Below you will find the flow table, a prep checklist, a student survey, a class agreement, a first-week task and an information note you can send to parents.
This post is about the "week 0" lesson: the one where you haven't handed out kits yet or start with only a few, and where students meet you and each other for the first time. If you want a technical ESP32 opener, read the first ESP32 lesson plan. We covered starter games in warm-up activities, a detailed skills check in mixed-ability classes, the full set of safety rules in lab safety rules and how educator codes are bought and handed out in Premium codes for the class. We won't repeat them here; we fit them into the first lesson.
Three goals for the first lesson: curiosity, order, a first success
A first lesson is not measured by how much students learned but by how they feel walking into the second one. If a student leaves thinking "this is for me, I made something work", they are more likely to stay all term; if they sit through 25 minutes of definitions of resistance, current and voltage without touching anything, they come back with less enthusiasm. So make the three goals observable and check them at the end with an exit ticket. Teaching one concept in depth is the job of lesson two; lesson one only opens the door. You also have a goal of your own: by the end you should know the names of all 24 students, who has built something before and who has no device access.
| Goal | What you see at the end | How you check it |
|---|---|---|
| Curiosity | Students link the demo to a device in their own life and ask "could we make this do that?" | Exit ticket question 1: can they write the input and output of a device? |
| Order | USB is unplugged while wires are changed, the kit box is counted and returned, stuck students ask their group first | Box count at the end; watching the USB rule while you walk around |
| First success | Every group lights the LED, changes one value themselves and sees the result | Exit ticket question 2: can they explain what changing the delay did? |
| Your own goal | You know names, experience levels and device access | The student survey and reading the exit tickets the same day |
The 40-minute introductory lesson, step by step
Say you have a class of 24 students who will work in eight groups of three, and you have at least one ready-made demo circuit, a projector and a computer with the Arduino IDE installed. With enough kits the first LED is done in groups, with few kits by half the class, and with none in a simulator or as your demo; we cover that separately below. Time slips most during the "first LED" stage, so write the remaining minutes on the board at the end of each stage. If you fall behind, cut the app stage, not the first LED: setting up accounts can move to home or to lesson two, but the first success can't.
| Minute | Stage | Teacher | Students |
|---|---|---|---|
| 0–5 | Demo opener | Runs the ready circuit and asks one question: "What does this circuit sense and what does it do?" Says in two sentences what they will build by the end of the course. | Watch, guess, come closer and try the demo. |
| 5–12 | Introductions and microcontrollers around us | Starts the "your name and a device at home that makes its own decisions" round and writes answers on the board in input and output columns. | Say their name and a device; put a name card on the desk. |
| 12–17 | Rules and class agreement | Shows the three rules, reads the agreement draft and asks for one suggestion per group. | Repeat the rules and write a suggestion for the agreement. |
| 17–22 | App and accounts | Opens the LED Blink project page on the projector; manages code distribution if it happens in this lesson. | Find the same project in the app or follow on the projector; share group roles. |
| 22–35 | First LED | Hands out kits or opens stations, checks circuits while USB is unplugged, asks the prediction question. | Build the circuit, upload the code, write a prediction before changing the delay value. |
| 35–40 | Exit ticket and pack-up | Hands out tickets, starts the box count, announces lesson two in one sentence. | Answer three questions, count the box and hand it in. |
Opening: start with a working demo (minutes 0–5)
In the first five minutes students should see something work on its own. One circuit that you built and tested the day before is enough. The most effective choice is the Night Light with Ldr project: when the light drops the LED turns on, and when a student covers the sensor with a hand the circuit decides "it's night". If you want sound, Using a Buzzer works, and if you want to show measuring, HC-SR04 Distance Measurement (Serial Display), which prints the distance on the computer screen, does the job. All three are free in BlueGrays, with the parts list, circuit diagram and code open. Don't jump into explaining once the demo runs; ask first: "What does this circuit sense? What does it decide? What does it do?" After two or three answers, say in one sentence what they will build by the end of the course, for example "By the end of the term you'll have designed your own alarm, game or measuring device." Leave the demo table open for the rest of the lesson; early finishers can come and try it.
Microcontrollers around us: 7 minutes that double as introductions
Tie the introduction round to the topic: each student says their name and one device at home that "makes its own decisions". At 15 seconds per student, 24 students finish in 6 minutes. Meanwhile, write the answers on the board in three columns: Input (what does it sense?), Decision (based on what?), Output (what does it do?). A washing machine senses that the door is closed and the water level, then runs the motor according to the program; an air conditioner measures room temperature, compares it to the set value and switches the compressor on or off; a microwave reads the buttons, counts down the time and beeps when it's done; an automatic door senses someone approaching and turns a motor. Keep the round moving by answering repeats with "same device, name a different sensor". At the end, give the one-sentence definition yourself: "There is a small computer inside these devices; we call it a microcontroller, and Arduino is one of them." Don't erase the three-column table; you will come back to it during the first LED so students notice their own circuit has no input, only an output.
Rules and a class agreement template (minutes 12–17)
Instead of reading ten rules in the first lesson, state only three and give a one-sentence reason for each: unplug USB before changing wires (a wrong connection with power on causes a short circuit), every LED gets a resistor (the resistor limits the current and protects the LED and the pin), the kit box is counted when opened and counted when closed (a missing part ruins the next group's lesson). The full list, the reasons behind it and the battery rules are in the safety rules post; covering that list in the second or third lesson, once students have built their first circuits, makes it stick. In the last two minutes, read the class agreement draft below. Give the agreement two sides: what students promise and what you promise. A one-sided list of rules soon becomes a sheet of paper on the wall; a two-sided agreement sets the balance of "mistakes are fine, changing wires with power on is not". Ask each group for one suggestion, add the suggestions in lesson two, have everyone sign and keep the sheet on the wall all term. Being clear about grading from day one is part of setting expectations too; show how work will be assessed at the end of the term with a table like the one in the assessment rubric post.
- We: unplug USB when changing wires; someone in the group checks the circuit before it gets power.
- We: try on our own for 3 minutes when stuck, then ask our group, and only then the teacher.
- We: don't hide error messages, we read them; mistakes are part of the lesson and nobody is laughed at for making one.
- We: rotate roles every lesson; the keyboard and the circuit don't stay with one person.
- We: count the kit box when we open and close it, and report missing or broken parts instead of hiding them.
- We: use phones during the lesson for the project page, the code and the daily questions.
- The teacher: makes sure at least one thing works every lesson and comes to class with a working example.
- The teacher: explains the assessment criteria up front and answers questions by the next lesson at the latest.
Installing the app and creating accounts: this lesson or the next?
In the first lesson, open the LED Blink project in BlueGrays on the projector: Required Components, Circuit Diagram, Source Code and the Show as blocks switch are where students will look most in the coming weeks. Since this project is free, nobody needs Premium or a code for the first LED. Whether students install the app and create an account on their own phones depends on the school Wi-Fi, the phone policy and their age; 24 people downloading an app at once easily turns five minutes into fifteen. If you are using educator codes, tie their distribution to this decision too. Buying codes and sharing them one by one is covered step by step in Premium codes for the class; here we only decide on timing.
| Situation | When to hand out codes | Why |
|---|---|---|
| The app was installed beforehand thanks to the parent note, accounts exist, phones are allowed | In this lesson, minutes 17–22 | Tapping the shared link opens the Redeem Code screen with the code filled in; the student only taps Redeem Code |
| Enrolment isn't final yet, students may change in the first week | In lesson two | Premium starts on the day the code is redeemed; unused codes have no expiry date, so waiting costs nothing |
| Phones are banned in class or most students have no device | At home, together with the parent note | The first LED is done on the projector with a free project; students enter the code in their own account at home |
| Some students already have an active App Store or Google Play Premium subscription | Don't give them a code for now | An account with an active store subscription can't redeem a code; give it once the subscription ends |
| Accounts must be created with a school email | After the accounts are created | Matching who redeemed which code in My Codes with the class list becomes easier |
The first LED: with full kits, a few kits or none (minutes 22–35)
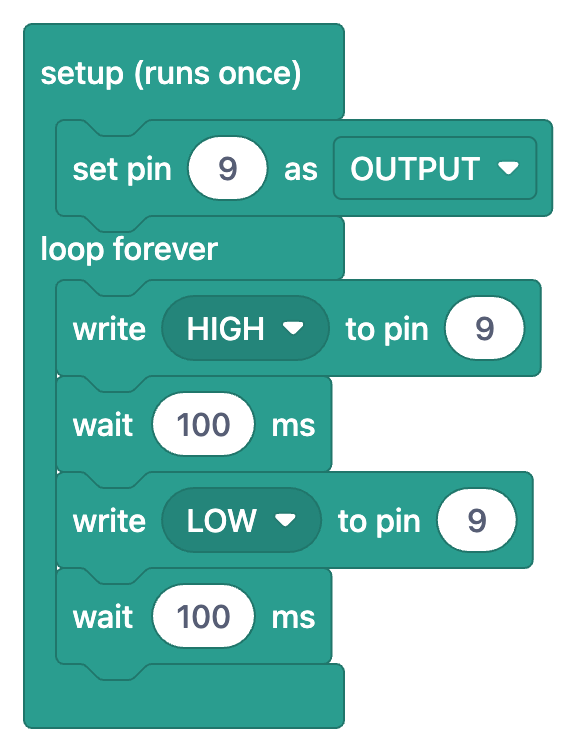
Use the LED Blink project for the first success. The parts list is short: one Arduino Uno, one breadboard, one LED, one 220 Ω resistor and two jumper wires. The code turns the LED on pin 9 on for 100 milliseconds and off for 100 milliseconds, so the LED blinks five times a second. The real task isn't uploading the code but predicting the effect of changing one value before trying it. That way, in their first lesson students both build a circuit and experience "I changed the code and the board did what I told it". Assign group roles at the start: one builds the circuit, one uses the keyboard, one reads and checks the diagram. Rotate roles at every step.
- Build the circuit with USB unplugged: following the Circuit Diagram on the projector, pin 9, the 220 Ω resistor and the LED are connected in series; the LED's long leg goes to the pin side and the short leg to GND.
- The group's reader compares the circuit with the diagram row by row, then raises a hand; you or the neighbouring group check it once.
- Get the code from the Source Code section onto the computer: a group working from a phone can copy the code or open it on the computer via the link. In the Arduino IDE, choose the Arduino Uno board and the port from the Tools menu and upload.
- If the LED blinks quickly, the first success is done. Go back to the input, decision, output table on the board: "What is this circuit's input?" Answer: none, only an output; in week two you'll add input with a button and a sensor.
- Prediction task: before changing both delay(100) values to delay(1000), each group writes its prediction on paper. Then they upload: the LED stays on for one second and off for one second. Was the prediction right?
- A group that finishes early turns on Show as blocks and finds which line of code each block matches, or adds a second LED to the same circuit and moves on to the Two LEDs Blinking Alternately project.
| Item | Per group (3 students) | Class of 24, full kits (8 groups) | Few kits (4 kits) | No kits |
|---|---|---|---|---|
| Arduino Uno and USB cable | 1 | 8 + 1 spare cable | 4 + 1 spare cable | 1 (teacher) |
| Breadboard | 1 | 8 | 4 | 1 |
| LED (5 mm) | 1 | 8 + 8 spare | 4 + 4 spare | 1 + 1 spare |
| 220 Ω resistor | 1 | 8 + 4 spare | 4 + 2 spare | 1 |
| Jumper wire (male-male) | 2 | 16 + 8 spare | 8 + 4 spare | 2 |
| Computer with the Arduino IDE | 1 | 8 | 4 (other computers for the simulator) | 1 plus projector |
| Numbered kit box and contents card | 1 | 8 | 4 | None |
| Teacher demo circuit (Night Light with Ldr) | None | 1 | 1 | 1 |
| Exit ticket and student survey | 1 per student | 24 + 4 spare | 24 + 4 spare | 24 + 4 spare |
If you have only a few kits, split the class in two: 12 students work in four groups with the kits while the other 12 build the same circuit in a simulator on the computer; they swap in lesson two. We explained how to use a browser-based circuit simulator in the Tinkercad Arduino simulation post. If you have no kits and not enough computers, do the first LED at your own desk, on a camera or with students gathered around, but keep the decisions with the students: collect their prediction slips, let the class vote on "what should the delay be?", upload and compare the result with the predictions. Even three rounds, such as 100, 1000 and 50 milliseconds, give every student one prediction and one result. In this case the device questions in the student survey matter even more, because they tell you who can do the first-week task from home.
Exit ticket: 3 questions, 4 minutes
- Input and output: "Pick one of the devices we talked about today. What does it sense, and what does it do?" (Measures the curiosity goal.)
- First success: "What changed when you wrote delay(1000) instead of delay(100)? Why?" (Did they understand how one value changes behaviour?)
- Expectations: "Write one project you want to build in this course and rate yourself 1–5 after today's lesson: 1 'I'm confused', 5 'I want to keep going right now'."
- Optional: "A question you wanted to ask but didn't." Answer the questions from this line anonymously in the first five minutes of lesson two.
Pre-lesson prep checklist
- [ ] Build the demo circuit the day before and test it at least once with the same computer; keep a spare USB cable next to it.
- [ ] Check that the Arduino IDE opens on every computer and that the port appears when an Uno is plugged in. For installation see Arduino IDE setup, for port errors see Arduino code won't upload.
- [ ] Build the LED Blink project once yourself beforehand; photograph where the LED and resistor sit on the breadboard, as a student would see it.
- [ ] Number the kit boxes, put a contents card in each and count every box once.
- [ ] Keep the LED Blink project page and its block view open in BlueGrays on the projector; take screenshots in case the Wi-Fi drops.
- [ ] Print the student survey, exit tickets and name cards for the number of students plus four spares.
- [ ] Write the class agreement draft on an A3 sheet; leave space at the bottom for students' suggestions.
- [ ] Send the parent or participant information note at least two days before the lesson.
- [ ] If you are using educator codes, buy the package beforehand from Profile > Educator Packages, check the codes in My Codes and prepare a table to match them with the class list.
- [ ] Write down plan B: if computers or kits fail, the first LED happens at your desk with a prediction vote.
Student survey template
Give the survey at the end of the first lesson or as homework, not at the start; the first minutes belong to the demo and introductions. Keep it on paper, with names, and short: 8 questions, 5 minutes at most. Its purpose isn't grading but seeing the first week's groups, demo choices and device problems in advance. Don't ask for more personal information than you need: phone numbers, addresses or family details are not this survey's business. If you want a more detailed skills check, put the 10-minute test from the mixed-ability class post into lesson two.
- Your name and class (or age group): ____________
- What have you done before? Nothing / Block coding / A step-by-step project with a kit / I wrote or changed my own code
- Why did you join this course? Curiosity / A school or competition project / I want to work in this field later / My family suggested it / Other: ____
- What interests you most? (up to 2) Light show / Sound and music / Games / Motion and robots / Measure and sense / Control from your phone / Smart home / Displays and clocks
- Can you use a computer at home? My own / Shared with family / No. If yes, operating system: Windows / macOS / Linux / Not sure
- Can you use a phone or tablet? My own (iPhone / Android) / A family member's / No
- Do you have a development board or electronics kit at home? Arduino Uno or Nano / ESP32 / Raspberry Pi Pico / Another kit / None
- What would you like to be able to do by the end of the term? One sentence: ____________ (Optional: is there anything you'd like your teacher to know?)
A short out-of-class task for the first week
The first-week task takes 15–20 minutes outside class and everything in it can be used for free. Its purpose is to form the groups for lesson two: the interests from the Project Finder hint at demo and project choices, and the placement test hints at who will move at what pace. The app has no class dashboard; you can't see results in a remote list, so students show you on paper or on their own screen. That's why the task should be written down. For students without a board or device, you can answer the three Project Finder questions together on the projector at the start of lesson two. If you want to turn the task into a longer out-of-class route, follow the plan in the Arduino practice outside class post.
- Open the Project Finder in BlueGrays and answer the three questions: What would you like to build?, Which board do you have?, How much experience do you have? If you don't have a board, choose I don't have a board yet.
- On the results screen, write down the name of the project shown as BEST MATCH and the warm-up project labelled WARM UP FIRST · FREE.
- In Daily questions, take the 15-question Placement test and write down your level (e.g. A1 First Light, A2 Circuit Builder).
- On at least three days this week, answer the daily questions; the daily set is 5 questions and takes about 3 minutes.
- Bring the sheet to lesson two or show your results on your phone.
A first-day information note for parents or participants
Send the note below to parents at least two days before the first lesson, or to the participants themselves if you teach adults, and fill in the square brackets with your details. Keep it short: at a glance, parents should see what the lesson covers, what to bring, how safety is handled and, if educator codes are used, what they are and which information is shared. Instead of putting a long code explanation in the note, point to the post that walks through the student's steps.
- What we'll learn: the basics of electronics and coding with Arduino. In the first lesson we'll get to know each other, talk about class rules and light an LED with our first circuit.
- Lesson day and time: [day, time, room]. Length: [number of weeks].
- What to bring: a pen and a notebook. If available, a phone or tablet (iOS or Android) with the BlueGrays app; 60 projects (20 per platform), such as LED Blink, are free in the app. A computer at home is not required; electronics kits are handed out and collected in class.
- Safety: circuits run on 5 V from a computer's USB port; mains voltage is never used in lessons.
- Educator code (if used): a single-use code in the format BG-XXXX-XXXX-XXXX that gives the student 30 or 365 days of BlueGrays Premium. The educator pays once; the student doesn't need to add a card to their Apple or Google account, and nothing is charged automatically when it ends.
- Privacy: the BlueGrays name, username, email and profile photo of a student who redeems a code are shared with the educator. Project progress and question scores are not shown to the educator. If the account has an ongoing App Store or Google Play subscription, the code can't be redeemed; please let us know.
- Contact: [name, email]. You'll find step-by-step instructions for redeeming the code in the how to redeem an educator code post.
Common first-lesson mistakes and how to fix them
| Mistake | Why it happens | Fix |
|---|---|---|
| Too much theory | Defining current, voltage and resistance takes 20 minutes and the first LED is pushed to the last minutes or never happens | Theory stays under 10 minutes and comes after the demo; explain the concepts in lesson two, while students hold a working circuit |
| Chaos when handing out kits | Eight boxes open at once, parts get mixed up, LEDs end up on the floor, parts are missing at the end | Boxes are handed out only at the first LED stage, numbered and with a contents card; each group has a box keeper; count at the start and the end |
| Getting stuck on setup | 24 people download the app at once, passwords are forgotten, the school network slows down or the IDE doesn't see the board | Have the app installed beforehand via the parent note and move account setup to home if needed; test the IDE and port on every computer the day before; keep screenshots ready so you can continue on the projector |
| Squeezing code distribution into the lesson | Students with an active subscription or no account get stuck and there's no time left for the first LED | If conditions aren't ready, leave codes for lesson two; the first LED uses a free project and unused codes don't expire |
| Everyone calling the teacher at once | A stuck group calls out without waiting and you end up stuck at one table | The rule "3 minutes on your own, then your group, then the teacher" plus a help queue on the board; details in the large class post |
| Fast finishers getting bored | An experienced student lights the LED in 3 minutes and loses interest for the rest of the time | Ready extension tasks: create a rhythm with delay, match blocks with Show as blocks, add a second LED, or explore the sensor at the demo table |
Walk into lesson two having read the exit tickets and surveys on the same day: sort the tickets into three piles (ready, some support, close follow-up), rebuild the groups using the levels and interests from the first-week task, and spend the first five minutes on the "questions you wanted to ask but didn't". Every part of this lesson, from Night Light with Ldr for the demo to LED Blink for the first success, is free in BlueGrays with a circuit diagram, code and blocks; if you download the app and build LED Blink once from start to finish before preparing your first lesson, you'll see in advance which step students are likely to get stuck on.
Frequently asked questions
What should you do in the first Arduino class?
The first lesson is for introductions, rules and a first success. Open with a working demo, talk with students about devices around them, give three basic rules and make sure every group lights an LED and changes one value before the bell. Keep the last five minutes for an exit ticket.
Should I hand out kits in the first Arduino lesson?
Yes if you have enough, but only at the first LED stage and in numbered boxes. Handing out boxes at the start of the lesson splits attention and leads to lost parts. With few kits, half the class works with kits while the other half uses a simulator, and they swap in lesson two.
How do you teach the first Arduino lesson without kits?
You can do the first LED at your own desk or in a simulator. What matters is that students keep the decisions: choose the delay value through their predictions and a vote, upload it and compare the result with the predictions. That way every student makes a prediction and sees the result.
How much theory should the first lesson include?
No more than ten minutes, and it should come after the demo. Concepts such as current, voltage and resistance are far easier to understand when students hold a working circuit. In the first lesson it's enough to explain what a microcontroller is and the idea of input, decision and output.
What questions should a student survey for a coding class include?
Prior experience, why they joined, interests, computer and phone access at home, which board they have and their goal for the end of the term. Stay within eight questions and five minutes, and don't ask for unnecessary personal information. The aim is not grading but seeing the first week's groups and possible device problems in advance.
Should I hand out educator codes in the first lesson?
Yes, if the app is already installed, accounts exist and phones are allowed. If enrolment isn't final, it's better to wait until lesson two; Premium starts on the day the code is redeemed and unused codes have no expiry date. Tell students in advance that their name, username, email and profile photo will be visible to you.
Projects to build after reading this
See all projects
LED Blink
The very first hello of electronics: switching a single LED on and off. The Arduino turns the LED on and off at short intervals, so the light blinks quickly. You see in the simplest way how the board

Two LEDs Blinking Alternately
Two LEDs blink quickly in turn: when one lights up the other goes off, as if they were tossing a ball back and forth. The Arduino keeps each light on for a fifth of a second and then hands over to the

Night Light with Ldr
A little night light that turns on by itself when it gets dark and goes off when morning comes. A light sensor measures how bright the room is, and the Arduino switches the LED on when it is dark enou
Using a Buzzer
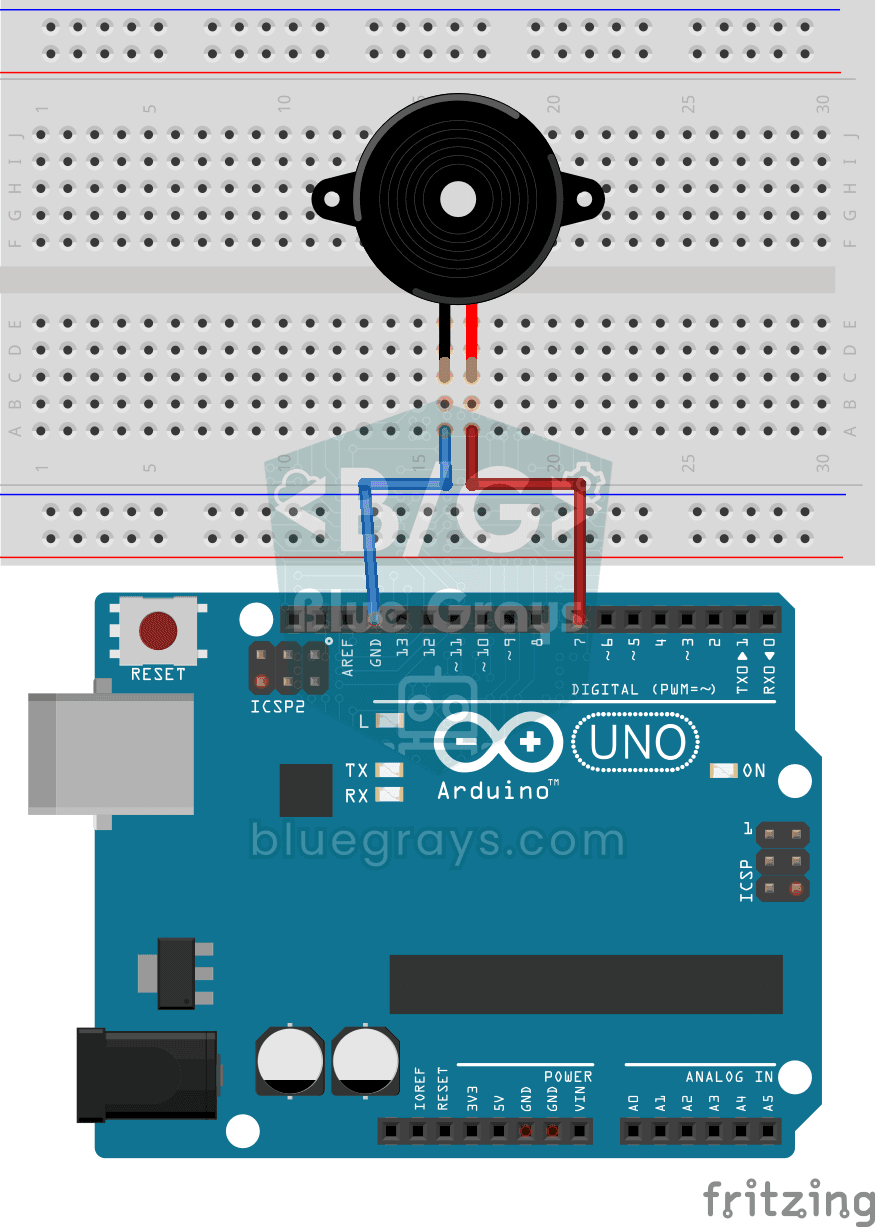
Ever wondered how a doorbell or an alarm makes its sound? The Arduino makes a small buzzer beep at short intervals: beep, pause, beep, pause. You see how sound is made with electricity and take the fi

HC-SR04 Distance Measurement (Serial Display)
The HC-SR04 sensor works just like a bat finding its way in the dark: it sends out a sound you cannot hear, listens for the echo and measures how far away the object in front of it is. The Arduino wri

Traffic Light
A tiny copy of the traffic light you see on the road every day. Red stays on for two seconds, yellow flashes for a moment, green stays on for two seconds, then it goes back to red through yellow again

LED Control with a Push Button (Push)
Just like a doorbell: the light stays on as long as you press, and goes off when you let go. The Arduino keeps listening to the button; while it's pressed the LED is on, and the moment you lift your f

Measuring Light Intensity with an LDR
Want to see how bright your room is as a number? The LDR, a small part that reacts to light, measures the light around it, and the Arduino writes the value to your computer screen every half second. C