
Coding Class Warm Up Activities: 15 Ready Ideas for Arduino
Coding class warm up activities for the first 10 minutes of an Arduino or robotics lesson: 15 no-prep ideas, a topic matching table and an 8-week plan.
The best coding class warm up activities are short tasks of 5–10 minutes that connect directly to the day's topic, need no preparation and get everyone in the room taking part at the same time. In an Arduino lesson that might mean predicting what four lines of code on the board will do, acting out setup() and loop() with the students, reading resistor colour bands or spotting a one-line bug. The point of a warm up is not entertainment: it pulls scattered attention together and builds a bridge to the lesson's real question. On the day you build a traffic light, ask "why does the yellow light only stay on for a moment?"; in a button lesson, play stop-and-go; in an LDR lesson, have them guess the sensor value.
This post is an activity bank. First comes one table with the time, materials, rules and target concept of 15 warm up activities; then a concrete example of each, a matching table that tells you which warm up fits which week's topic, ways to run warm ups with the BlueGrays app on a projector, remote versions and an 8-week warm up plan you can copy and use. The examples assume a 40-minute Arduino Uno lesson with 24 students, and every one of them works with a board, a projector or a few sheets of paper. For the weekly topic order see the 8-week robotics coding plan, and for keeping students of different levels in the same lesson see the mixed-ability class post.
How to choose a warm up: four principles
Say 24 students come back from break and drift into the room: half of them are still talking about the last lesson, a few can't wait to open the kit box and one is looking at their phone. The activity you run in the first 10 minutes has to turn that energy towards the lesson topic. Pick each warm up against the four criteria below; if an activity fails one of them, it is better suited to the end of a lesson or to club time than to the start.
- Linked to the topic: The warm up should be a small preview of a concept the lesson will meet. On the day you teach buttons and if/else, play stop-and-go; on the day you teach for loops, do the loop dance. A riddle unrelated to the topic wakes the class up, but once the lesson starts you are explaining from scratch again.
- 5–10 minutes: Set a timer and show the remaining time to the students as well. In a 40-minute lesson, a warm up that runs past 10 minutes steals time from building and testing the circuit; a 3-minute warm up often just feels like taking the register.
- Everyone takes part: An activity where one student answers at the board while the other 23 watch is not a warm up. Choose a format where everyone writes something, points with a finger or gets up: a prediction slip, a mini whiteboard, hand signals, talking in pairs.
- No prep, or two minutes at most: Most activities in this bank need a few lines on the board or a single screen on the projector. Print the ones that need cards or drawings once and reuse them all year.
End every warm up with one bridge sentence: "You just read delay(300) as 0.3 seconds; today you will change that number yourselves." That sentence ties the warm up to the rest of the lesson and tells students why they played the game. Don't grade warm ups: a wrong prediction is the most valuable data a warm up gives you. You see who is stuck on which concept, and when the lesson starts you go to that student's table first. Jotting the mistakes from the warm up in a corner of the board also makes it easier to choose the exit question at the end of the lesson.
15 warm up activities: a ready-made bank
The times in the table are for a class of 24. Where the materials column says "none", all you need is a board and a pen; where it says "projector", mirroring your phone or tablet to the projector is enough and students don't need to open their phones. The last column shows which concept of the day the activity prepares. In the next four sections the activities are grouped by type and each one is explained with a concrete example.
| Activity | Time | Materials | How to play | Concept it prepares |
|---|---|---|---|---|
| 1. Human Arduino | 8–10 min | 4 cards (setup and loop steps) | One student is the Arduino and reads the cards, another is the LED: hand up on HIGH, hand down on LOW. The setup card is read once, the loop cards again and again. | setup() and loop(), order of commands |
| 2. Predict it: what does this code do? | 5–7 min | Projector | A code snippet from a project's Understand the code section is shown before its explanation is read; everyone writes a prediction, then the explanation is read together. | Reading code, delay(), variables |
| 3. Colour code race | 6–8 min | 5 resistors per pair, or 5 colour sequences on the board | Pairs read the bands and write the value; results are checked on the projector with the Color code tool. | Resistors, Ω and kΩ |
| 4. Find the bug | 5 min | None | One faulty line goes on the board; 30 seconds of silent thinking, then everyone points to the error at the same time. | Syntax, compile errors |
| 5. Question of the day | 5 min | Projector | One question from the Daily questions set is read together, everyone shows their option with fingers and the majority answer is tapped. | The topic of that day's question |
| 6. Blocks to code | 7–10 min | Projector | A project's Show as blocks view is projected; pairs write the same program as C++ lines on paper, then compare with the real code. | Matching blocks and text code |
| 7. Ohm triangle | 6–8 min | None | A V, I, R triangle is drawn on the board; three quick questions follow, the last one an LED resistor calculation. | V = I × R, LED resistor |
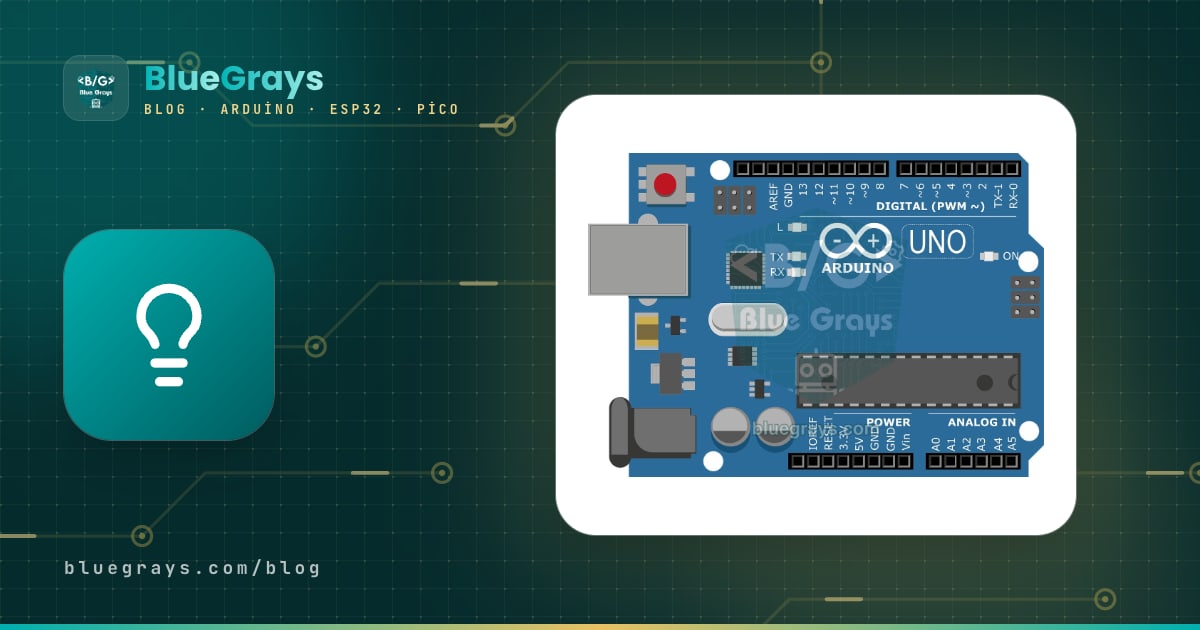
| 8. Pin hunt | 5–7 min | Arduino Uno boards | On commands like "show a PWM pin" or "show an analog input", pairs point to the pin on the board. | Digital, PWM, analog and power pins |
| 9. Stop-and-go signal game | 5–7 min | None | A rule goes on the board: "If the hand is up, stand; else sit." The rule changes slightly every round. | if / else, conditions |
| 10. Loop dance | 5–7 min | None | Following the for line on the board, the class claps once per round and says the counter value; then the limit and step change. | for loops, counters, array bounds |
| 11. Sensor guess | 6–8 min | An LDR circuit set up on your desk, Serial Monitor on the projector | With the screen hidden, the class predicts the LDR value for three situations, then the screen is revealed. | analogRead(), the 0–1023 range |
| 12. Wrong diagram | 6–8 min | A faulty circuit, printed or drawn on the board | In a circuit drawn with three deliberate mistakes, pairs circle the errors and write the fix. | Reading circuits, LED direction, pin and code match |
| 13. millis in one word | 5 min | Sticky notes | Everyone writes one word for millis(); the notes are grouped on the board and discussed. | Timing, the difference from delay() |
| 14. Mini talk: my project from last time | 6–9 min | The student's circuit or phone | 3 students chosen in advance present the last lesson's project in 2 minutes each; the class asks one question per talk. | Recall, explaining |
| 15. Exit question in reverse | 5 min | None | The answer to last lesson's exit question goes on the board; students work out what the question was. | Review of the last lesson |
Code reading warm ups: prediction, bugs and one word
Predict it: what does this code do? needs the least preparation and pays off the most, because the material is ready. In BlueGrays, every project's Understand the code tab splits the code into pieces in its Step by step section and puts an explanation under each piece. In the free Traffic Light project, for example, one step has four lines: LOW on pins 2 and 4, HIGH on pin 3, then delay(300). Write that piece on the board, or zoom in on the projector so only the code is visible, and ask: "Which LED lights up, and for how many seconds?" Once everyone has written an answer, read the explanation together; it says the yellow light stays on for only 0.3 seconds and that real traffic lights keep it on longer. The bridge sentence comes by itself: "Today we'll change that time." The same project's Try it yourself task asks students to make the yellow after green last 1.5 seconds, so the warm up turns into the lesson's first task.
For Find the bug, write one line on the board and keep it short so everyone can read it in 30 seconds. Thirty seconds of silent thinking, then everyone points to the error at once, with a finger or by marking it on paper. Don't give the answer yourself: ask a student who found the bug to predict what message the Arduino IDE will show. The five lines below are among the most common mistakes in beginner lessons, each with what will happen. We collected how compile errors look on screen in the exit status 1 post.
- digitalWrite(13, HIGH) has no semicolon at the end: the compiler usually reports the error on the next line, which sends the student to the wrong line.
- digitalwrite(13, HIGH); is written with a lowercase w: Arduino is case sensitive and you get "'digitalwrite' was not declared in this scope".
- if (value = 50) uses a single equals sign: the code compiles, but 50 is assigned to value and the condition counts as true every time; a comparison needs ==.
- for (int i = 0; i < 6; i++); has a semicolon after the parenthesis: the loop body is empty, and because i is used inside the braces below, the compiler says "'i' was not declared in this scope".
- if (analogRead(A0) > 1100) is never true: on an Arduino Uno analogRead() returns at most 1023. The code compiles but the LED never lights, which makes it the sneakiest kind of bug.
millis in one word brings out the mental model students have before a timing lesson. Give everyone a sticky note and say: "Write the one word that comes to mind when you hear millis()." The words usually fall into three groups: ones heading the right way, like "clock", "stopwatch" or "counter"; ones that mix millis() up with delay(), like "wait" or "pause"; and "no idea". Gather the notes on the board in those three groups and tie them together in one sentence: millis() tells you how many milliseconds have passed since the board started, and it does not stop the board. The details are in the millis() and delay() post. Exit question in reverse is a review of the last lesson: write the answer to last lesson's exit question on the board, for example "The higher the threshold, the less dark it has to be before the LED turns on", and ask: "What was the question?" Rebuilding the question brings back last week's concept, and when more than one correct question comes up, you get a short and useful discussion.
Warm ups that move: Human Arduino, stop-and-go and the loop dance
Human Arduino shows how a program runs, without a screen, in the very first lesson. Prepare five cards: "setup: make pin 9 an output", "loop 1: write HIGH to pin 9", "loop 2: count to 3 silently", "loop 3: write LOW to pin 9", "loop 4: count to 3 silently". One student is the Arduino and reads the cards aloud, another is the LED on pin 9: hand up on HIGH, hand down on LOW. The Arduino reads the setup card once and puts it aside, but reads the loop cards in order, again and again. After three rounds, ask: "Why wasn't the setup card read again?" Then take away both "count to 3" cards. The LED student has to raise and lower their hand so fast that the class starts laughing, and that is the easiest way to explain why, without a wait, an LED looks dim and steadily lit instead of blinking. The cards match the code of the free LED Blink project line for line; add a second LED student on another pin and the activity becomes a bridge to the Two LEDs Blinking Alternately project.
Stop-and-go signal game is a physical rehearsal of if/else. Write on the board: "If the teacher's hand is up, stand up; else sit down." The first two rounds are easy. In round three change the rule to "if the hand is up and holding a red pen", and in round four change the else branch: "else raise your right hand". Every wrong move shows that the condition or the else branch was misread. Finish by telling them they will see the same structure in the line if (digitalRead(13) == HIGH) in the button lesson; that line is exactly the condition in the free LED Control with a Push Button (Push) project. Loop dance is for for loops: write for (int i = 0; i < 4; i++) on the board, the class claps once per round and calls out the value of i: 0, 1, 2, 3. Then write i <= 4 instead of i < 4 and ask: "How many claps?" Then i = i + 2 instead of i++. These two changes catch the classic off-by-one mistake with arrays in advance. When you move on to the six-LED for loop in the LED Chaser project, students explain for themselves why it says i < 6: the array has six elements, numbered 0 to 5.
Circuit and maths warm ups: colour code, Ohm, pins, diagrams, sensors
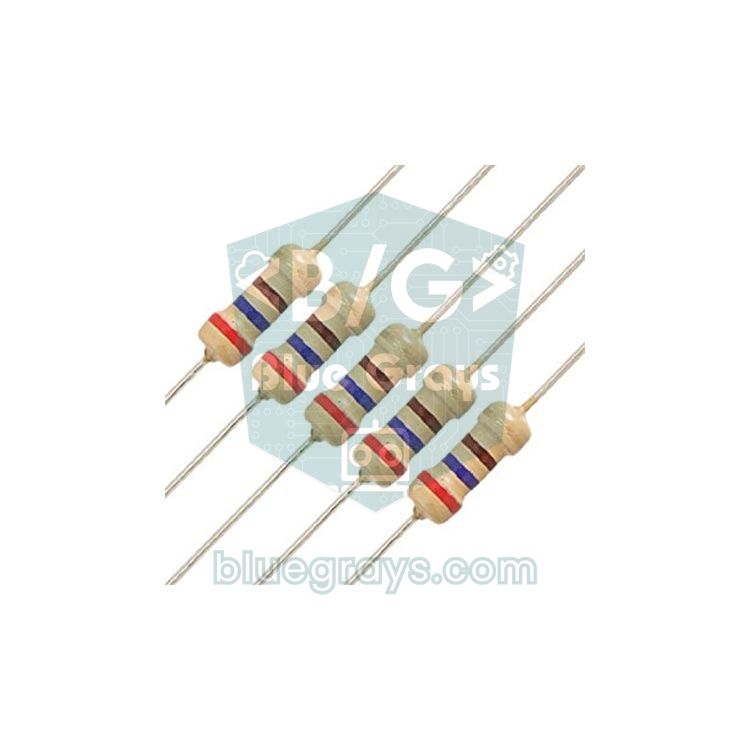
Colour code race is the quickest way to introduce the resistors in the kits. Give each pair five resistors or write five colour sequences on the board: red-red-brown (220 Ω), orange-orange-brown (330 Ω), brown-black-red (1 kΩ), yellow-violet-red (4.7 kΩ) and brown-black-orange (10 kΩ). Pairs write the values in 3 minutes, then you check them together on the projector with the free Color code tool: the value appears as you pick the bands. The trick of the race is reading direction; the fourth band is usually gold and you start reading from the opposite end. If you run this warm up before the first circuit lesson, mixing up 220 Ω and 10 kΩ, and the LED that stays dark or glows very faintly as a result, largely disappears.
For the Ohm triangle, draw a triangle on the board with V at the top and I and R at the bottom corners. The letter you cover with your finger is the quantity you are looking for: cover R and you are left with V divided by I. Then ask three questions. How many milliamps flow through a 250 Ω resistor on a 5 V supply? (20 mA.) If you want 30 mA from a 9 V battery, what resistor do you need? (300 Ω.) The last question ties into the lesson: on a 5 V pin, with a red LED dropping about 2 V and 20 mA wanted, the resistor is (5 − 2) / 0.02 = 150 Ω; if the kit has no 150 Ω, use the next value up, 220 Ω, and the current drops to about 14 mA, which still lights the LED well. Check the results with the free Ohm's law and LED resistor tools. If you want to give Ohm's law a full lesson, the Ohm's law classroom activity post has a ready plan. Pin hunt introduces the board before moving to the breadboard: "Show a PWM pin" (3, 5, 6, 9, 10 and 11, marked ~ on the Uno), "show an analog input" (A0–A5), "show the two pins that talk to the computer" (0 and 1, RX and TX), "show GND". On each command pairs point to the pin on their board while you walk between the desks and check. The whole board is covered in the Arduino Uno pins post.
Wrong diagram turns circuit reading into a game. Draw an LED circuit with three deliberate mistakes: the LED is reversed (the short leg goes to the pin), there is no resistor at all, and the LED is on pin 9 while the code you wrote under it lights pin 13. Pairs circle the errors and write the fix next to each; a pair that finds all three comes to the board and explains one. The third mistake is the most valuable, because it shows that the circuit and the code have to agree. For classes that don't know schematic symbols yet, look at the reading circuit diagrams post first. Sensor guess prepares for analog reading. Build the circuit of the free Measuring Light Intensity with an LDR project on your own desk before the lesson; the code prints the LDR value to the Serial Monitor every half second. With the screen hidden, ask for predictions for three situations: the normal classroom light, the LDR covered by a hand, and a phone torch held close. Predictions should be between 0 and 1023; a student who doesn't know that range writes 5000 or -20, and exactly what they need to learn comes to light. In this circuit the LDR sits on the 5 V side, so the value rises with more light; since exact numbers depend on the room, the pairs who put the three predictions in the right order win.
App and sharing warm ups: question of the day, blocks to code, mini talks
The question of the day warm up uses the Daily questions section in BlueGrays. A new set of 5 questions arrives every day at 00:00, drawn from ten types such as concept, code output, find the bug, circuit, calculation and blocks. Mirror your phone to the projector, open the next question in the set and read it to the class. Everyone thinks for 30 seconds, then shows their choice with fingers at the same time: one finger A, two fingers B, three C, four D. You tap the majority answer and the app immediately shows the correct option with a short explanation. If a This question comes from card appears under the question, open the project and find the line from the question in the real code together; the Topic card link takes the topic to the matching card in the Code guide. Because the set has 5 questions a day, five different classes can each get one question on the same day. Questions are chosen for your account's level, so sometimes they sit above the class's level; then eliminating options together is a good warm up too. The section is explained in detail in the daily questions post.
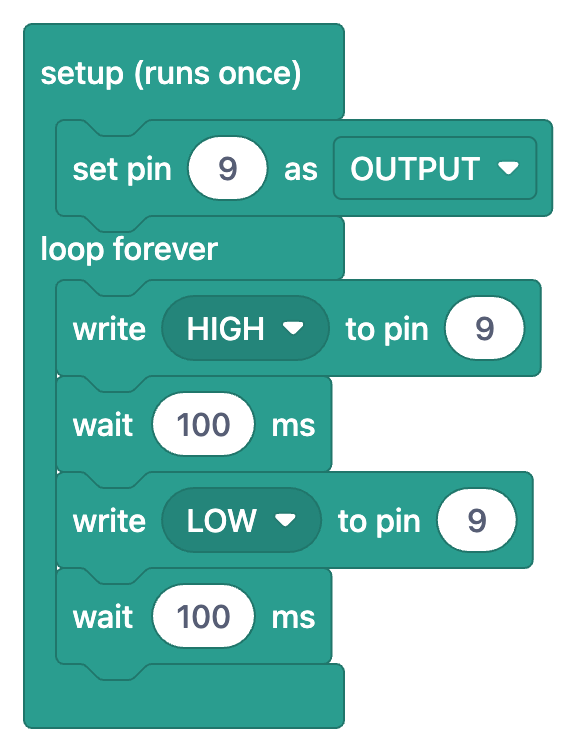
For Blocks to code, open the free LED Blink project and switch on Show as blocks in the code section; the blocks of the same program appear in place of the code. While the blocks are projected, pairs write the same program in C++ on paper: "setup (runs once)" becomes setup(), "set pin 9 as OUTPUT" becomes pinMode(9, OUTPUT) and "wait 100 ms" becomes delay(100). After 5 minutes, switch the toggle off, show the real code and let each pair compare their sheet line by line. The most common differences are semicolons and capital letters, and those differences are the shortest road into the day's code writing. With classes that have seen the blocks before, do it the other way round: show the code and have them guess the blocks. The full list of block and code equivalents is in the blocks to C++ table. Mini talk: my project from last time works very well in project weeks: three students present the circuit they built last lesson, or the project on their phone, in 2 minutes each. The rule is simple: what I did, what I changed, where I got stuck. The class asks one question after each talk. Choose the speakers at the end of the previous lesson so they can prepare; in 9 minutes you get a review and quieter students get a short, safe experience of speaking in front of the class.
Which warm up for which topic? A matching table
The table below lists the most common topics of an Arduino beginner term and suggests one main warm up and one backup for each. The backup column helps when you spend a second lesson on the same topic or when the main warm up doesn't land with a particular class. The bridge question is the last sentence of the warm up; its answer turns up in the lesson's first task. All the projects in the table are free in BlueGrays with circuit diagram, code and Understand the code.
| Topic | Main warm up | Backup warm up | Bridge question |
|---|---|---|---|
| First lesson: program and board | Human Arduino | Pin hunt | "Why was the setup card read only once?" |
| Digital output and delay(): LED Blink | Blocks to code | Predict it | "If we change 100 to 1000, how will the LED blink?" |
| Sequence and timing: Traffic Light | Predict it | Human Arduino (with three LED students) | "Why does the yellow light stay on so briefly?" |
| Resistors and LED wiring | Colour code race | Wrong diagram | "Why do we put 220 Ω next to the LED?" |
| Ohm's law | Ohm triangle | Colour code race | "What happens to the LED if we increase the resistance?" |
| Buttons and if/else: LED Control with a Push Button (Push) | Stop-and-go signal game | Find the bug (single = in if) | "Which branch does the program take when the button isn't pressed?" |
| for loops and arrays: LED Chaser | Loop dance | Blocks to code | "For six LEDs, from what to what does i count?" |
| Analog reading: Measuring Light Intensity with an LDR | Sensor guess | Question of the day | "How does the number change when we cover the LDR?" |
| Threshold and decision: Night Light with Ldr | Exit question in reverse | Stop-and-go signal game | "Below which value should the lamp turn on?" |
| Speed with a potentiometer: LED Chaser with Adjustable Speed | Sensor guess (turning the pot) | Predict it | "With the pot turned all the way, how many milliseconds does one LED stay on?" |
| millis() and non-blocking code | millis in one word | Find the bug | "Why is a button press sometimes missed while delay() is running?" |
| Debugging lesson | Find the bug | Wrong diagram | "Why did the compiler report the error one line further down?" |
| Project week and presentations | Mini talk: my project from last time | Question of the day | "What one feature will you add to your project today?" |
Running warm ups with BlueGrays: projector tips
- Daily questions: You get there from the Lessons section of the Learn tab at the bottom; the set renews every day and is free. In an Arduino lesson, set the question language preference to Arduino so no MicroPython code appears in the set. If you want more questions on the same day, Practice is the option, but Practice is a Premium feature.
- Understand the code steps: Open in free projects. The What does this code do? summary is a one-sentence guessing game, the Step by step section is piece-by-piece prediction, If you get stuck is a "why would this symptom happen?" question, and the Try it yourself task is ready-made material for moving from the warm up into the lesson. The structure of the section is explained in the Understand the code post.
- Free tools: 7 of the 18 tools in Electronics Tools are free: Color code, SMD code, Ohm's law, LED resistor, Capacitor code, Inductor code and LED voltages. They are all you need for the colour code race and the Ohm triangle. All the tools are introduced in the electronics calculator post.
- Show as blocks: In projects with a block view this is the toggle in the code section; while it is on, the Understand the code tab becomes Understand the blocks. Blocks are for reading: you can't arrange blocks in the app and they aren't uploaded to the board, which is exactly what you want for the blocks to code warm up. The filter in the projects list can show only projects with blocks.
- Projector setup: Connect the phone by cable or wireless screen mirroring, turn up the brightness and zoom in on code snippets so the back rows can read them. Leave the screen you will use for the warm up open during the break, so you don't lose the first minute of the lesson in menus.
Warm ups for remote or online lessons
Warm ups matter even more online, because you can't see whether a student with the camera off has really started the lesson. Most activities work remotely with small changes; the basic rule is still that everyone answers at the same time. Use the chat, but say "type your answer and press Enter when I say 'now'", so nobody copies the first answer that appears. For the rest of an online lesson (setup, asking students for clear circuit photos, managing groups), see the online Arduino lesson post.
| Activity | Online version |
|---|---|
| Human Arduino | Cameras on; the Arduino student reads the cards aloud, the LED students raise a hand to the camera. Students with the camera off type 1 or 0 in the chat. |
| Predict it and Find the bug | Show the code snippet via screen sharing; predictions are typed in the chat at the same moment. |
| Question of the day | Share your phone screen; options are typed as letters in the chat or asked with the poll feature of your lesson platform. |
| Colour code race | Share a photo of the resistors; students type the value, then you use the Color code tool together on screen. |
| Sensor guess | Point the camera at your own circuit and share the Serial Monitor; cover the LDR and hold the torch live. |
| Mini talk: my project from last time | The student shares a photo or short video of their circuit and talks for 2 minutes. |
A copyable 8-week warm up plan
The plan is built for an 8-week beginner term in which every week rests on a free project. Each row has the week's topic, the main warm up and its length, a backup warm up, the preparation before the lesson and the bridge question that ends the warm up. Copy the table into your own planner; if your topics differ, choose a new warm up from the matching table. The checklist below it is written to be run through in two minutes before every lesson.
| Week | Topic and project | Main warm up | Backup | Preparation | Bridge question |
|---|---|---|---|---|---|
| 1 | What is a program, first LED: LED Blink | Human Arduino (10 min) | Pin hunt | 5 cards: setup, HIGH, count to 3, LOW, count to 3 | "Why was the setup card read only once?" |
| 2 | Sequence and timing: Traffic Light | Predict it (7 min) | Blocks to code | Yellow phase step open in Understand the code | "Which line changes to make yellow last 1.5 seconds?" |
| 3 | Resistors and two LEDs: Two LEDs Blinking Alternately | Colour code race (8 min) | Ohm triangle | 5 resistors per pair, Color code tool open | "How many resistors do two LEDs need?" |
| 4 | Buttons and if/else: LED Control with a Push Button (Push) | Stop-and-go signal game (6 min) | Find the bug | 4 rules written on the board | "Which line runs when the button isn't pressed?" |
| 5 | for loops and arrays: LED Chaser | Loop dance (6 min) | Blocks to code | for line on the board | "For six LEDs, i < 6 or i <= 6?" |
| 6 | Analog reading: Measuring Light Intensity with an LDR | Sensor guess (8 min) | Question of the day | LDR circuit built on your desk, Serial Monitor open | "Which range do the values stay in?" |
| 7 | Threshold and decision: Night Light with Ldr | Exit question in reverse (5 min) + Question of the day (5 min) | Wrong diagram | Last week's exit answer on the board | "Should the threshold be 50 or 300?" |
| 8 | Your own change and presentations | Mini talk: my project from last time (9 min) | millis in one word | 3 speakers chosen in the previous lesson | "What one feature will you add to your project today?" |
- The name and length of the warm up are written in a corner of the board, timer ready.
- The screen for the projector (Understand the code step, Daily questions, Show as blocks or a tool) is open before the lesson.
- Cards, resistor boxes or sticky notes are on the table by the door.
- The way everyone answers at the same time is clear: fingers, paper, mini whiteboard or chat.
- The bridge question is written down and linked to the lesson's first task.
- A small sheet is ready for noting students who got stuck in the warm up; the first round starts at their tables.
- When time is up, any unfinished question moves to the exit question.
Once you print the warm up bank, you don't have to prepare anything new for the rest of the year: each week you pick a row from the matching table and write the bridge question on the board. Over time you'll see which warm ups work in your class and extend the table with your own notes. You can open the free projects, Understand the code steps and tools used in the predict it, blocks to code and question of the day warm ups in the BlueGrays app before the lesson and keep them ready for the projector.
Frequently asked questions
How do you start a coding class?
Spend the first 5–10 minutes on a warm up linked to the day's topic, such as predicting what a short piece of code does, acting out setup() and loop() or finding a one-line bug. Choose a format where everyone takes part at the same time and end the warm up with a question that leads into the lesson's first task.
How long should a warm up activity last?
In a 40-minute lesson, 5–10 minutes is enough. Longer warm ups eat into the time for building and testing circuits. Use a visible timer and save any unfinished question for the exit question.
What are some unplugged coding warm up activities?
Human Arduino, the stop-and-go signal game, the loop dance, find the bug and the exit question in reverse need only a board and paper. They act out concepts such as setup/loop, if/else and for loops with the body or on paper, without a screen.
How do you get students' attention in a robotics class?
In the first minute, give a task where everyone writes or shows something: a prediction slip, showing an answer with fingers or a quick pair talk. Keeping kit boxes closed until the warm up is over and showing the time on a visible timer also helps focus the room.
Should warm up activities be graded?
Better not. Wrong predictions in a warm up are the most valuable information about who is stuck on which concept, and grade anxiety hides it. Use warm ups for diagnosis and base grades on the circuit built in the lesson and the student's explanation.
Do I need BlueGrays Premium for these warm ups?
No. Daily questions, Understand the code and Show as blocks in free projects, and 7 tools including Color code, Ohm's law and LED resistor are free. Premium is needed for the Pinout tool, Practice and the Understand the code section of Premium projects.
Projects to build after reading this
See all projects
LED Blink
The very first hello of electronics: switching a single LED on and off. The Arduino turns the LED on and off at short intervals, so the light blinks quickly. You see in the simplest way how the board

Traffic Light
A tiny copy of the traffic light you see on the road every day. Red stays on for two seconds, yellow flashes for a moment, green stays on for two seconds, then it goes back to red through yellow again

LED Control with a Push Button (Push)
Just like a doorbell: the light stays on as long as you press, and goes off when you let go. The Arduino keeps listening to the button; while it's pressed the LED is on, and the moment you lift your f

LED Chaser
Lights that switch on one after another, as if they were running. The Arduino lights six LEDs one at a time; each glows for a brief moment and goes out, so the light walks from start to end and then s

Measuring Light Intensity with an LDR
Want to see how bright your room is as a number? The LDR, a small part that reacts to light, measures the light around it, and the Arduino writes the value to your computer screen every half second. C

Night Light with Ldr
A little night light that turns on by itself when it gets dark and goes off when morning comes. A light sensor measures how bright the room is, and the Arduino switches the LED on when it is dark enou

Two LEDs Blinking Alternately
Two LEDs blink quickly in turn: when one lights up the other goes off, as if they were tossing a ball back and forth. The Arduino keeps each light on for a fifth of a second and then hands over to the

LED Chaser with Adjustable Speed
Six LEDs light up one after another, so the light seems to run from one end to the other. Turn the potentiometer knob and the speed of that run changes instantly: one way and the light races along, th