
Arduino Arrays: Declaring, for Loops and Practical Examples
How to use Arduino arrays step by step: declaring, indexing, looping with for, 2D arrays, LED pins, sensor averaging (moving average) and melody examples.
Using arrays in Arduino is a core programming skill that lets you group many values of the same type under one name and reach each one by its number (index). Instead of writing the pin numbers of six LEDs, the last ten sensor readings or the notes of a song into separate variables like led1, led2, led3, you store them in a single array and process them all in a few lines with a for loop. Your code gets shorter, you make fewer mistakes, and adding a new LED to the circuit only takes adding one number to the list.
In this guide you'll learn how an array sits in memory, how to declare it, why the index starts at zero and how to count the elements with sizeof. Then we'll build three real examples: a Knight Rider LED effect, a moving average that smooths noisy sensor data, and melody playback with a buzzer. Finally, you'll build a traffic light state table with two-dimensional arrays, look at the differences on the ESP32 and Raspberry Pi Pico, and see how to catch the overflow bugs that silently break your program. If you're completely new to the topic, first take a look at Arduino programming basics.
What is an array and how does it work?
An array is a block of elements of the same data type that sit side by side in memory. Think of it as a cabinet of numbered drawers: the cabinet has one name, and each drawer has a number. In the C and C++ based Arduino language this numbering starts at 0; a 5-element array has indexes 0, 1, 2, 3 and 4, so the last index is always one less than the element count. The compiler knows the array's start address; when you write array[3], it adds 3 × element size to the start address and goes straight to that cell. That's why accessing an array is very fast, but for the same reason the compiler doesn't check whether you've gone out of bounds. The memory an array takes is the element count multiplied by the size of one element:
| Data type | Element size (Uno) | Element size (ESP32 / Pico, C++) | 100-element array (Uno) |
|---|---|---|---|
| byte / uint8_t | 1 byte | 1 byte | 100 bytes |
| char | 1 byte | 1 byte | 100 bytes |
| int | 2 bytes | 4 bytes | 200 bytes |
| unsigned int | 2 bytes | 4 bytes | 200 bytes |
| long | 4 bytes | 4 bytes | 400 bytes |
| float | 4 bytes | 4 bytes | 400 bytes |
Considering that the Arduino Uno has only 2 KB (2048 bytes) of RAM, a 1000-element int array would eat almost all the memory by itself. So it's a good habit to use byte for values between 0 and 255 (pin numbers, PWM brightness, day or hour values), int for analogRead results and long for large sums. Choosing the right type means fitting twice as much data into the same memory.
How do you declare an array in Arduino?
When declaring an array, you write the data type first, then the array's name, then the element count in square brackets. You can give the values right away in curly braces, or leave the size empty and let the compiler count. The program below shows the most common forms together and prints the results to the Serial Monitor:
1int notlar[5] = {90, 75, 60, 85, 100};   // boyut ve değerler / size and values
2int pinler[] = {2, 3, 4, 5, 6, 7};       // boyutu derleyici sayar / compiler counts the size
3float olcumler[10] = {1.5, 2.0};         // kalan 8 eleman 0.0 / remaining 8 are 0.0
4int bos[5];                              // global dizi: hepsi 0 / global array: all zeros
5char isim[] = "Arduino";                 // 7 harf + '\0' = 8 bayt / 7 letters + '\0' = 8 bytes
6
7void setup() {
8  Serial.begin(9600);
9  Serial.println(notlar[0]);             // ilk eleman: 90 / first element: 90
10  Serial.println(notlar[4]);             // son eleman: 100 / last element: 100
11  notlar[2] = 65;                        // üçüncü elemanı değiştir / change the third element
12  Serial.println(notlar[2]);             // 65
13  Serial.println(olcumler[5]);           // 0.00
14  Serial.println(bos[3]);                // 0
15  Serial.println(sizeof(isim));          // 8
16  Serial.println(sizeof(pinler) / sizeof(pinler[0]));  // eleman sayısı: 6 / element count: 6
17}
18
19void loop() {
20}| Declaration | Meaning |
|---|---|
| int a[5]; | A 5-element array; if global, all zeros, if inside a function, the starting values are random |
| int a[5] = {1, 2, 3, 4, 5}; | Size and all values given together |
| int a[] = {2, 3, 4}; | The compiler counts the size (3 here) |
| float a[10] = {1.5, 2.0}; | Elements without a given value become 0 |
| int a[5] = {0}; | The short way to zero all elements |
| char s[] = "Arduino"; | A text array; there's an invisible '\0' character at the end (8 bytes in total) |
| const byte a[] = {2, 3, 4}; | A constant array that can't be changed in the program |
Walking through an array with a for loop
The real power of arrays shows when you combine them with a for loop. The loop variable i starts at 0 and increases up to one less than the element count, and on each pass you reach the next element with array[i]. Instead of typing the element count by hand, the safest way is to calculate it with sizeof(array) / sizeof(array[0]): sizeof(array) gives the total bytes of the array, and sizeof(array[0]) gives the size of one element. For example, on the Uno a 7-element int array is 14 bytes, and 14 / 2 = 7. When you add an element to the array, this formula updates the count automatically. The code below finds the average, minimum and maximum of a week's temperatures. The readings add up to 161, the average is 23.0 degrees, the minimum is 19 and the maximum is 27. Note that the loop condition is i < ADET (the count): if you make it less-than-or-equal, the loop runs one extra time and reads memory outside the array.
1int sicakliklar[] = {22, 24, 19, 27, 25, 21, 23};   // bir haftalık ölçüm / one week of readings
2const int ADET = sizeof(sicakliklar) / sizeof(sicakliklar[0]);   // 7
3
4void setup() {
5  Serial.begin(9600);
6  long toplam = 0;                       // taşmasın diye long / long to avoid overflow
7  int enKucuk = sicakliklar[0];
8  int enBuyuk = sicakliklar[0];
9
10  for (int i = 0; i < ADET; i++) {       // 0'dan 6'ya / from 0 to 6
11    toplam += sicakliklar[i];
12    if (sicakliklar[i] < enKucuk) enKucuk = sicakliklar[i];
13    if (sicakliklar[i] > enBuyuk) enBuyuk = sicakliklar[i];
14  }
15
16  Serial.print("Ortalama / Average: ");
17  Serial.println((float)toplam / ADET);  // 23.00
18  Serial.print("En dusuk / Min: ");
19  Serial.println(enKucuk);               // 19
20  Serial.print("En yuksek / Max: ");
21  Serial.println(enBuyuk);               // 27
22}
23
24void loop() {
25}
Example 1: managing LED pins with an array
The classic use of arrays in Arduino is managing several LEDs. Controlling six LEDs without an array means writing six separate pinMode lines and separate digitalWrite lines for each step; with an array, a single loop is enough. Connect the long leg (anode) of each LED to a digital pin and the short leg to GND through a 220 Ω resistor. If you want to calculate the resistor value yourself, you can use the LED resistor calculator tool.
| LED (array index) | Arduino Uno | ESP32 | Raspberry Pi Pico |
|---|---|---|---|
| LED 1 (ledPins[0]) | D2 | GPIO 13 | GP14 |
| LED 2 (ledPins[1]) | D3 | GPIO 14 | GP13 |
| LED 3 (ledPins[2]) | D4 | GPIO 27 | GP12 |
| LED 4 (ledPins[3]) | D5 | GPIO 26 | GP11 |
| LED 5 (ledPins[4]) | D6 | GPIO 25 | GP10 |
| LED 6 (ledPins[5]) | D7 | GPIO 33 | GP9 |
| Cathode (short leg) | GND via 220 Ω | GND via 220 Ω | GND via 220 Ω |
- Place the LEDs on the breadboard in order; connect the short legs (cathodes) to the GND rail through 220 Ω resistors.
- Connect the long legs to Arduino pins 2–7 in the order shown in the table.
- Write the pin numbers into the ledPins array in the LEDs' physical order; the order in the array sets the direction the light travels.
- In setup(), set all the pins to OUTPUT with a single for loop.
- In loop(), create the Knight Rider effect with two loops, one going forward and one going back, and upload the code.
1const byte ledPinleri[] = {2, 3, 4, 5, 6, 7};   // LED'lerin fiziksel sırası / physical order of LEDs
2const byte LED_SAYISI = sizeof(ledPinleri) / sizeof(ledPinleri[0]);   // 6
3const int BEKLEME = 100;                         // adım süresi ms / step time in ms
4
5void setup() {
6  for (byte i = 0; i < LED_SAYISI; i++) {
7    pinMode(ledPinleri[i], OUTPUT);              // tüm pinler çıkış / all pins as output
8  }
9}
10
11void loop() {
12  // ileri: 0'dan 5'e / forward: 0 to 5
13  for (byte i = 0; i < LED_SAYISI; i++) {
14    digitalWrite(ledPinleri[i], HIGH);
15    delay(BEKLEME);
16    digitalWrite(ledPinleri[i], LOW);
17  }
18  // geri: 4'ten 1'e, uçlar tekrar yanmaz / backward: 4 to 1, ends are not repeated
19  for (int i = LED_SAYISI - 2; i > 0; i--) {
20    digitalWrite(ledPinleri[i], HIGH);
21    delay(BEKLEME);
22    digitalWrite(ledPinleri[i], LOW);
23  }
24}
The forward loop lights and turns off each LED from 0 to 5 for 100 ms. The backward loop starts at 4 and stops at 1; because it doesn't light the end LEDs a second time, the light turns back smoothly without pausing at the ends. We used int as the counter in the backward loop because byte is unsigned and can't go below 0; if you use a byte in a loop that expects the counter to drop below 0, it wraps to 255 after 0 and the loop never ends. To change the order of the effect, you only need to swap the numbers in the array without touching the rest of the code. For other effects written with the same logic, see Knight Rider and running LEDs.
Example 2: sensor averaging with an array (moving average)
Readings from analog sensors such as a potentiometer, an LDR or a soil moisture sensor keep jittering by a few units. The easiest way to reduce this noise is to average the last N readings. You keep the last 10 readings in an array, and with each new measurement you subtract the oldest value from the total and add the new one. Because we return the index to 0 when we reach the end of the array, this structure is called a ring buffer. Updating the total with the subtract-and-add method instead of recalculating it every time keeps the work fast even if the window grows to 100 elements. During the first 10 readings the array isn't full yet, so the average climbs up from zero and settles at the real value after about half a second. Connect the sensor's signal pin to A0 (for example, the middle leg of a potentiometer) and watch the result as two lines in the Serial Plotter:
1const byte PENCERE = 10;            // ortalama alınacak okuma sayısı / number of readings to average
2int okumalar[PENCERE];              // global dizi sıfırla başlar / global array starts at zero
3byte indeks = 0;                    // sıradaki hücre / next slot
4long toplam = 0;                    // taşmasın diye long / long to avoid overflow
5
6void setup() {
7  Serial.begin(9600);
8}
9
10void loop() {
11  int yeni = analogRead(A0);
12  toplam -= okumalar[indeks];       // en eski okumayı çıkar / remove the oldest reading
13  okumalar[indeks] = yeni;          // yerine yenisini yaz / store the new one
14  toplam += yeni;                   // toplama ekle / add to the total
15  indeks++;
16  if (indeks >= PENCERE) {          // sona gelince başa dön / wrap around at the end
17    indeks = 0;
18  }
19  int ortalama = toplam / PENCERE;
20  Serial.print(yeni);               // ham değer / raw value
21  Serial.print(" ");
22  Serial.println(ortalama);         // yumuşatılmış değer / smoothed value
23  delay(50);
24}Example 3: storing melody notes in an array
A melody really consists of two lists: which note to play (frequency) and how long it lasts. You store these two pieces of information in two parallel arrays of the same length: melody[i] and durations[i] always belong to the same note. Connect the passive buzzer's positive leg to pin 8 and its negative leg to GND. The code below plays the first two lines of "Twinkle Twinkle Little Star" and separates the sounds by leaving a gap of one third of each note's duration between notes. To add a new song you only need to fill the two arrays; the playback loop never changes. If the two arrays have different element counts, the loop runs past the end of the shorter one, so writing the same number of elements on each line prevents the bug. If long melodies start to fill the Uno's RAM, you can move the arrays to flash memory with PROGMEM. If you don't know the difference between active and passive buzzers, read what is a buzzer.
1#define NOTA_DO  262   // Hz
2#define NOTA_RE  294
3#define NOTA_MI  330
4#define NOTA_FA  349
5#define NOTA_SOL 392
6#define NOTA_LA  440
7
8const byte BUZZER_PIN = 8;   // pasif buzzer / passive buzzer
9
10// notalar ve süreler aynı sırada / notes and durations in the same order
11const int melodi[] = {NOTA_DO, NOTA_DO, NOTA_SOL, NOTA_SOL, NOTA_LA, NOTA_LA, NOTA_SOL,
12                      NOTA_FA, NOTA_FA, NOTA_MI, NOTA_MI, NOTA_RE, NOTA_RE, NOTA_DO};
13const int sureler[] = {400, 400, 400, 400, 400, 400, 800,
14                       400, 400, 400, 400, 400, 400, 800};
15const int NOTA_SAYISI = sizeof(melodi) / sizeof(melodi[0]);   // 14
16
17void setup() {
18  for (int i = 0; i < NOTA_SAYISI; i++) {
19    tone(BUZZER_PIN, melodi[i], sureler[i]);   // notayı çal / play the note
20    delay(sureler[i] + sureler[i] / 3);         // nota + kısa boşluk / note + short gap
21  }
22  noTone(BUZZER_PIN);
23}
24
25void loop() {
26}
Multidimensional arrays: storing table-like data
A two-dimensional array is a table made of rows and columns. int table[4][3] is a 12-element array of 4 rows and 3 columns; you access an element with table[row][column], and both indexes start at 0. In memory the rows are laid out one after another, so this table takes 4 × 3 × 2 = 24 bytes on the Uno. 8x8 LED matrix patterns, keypad key maps and state tables are typical uses of two-dimensional arrays. In the example below we wrote each state of a traffic light on one row: the first three columns hold whether the red, yellow and green LEDs are on, and the fourth column holds how many milliseconds that state lasts. You can connect the LEDs to the first three pins in the pin table (D2 red, D3 yellow, D4 green). We calculated the row count with sizeof(states) / sizeof(states[0]); here sizeof(states[0]) gives the size of a whole row. To add a new state to the light, just write a new row in the table; the code inside loop() stays the same. This approach of separating the program's logic from its data will also help you later when you build a state machine.
1const byte trafikPinleri[3] = {2, 3, 4};   // kırmızı, sarı, yeşil / red, yellow, green
2
3// her satır bir durum: {kırmızı, sarı, yeşil, süre ms} / each row: {red, yellow, green, time ms}
4const unsigned int durumlar[4][4] = {
5  {1, 0, 0, 5000},   // kırmızı / red
6  {1, 1, 0, 1500},   // kırmızı + sarı / red + yellow
7  {0, 0, 1, 5000},   // yeşil / green
8  {0, 1, 0, 1500}    // sarı / yellow
9};
10const byte DURUM_SAYISI = sizeof(durumlar) / sizeof(durumlar[0]);   // 4 satır / 4 rows
11
12void setup() {
13  for (byte i = 0; i < 3; i++) {
14    pinMode(trafikPinleri[i], OUTPUT);
15  }
16}
17
18void loop() {
19  for (byte d = 0; d < DURUM_SAYISI; d++) {          // satırları gez / walk the rows
20    for (byte led = 0; led < 3; led++) {              // sütunları gez / walk the columns
21      digitalWrite(trafikPinleri[led], durumlar[d][led] ? HIGH : LOW);
22    }
23    delay(durumlar[d][3]);                            // durumun süresi / duration of the state
24  }
25}
Arrays on the ESP32 and Raspberry Pi Pico
On the ESP32, arrays are written with the same C++ syntax as on the Arduino Uno, and the examples above compile unchanged; you only need to adapt the pin numbers. In the LED example, just change the array line to {13, 14, 27, 26, 25, 33}; pins 6–11 are reserved for the internal flash memory, so don't put them in the array. On the ESP32 an int is 4 bytes and there is more than 300 KB of RAM available to your programs; a 10,000-element measurement array that wouldn't fit on the Uno fits comfortably here. Because the ESP32's analog readings range from 0 to 4095, the numbers in the moving average example come out larger, but the logic is the same. If you use the Raspberry Pi Pico with MicroPython, you use a list instead of an array: the size isn't fixed, you can add elements with append() and get the length with len(). Negative indexes are valid in a list too; leds[-1] gives the last element. Putting Pin objects directly into the list simplifies the code a lot:
1from machine import Pin
2import time
3
4led_pinleri = [14, 13, 12, 11, 10, 9]            # GP14 -> GP9 sırası / order
5ledler = [Pin(p, Pin.OUT) for p in led_pinleri]  # Pin nesnelerinden liste / list of Pin objects
6print("LED sayisi / LED count:", len(ledler))
7
8while True:
9    for led in ledler:                           # ileri / forward
10        led.on()
11        time.sleep_ms(100)
12        led.off()
13    for i in range(len(ledler) - 2, 0, -1):      # geri, uçlar hariç / backward, ends skipped
14        ledler[i].on()
15        time.sleep_ms(100)
16        ledler[i].off()
Overflow bugs and common array mistakes
| Mistake | Symptom | Fix |
|---|---|---|
| Using less-than-or-equal in the loop condition | The last pass reads or writes outside the array; meaningless values, resets | Make the condition i < COUNT |
| Starting the index at 1 | The first element is skipped and the last pass overflows | Indexes run from 0 to N-1 |
| Mistaking the result of sizeof(array) for the element count | On an int array the loop runs twice as many times on the Uno and four times as many on the ESP32 | Use sizeof(array) / sizeof(array[0]) |
| Using sizeof inside a function | The array is passed to the function as an address; sizeof returns 2 or 4 | Pass the element count as a separate parameter |
| Keeping the total in an int variable | A negative average once 32,767 is exceeded on the Uno | Use long for the total |
| Not initialising an array inside a function | Random starting values in a local array | Zero it with int a[10] = {0}; |
| Assigning an array to another with = | Compile error: invalid array assignment | Copy it with a for loop or memcpy |
| Declaring a very large array on the Uno | Low-memory warning, freezes and resets | Use byte, and move constant tables to PROGMEM |
Project ideas with arrays
- LED effect pack: Keep patterns in a two-dimensional array and play each row like an animation frame; manage Knight Rider and running LED effects with a single loop.
- Simon memory game: Store the randomly generated colour sequence in an array and compare it with the buttons the player presses; for similar ideas, see Arduino game projects.
- Password lock: Keep the correct password in a char array, write the keys entered on a keypad into a second array and compare them element by element.
- LED matrix animations: Store 8x8 patterns in byte arrays and show them on a MAX7219 LED matrix.
- Daily data logger: Keep the hourly temperatures in a 24-element array and calculate the day's minimum, maximum and average; you can use a DHT11 as the sensor.
- Music box: Store several songs in separate arrays and switch between them with a button.
Arrays are a basic building block that comes into play the moment you deal with more than a few variables in Arduino programming: pin lists, measurement history, melodies and patterns are all managed with arrays. When you work with text, you can continue with using Arduino String to learn the difference between char arrays and the String class. In the BlueGrays app you can go through the running LED, Knight Rider, traffic light and buzzer national anthem projects step by step, with ready-made array-based code and circuit diagrams.
Frequently asked questions
How do you find the number of elements in an Arduino array?
Arduino has no built-in length() function for arrays. You find the element count with the formula sizeof(array) / sizeof(array[0]): the first gives the total bytes of the array, the second the size of one element. This formula only works correctly where the array is declared; for an array passed to a function, it gives the size of a pointer.
Does an Arduino array index start at 0 or 1?
In the C and C++ based Arduino language, an array index always starts at 0. In a 10-element array the first element is array[0] and the last is array[9]. Accessing array[10] doesn't cause a compile error but corrupts memory outside the array.
Can you change the size of an Arduino array later?
No, the size of a normal array is fixed at compile time and can't be enlarged while the program runs. The practical solution is to declare an array of the largest size you might need and keep track of how many elements are filled in a separate counter variable. Allocating dynamic memory with malloc or new is possible, but it isn't recommended on the 2 KB RAM Uno because it fragments memory.
How do you declare an array of strings in Arduino?
To store several texts, you use an array of pointers like const char* colors[] = {"Red", "Yellow", "Green"}; and reach "Yellow" with colors[1]. A single text is a character array like char name[] = "Arduino"; and carries an invisible '\0' character at the end. You can also write arrays of String objects, but they use up RAM faster on the Uno.
How many elements can an array hold on an Arduino Uno?
RAM sets the limit: the Uno has 2048 bytes of RAM in total, and part of it is used by Serial and other variables. In practice an array of about 1500 bytes, that is 1500 bytes or 750 ints, is near the limit. If you move constant tables to flash with PROGMEM, you can store much more data; the ESP32 and Pico have hundreds of KB of RAM.
How do you copy an array to another array in Arduino?
In C++ you can't copy an array by writing target = source; the compiler gives an error. You can copy the elements one by one with a for loop or use memcpy(target, source, sizeof(source));. Make sure both arrays have the same type and size; if the target is smaller, memcpy overflows too.
Projects to build after reading this
See all projects
Traffic Light
A tiny copy of the traffic light you see on the road every day. Red stays on for two seconds, yellow flashes for a moment, green stays on for two seconds, then it goes back to red through yellow…

LED Chaser
Lights that switch on one after another, as if they were running. The Arduino lights six LEDs one at a time; each glows for a brief moment and goes out, so the light walks from start to end and then…

Knight Rider LED Effect
The classic scanner light: a dot of light slides from one end of six LEDs to the other and then comes back.

LED Chaser with Adjustable Speed
Six LEDs light up one after another, so the light seems to run from one end to the other.

Knight Rider LED Effect with Adjustable Speed
A light runs from one end of six LEDs to the other, turns around and runs back again.
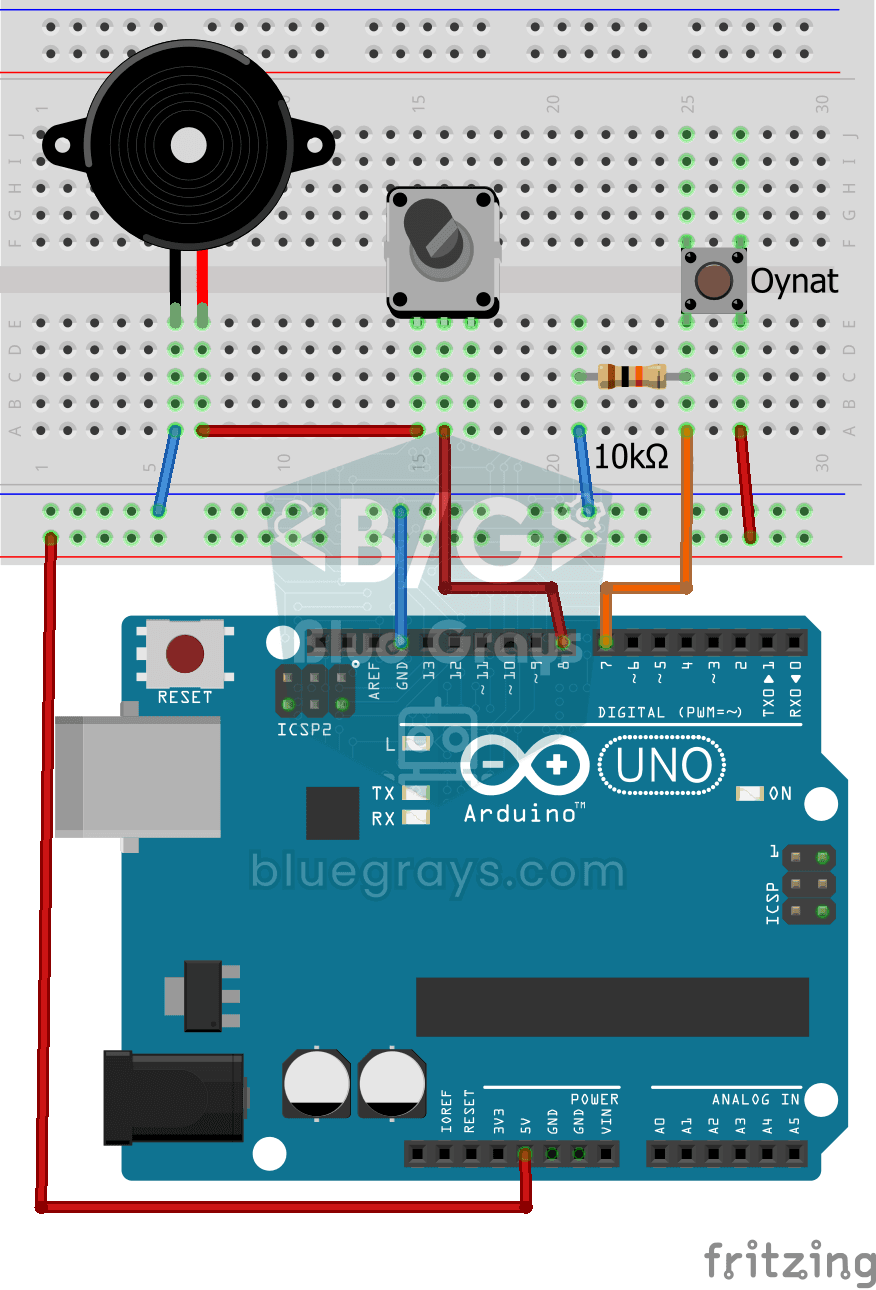
Turkish National Anthem with Buzzer
Press the button and a small buzzer starts playing the Turkish National Anthem, note by note.

ESP32 Knight Rider LED
6 LEDs moving sequentially from left to right and right to left (Knight Rider style). A basic example of using for loops and arrays. Teaches the logic of direction change.
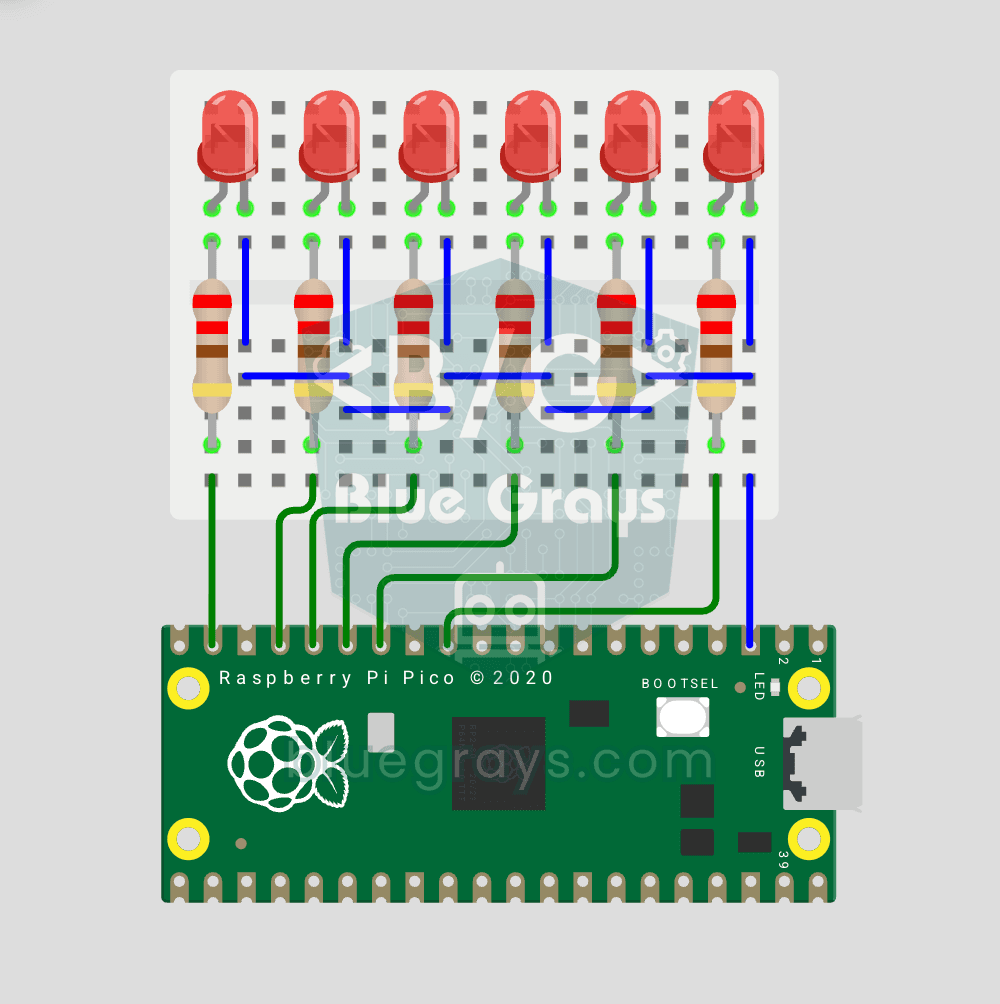
Raspberry Pi Pico Chasing LED (6 LEDs)
The classic "running LED" animation with the Pico, 6-LED version! Six LEDs light up one after another from left to right, as if the light were walking along the row. You'll learn Python lists (LED_PINS = [14, 13, 12, 11, 10, 9]), list comprehensions, controlling pins with a for loop and enumerate(). Six LEDs go on pins GP9-GP14, each with a 220Ω current-limiting resistor.