
Christmas Tree LED Lights with Arduino: WS2812B Snow & Rainbow
Make Christmas tree LED lights with Arduino: WS2812B strip, snowfall, rainbow and twinkle effects, button mode switching, 5 V power calculation and code.
Using an Arduino and a WS2812B LED strip for a Christmas tree project is the most fun way to go beyond the few fixed modes of ready-made tree lights. Because you can control the colour and brightness of every LED individually, you can add snowflakes drifting down from the top, a rainbow circling the branches, or red, green and gold stars twinkling at random. All you need for this is a single data wire, a button and a correctly chosen 5 V power supply.
In this guide we'll start with the parts list and build up step by step: the power supply calculation for your strip length, the correct wiring between the supply, the board and the strip, a complete Arduino Uno program (FastLED) that switches effects with a button, and the ESP32 (Adafruit NeoPixel) and Raspberry Pi Pico (MicroPython) versions of the same project. At the end you'll also learn how to wrap the strip around the tree, what to watch out for safety-wise, and how to fix the most common problems.
Why a WS2812B LED strip for a Christmas tree?
In classic Christmas lights, all the bulbs light up at once or run in sequence in a few groups. In a WS2812B, every LED has a tiny driver chip inside. The Arduino sends colour data one after another on the data line; the first LED takes its own 24-bit share and passes the rest on to the next LED. That way you control a strip of 100 or 300 LEDs with one pin and can give every LED its own colour. This is what gives moving effects like snowfall a liveliness that fixed lights can't match. If you'd like to understand how addressable LEDs work in more depth, check out the WS2812B NeoPixel LED post.
| Feature | Value |
|---|---|
| Package | 5050 SMD, driver chip inside the LED |
| Supply | 5 V (roughly 3.5–5.3 V) |
| Current | About 20 mA per colour, about 60 mA at full white |
| Data | Single line, 800 kHz, 24 bits per LED (G-R-B order) |
| Data time | 30 µs per LED; 100 LEDs take about 3 ms |
| Data input threshold | At least 0.7 × VDD for logic 1 (3.5 V at 5 V) |
| Colour | 256 levels per channel, 16.7 million colours in total |
| Strip density | 30, 60 and 144 LEDs/m |
| Cutting | Can be cut through the middle of the copper pads between LEDs |
Parts list
- WS2812B LED strip: for a tree 1.5–1.8 m tall, 2.5 m of 60 LED/m strip or 5 m of 30 LED/m strip is a good start. Silicone-coated IP65 versions hold up better against being hung on branches and against dust.
- Control board: Arduino Uno, Nano, ESP32 or Raspberry Pi Pico.
- 5 V power supply: choose the current rating from the table below; for 100 LEDs, 5 V 4 A is a comfortable choice.
- Female DC jack (screw terminal): to connect the supply's plug to your wires without soldering.
- 1000 µF / 10 V electrolytic capacitor: smooths out sudden current surges at the strip input.
- 330 Ω resistor: placed in series with the data line; it dampens reflections in the signal and limits the first LED's input current.
- Push button: to switch between effects.
- Thick wire: wire with a cross-section of at least 0.75–1.5 mm² for the 5V and GND lines.
- Optional 74AHCT125 or 74HCT245: to raise the 3.3 V data signal of the ESP32 and Pico to 5 V.
Power supply calculation: how many amps do you need?
Each of the red, green and blue chips inside a WS2812B draws about 20 mA at full brightness, so one LED uses about 60 mA at full white. You find the worst-case current with the formula I = number of LEDs × 60 mA. A strip of 100 LEDs draws 6 A when every LED is pure white at full brightness, which means P = 5 V × 6 A = 30 W. In rainbow, snow and twinkle effects most LEDs are a single colour or dimmed, so in practice the current stays around a third of the worst case. For a safe choice, multiply this typical current by 2 and round up to the nearest supply rating, and set the software current limit to about 80% of the supply. You can easily check the relationship between current, voltage and power with the Ohm's Law calculator.
| Number of LEDs | Worst case (full white) | Typical effect current | Recommended supply | Software limit (MAX_MA) |
|---|---|---|---|---|
| 30 | 1.8 A | about 0.6 A | 5 V 2 A | 1600 mA |
| 60 | 3.6 A | about 1.2 A | 5 V 3 A | 2400 mA |
| 100 | 6 A | about 2 A | 5 V 4 A | 3200 mA |
| 150 | 9 A | about 3 A | 5 V 6 A | 4800 mA |
| 300 (5 m, 60 LED/m) | 18 A | about 6 A | 5 V 12 A | 9600 mA |
On long strips the second problem is voltage drop. Because the thin copper tracks on the strip have resistance, the voltage at the end of a 5 m strip can fall below 4 V; the blue and green chips then weaken and white looks yellowish and dull. The fix is to feed 5V and GND again, not only from the start of the strip but every 1–1.5 metres (or every 100–150 LEDs), with separate wires from the supply. This is called power injection. For these wires use at least 0.75 mm² for 5 amps and 1.5 mm² for 10 amps; connect the data line only at the start of the strip.
Wiring diagram: 5 V supply, strip and board
| Connection | Arduino Uno | ESP32 | Raspberry Pi Pico |
|---|---|---|---|
| Strip DIN (data) | D6 (through 330 Ω) | GPIO 13 (through 330 Ω) | GP0 (through 330 Ω) |
| Strip 5V | Supply +5 V | Supply +5 V | Supply +5 V |
| Strip GND | Supply GND + Uno GND | Supply GND + ESP32 GND | Supply GND + Pico GND |
| Button | D2 and GND | GPIO 4 and GND | GP15 and GND |
| 1000 µF capacitor | 5V–GND at the strip input | 5V–GND at the strip input | 5V–GND at the strip input |
| Board power (finished version) | 5V pin or USB | 5V (VIN) pin or USB | VSYS (through a Schottky diode) or USB |
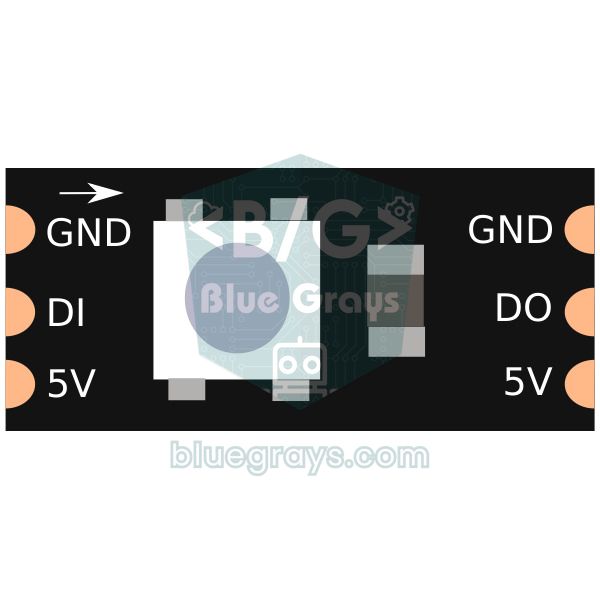
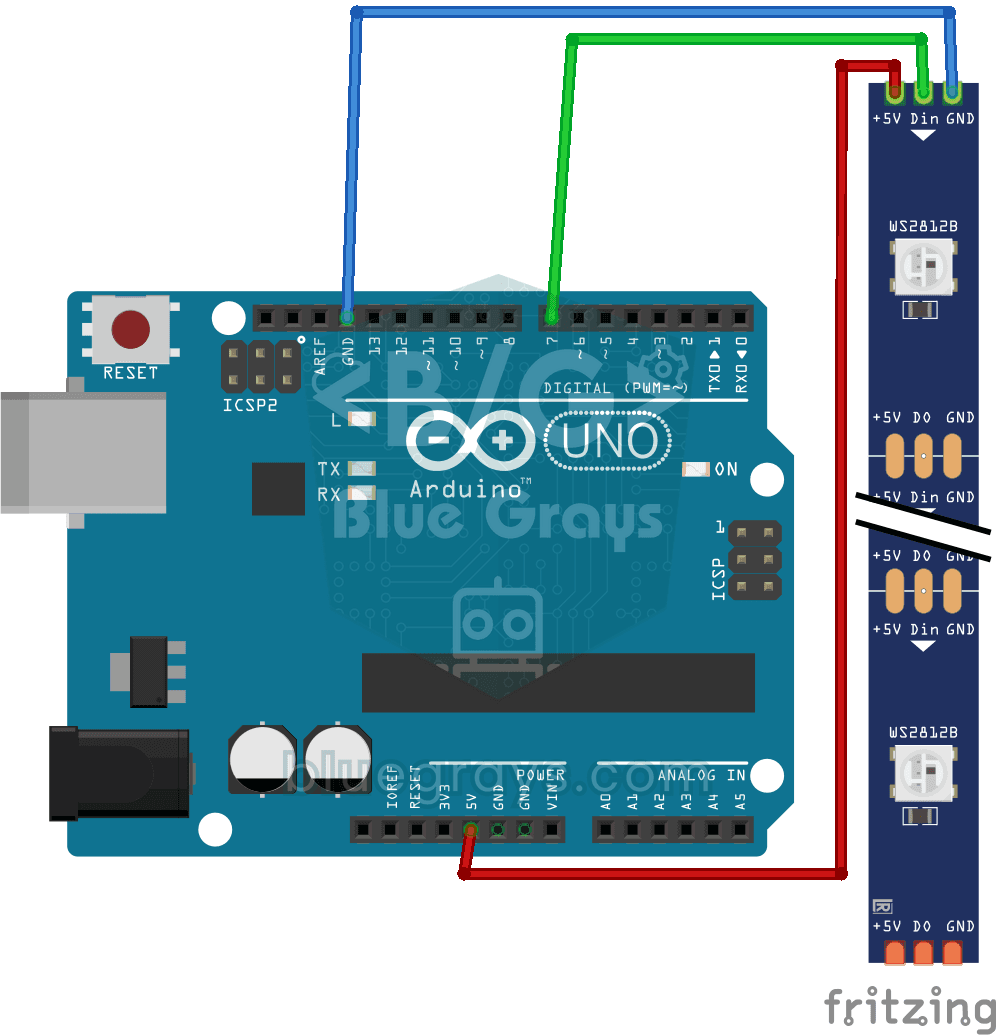
- Find the arrows on the strip and solder a wire to the end the arrow starts from (DIN). If you send data from the opposite end, the DOUT end, no LED will light.
- Connect the supply's +5 V output to the strip's 5V end (labelled +5V or VCC on some strips) and the supply's GND to the strip's GND end.
- Connect the 1000 µF capacitor between 5V and GND at the strip input; the long leg (positive) goes to 5V and the leg with the stripe marking on the body (negative) goes to GND.
- Connect the board's GND pin to the supply's GND. Without a common GND the data signal has no reference.
- Connect the board's data pin (D6 on the Uno) to the strip's DIN end through the 330 Ω resistor; placing the resistor close to the strip gives better results.
- Connect one leg of the button to D2 and the other to GND; the internal pull-up resistor will be enabled in the code.
- If you're using more than 150 LEDs, run separate 5V and GND wires from the supply to the middle and end of the strip too.
- During development, power the board from USB and the strip from the supply. When the project is finished you can feed the supply's 5 V into the Uno's 5V pin; in that case don't plug in the USB cable at the same time.
Arduino Uno code (FastLED): three effects and button mode switching
Open the Library Manager in the Arduino IDE and install the library by searching for FastLED; for a detailed walkthrough see Adding a library to Arduino. The program below includes rainbow, snowfall and star-like twinkle effects; each press of the button moves on to the next effect. Because the code uses millis() instead of delay(), the button is detected at any moment while an effect is running. You can find the logic of this method in the millis vs delay post.
1#include <FastLED.h>
2
3#define LED_PIN     6      // şeridin DIN girişi (330 ohm üzerinden) / strip DIN input (via 330 ohm)
4#define BUTTON_PIN  2      // buton, diğer bacak GND / button, other leg to GND
5#define NUM_LEDS    100    // şeritteki LED sayısı / number of LEDs on the strip
6#define BRIGHTNESS  120    // genel parlaklık 0-255 / global brightness 0-255
7#define MAX_MA      3200   // 4 A adaptörün %80'i / 80% of a 4 A supply
8
9CRGB leds[NUM_LEDS];
10
11const uint8_t MODE_COUNT = 3;                          // 0 gökkuşağı, 1 kar, 2 yıldız / 0 rainbow, 1 snow, 2 twinkle
12const uint16_t FRAME_MS[MODE_COUNT] = {20, 60, 30};    // kare süreleri (ms) / frame times (ms)
13const CRGB XMAS[4] = {CRGB::Red, CRGB::Green, CRGB::Gold, CRGB::White};
14
15uint8_t mode = 0;
16uint8_t hue = 0;
17
18void setup() {
19  pinMode(BUTTON_PIN, INPUT_PULLUP);
20  FastLED.addLeds<WS2812B, LED_PIN, GRB>(leds, NUM_LEDS);
21  FastLED.setMaxPowerInVoltsAndMilliamps(5, MAX_MA);  // akım sınırı / current limit
22  FastLED.setBrightness(BRIGHTNESS);
23  FastLED.clear(true);                                // açılışta hepsini söndür / all off at start
24}
25
26void checkButton() {
27  static bool lastState = HIGH;
28  static unsigned long lastChange = 0;
29  bool state = digitalRead(BUTTON_PIN);
30  if (state != lastState && millis() - lastChange > 50) {  // 50 ms zıplama filtresi / 50 ms debounce
31    lastChange = millis();
32    lastState = state;
33    if (state == LOW) {                                     // basıldı / pressed
34      mode = (mode + 1) % MODE_COUNT;
35      FastLED.clear();
36    }
37  }
38}
39
40void rainbow() {
41  fill_rainbow(leds, NUM_LEDS, hue, 3);   // her LED'de ton 3 artar / hue +3 per LED
42  hue += 2;                               // renkler döner / colours rotate
43}
44
45void snowfall() {
46  for (int i = 0; i < NUM_LEDS - 1; i++) {
47    leds[i] = leds[i + 1];                // bir LED aşağı kaydır / shift one LED down
48  }
49  if (random8() < 38) {
50    leds[NUM_LEDS - 1] = CRGB::White;     // tepede yeni kar tanesi / new flake at the top
51  } else {
52    leds[NUM_LEDS - 1] = CRGB(0, 0, 24);  // koyu mavi gece / dark blue night
53  }
54}
55
56void twinkle() {
57  fadeToBlackBy(leds, NUM_LEDS, 20);      // hepsini biraz kıs / dim everything a little
58  if (random8() < 80) {
59    leds[random16(NUM_LEDS)] = XMAS[random8(4)];  // rastgele yıldız / random star
60  }
61}
62
63void loop() {
64  checkButton();
65  static unsigned long lastFrame = 0;
66  if (millis() - lastFrame >= FRAME_MS[mode]) {
67    lastFrame = millis();
68    if (mode == 0) rainbow();
69    else if (mode == 1) snowfall();
70    else twinkle();
71    FastLED.show();                       // renkleri şeride gönder / push colours to the strip
72  }
73}| Line / setting | What it does |
|---|---|
| NUM_LEDS | The number of LEDs on the strip; if it's entered wrong, part of the strip stays dark or the effects shift. |
| BRIGHTNESS | Global brightness (0–255). Around 120 is bright enough for a tree and safe in terms of current and heat. |
| setMaxPowerInVoltsAndMilliamps(5, MAX_MA) | FastLED estimates the current drawn in each frame and automatically lowers the brightness if the limit would be exceeded. |
| addLeds<WS2812B, LED_PIN, GRB> | Defines the strip type, the data pin and the colour order; for the WS2812B the order is GRB. |
| FRAME_MS | The frame time of each effect (ms); a smaller value means a faster animation. |
| checkButton() | Reads the button with a 50 ms debounce filter and increases the mode with each press. |
| FastLED.show() | Sends the colours in memory to the strip; if it isn't called, no change is visible. |
How do the effects work?
Rainbow: the fill_rainbow function starts from the hue given to the first LED and increases the hue by 3 steps for each LED. In FastLED the hue ranges from 0 to 255; with 100 LEDs the hue advances a total of 300 steps, so you see slightly more than one full colour wheel across the strip. Because we increase the hue variable by 2 each frame, the colours rotate slowly around the tree. If you want wider colour bands, use 1 or 2 instead of 3.
Snowfall: when the strip is wrapped around the tree from bottom to top, the first LED is at the bottom and the last LED is at the top. In each frame we shift all the colours down by one LED and add either a white snowflake or a dark blue night pixel at the top. Because random8() produces a number from 0 to 255, the chance of it coming out below 38 is about 15%; increase this number and the snow gets denser. With a 60 ms frame time, a snowflake takes 6 seconds to fall down 100 LEDs. Twinkle (stars): fadeToBlackBy dims all the LEDs by about 8% each frame; at the same time a randomly chosen LED lights up at full brightness in red, green, gold or white. The result is a sparkle that recalls old-style Christmas lights but is much livelier.
Christmas tree with the ESP32 (Adafruit NeoPixel)
FastLED works on the ESP32 too, but here we write the same project with the Adafruit NeoPixel library so that you get to know both popular libraries. The current version of the library compiles with the same code on versions 2.x and 3.x of the ESP32 Arduino core and generates the signal with the hardware RMT unit. Because colours dimmed with setBrightness in Adafruit NeoPixel can get distorted when read back, we calculate the effects in our own brightness array (level) and rewrite them to the strip from scratch in every frame. The data pin is GPIO 13 and the button is GPIO 4. If you later want to control the tree from your phone, the WLED setup post offers a ready-made interface.
1#include <Adafruit_NeoPixel.h>
2
3#define LED_PIN     13     // şeridin DIN girişi (330 ohm üzerinden) / strip DIN input (via 330 ohm)
4#define BUTTON_PIN  4      // buton, diğer bacak GND / button, other leg to GND
5#define NUM_LEDS    100    // şeritteki LED sayısı / number of LEDs on the strip
6
7Adafruit_NeoPixel strip(NUM_LEDS, LED_PIN, NEO_GRB + NEO_KHZ800);
8
9const uint8_t MODE_COUNT = 3;                          // 0 gökkuşağı, 1 kar, 2 yıldız / 0 rainbow, 1 snow, 2 twinkle
10const uint16_t FRAME_MS[MODE_COUNT] = {20, 60, 30};    // kare süreleri (ms) / frame times (ms)
11const uint8_t PALETTE[4][3] = {{255, 0, 0}, {0, 255, 0}, {255, 160, 0}, {255, 255, 255}};
12
13uint8_t level[NUM_LEDS];      // LED başına parlaklık / per-LED level
14uint8_t colorIdx[NUM_LEDS];   // yıldız rengi / star colour index
15uint8_t mode = 0;
16uint16_t hue = 0;
17
18void setup() {
19  pinMode(BUTTON_PIN, INPUT_PULLUP);
20  strip.begin();
21  strip.setBrightness(110);   // genel parlaklık / global brightness
22  strip.clear();
23  strip.show();
24}
25
26void checkButton() {
27  static bool lastState = HIGH;
28  static unsigned long lastChange = 0;
29  bool state = digitalRead(BUTTON_PIN);
30  if (state != lastState && millis() - lastChange > 50) {  // 50 ms zıplama filtresi / 50 ms debounce
31    lastChange = millis();
32    lastState = state;
33    if (state == LOW) {                                     // basıldı / pressed
34      mode = (mode + 1) % MODE_COUNT;
35      memset(level, 0, sizeof(level));                      // efekt belleğini sıfırla / reset effect buffer
36      strip.clear();
37    }
38  }
39}
40
41void rainbow() {
42  for (int i = 0; i < NUM_LEDS; i++) {
43    uint16_t h = hue + (uint32_t)i * 65536UL / NUM_LEDS;   // LED'e göre ton / hue per LED
44    strip.setPixelColor(i, strip.gamma32(strip.ColorHSV(h)));
45  }
46  hue += 256;                                              // renkler döner / colours rotate
47}
48
49void snowfall() {
50  for (int i = 0; i < NUM_LEDS - 1; i++) level[i] = level[i + 1];   // bir LED aşağı kaydır / shift one LED down
51  level[NUM_LEDS - 1] = (random(100) < 15) ? 255 : 0;               // tepede yeni kar / new flake on top
52  for (int i = 0; i < NUM_LEDS; i++) {
53    if (level[i]) strip.setPixelColor(i, 255, 255, 255);            // kar tanesi / snowflake
54    else strip.setPixelColor(i, 0, 0, 24);                          // koyu mavi gece / dark blue night
55  }
56}
57
58void twinkle() {
59  for (int i = 0; i < NUM_LEDS; i++) {
60    level[i] = (level[i] > 12) ? level[i] - 12 : 0;                 // yavaşça sön / fade out
61  }
62  if (random(100) < 30) {
63    int p = random(NUM_LEDS);
64    level[p] = 255;                                                 // yeni yıldız / new star
65    colorIdx[p] = random(4);
66  }
67  for (int i = 0; i < NUM_LEDS; i++) {
68    const uint8_t *c = PALETTE[colorIdx[i]];
69    strip.setPixelColor(i, c[0] * level[i] / 255, c[1] * level[i] / 255, c[2] * level[i] / 255);
70  }
71}
72
73void loop() {
74  checkButton();
75  static unsigned long lastFrame = 0;
76  if (millis() - lastFrame >= FRAME_MS[mode]) {
77    lastFrame = millis();
78    if (mode == 0) rainbow();
79    else if (mode == 1) snowfall();
80    else twinkle();
81    strip.show();                                                   // renkleri şeride gönder / push colours to the strip
82  }
83}
Christmas tree with Raspberry Pi Pico and MicroPython
The neopixel module comes built into MicroPython on the Raspberry Pi Pico; you don't need to install anything extra. Since the module handles the WS2812B's precise timing itself, you can use any GP pin; below, data is connected to GP0 and the button to GP15. Because MicroPython has no global brightness setting, we dim the colours ourselves with the BRIGHT factor. Since Python runs slower than C++, effects are smooth with 100 LEDs; above 300 LEDs the frame times may grow longer. If you're new to MicroPython, you can start with the MicroPython basics post.
1from machine import Pin
2import neopixel, time, random
3
4NUM_LEDS = 100
5BRIGHT = 0.4                                   # 0-1 parlaklık / brightness
6np = neopixel.NeoPixel(Pin(0), NUM_LEDS)       # veri GP0 / data on GP0
7button = Pin(15, Pin.IN, Pin.PULL_UP)          # buton GP15-GND / button GP15-GND
8
9mode = 0
10MODE_COUNT = 3                                 # 0 gökkuşağı, 1 kar, 2 yıldız / 0 rainbow, 1 snow, 2 twinkle
11FRAME_MS = (20, 60, 30)                        # kare süreleri / frame times
12level = [0] * NUM_LEDS                         # LED başına parlaklık / per-LED level
13color_idx = [0] * NUM_LEDS                     # yıldız rengi / star colour index
14PALETTE = ((255, 0, 0), (0, 255, 0), (255, 160, 0), (255, 255, 255))
15hue = 0
16
17def scale(r, g, b):
18    return (int(r * BRIGHT), int(g * BRIGHT), int(b * BRIGHT))
19
20def wheel(pos):
21    # 0-255 -> gökkuşağı rengi / rainbow colour
22    pos = pos & 255
23    if pos < 85:
24        return (255 - pos * 3, pos * 3, 0)
25    if pos < 170:
26        pos -= 85
27        return (0, 255 - pos * 3, pos * 3)
28    pos -= 170
29    return (pos * 3, 0, 255 - pos * 3)
30
31def rainbow():
32    global hue
33    for i in range(NUM_LEDS):
34        np[i] = scale(*wheel(hue + i * 256 // NUM_LEDS))
35    hue = (hue + 2) & 255                      # renkler döner / colours rotate
36
37def snowfall():
38    for i in range(NUM_LEDS - 1):
39        level[i] = level[i + 1]                # bir LED aşağı kaydır / shift one LED down
40    level[-1] = 255 if random.randint(0, 99) < 15 else 0
41    for i in range(NUM_LEDS):
42        np[i] = scale(255, 255, 255) if level[i] else scale(0, 0, 24)
43
44def twinkle():
45    for i in range(NUM_LEDS):
46        level[i] = level[i] - 12 if level[i] > 12 else 0   # yavaşça sön / fade out
47    if random.randint(0, 99) < 30:
48        p = random.randint(0, NUM_LEDS - 1)
49        level[p] = 255                         # yeni yıldız / new star
50        color_idx[p] = random.randint(0, 3)
51    for i in range(NUM_LEDS):
52        r, g, b = PALETTE[color_idx[i]]
53        k = level[i] * BRIGHT / 255
54        np[i] = (int(r * k), int(g * k), int(b * k))
55
56effects = (rainbow, snowfall, twinkle)
57last_btn = 1
58last_change = time.ticks_ms()
59last_frame = time.ticks_ms()
60
61while True:
62    now = time.ticks_ms()
63    state = button.value()
64    if state != last_btn and time.ticks_diff(now, last_change) > 50:   # zıplama filtresi / debounce
65        last_change = now
66        last_btn = state
67        if state == 0:                         # basıldı / pressed
68            mode = (mode + 1) % MODE_COUNT
69            for i in range(NUM_LEDS):
70                level[i] = 0
71    if time.ticks_diff(now, last_frame) >= FRAME_MS[mode]:
72        last_frame = now
73        effects[mode]()
74        np.write()                             # şeride gönder / push to the strip
Placing the strip on the tree and safety
- Start from the bottom: put the strip's DIN end at the base of the tree next to the control box and wrap the strip upward in a spiral. That way the snow effect flows from top to bottom and the data wire stays short.
- Spiral spacing: on a 1.8 m tree, wrapping at 20–25 cm spacing spreads a 5 m strip evenly over the branches; since the turn diameter gets smaller towards the top of the tree, you can narrow the spacing slightly.
- Vertical strips: you can also lay the strip in a zigzag, from top to bottom and bottom to top. With this layout the direction of the snow effect reverses on every second strip, so you need to make a small adjustment that calculates the LED order from the strip number.
- Heat: a WS2812B strip warms up at high brightness; don't press it tightly against paper decorations or dry branches. Keeping brightness around 100–150 reduces both heat and current.
- Supply safety: don't build your own circuit on the 220 V side; use a ready-made, enclosed 5 V supply with a CE mark. Keep the control box away from water and plant watering, and switch the tree off when you leave the house.
- Fuse: in systems above 5 A, adding a blade fuse of a suitable rating at the supply output is a good precaution against a possible short circuit.
Christmas tree project ideas
- Music-reactive tree: light the LEDs to the rhythm of a song with a microphone; details are in the music-reactive LED post.
- New Year countdown: show the time left until midnight on a display and start a firework effect on the tree at 00:00; check out the New Year countdown timer post.
- Self-switching tree: turn the lights on automatically when it gets dark with an LDR light sensor.
- Tree that brightens as you approach: raise the brightness with a PIR motion sensor when someone enters the room and dim it when the room is empty.
- Phone control: open a web page with the ESP32 and choose effects and colours from your phone; the ESP32 web server post is a good starting point.
- Treetop star display: place a small WS2812B LED matrix on top of the tree and play a star or snowflake animation.
Common mistakes and how to fix them
| Symptom | Likely cause | Fix |
|---|---|---|
| No LED lights up | Data is connected to the DOUT end or GND isn't common | Check the arrow direction and connect to the DIN end, join the board's and the supply's GNDs |
| First LEDs flicker, random colours | Weak data signal, 3.3 V level, long data wire | Move the 330 Ω resistor closer to the strip, shorten the data wire, use a 74AHCT125 |
| Wrong colours (green instead of red) | Wrong colour order | Use GRB in FastLED and NEO_GRB in NeoPixel; some strips are in RGB order |
| End of the strip is yellowish and dull | Voltage drop | Add power injection in the middle and at the end, use thicker wire |
| Board resets when it goes to white | Supply too small, sudden current draw | Use a bigger supply, lower the MAX_MA limit, add the 1000 µF capacitor |
| Button skips two modes in one press | Button bounce | Raise the debounce time from 50 ms to 80 ms, keep the button wires short |
| Effects run slowly on the Pico | Too many LEDs and Python calculations | Reduce NUM_LEDS, increase the frame time or switch to C++ in the Arduino IDE |
With a few metres of LED strip, a single button and a correctly sized 5 V supply, your Christmas tree becomes a programmable light show that can be refreshed with new effects every year. You can design your own effects by playing with colour palettes and frame times, and for any power and wiring questions you can go back to the Arduino power supply guide. In the BlueGrays app you'll find WS2812B running light, Knight Rider, police strobe and animation projects, plus NeoPixel strip control with the ESP32, with step-by-step circuit diagrams and code.
Frequently asked questions
How many LEDs do I need for a Christmas tree?
For a tree 1.5–1.8 m tall, 150–300 LEDs, meaning 5 m of 30 LED/m or 2.5–5 m of 60 LED/m strip, gives a full and lively look. It works with fewer LEDs too, but the effects look sparse. As the LED count grows, you also need to account for the supply current and the board's RAM (3 bytes per LED).
What amp rating of power supply does a WS2812B LED strip need?
Each LED draws about 60 mA at full white; for 100 LEDs the worst case is 6 A. In colourful effects the real current stays around a third of that, so a 5 V 4 A supply is enough for 100 LEDs, as long as you limit the current to 3200 mA with FastLED's setMaxPowerInVoltsAndMilliamps function. If you'll be running full white for long periods, choose the supply for the worst case.
Does a WS2812B strip work at 12 V?
No, the WS2812B is a 5 V strip and connecting 12 V destroys the LEDs instantly. If you want an addressable strip that runs on 12 V, choose the WS2811 or WS2815 type. If you want to use a 12 V supply you already have for a small strip, you can get 5 V with a step-down converter such as the LM2596, but these modules are limited to about 2–3 A.
Should I use FastLED or Adafruit NeoPixel?
Both drive the WS2812B without trouble. FastLED makes writing effects easier with ready-made rainbow, colour palette, dimming and current-limiting functions and is usually faster. Adafruit NeoPixel offers a simpler API; if you're just starting out, a good way is to begin with one and then try the other.
How many WS2812B LEDs can an Arduino Uno control at most?
RAM and speed set the limit. Since each LED takes 3 bytes of the Uno's 2 KB of RAM, in practice there's a limit of around 500 LEDs once you include other variables. Also, because sending data to each LED takes 30 µs, a single frame at 1000 LEDs reaches 30 ms. On the ESP32 and Pico, with plenty of RAM, thousands of LEDs are possible; the real limit becomes the power supply.
Why does the end of my LED strip glow yellow or dim?
This is a sign of voltage drop. The thin copper tracks of the strip lose voltage as current increases; below 4 V the LEDs at the end produce weak blue and green, and white shifts to yellow. You fix it by running separate 5V and GND wires from the supply to the middle and end of the strip and by lowering the brightness a little.
Projects to build after reading this
See all projects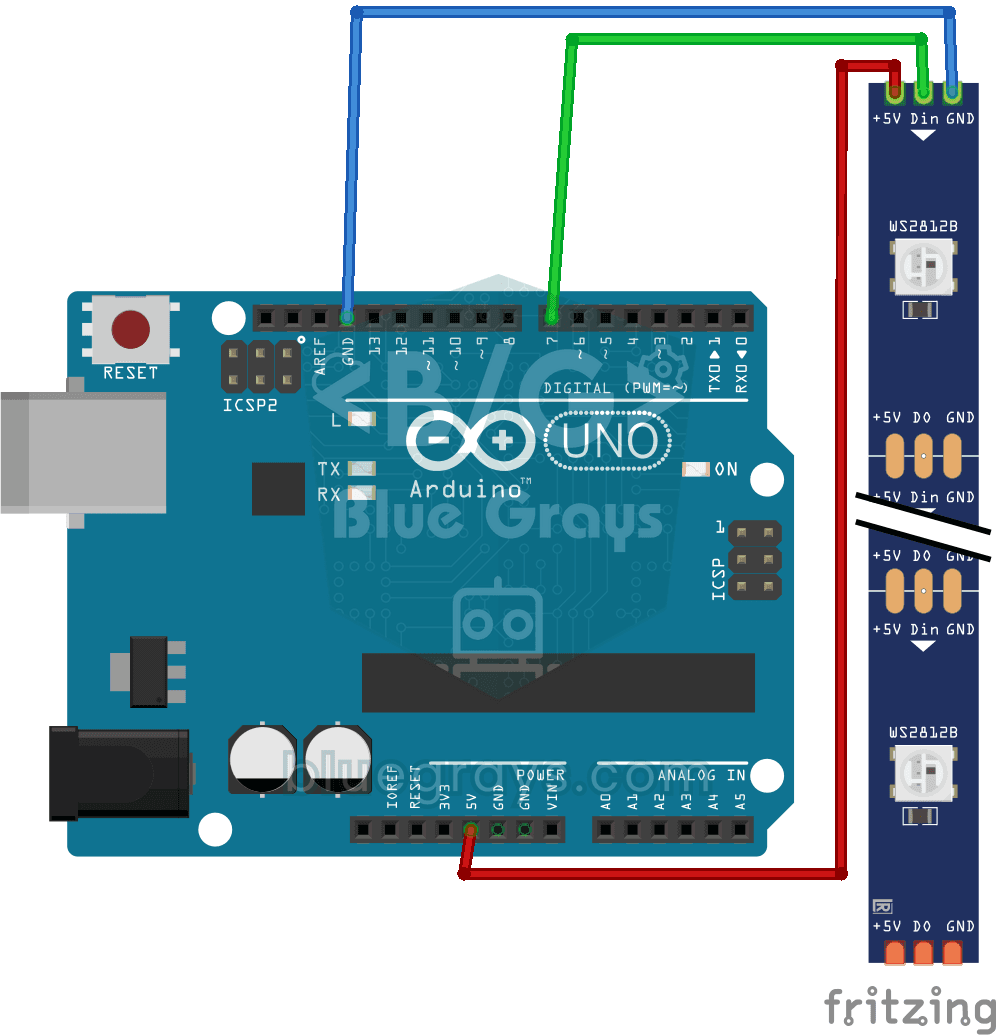
Using a WS2812B LED Strip
Meet a smart LED strip where you can colour every single light on its own. The Arduino first lights the first five LEDs red, a second later turns the other five blue, then switches them all off and st
Police Lights with WS2812B
You bring the red and blue lights from the roof of a police car right onto your desk. One half of a ten-LED WS2812B strip flashes red three times in quick succession, then the other half flashes blue
WS2812B LED Chaser
On a strip of ten LEDs, a green dot of light moves from start to finish one LED at a time, then jumps back to the beginning; it stays on each LED for a third of a second. On a WS2812B strip you contro
WS2812B LED Chaser (Fill Effect)
A light strip that fills up and empties like a glass of water. The Arduino lights ten color LEDs one by one in orange and keeps them on; once the strip is full, it switches them off one by one in the
WS2812B Knight Rider Effect
A red dot of light slides from one end of a smart LED strip to the other, then comes back, sweeping back and forth without ever stopping. At each step the Arduino lights just one LED, waits a tenth of

WS2812B Animation 1
On a strip of 56 LEDs, all the colours of the rainbow line up side by side and flow without ever stopping, as if a river of light were gliding along the strip. Each LED glows in a slightly different c

WS2812B Animation 2
Set up a light show in your room that changes colors all by itself. The Arduino keeps colors flowing along a 30-LED strip and switches to a new color set every few seconds: rainbow, purple and green s

ESP32 WS2812B NeoPixel Strip Control
WS2812B (NeoPixel) addressable LEDs are smart RGB LEDs that can be controlled in a daisy-chain configuration via a single data pin. In this project, we will control an 8-LED WS2812B strip using the Adafruit_NeoPixel library to create a smooth rainbow animation. While the ESP32’s 3.3V logic level works seamlessly with most WS2812B components, we’ll demonstrate a solution using a 470Ω series resistor and a 1000µF capacitor in case of instability. The animation is achieved by shifting the hue value