
BlueGrays Premium: Free vs Premium and What It Unlocks
BlueGrays Premium free vs premium: what 60 free projects, 7 tools and daily questions cover, what Premium adds, a 2-week free plan and how cancelling works.
BlueGrays Premium unlocks the circuit diagrams, code and steps of more than 150 Premium projects, 11 Premium electronics tools, the Parts section of the Workshop, the Troubleshooting tips and Practice mode in the quiz. The free version, on the other hand, is not a demo window but an app you can actually use on its own: 60 projects (20 per platform) are fully open with circuit diagram, parts list, code, blocks and Understand the code; 7 electronics tools, the core of Daily questions, the 36-card Code guide, the Forum, the Project Finder and more than 130 component pages are free as well. The short answer: if you are new to Arduino and want to learn the basics such as LEDs, buttons, light sensors, buzzers and distance sensors, the free version will last you a long time. If you want to build a specific Premium project, move on to more advanced projects with the ESP32 or Raspberry Pi Pico, or see what you can build with the parts you already own, Premium gives you something concrete.
In this post we go through it screen by screen, without hype: what is open and what is locked. First comes a table comparing the free and Premium versions section by section, then what you can and cannot see on the page of a free project versus a Premium one. After that you get a decision table for five types of users, a 2-week plan to get the most out of the free version, a checklist to go through before upgrading, how subscriptions and cancelling work, and the difference between individual Premium and an educator code. We do not list prices: store prices vary by country, and you always see the current price on the plan screen in the app.

What is fully open in the free version?
The easiest way to understand the free version is to start with what is open rather than what is locked. Once you create an account and sign in, you can use every section below without paying anything. Nothing is left half-finished in the free projects; the project page is the same one a Premium user sees, the only exception being the Troubleshooting tips.
- 60 free projects, complete: 20 Arduino, 20 ESP32 and 20 Raspberry Pi Pico projects. Each one has Required Components, Circuit Diagram, Source Code, Understand the code and the Let's build it together guided mode open; 31 of them also have Show as blocks.
- 7 electronics tools: Color code, SMD code, Ohm's law, LED resistor, Capacitor code, Inductor code and LED voltages. Nine of the Premium tools also open for free users as a Sample calculation, so you can see how the tool works with preset values.
- Daily questions: a new 5-question set every day, the Placement test, 6 levels from A1 to C2, level-up exams, XP, a daily streak, badges and the weekly leaderboard.
- Code guide: 18 Arduino C++ and 18 MicroPython cards, each with syntax, an example, a common mistake and a mini test.
- Forum: asking questions, writing answers, adding photos and code, accepting an answer.
- Project Finder: ranks suitable projects after 3 questions and also suggests a free warm-up project you can start with the same parts.
- More than 130 component pages: a description and the list of projects that use that part. All component pages are currently free.
- The showcase of every project: you also see the name, platform, difficulty, parts list and completion count of Premium projects; what is locked is the diagram, the code and the steps.
What exactly does Premium unlock?
Listing what Premium adds one by one makes the picture clear: most of it is more content, some of it is convenience. None of it exists to restrict something in the free version; free projects stay free, and going Premium simply removes the locks.
- All projects: the circuit diagram, source code, blocks, Understand the code steps, Let's build it together mode and, where available, the demo video of more than 150 Premium projects. Most of the advanced ESP32 projects, such as Wi-Fi, web server and Bluetooth, are in this group.
- Troubleshooting: project-specific checks in more than 170 projects, starting with "If your project isn't working". This section is unlocked with Premium in free projects too.
- 11 Premium tools: Series / parallel, Standard value, Voltage divider, 555 timer, Battery life, Op-amp gain, Series / parallel C, RC time constant, Transistors, Pinout and Logic gates; calculations with your own values and Saved calculations (kept on all your devices).
- Workshop: you record the parts you own, with quantities, in Parts; the app shows Projects You Can Build and the projects you are missing parts for. The Only Buildable filter in the project list depends on it too.
- Devices (IoT): in Workshop > Devices you control your Wi-Fi board (ESP32 or Pico W) from your phone; the free plan includes 1 device, and Premium raises that to up to 10. You pick one of 8 ready templates, Ohmi prepares the code with your device key and you upload it once from the Arduino IDE; the free plan keeps a chart for 1 value with 24 hours of history, Premium 20 values and 30 days. The details are in the guide to controlling an ESP32 from your phone.
- Daily questions extras: Practice (as many questions as you like), all of My mistakes (the free version shows the last 10), retrying a missed level-up exam without the 24-hour wait, and 2 rest days a week instead of 1.
Section by section: free vs Premium
The table below sums up every section of the app in one row. Wherever it says "Open", there is no restriction for free users. The numbers are valid as of November 2026; as new projects are added, the free and Premium project counts may change.
| Section | Free | Premium |
|---|---|---|
| Projects | 60 projects fully open; name, parts and preview of the rest are visible | All of the 200+ projects |
| Circuit diagram and source code | Open in free projects | Open in all projects |
| Show as blocks | Open in the 31 free projects that have blocks | In all of the 100+ block projects |
| Understand the code | Open in free projects | In all projects |
| Let's build it together guided mode | Open in free projects | In all projects |
| Troubleshooting | Locked | Open in more than 170 projects |
| Electronics tools | 7 tools in full; 9 tools as a Sample calculation | All 18 tools and Saved calculations |
| Workshop (Parts, Projects You Can Build) | Locked | Open |
| Devices (IoT) | 1 device, 1 chart, 24-hour history | Up to 10 devices, 20 charts, 30-day history |
| Daily questions, level, badges, leaderboard | Open | Open |
| Practice and all mistakes | Last 10 mistakes visible, Practice locked | Open |
| Retrying a level-up exam | After 24 hours | Without waiting |
| Code guide (36 cards) | Open | Open |
| Forum | Open | Open |
| Project Finder | Open; Premium results appear locked | All results open |
| Component pages (130+) | Open | Open |
What do you see on a free project page vs a Premium one?
The project page is what affects the decision most, because that is where you spend most of your time in the app. When you open a free project, every section of the page is open. When you open a Premium project with a free account, you first see the project's 4-step path: the step for getting the parts ready is open, and you can tap the parts to read what they do. Building the circuit, uploading the code and testing are locked. Below that, a Try this first card usually appears: a free warm-up project that uses the same parts or the same board. So running into a locked project does not leave you empty-handed; most of the time it points you to a free project you can start with the same parts.
| Project page section | Free project | Premium project, free account | Premium project, with Premium |
|---|---|---|---|
| Required Components | Open | Open | Open |
| Circuit Diagram | Open | Locked | Open |
| Source Code | Open, can be copied | Locked | Open, can be copied |
| Show as blocks | Open if blocks exist | Locked | Open if blocks exist |
| Understand the code and Try it yourself | Open | Locked | Open |
| Let's build it together | Open | Locked | Open |
| Project Video | Open if available | "With video" label is shown | Open if available |
| Troubleshooting | With Premium | Locked, number of tips shown | Open |
Who is the free version enough for, and when does Premium make sense?
There is no single answer for everyone. Three things decide it: which board you work with, which project you want to build and how often you use the app. The table below sums this up for five typical users; find the row closest to you.
| User | Is free enough? | When does Premium make sense? | Suggestion |
|---|---|---|---|
| Trying it for the first time (starting Arduino from scratch) | Yes, for a long time. The 20 free Arduino projects cover all the basics from LEDs to the distance sensor | When you have finished the basic projects and want to move on to motors, displays or games | Start free and follow the 2-week plan below |
| Wanting to go further with the ESP32 or Pico | Yes, to get started: 20 ESP32 and 20 Pico projects are free | Wi-Fi, web server, Bluetooth and multi-part projects are mostly Premium | Finish the free ESP32/Pico projects, then get Premium for the period you need it |
| Doing a school project or a final-year project | Yes, if the project is on the free list | If the project you want is Premium, or you need Troubleshooting when it does not work | Pick the project and check whether it is paid; a monthly plan 3–4 weeks before the deadline is often enough |
| Teacher | You can build lessons around the free projects | When you want to use Premium projects in class | Individual Premium for yourself; an educator package for your students |
| Robotics club | Largely yes for the first term | When the club moves on to robots, IoT and competition projects | The club advisor buys an educator package and hands codes to active members |
A note for anyone doing a school or final-year project: think about Premium after you have picked the project, not before. In the Project Finder, choose your interests, your board and your experience; Premium projects show up in the results with a lock. If the project you choose is free, you do not need to buy anything. If it is Premium, the parts list is already visible, so you can gather the parts first and start Premium only when you are ready to build the circuit. That way the time you pay for is not spent waiting for parts. If you are not sure which project to pick for your assignment, the guide to choosing the right project makes that decision easier.
Getting the most out of the free version: a 2-week plan
The most honest way to find out whether the free version is enough is to really use it for two weeks. The plan below assumes 30–45 minutes of work a day and only uses free projects. Each day pairs a project with a task from another free part of the app, so by the end of two weeks you will have tried not only the projects but also the tools, the quiz, the code guide and the forum. The parts are the ones found in a starter kit: LEDs, 220 Ω and 10 kΩ resistors, a button, an LDR, a buzzer, an HC-SR04 and a DHT11. You can find which parts you need in detail in the Arduino starter kit guide.
| Day | Free project | Extra task (free sections) |
|---|---|---|
| 1 | LED Blink | Placement test (15 questions) and your first Daily questions set |
| 2 | Traffic Light | Work out the resistor for 3 LEDs with the LED resistor tool |
| 3 | LED Police Lights | Finish the for loop card and its mini test in the Code guide |
| 4 | LED Control with a Push Button (Push) | Solve the Understand the code > Try it yourself task without hints first |
| 5 | Toggle an LED with a Button (On/Off) | Use Show as blocks to match the blocks with lines of code |
| 6 | Night Light with Ldr | Use Ohm's law to calculate the current in the LDR and resistor circuit |
| 7 | Review day | Redo the questions in My mistakes; ask about anything you got stuck on in the Forum |
| 8 | Using a Buzzer and Frequency Setting with Buzzer | Identify the resistors in your kit by their colour bands with Color code |
| 9 | LED Chaser | Read how the array is used in Understand the code > Step by step |
| 10 | HC-SR04 Distance Measurement (Serial Display) | Compare the measured distance with a ruler and note the difference |
| 11 | Temperature and Humidity with DHT11 | Check the other projects that use the DHT11 on its component page |
| 12 | LED Blink with ESP32 or Raspberry Pi Pico: Controlling an External LED (GP14 + Breadboard) | If you have an ESP32 or a Pico, do the same LED task with that board; open the MicroPython track in the Code guide |
| 13 | Run the Project Finder | Look at the parts list and preview of the suggested Premium projects and note the ones you want |
| 14 | Combine two projects (e.g. LDR + buzzer) | Photograph the result and share it in the Forum; move on to the decision list below |
If you have an ESP32 or a Raspberry Pi Pico instead of an Arduino, you can follow the plan with the same logic. For the ESP32 the free sequence goes like this: ESP32 LED Control with Push Button (Push), Reading Light Intensity with the ESP32 LDR Module, ESP32 HC-SR04 Ultrasonic Distance Sensor, ESP32 DHT22 Temperature and Humidity (with LCD Display), ESP32 MQ-2 Gas/Smoke Detector Alarm and ESP32 RFID RC522 Card Reader (with LCD). If you want to try the Wi-Fi side, ESP32 Wi-Fi STA Connection (with LCD Screen) and ESP32 Asynchronous Web Server (with IP Display on LCD) are free too. For the Pico and MicroPython, Raspberry Pi Pico Traffic Light Simulator (3 LEDs Sequential, GP11/GP12/GP13), Raspberry Pi Pico Police Strobe Light Effect (Red + Blue, GP11 + GP12), Raspberry Pi Pico Traffic Light with 4-Mode Button Selector (State Machine, GP11-13 + GP4), Raspberry Pi Pico Parking Sensor (HC-SR04 + 3 LEDs + Buzzer) and Raspberry Pi Pico Button Piano (5 Buttons + Buzzer + Melody Recorder) fill the two weeks. If you want a longer, 30-day route, the Arduino learning roadmap post reads like a continuation of this plan.
Decision time on day 14: is the free version enough for you?
- Free is enough if: you have not finished even half of the free projects, the topics you are interested in are at the level of LEDs, buttons, reading sensors and sound, and the forum plus Understand the code are enough when you get stuck. In that case it makes sense to put Premium off.
- Premium will be useful if: most of the projects you noted on day 13 turned out to be Premium, you want to move on to Wi-Fi or Bluetooth projects with the ESP32, you have looked for Troubleshooting tips several times on a circuit that would not work, or you will use one of the Premium tools (such as the voltage divider or pinout) every week.
- It is still too early if: you have not started the plan at all or you are missing parts. Complete your parts with the free projects first; start Premium on the day you are ready to use it.
Checklist before upgrading to Premium
- Can you name at least 3 Premium projects you want to build? If not, run the Project Finder first.
- Have you checked the parts list of those projects, and are the parts in your hands or on the way? The parts list is open on a free account too.
- How many days a week will you use the app? For one or two short sessions a week on a single project, a monthly plan makes more sense; for regular, long-term work, a yearly plan does.
- Could a teacher or club advisor give you an educator code? If so, ask before buying an individual subscription; an account with an active subscription cannot redeem a code.
- Which store account will you pay with? The subscription is tied to your App Store or Google Play account, and cancelling and renewal are managed there.
- Have you checked which BlueGrays account you are signed in with? Premium is assigned to that account; buying with the wrong account causes confusion later.
- Have you read whether the price on the plan screen is monthly or yearly, and that it renews automatically?
- Even if you see a discount offer, base the decision on the first three items; if you do not need it, a discount is still money spent for nothing.
Monthly and yearly plans, renewal and cancelling
Individual Premium comes in two forms: a monthly and a yearly subscription. Both are paid through the store you buy from, the App Store on iPhone and iPad or Google Play on Android, and they renew automatically at the end of each period. When you want to cancel, you do it in the store's subscription settings, not inside the app; the Manage Subscription button on the Premium screen in your Profile takes you straight there. Cancelling does not stop Premium immediately: Premium stays on until the end of the period you paid for, then the account goes back to the free version. Deleting the app from your phone does not cancel the subscription; we especially want you to know that.
| Action | iPhone / iPad | Android |
|---|---|---|
| Cancelling the subscription | Settings > Apple ID > Subscriptions | Google Play > Payments & subscriptions > Subscriptions |
| Shortcut from the app | Profile > Premium > Manage Subscription | Profile > Premium > Manage Subscription |
| Seeing Premium on a new device | Sign in with the same BlueGrays account; use Restore Purchases if needed | Sign in with the same BlueGrays account; use Restore Purchases if needed |
| Switching between monthly and yearly | In the App Store subscription settings | In the Google Play subscription settings |
Individual Premium or an educator code?
The second way to get Premium is a code from an educator. If you are a student and your teacher, course instructor or club advisor uses BlueGrays, ask them first whether they can give you a code. An educator code looks like BG-XXXX-XXXX-XXXX; you enter it on the Profile > Redeem Code screen or tap the link your teacher shared, and 30 or 365 days of Premium are added to your account. You do not need to add a card, nothing renews automatically, and when the time is up the account simply goes back to the free version. When you redeem a code, your name, username, email and profile photo are shared with the educator who gave it; the educator sees which code was used by whom. You can find the step-by-step process and possible error messages in how to use an educator code.
| Individual Premium | Educator code | |
|---|---|---|
| Who pays? | The user (or their family), from their store account | The educator, from their own store account |
| Renewal | Monthly or yearly, renews automatically | One-off; ends after 30 or 365 days, does not renew |
| Is a card needed? | Yes, the store account needs a payment method | No, the student only enters the code |
| How does it start? | By choosing a plan on the Profile > Premium screen | Via Profile > Redeem Code or the shared link |
| What it unlocks | All Premium features | All Premium features, the same |
| Who can see it | Only you | The educator who gave the code sees your name, username and email |
| With an active subscription | Not applicable | An account with an active subscription cannot redeem a code |
If you are a teacher, it works the other way round: you can get individual Premium for your own account, or buy codes in bulk for your students on the Educator Packages screen. Right now there are monthly and yearly packages with 5, 10 or 50 codes. Packages are a one-off payment and do not renew; unused codes have no expiry date, and you see the status of each code on the My Codes screen. Monthly packages give you 1 transfer per code and yearly packages 6, so you can pass the remaining time of a student who leaves on to a new student. In the 10-code package the cost per student is about 20 percent lower than in the 5-code one. You can also redeem one of the codes on your own account. We explain how many packages to buy for your class size in the guide to Premium codes for a class.
What happens when Premium ends?
When your subscription ends or an educator code runs out, your account goes back to the free version; the account is not closed and your progress is not deleted. Your completed projects, quiz level, XP, badges and forum posts stay exactly as they are. The 60 free projects, 7 tools, the Code guide and the core of Daily questions keep working. Premium projects, Premium tools, Troubleshooting, Practice and the Parts section of the Workshop appear locked again; the parts you saved there are not deleted and are still there when you go Premium again. So you can switch Premium on and off for the periods you need it, for example a monthly subscription for two busy months over the summer holidays, cancelled afterwards.
In short: if you are new to Arduino, the free version of BlueGrays has enough in it to keep you busy for weeks; Premium starts to make sense once you are ready for a specific project, for more advanced work with the ESP32 and Pico, or for building projects regularly with the parts you own. If you like, open one of the free projects in the app today, start day one of the 2-week plan and make your decision two weeks from now based on your own experience.
Frequently asked questions
Is BlueGrays completely free?
Downloading and using the app is free. 60 projects (20 per platform) are fully open with circuit diagram, code and the Understand the code section; 7 electronics tools, Daily questions, the Code guide, the Forum and the Project Finder are free as well. The other projects, 11 tools, the Parts section of the Workshop, Troubleshooting and Practice are unlocked with Premium.
How do I cancel my BlueGrays Premium subscription?
On iPhone, cancel it in Settings > Apple ID > Subscriptions; on Android, in Google Play > Payments & subscriptions. The Profile > Premium > Manage Subscription button in the app takes you there too. After cancelling, Premium stays on until the end of the period you paid for. Deleting the app does not cancel the subscription.
Will I lose Premium if I change phones?
No. Premium is tied to your BlueGrays account, so signing in with the same account on the new phone is enough. If Premium does not show up, use Restore Purchases on the Premium screen.
Can I use Premium on more than one device with the same account?
Yes, Premium is active on every phone and tablet where you sign in with the same BlueGrays account. The account is personal: your quiz progress, level and Workshop belong to you, so it is best not to share your account with others.
Are my projects and progress deleted when Premium ends?
No. Your completed projects, level, XP, badges and forum posts remain, and the parts you saved in the Workshop stay in your account. Only the Premium sections appear locked again, and when you go Premium again you pick up where you left off.
Can I get Premium with a code from my teacher?
Yes. Enter the code starting with BG on the Profile > Redeem Code screen or tap the link your teacher shared; 30 or 365 days of Premium are added to your account, no card is needed and it does not renew. If you have an active store subscription, it has to end first.
Projects to build after reading this
See all projects
LED Blink
The very first hello of electronics: switching a single LED on and off. The Arduino turns the LED on and off at short intervals, so the light blinks quickly. You see in the simplest way how the board

Traffic Light
A tiny copy of the traffic light you see on the road every day. Red stays on for two seconds, yellow flashes for a moment, green stays on for two seconds, then it goes back to red through yellow again

LED Control with a Push Button (Push)
Just like a doorbell: the light stays on as long as you press, and goes off when you let go. The Arduino keeps listening to the button; while it's pressed the LED is on, and the moment you lift your f

Night Light with Ldr
A little night light that turns on by itself when it gets dark and goes off when morning comes. A light sensor measures how bright the room is, and the Arduino switches the LED on when it is dark enou

HC-SR04 Distance Measurement (Serial Display)
The HC-SR04 sensor works just like a bat finding its way in the dark: it sends out a sound you cannot hear, listens for the echo and measures how far away the object in front of it is. The Arduino wri

Temperature and Humidity with DHT11
How warm is your room, and is the air humid or dry? The DHT11 sensor measures temperature and humidity, and the Arduino writes the values on a two-line LCD screen, refreshing every couple of seconds.

LED Blink with ESP32
Teaches basic GPIO output usage with ESP32. We achieve a blinking effect by turning an LED on and off from a digital pin. ESP32 version of the classic blink project on Arduino UNO; the basic blink commands in the Arduino environment are the same, but the ESP32's pin layout and 3.3 V GPIO levels differ from those of the Arduino UNO.
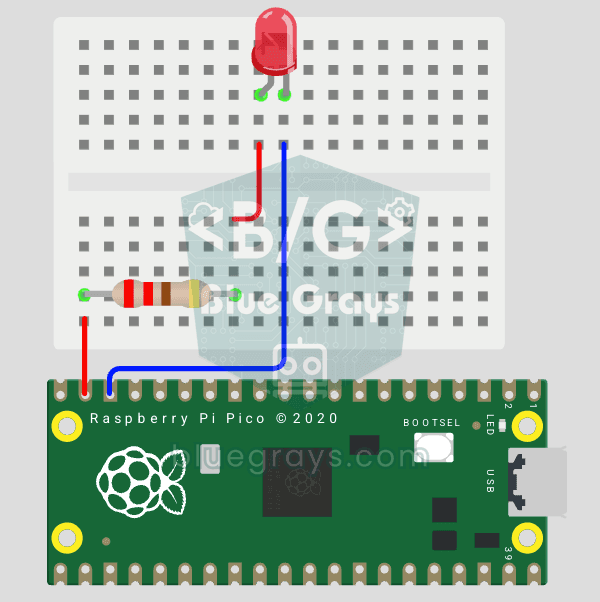
Raspberry Pi Pico: Controlling an External LED (Breadboard)
The next step after Pico’s built-in LED: connecting an external LED to the breadboard and controlling it via the GP14 pin. In this project, you’ll learn how to use any of the Pico’s general-purpose GPIO pins as an output, the LED’s polarity (long leg = anode/+, short leg = cathode/–), and why a current-limiting resistor (220Ω) is required. If you don’t include the resistor, excessive current will flow through the LED and it may burn out. The circuit is very simple: Pico GP14 → 220Ω resistor → LE