
Raspberry Pi Pico Lesson Plan: 6 Weeks of MicroPython in Class
Raspberry Pi Pico lesson plan: 6 weeks of 40-minute MicroPython lessons with free projects, Thonny setup, a materials list for 24 and a sample lesson.
If you are looking for a Raspberry Pi Pico lesson plan, here is the short answer: 6 weeks, one 40-minute lesson a week, pairs of students and a single new MicroPython concept each week. In week 1 students light the onboard LED with one line in Thonny's REPL; then come variables and timing, functions, buttons and conditions, sound and a distance sensor with PWM, and in the last week a five-button piano built with a list and a for loop. Every week's project is free in BlueGrays with its circuit diagram, parts list and code, so students don't need Premium. The plan uses the Raspberry Pi Pico or Pico W with Thonny and is written for middle and high school students who have never written code before.
First we look at why the Pico and MicroPython work so well in a classroom, then at preparing before the first lesson: the MicroPython UF2 file, the BOOTSEL button, choosing the interpreter in Thonny and what to watch out for on school computers. After that you get the week-by-week plan with the Arduino C++ equivalent of every concept, a materials list for a class of 24, a minute-by-minute sample lesson, three short code examples, an assessment table and fixes for the problems that come up most in class. We covered the 8-week version of this approach with Arduino and blocks in the block coding lesson plan; this plan doesn't repeat it and is meant for classes that want to start straight with text-based code or move on to Python after blocks.
Why the Raspberry Pi Pico and MicroPython?
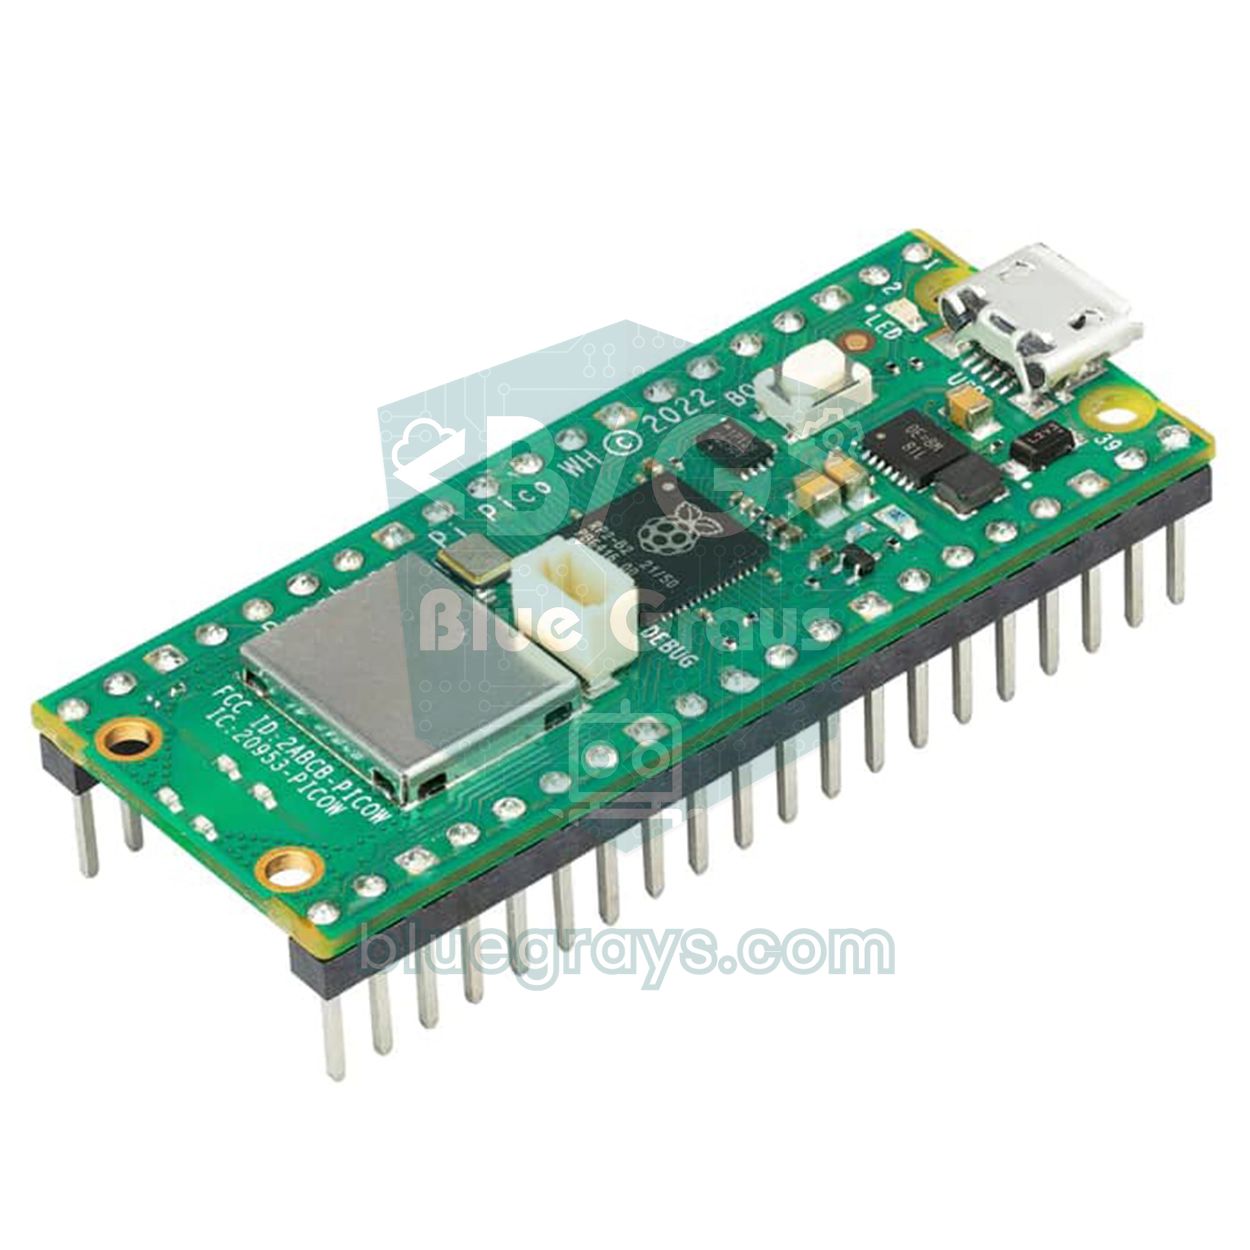
The Pico is a small microcontroller board built by Raspberry Pi around its own RP2040 chip. It isn't a computer; like an Arduino, it runs a single program over and over. It has three strengths in a classroom. The first is MicroPython, a slimmed-down version of Python for microcontrollers. It is easy to read and has no semicolons or curly braces, so students who have met Python in computing class use the same language to control an LED or a buzzer. The second is that there is no compiling: the moment you press Run in Thonny, the code runs on the board, and you don't wait for a compile and upload after every small change. In a 40-minute lesson that means far more attempts in the same time. The third is the REPL: type a single line into Thonny's Shell, press Enter, and the board carries it out right away. When a student types led.on() and the LED lights up, they understand within five minutes that programming means giving the board commands. The low price and the fact that the board plugs straight into a breadboard also make pairs realistic. When is the Arduino the easier choice? With younger students who have only just learned to read, or if most of your kit is 5 V modules, starting with the Arduino and blocks brings fewer surprises. For the board's specifications and pinout, see what the Raspberry Pi Pico is.
| Feature | Raspberry Pi Pico + MicroPython | Arduino Uno + C++ |
|---|---|---|
| Pin voltage | 3.3 V (not 5 V tolerant) | 5 V |
| Language and editor | MicroPython, Thonny | C++, Arduino IDE |
| Running code | Instantly when you press Run, no compiling | Compile and upload after every change |
| Line-by-line testing (REPL) | Yes: >>> in the Thonny Shell | No |
| Analog inputs | 3 pins (GP26–GP28), read_u16() 0–65535 | 6 pins (A0–A5), analogRead() 0–1023 |
| USB port | Micro USB | USB-B (Uno R3) |
| On a breadboard | Pico H / WH come with headers and plug straight in | Board sits outside, wired with jumpers |
| Price | Usually clearly cheaper than an Uno | More expensive |
Before the first lesson: MicroPython and Thonny
- Know your board: the Pico, Pico W, Pico 2 and Pico 2 W each need a different MicroPython file. Check the printing on the board and download the latest .uf2 file for exactly that board from the official MicroPython download page. With the wrong file the board won't start or Wi-Fi won't work.
- Plug in while holding BOOTSEL: hold down the white BOOTSEL button next to the USB port while you plug the cable into the computer, then let go. A drive called RPI-RP2 appears on the computer (on the Pico 2 it is called RP2350).
- Copy the UF2 file: drag the .uf2 file onto that drive. The board restarts within a few seconds and the drive disappears; that isn't an error, it means MicroPython is installed. MicroPython stays on the board, so you don't reinstall it every lesson.
- Choose the interpreter in Thonny: in Tools > Options > Interpreter, select "MicroPython (Raspberry Pi Pico)" and leave the port on automatic detection. You can make the same choice by clicking the bottom-right corner of the Thonny window.
- Test the connection: you should see the >>> prompt in the Shell at the bottom. Type print("hello") and press Enter; if you get a reply, the board is ready for class.
Don't leave the setup on school computers for the lesson itself; talk to your IT team a week in advance. Thonny runs on Windows, macOS and Linux and comes with its own Python, so there is no separate Python to install. There is also a portable version for Windows that needs no installation at all, which makes life much easier in locked-down labs where only IT can install software. Windows 10 and 11 recognise the Pico as a serial port (COM) without any extra driver. Some schools block USB drives; then the RPI-RP2 drive may not show up on student computers, but if you installed MicroPython on the boards beforehand on your own computer, it doesn't matter, because the lesson only uses the serial connection. Finally, show students the two options in Thonny's save dialog: "This computer" saves the file to the computer, "Raspberry Pi Pico" saves it to the board. Pairs who don't know which one they picked won't find their code in week 6.
The 6-week Raspberry Pi Pico lesson plan
Each lesson is planned for 40 minutes with pairs. Every project in the table is free in BlueGrays, and the projects of the first three weeks also have a block view next to the code. The order is deliberate: output (LED) first, then variables and timing, functions, then input and conditions, sound and a sensor with PWM, and finally lists and loops. Each week adds a single new idea on top of the previous one. The last column shows the same concept in Arduino C++, which builds a bridge for students who will move on to the Arduino later; for the C++ side in detail, see Arduino programming basics.
| Week | Goal | Free BlueGrays project | New MicroPython concept | Arduino C++ equivalent |
|---|---|---|---|---|
| 1 | Getting to know the Pico, first program, digital output | Raspberry Pi Pico Onboard LED Blink (Pico and Pico W), Raspberry Pi Pico: Controlling an External LED (GP14 + Breadboard) | REPL (>>>), from machine import Pin, Pin(14, Pin.OUT), led.on() / led.off(), time.sleep(0.5), while True:, indentation | pinMode(14, OUTPUT); digitalWrite(14, HIGH); delay(500); void loop() |
| 2 | Variables, timing, two outputs | Raspberry Pi Pico Alternating Two LEDs (Blink-Flip Pattern, GP14 + GP13), Raspberry Pi Pico Police Strobe Light Effect (Red + Blue, GP11 + GP12) | WAIT_MS = 300 (variable), led.value(1), led.toggle(), sleep_ms(300) | int waitMs = 300; digitalWrite(13, !digitalRead(13)); delay(waitMs); |
| 3 | Less repetition: functions | Raspberry Pi Pico Traffic Light Simulator (3 LEDs Sequential, GP11/GP12/GP13) | def all_off():, calling a function, decimal seconds with sleep(1.5) | void allOff() { … } ; delay(1500); |
| 4 | Input, conditions and state | Raspberry Pi Pico Traffic Light with 4-Mode Button Selector (State Machine, GP11-13 + GP4) | Pin(4, Pin.IN, Pin.PULL_UP), if / elif / else, mode = (mode + 1) % 4, time.ticks_ms() | pinMode(4, INPUT_PULLUP); if / else if / else; millis() |
| 5 | Sensor and sound | Raspberry Pi Pico Parking Sensor (HC-SR04 + 3 LEDs + Buzzer) | PWM(Pin(17)), freq(), duty_u16(), time_pulse_us(), def … return | tone(17, 1200); pulseIn(); return |
| 6 | Lists, for loops, final project | Raspberry Pi Pico Button Piano (5 Buttons + Buzzer + Melody Recorder) | NOTE_HZ = (523, 587, 659, 698, 784), for … in, five buttons with the same code | int notes[] = {523, 587, 659, 698, 784}; for (int i = 0; i < 5; i++) |
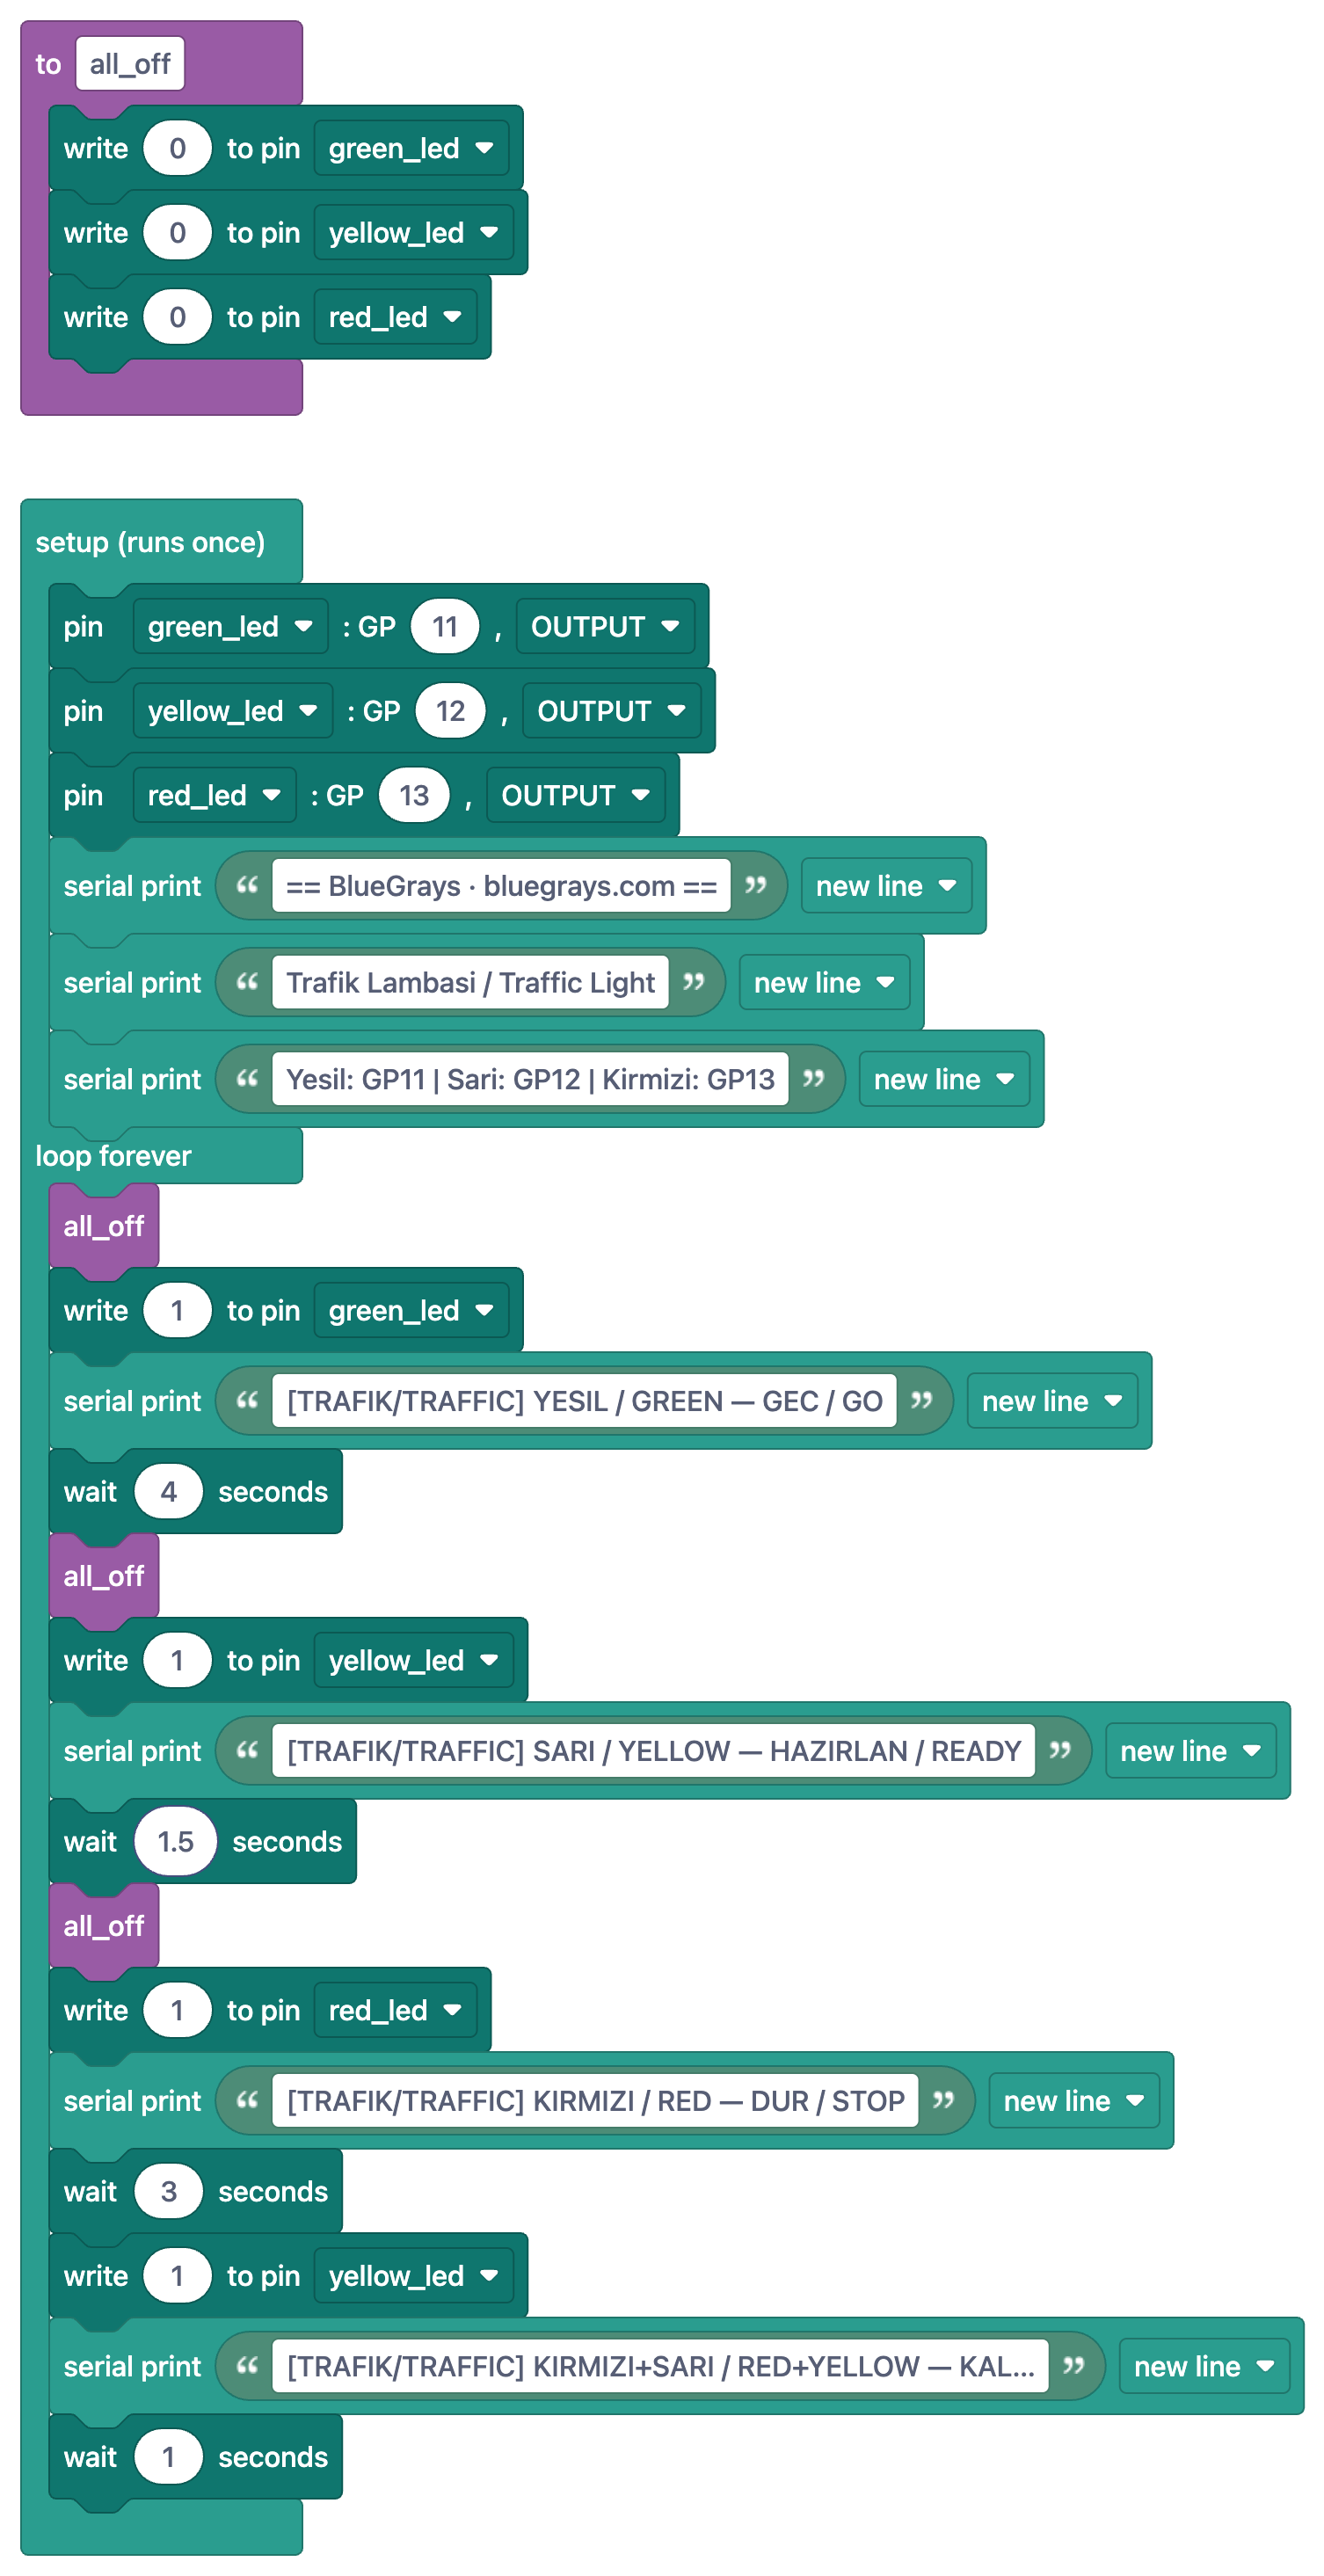
As you run the plan, make it a rule that students change a single value at the end of every week. In week 1, the onboard LED project calls the LED by the name "LED", so it works the same on the Pico and the Pico W; the external LED goes to GP14, which is physical pin 19, and pin 18 right next to it is GND. In week 2, dropping WAIT_MS in the Police Strobe Light Effect from 300 to 80 shows that one variable changes the rhythm of both LEDs at once. In week 3, the Traffic Light calls all_off() three times in the loop; ask students to delete the function and write the same thing by hand, and once they see nine lines pile up they'll tell you themselves why functions exist. Week 4 is an intermediate project: the button is wired with PULL_UP, so it reads 0 when pressed, and each press cycles the mode through normal, red only, flashing yellow and off. The code is long, so read it first with the steps in the Understand the code tab. In week 5, the HC-SR04 runs on 5 V, so don't forget to connect ECHO through the divider; playing with the GREEN_CM 100, YELLOW_CM 50, RED_CM 25 and STOP_CM 10 values gives students the idea of a threshold. You'll find how the sensor works in the HC-SR04 distance sensor post and how to make sound with PWM in what a buzzer is; use a passive buzzer, because the project changes the frequency. In week 6, the piano plays five notes from DO to SOL between 523 and 784 Hz, and holding the DO key for one second starts recording a melody. The full code is long for this level; instead of asking students to type it all, ask them to change the frequencies in the NOTE_HZ list and build their own scale.
Exit questions for every week
- Week 1: What happens if you swap the led.on() and time.sleep(0.5) lines? Why do the lines under while True: start further in?
- Week 2: How does the strobe change when you raise WAIT_MS from 300 to 1000? Which two lines does toggle() replace on its own?
- Week 3: How many more lines would you write without the all_off() function? What is the difference between defining a function and calling it?
- Week 4: Why does button.value() return 0 when you press a button that uses PULL_UP? If mode is 3 and you press the button, what is mode now?
- Week 5: Why don't we connect the HC-SR04's ECHO pin directly to the Pico? What does the duty_u16(0) line make the buzzer do?
- Week 6: Which lists in the code do you need to change to add a sixth key to the piano?
Materials list for a class of 24
Split 24 students into pairs and you get 12 groups; with one spare, prepare 13 sets. Because the Pico is cheap, pairs instead of groups of three are possible in most schools and every student gets more time at the keyboard; if you go with groups of three, cut the numbers down to 9 sets. Every group needs a computer, because Thonny talks to the Pico over USB. A phone or tablet is used to keep the week's project, its circuit diagram and the Understand the code tab open in BlueGrays. Nothing needs soldering; everything plugs into the breadboard.
| Item | Per group | For the class (12 groups + 1 spare) | Week used |
|---|---|---|---|
| Raspberry Pi Pico H or Pico WH (headers soldered) | 1 | 13 | All |
| Micro USB data cable | 1 | 13 | All |
| Breadboard (400 or 830 holes) | 1 | 13 | All |
| Male-to-male jumper wires | 20 | about 260 | All |
| 5 mm LEDs (red, yellow, green, blue) | 4 | about 60 | 1–5 |
| 220 Ω resistor | 4 | about 60 | 1–5 |
| Push button (4 legs) | 5 | about 70 | 4, 6 |
| Passive buzzer | 1 | 13 | 5, 6 |
| HC-SR04 ultrasonic distance sensor | 1 | 13 | 5 |
| 1 kΩ and 2 kΩ resistor (ECHO divider) | 1 + 1 | 13 + 13 | 5 |
| Computer with Thonny | 1 | 12 | All |
| 10 kΩ potentiometer (optional, for ADC) | 1 | 13 | Fast groups |
Sample lesson: week 1, the first program
The plan below is for week 1. The first lesson is the riskiest one, because this is where setup problems show up. We assume you installed MicroPython on the boards beforehand and that Thonny is installed on the computers. You can use the same skeleton in the other weeks: warm-up, reading together, prediction, circuit, running the code, changing one value and an exit question. If you have an 80-minute double lesson, stretch the "change one value" stage and let the pairs present their exit answers.
| Time | Stage | What happens |
|---|---|---|
| 0–5 min | Warm-up | Question: what do you need to tell a board to make it "turn on the LED"? Answers go on the board. Boards are handed out, and the BOOTSEL button and USB port are pointed out. |
| 5–12 min | First command in the REPL | Thonny Shell on the projector: from machine import Pin, led = Pin("LED", Pin.OUT), led.on(). Pairs type the same three lines on their own computer, then switch it off with led.off(). |
| 12–18 min | Reading the project together | Open the Onboard LED Blink project in BlueGrays. Read the blocks first with Show as blocks switched on, then the code; talk about while True and indentation. |
| 18–22 min | Running | Paste the code into Thonny and press Run (F5). The LED blinks every 0.5 seconds. Show the Stop button for stopping it. |
| 22–32 min | External LED circuit | Unplug USB. GP14 (pin 19) → 220 Ω → long leg of the LED, short leg → GND (pin 18). Run the code of the external LED project. Roles: builder and checker. |
| 32–37 min | Change one value | Change time.sleep(0.5) to 0.1, then to 2. Pairs who want to can move the LED to GP15 and change 14 to 15 in the code. |
| 37–40 min | Exit question | One question on paper: what would happen if the lines under while True: didn't start further in? Boards are unplugged and go back into their numbered boxes. |
Three short MicroPython examples for class
The onboard LED causes the most confusion between the Pico and the Pico W. On the classic Pico the LED is wired to GP25, which is why older examples use Pin(25). On the Pico W the LED is wired to the Wi-Fi chip and has no numbered GP pin, so Pin(25) won't light it there. The way that works on both is to call the LED by name: Pin("LED"). Current MicroPython releases define this name for the Pico, the Pico W and the Pico 2, which is why the onboard LED project in BlueGrays uses it. If your class has a mix of boards, you can hand out the same code to everyone. If an old firmware doesn't know the name "LED", the fix is to update the UF2 file.
1from machine import Pin
2import time
3
4# "LED" adı Pico, Pico W ve Pico 2'de karttaki LED'i bulur / The name "LED" finds the onboard LED on Pico, Pico W and Pico 2
5led = Pin("LED", Pin.OUT)
6# Eski firmware'li klasik Pico'da: Pin(25, Pin.OUT) / Classic Pico with old firmware: Pin(25, Pin.OUT)
7# Pico W'de Pin(25) LED'i yakmaz / On the Pico W, Pin(25) does not light the LED
8
9while True:
10    led.toggle()       # Durumu tersine çevir / Flip the state
11    time.sleep(0.5)    # 0,5 saniye bekle / Wait 0.5 seconds
12
The external LED code uses the same skeleton; only the pin number changes. Here we moved the wait time into a variable called WAIT, which becomes the first line students change in week 2. The count variable and the print() line write a number to Thonny's Shell every time the LED lights, so students can see on screen that the loop really is running. The 14 in the code is a GP number, not a physical pin number; that's the point students mix up most often.
1from machine import Pin
2import time
3
4LED_PIN = 14          # LED'in bağlı olduğu GP pini (fiziksel pin 19) / GP pin the LED is wired to (physical pin 19)
5WAIT = 0.5            # Bekleme süresi, saniye / Wait time in seconds
6
7led = Pin(LED_PIN, Pin.OUT)   # Pini çıkış yap / Make the pin an output
8count = 0                     # Kaç kez yandığını say / Count how many times it lit
9
10while True:
11    led.on()                  # LED'i yak / Turn the LED on
12    count = count + 1
13    print("LED", count)       # Thonny Shell'e yaz / Print to the Thonny Shell
14    time.sleep(WAIT)
15    led.off()                 # LED'i söndür / Turn the LED off
16    time.sleep(WAIT)
17
There are two ways to wire a button, and both are worth showing. With PULL_UP, one leg of the button goes to GP15 and the opposite leg to GND; a resistor inside the Pico pulls the pin up to 3.3 V, pressing the button connects the pin to GND and it reads 0. All the Pico button projects in BlueGrays use this approach because it needs no extra wire. With PULL_DOWN, the opposite leg goes to the 3V3(OUT) pin (pin 36) and the button reads 1 when pressed; the logic feels more natural, but it's easy to plug the wire into VBUS (pin 40, 5 V) by mistake. We explained which of the button's four legs are connected in the button wiring post. You can start week 4 with the short code below and then move on to the mode selector.
1from machine import Pin
2import time
3
4led = Pin(14, Pin.OUT)                  # GP14 -> 220 ohm -> LED -> GND / GP14 -> 220 ohm -> LED -> GND
5button = Pin(15, Pin.IN, Pin.PULL_UP)   # Buton GP15 ile GND arasında / Button between GP15 and GND
6# PULL_DOWN: Pin(15, Pin.IN, Pin.PULL_DOWN), buton GP15 ile 3V3(OUT) arasında / button between GP15 and 3V3(OUT)
7# PULL_DOWN ile koşul == 1 olur / With PULL_DOWN the condition becomes == 1
8
9while True:
10    if button.value() == 0:             # PULL_UP: basınca 0 okunur / PULL_UP: reads 0 when pressed
11        led.on()
12    else:
13        led.off()
14    time.sleep_ms(10)                   # Döngüyü biraz yavaşlat / Slow the loop down a little
15
How to use BlueGrays in a Pico lesson
- Code guide, MicroPython track: the Code guide in the Learn section offers an 18-card MicroPython track next to the Arduino C++ track: import, print, pin output, pin input (PULL_UP, PULL_DOWN), time.sleep, while True, indentation, variables, if / elif / else, for and range, lists, def and return, ADC, PWM, ticks_ms, Pin.irq, try / except and I2C. Each card has What does it do?, Syntax, an example with Blocks · Arduino · MicroPython tabs, Common mistake and a mini test. Suggest the cards for the week's concept for students to read between lessons; each student sees their own MicroPython x/18 progress on the My level screen.
- See it in projects: this link at the end of every card lists the projects whose code uses the command, from easy to hard. A student who has read about a command on a card goes from here to finding it in the code of a real project.
- Daily questions: the "Code language in questions" setting offers Both, Arduino and MicroPython. If you teach with the Pico, have students choose MicroPython; general questions without code come with every choice. There is a set of about 3 minutes every day, a 15-question placement test and 6 levels from A1 to C2, which makes a good daily review habit between lessons.
- Show as blocks: five of the free Pico projects (Onboard LED, External LED, Alternating Two LEDs, Traffic Light and Police Strobe) have a block view next to the code. Showing a student who sees Python for the first time the blocks first and then the code of the same program builds the idea "same logic, different spelling"; we covered this step in detail in moving from blocks to MicroPython. The blocks are for reading; they can't be edited in the app, and the MicroPython code is always what goes onto the board.
- Understand the code and Troubleshooting: every free Pico project has both. The Understand the code tab starts with a What does this code do? summary, continues with a Step by step walkthrough and ends with If you get stuck and a Try it yourself task. With the long code in weeks 4 and 6, it is your biggest helper for pairs who can't read quickly yet.
- Let's build it together and Copy Link: the guided mode goes through four steps and, at the code step, reminds students to choose the MicroPython interpreter in Thonny. Copy Link in the source code section gives a link for opening the code on a computer, so students don't have to retype the code from the phone into Thonny.
Assessment and differentiation
| Criterion | 1 – Beginning | 2 – Developing | 3 – Secure |
|---|---|---|---|
| Building circuits | Builds with help, forgets GND | Builds from the diagram, matches the GP number with the code | Tells physical pins and GP numbers apart, spots a classmate's mistake |
| Reading code | Reads the lines, can't explain what they do | Explains in general what the program does | Explains each line and what indentation means |
| Change and test | Changes a value, can't explain the effect | Predicts the result before trying | Finds the cause from the error message in the Shell when a prediction fails |
| Matching with C++ | Can't match | Matches Pin, sleep and while True | Also matches if, for and functions |
- Fast groups, analog reading: the plan has no ADC week; pairs who finish early connect the middle leg of a 10 kΩ potentiometer to GP26, read a value from 0 to 65535 with ADC(26).read_u16() and use it to set the speed of the week 2 strobe. For a bigger challenge, the free Raspberry Pi Pico LED Campfire (8x8 NeoPixel Matrix + Potentiometer + Buzzer) project drives an 8x8 NeoPixel matrix with the same potentiometer.
- Fast groups, combining: adding the week 4 button to the week 5 parking sensor to write a "silent mode" that switches the sound on and off is the first real step towards writing their own code.
- Slower groups: hand out the circuit ready-built, or put a large printed copy of the circuit diagram on the desk. Let them go step by step with the Understand the code tab and aim to change just one value that day; that is a worthwhile result on its own.
Common problems and quick fixes
| Problem | Likely cause | Fix |
|---|---|---|
| The computer doesn't see the Pico at all | Charge-only cable, loose connection, USB hub | Try a known data cable, plug the board directly into the computer, try another USB port. |
| The RPI-RP2 drive opens every time you plug in | No MicroPython on the board, or BOOTSEL is stuck | Copy the UF2 file to the drive; plug in again without pressing the button. |
| RPI-RP2 never appears | BOOTSEL was pressed after plugging in | Unplug, hold BOOTSEL while plugging back in, then let go. |
| Thonny can't connect, "Device is busy" or a port error | Wrong interpreter or port, port open in another program, running code is busy | Pick "MicroPython (Raspberry Pi Pico)" in the bottom-right corner, press Stop/Restart, close a second Thonny window, unplug and replug USB. |
| No module named 'machine' | The code is running in the computer's Python | Set the interpreter to MicroPython (Raspberry Pi Pico). |
| IndentationError or SyntaxError | Mixed indentation, missing colon | Go to the line number in the error; while, if and def lines need a colon at the end and 4 spaces on the lines below. |
| The code runs but the LED stays dark | LED reversed, no GND, GP number in code differs from the circuit, Pin(25) on a Pico W | Long leg towards the resistor (GP side), check the GND wire, use Pin("LED") for the onboard LED. |
| The code stops working when unplugged from the computer | File saved to the computer, or not named main.py | In Thonny choose save > Raspberry Pi Pico and name it main.py; the code starts by itself whenever the board gets power. |
| main.py runs an endless loop and Thonny can't get in | The code starts immediately at boot | Press Stop a few times or Ctrl+C in the Shell; if that fails, wipe the flash with the official flash_nuke.uf2 and reinstall MicroPython (all files on the board are deleted). |
Pre-lesson checklist
- MicroPython is installed on every board, and boards and cables are numbered 1 to 13.
- Thonny opens on every computer with "MicroPython (Raspberry Pi Pico)" selected as the interpreter.
- Every board and cable pair has been tested and shows >>> in the Shell.
- Resistors are in separate boxes by value: 220 Ω, 1 kΩ, 2 kΩ.
- The week's project is open in BlueGrays on the projector; Show as blocks is ready for the first three weeks.
- Exit question slips are printed and the roles (builder, checker) have been given to the pairs.
- Before week 5, the HC-SR04 divider resistors have been set aside for every group.
- At the end of the lesson, USB cables are unplugged and parts are counted back into the numbered boxes.
You can open every project you'll use over these six weeks in the BlueGrays app for free, with the circuit diagram, parts list, MicroPython code and the Understand the code tab, which makes it easy to run the lesson from the projector while students follow along on their own phones. If after six weeks you want to move on to Premium Pico projects with PWM LED brightness, servos, an OLED screen or a keypad, you can hand out educator codes instead of individual subscriptions; they are a one-time purchase and don't renew automatically.
Frequently asked questions
How do you teach with the Raspberry Pi Pico?
Put a single new concept into each lesson and order them as output, variables, functions, input and conditions, PWM and sensors, then lists and loops. Let every lesson follow the same skeleton: warm-up, reading together, prediction, circuit, running the code, changing one value and an exit question. The 6-week plan in this post is built that way, using free projects.
How do I install MicroPython on a Raspberry Pi Pico?
Hold the BOOTSEL button while you plug the Pico into the computer over USB; a drive called RPI-RP2 appears. Copy the MicroPython .uf2 file for your board onto that drive and the board restarts. You can also install it with the "Install or update MicroPython" option in Thonny's interpreter settings.
Thonny doesn't see my Raspberry Pi Pico. What should I do?
First make sure you are using a USB cable that carries data, because the computer can't see the board through a charge-only cable. Then set the interpreter in Thonny to "MicroPython (Raspberry Pi Pico)" and press Stop/Restart. If the RPI-RP2 drive opens every time you plug in, the board has no MicroPython yet, so install the UF2 file.
Raspberry Pi Pico or Arduino for school?
Both are good starting points; the choice depends on the language and the students. If you teach Python or want quick experiments without waiting for a compile, the Pico with MicroPython is comfortable. With younger students, if you want to start with blocks, or if your kit is made of 5 V modules, the Arduino brings fewer surprises.
How do I run code on the Pico without a computer?
In Thonny, save the code to the board with the "Raspberry Pi Pico" option and name it main.py. The Pico runs main.py by itself every time it gets power, so a USB charger or power bank is enough. To stop the code, connect the board to Thonny again and press Stop.
Is there a difference between the Pico and the Pico W in class?
Every project in this plan works on both with the same pins; the only difference is the onboard LED. On the classic Pico it is wired to GP25, on the Pico W to the Wi-Fi chip, so use Pin("LED"), which works on both. The Pico W also has Wi-Fi and Bluetooth, but you won't need them in the first six weeks.
Projects to build after reading this
See all projects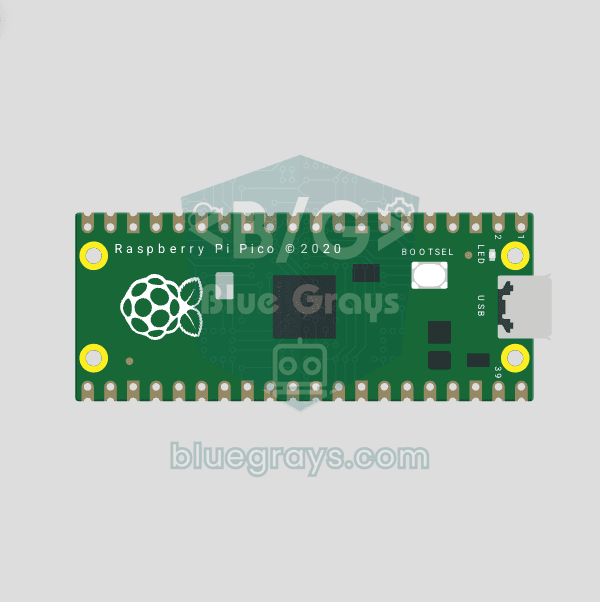
Raspberry Pi Pico Onboard LED Blink (Pico and Pico W)
The opening project of the Raspberry Pi Pico series! We blink the green onboard LED to verify the board works — a classic "Hello World" first experiment. NO external components, just Pico and USB cable. Code is written in MicroPython (the official language backed by Raspberry Pi Foundation). Learn machine.Pin class, Pin.OUT mode, led.on()/off() methods, and time.sleep() in Thonny IDE. Follow every toggle live in the Serial (REPL) output. Also perfect to verify
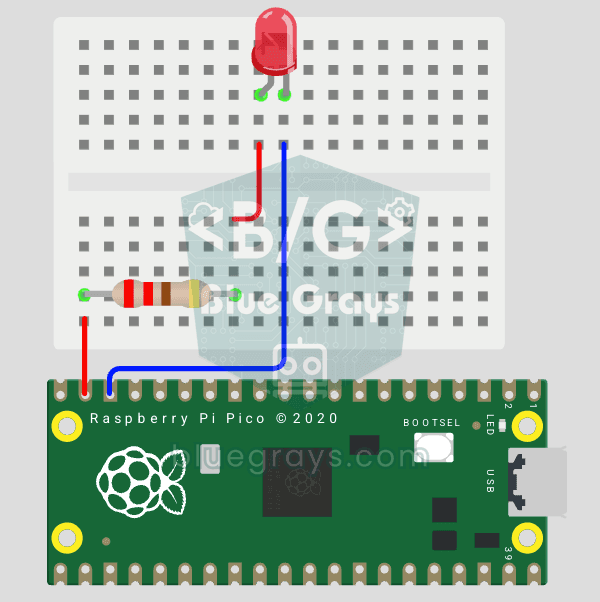
Raspberry Pi Pico: Controlling an External LED (Breadboard)
The next step after Pico’s built-in LED: connecting an external LED to the breadboard and controlling it via the GP14 pin. In this project, you’ll learn how to use any of the Pico’s general-purpose GPIO pins as an output, the LED’s polarity (long leg = anode/+, short leg = cathode/–), and why a current-limiting resistor (220Ω) is required. If you don’t include the resistor, excessive current will flow through the LED and it may burn out. The circuit is very simple: Pico GP14 → 220Ω resistor → LE
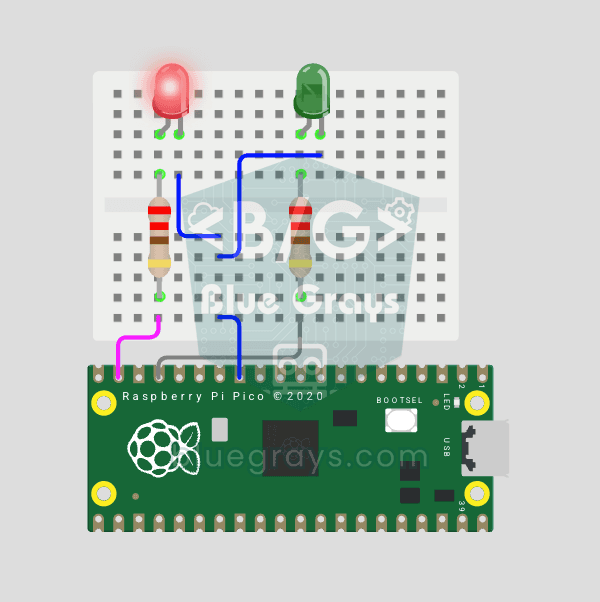
Raspberry Pi Pico Alternating Two LEDs (Blink-Flip Pattern)
The next step after single LED on Pico: two LEDs blink alternately in a classic flip-flop pattern. When one turns off, the other lights up — the most basic example of multi-GPIO coordination. In this project two different color LEDs (red on GP14, green on GP13) swap states every 500ms. MicroPython's Pin.toggle() method makes the code short and clear. The same core logic is the foundation of traffic lights, police strobes, chasing LEDs and all multi-LED animations. Very simple circuit: 220Ω res
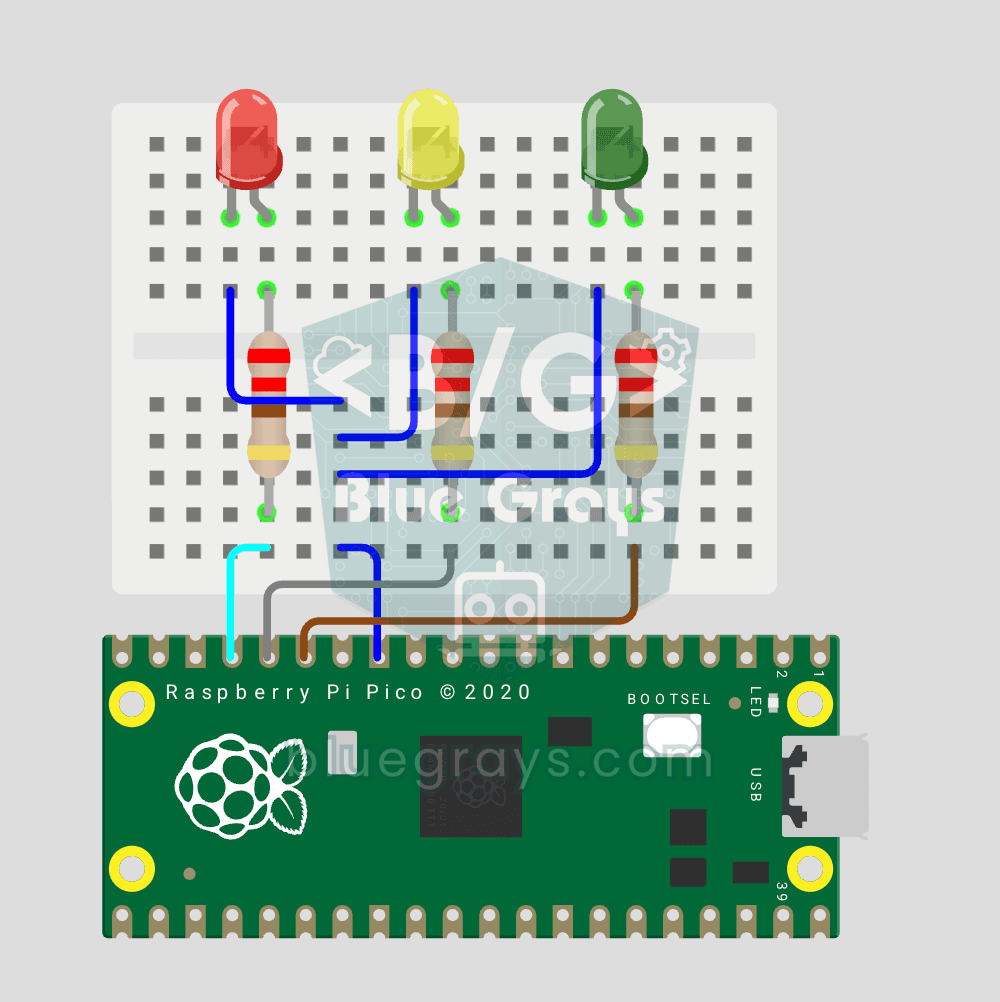
Raspberry Pi Pico Traffic Light Simulator (3 LEDs Sequential)
We simulate a real traffic light with red, yellow and green LEDs — the first 3-LED project of the Pico series! Green 4 sec "go", yellow 1.5 sec "ready", red 3 sec "stop" and red+yellow 1 sec "starting" (European traffic light pattern). Learn function definition (def all_off()), state machine logic (sequence) and multi-GPIO synchronization. Very simple circuit: 3 LEDs on GP11 (Green), GP12 (Yellow), GP13 (Red), each with a 220Ω current-limiting resistor. GP11-GP12-GP13 are ad
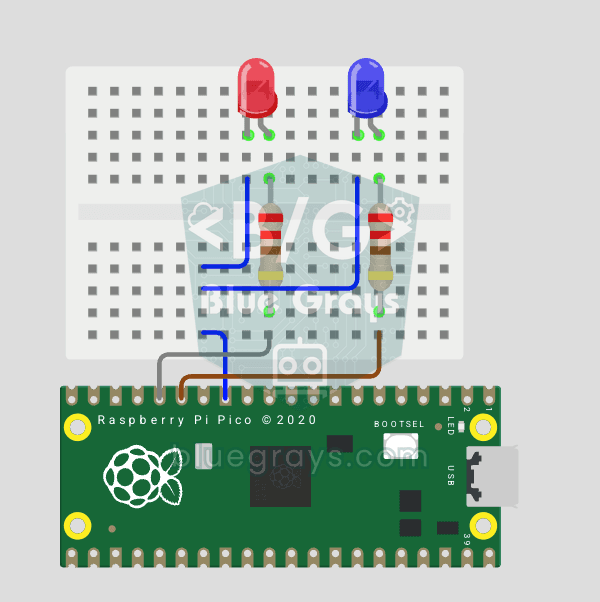
Raspberry Pi Pico Police Strobe Light Effect (Red + Blue)
We simulate a police car's light bar with a Raspberry Pi Pico in its simplest form! The red and blue LEDs take turns (flip-flop): while red is on, blue is off, and they swap every 0.3 seconds, forever. The code writes the two steps directly in a single while True loop; the speed is set with the WAIT_MS constant.
Raspberry Pi Pico Traffic Light with 4-Mode Button Selector (State Machine)
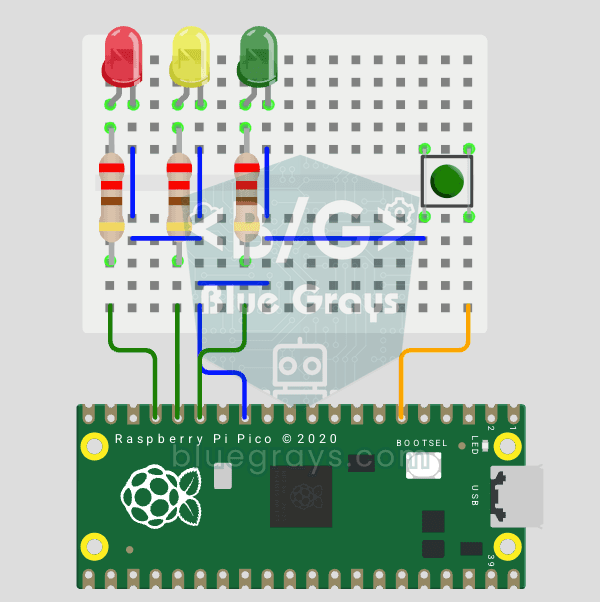
4 different traffic light modes with just 1 button! The mode changes with each press of the button: Normal cycle (red → yellow → green in sequence), Red Only (stop signal), Yellow Flash (caution/night mode), Off (maintenance). Concepts: state machine (the mode variable determines which behavior runs), modulo mode cycling ((mode + 1) % 4 → 0→1→2→3→0 infinite loop), non-blocking timing (LED phases are timed with time.ticks_ms() + time.ticks_diff(); however, the
Raspberry Pi Pico Button Controlled LED (Push)
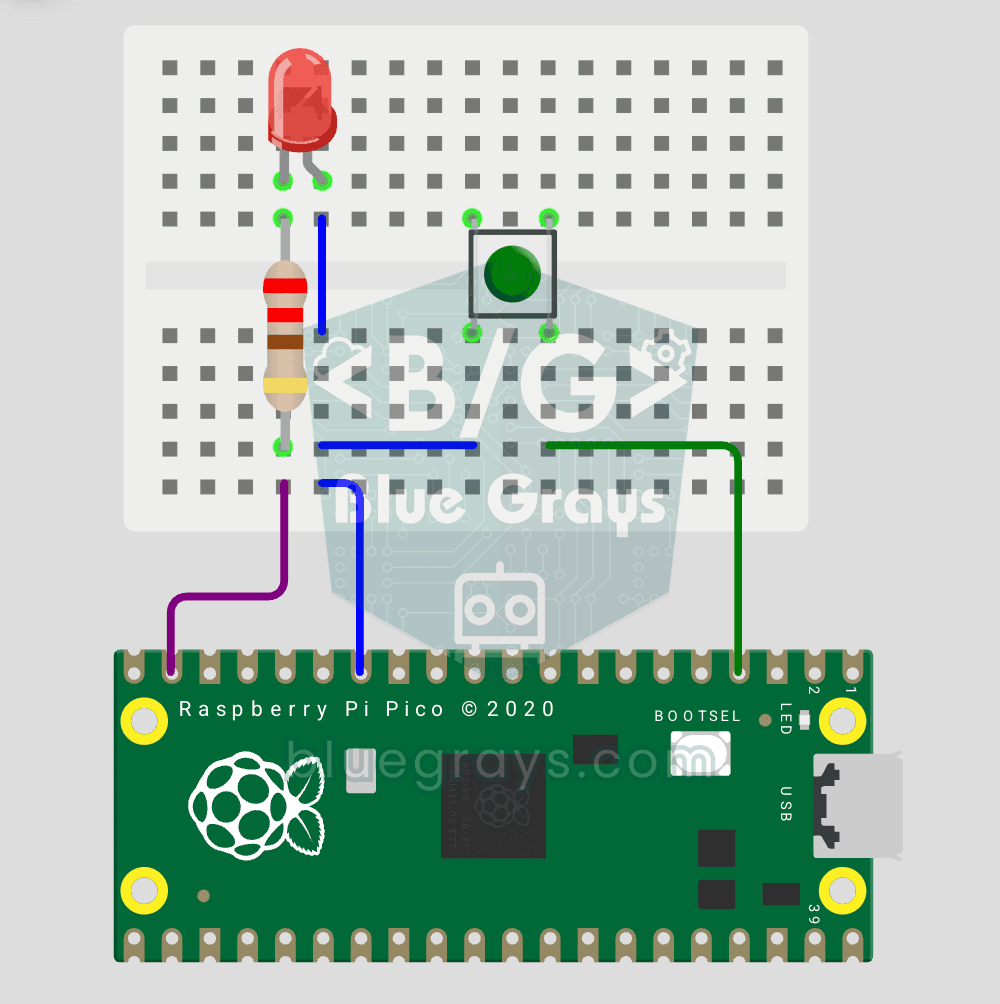
First input project with Pico — button read! LED lights while button is pressed, off when released. This is the big step after LED animations: signal input from the world to Pico. Learn Pin.IN (input mode), Pin.PULL_UP (internal pull-up resistor — standard for buttons), button.value() reading. GP14 LED, GP2 button (internal PULL_UP). Pressed = LOW (0), released = HIGH (1) — reverse logic seems confusing at first but is industry standard.
Raspberry Pi Pico PWM LED Fade (Breathing Effect)
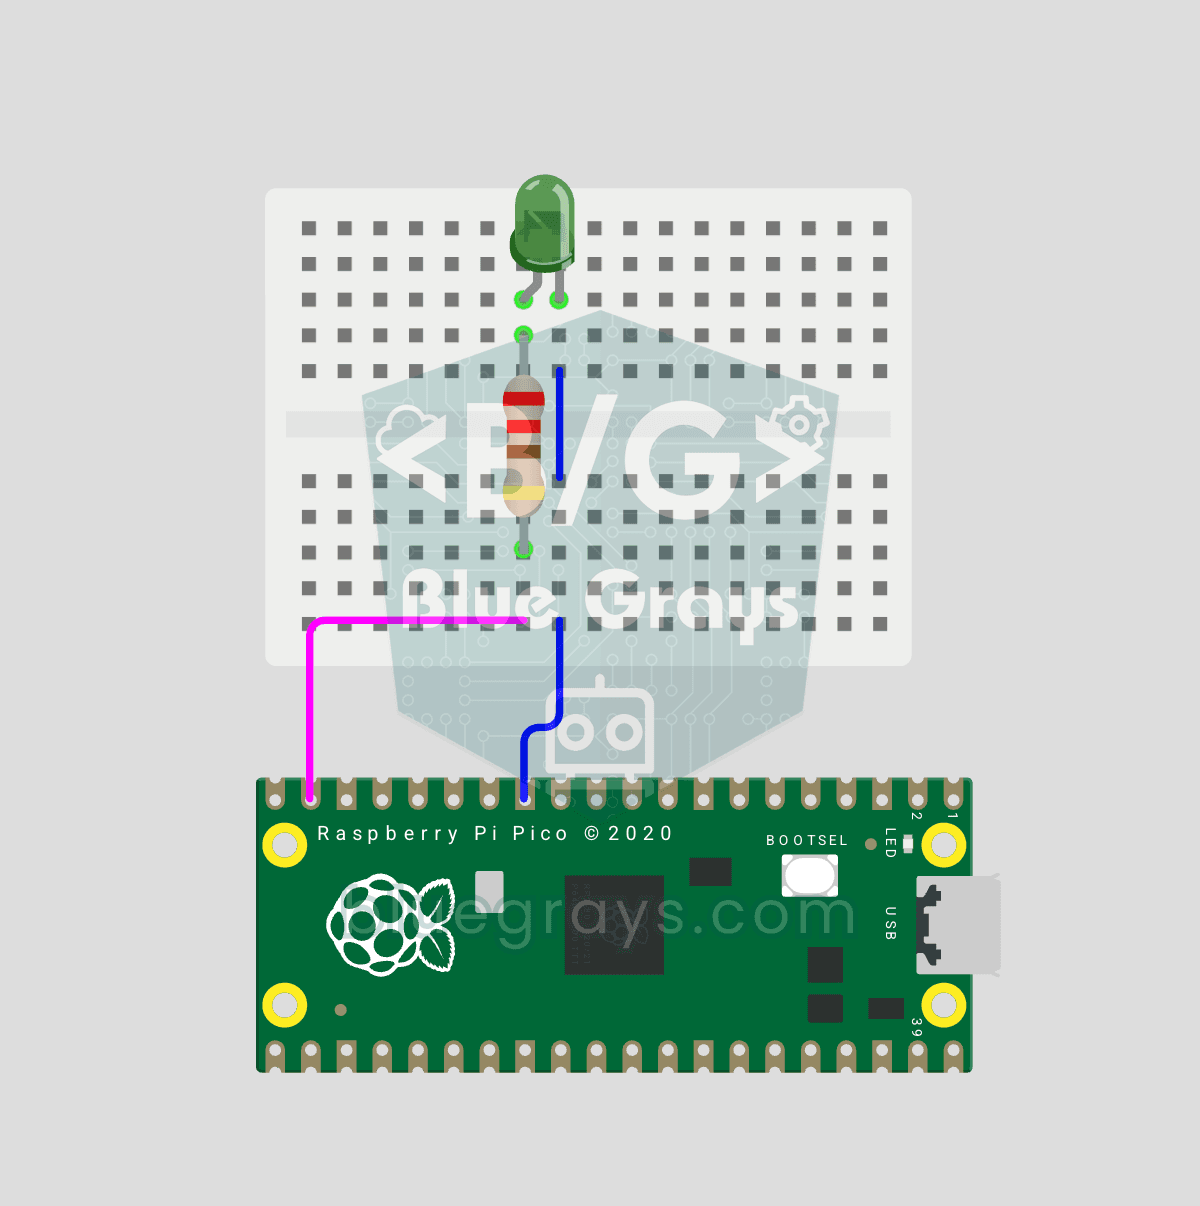
The LED no longer just blinks — it breathes! Using the Raspberry Pi Pico's PWM (Pulse Width Modulation), the LED brightness slowly rises and then slowly falls, like a sleeping MacBook's light. Learn the machine.PWM class, duty_u16() (16-bit brightness 0–65535), PWM frequency (freq(1000) — 1000 on/off cycles per second, no visible flicker), range() step loops (up and down) and analog-like output from a digital pin. PWM is a core embedded tool — RGB color mixing, motor