
How to Start an Arduino Class: A Starter Plan for Private Tutors
How to start an Arduino class: choosing a format, intake questions, an 8-week C++ syllabus, a kit list, what the course fee covers and a 12-point checklist.
How to start an Arduino class on solid ground: describe your audience in one sentence (for example "high school students and adults who have never written code"), run your first course as a small group of 4–6 people, start with an 8-week core syllabus of one 2-hour session a week, and give every student their own Arduino Uno kit. Build the syllabus on C++ projects that move from LEDs to buttons, sensors, sound, displays and servos, and let everyone present their own final project in the last week. Plan the course fee as a set of items rather than a single number: your time, the kit or a share of kit use, the venue, one BlueGrays Premium code per student and a small reserve. When you can tell students "the fee includes the kit and BlueGrays Premium" (2 monthly codes or 1 yearly code for an 8-week course), the first lesson gets easier and students have a way to keep going at home once the course ends.
This post is a starter plan for anyone who gives private lessons or wants to open their own small class: in a spare room at home, in a rented workshop or in a community centre hall. We covered a block-based programme for younger learners in the 8-week robotics coding plan and an intensive one-week format in the 5-day workshop programme. The syllabus here is different: C++ focused, for high school students and adults, meeting once a week. All examples are hypothetical; you will need to adjust the numbers to your city, your students and your budget. We do not give legal advice on registration, tax or permits for teaching; check the rules where you live.

Choose the format first: one-to-one, small group, larger group or online
The format decides everything else about the course: how many kits you buy, which venue is big enough, how many Premium codes you need and how tiring each session will be. If this is your first class, compare the four options with the table below. The "Suitable pack" column is based on the monthly and yearly packs of 5 and 10 codes on the Educator Packages screen in the app; we worked out in detail how monthly codes stack for an 8-week course and when a yearly code makes sense in the monthly or yearly post.
| Format | Advantage | Watch out | Suitable pack |
|---|---|---|---|
| One-to-one private lesson | The pace fits the student completely; you can steer towards their own target project from the first lesson. | The hourly fee per person is high; with a single student the weekly schedule changes often. | One code from a 5-code pack (two monthly codes or one yearly code for 8 weeks); the remaining codes stay for future students. |
| Small group of 4–6 | Everyone works on their own kit and you can check every circuit; the most balanced option for a first course. | Speed differences open up between students; have extra tasks ready for those who move ahead. | With yearly codes, one 5-code pack for up to 5 people and one 10-code pack for 6; with monthly codes count 2 codes per student. |
| Group of 10–16 | The fee per person drops and the venue is used more efficiently. | Kits are shared in pairs; keeping up alone gets harder, so structure and roles are a must. | With yearly codes, 2 × 10-code packs for 16 people; with monthly codes the number of codes doubles. In the 10-code pack the cost per student is about 20% lower than in the 5-code pack. |
| Online lessons | No venue needed and you can take students from other cities. | Students get their own kit; a wrong connection is hard to spot on camera. | A 5- or 10-code pack depending on the number of students; you send each code by message, with its link, before the lesson. |
Audience and level: 5 questions for the intake chat
A course succeeds largely by putting the right student in the right group. Put an adult who has never seen code next to a high school student with two years in a school robotics club and one gets bored while the other gets lost. So before enrolment, have a short 10-minute intake chat with every candidate, on the phone or in person. These five questions show both the level and the practical problems you would otherwise meet in the first lesson:
- What do you want to be able to do by the end of this course? (A hobby, a school project, preparation for work or a specific project they have in mind.)
- Have you written code before? None, block coding, another language or a bit of Arduino.
- Do you have an Arduino board or a kit? If so, which board and which parts?
- Can you bring your own laptop to class and install software on it?
- Do you have BlueGrays on your phone, and do you have an active Premium subscription through the App Store or Google Play? (An account with an active store subscription cannot redeem an educator code; you need to know this in advance.)
Spoken answers do not always show the real level; someone who says "I know a bit of Arduino" may have blinked an LED or may have finished a project with an LCD. For a quick and neutral measure, ask the candidate to take the 15-question Placement test in the Daily questions section of the app and tell you which level it started them at. For someone with no experience, the third question of the Project Finder ("How much experience do you have?") is also a good conversation starter: the answer "This will be my first project", "I've built a few projects" or "I'm comfortable, challenge me" is a natural way into which group they should join. We explained how the placement test works in the daily questions post and the Project Finder in the project picking guide.
| Placement test result | Suggested placement |
|---|---|
| A1 First Light | The 8-week core course, starting in week 1. |
| A2 Circuit Builder | The core course, sped up with extra tasks in the first two weeks. |
| B1 Sensor Explorer | Weeks 5–8 of the core course or one-to-one project lessons. |
| B2 Project Maker and above | One-to-one lessons focused on their own project, or an advanced module (ESP32, Wi-Fi) instead of a group course. |
A sample 8-week course syllabus: C++ from LEDs to a final project
The syllabus assumes one 2-hour (120-minute) session a week. Every session follows the same frame: 15 minutes reviewing last week and the homework, 25 minutes on a new concept (with short code snippets on the board), 65 minutes on the hands-on project and 15 minutes of wrap-up (everyone shows their working circuit and explains one bug and its fix). All projects are ready in BlueGrays with a circuit diagram, parts list and source code; students only need to open the page before class and check the Required Components list. The "Access" column shows whether a project is free or Premium.
| Week | Topic and C++ concepts | Projects in the app | Access | Outcome of the week |
|---|---|---|---|---|
| 1 | Setup, setup() and loop(), pinMode(), digitalWrite(), delay() | LED Blink, Traffic Light | Free | A traffic light with timings the student chooses |
| 2 | Variables, for loops, arrays (putting pin numbers in an array) | LED Chaser, Knight Rider LED Effect | Free | 6 LEDs driven by a single array |
| 3 | digitalRead(), if/else, the job of the 10k resistor, state variables | LED Control with a Push Button (Push), Toggle an LED with a Button (On/Off) | Free | An LED toggled on and off with a button |
| 4 | analogRead(), Serial Monitor, thresholds, turning a reading into a delay | Measuring Light Intensity with an LDR, Night Light with Ldr, LED Chaser with Adjustable Speed | Free | A night light with its threshold tuned to the student's own room |
| 5 | tone() and noTone(), a note table with #define, writing your own function | Using a Buzzer, Frequency Setting with Buzzer, Simple Piano with Buzzer and Button | Free + Premium (piano) | A short melody played by a function the student wrote |
| 6 | Measuring time with pulseIn(), installing a library, decimal numbers | HC-SR04 Distance Measurement (Serial Display), Temperature and Humidity with DHT11, Parking Sensor with HC-SR04 | Free + Premium (parking sensor) | A warning that speeds up as the distance shrinks |
| 7 | I2C communication, writing to an LCD, the Servo library | Using LCD Screen with I2C, Using a Servo Motor, Servo Motor Operation with Potentiometer | Premium | A servo controlled with a potentiometer |
| 8 | Final project: plan, build, debug, present | Arduino Touchless Trash Can (HC-SR04 + SG90 Servo + LED), Arduino Memory Game (4 LEDs + 4 Buttons + Buzzer), Arduino Mini Radar (Servo + HC-SR04 + OLED Display) | Premium | A working project and a 3-minute presentation |
Look closely at the table and you will see that the first four weeks run entirely on free projects; that is deliberate. Free projects have the circuit diagram, code, blocks and the Understand the code section open, so students make progress in the early weeks without paying anything. What Premium adds starts in the second half: the piano, parking sensor, LCD, servo and final projects of weeks 5–8 are Premium, and even on free projects the Troubleshooting section opens with Premium. Most of the 200+ projects students can explore outside class, the 11 Premium electronics tools and the Workshop also come with Premium. So one Premium code per student shows its value not from day one but in the second half of the course and after it.
Materials: should the kit stay with the student or in your workshop?
This is the decision that confuses people most when opening a class. There are two routes: students buy the kit at the start and keep it, or the kits stay in your workshop and are handed out and collected every session. A mix also works: the board and larger parts stay in the workshop while students buy a small box of parts. Your choice depends on how the course fee will look and whether students will work at home.
| Method | Advantage | Watch out | Who is it for? |
|---|---|---|---|
| Kit stays with the student | Students build circuits at home too; homework really happens and continuing after the course is easier. | The course fee rises noticeably; if kits differ, everyone hunts for different parts in class. | Adults and high school students, groups keen to work at home |
| Kit stays in the workshop | The fee drops, kits are identical and you control missing parts. | Time to hand out and count every session; you need to budget for wear and losses. | Short courses, trial groups, community centres |
| Mixed | Boards and modules stay in the workshop; students take a box of LEDs, resistors, buttons and jumpers. | Only the early weeks' projects can be done at home. | Price-sensitive groups where you still want to set homework |
- Arduino Uno and USB cable (1)
- Breadboard (full size) and at least 30 male-to-male jumper wires
- LEDs: 6 (at least red, yellow, green); resistors: 6 × 330 Ω, 4 × 220 Ω, 8 × 10 kΩ
- 8 push buttons, 1 potentiometer, 1 LDR, 1 buzzer
- Sensors and modules: HC-SR04 distance sensor, DHT11, 2x16 LCD with I2C module, SG90 servo
- Extra parts for the final project depending on the student's choice (such as an OLED display or a second sensor)
The list above is compiled from the parts lists of the projects in the 8-week syllabus and is one kit per student. Next to it, keep a spares box in your workshop: a few LEDs, a few resistors of each value, a few buttons, 10 jumpers, 1 spare USB cable and 1 spare board. A student waiting 20 minutes because of a burnt LED or a broken wire spoils the mood of a course more than anything else. When sorting resistor values you can use the free Color code and LED resistor tools in the app together with your students. For a more detailed shopping list when choosing kit contents, see the starter kit post.
What the course fee covers: structure, not numbers
We do not quote prices here; they vary a lot from country to country and you set the value of your own time. But splitting the fee into items does two things: you see what you forgot, and you can give students a clear answer to "what does this fee include?". Fill in every row of the table below with your own figures.
| Item | How to calculate it | Note |
|---|---|---|
| Your time as the tutor | Lesson hours × number of weeks + preparation hours + answering questions outside class | Do not forget preparation: in your first 8-week course you need to build every project yourself beforehand. |
| Kit or share of kit use | If students keep the kit, the kit price; if it stays in the workshop, kit price ÷ number of courses the kit will last | Add a small share for consumables like burnt LEDs and broken jumpers. |
| Venue | Rent or hall fee ÷ number of students | Even if you teach at home, the table, sockets and lighting are a cost. |
| Educator code (BlueGrays Premium) | Pack price ÷ codes in the pack × codes per student | The current price shows in the app under Profile > Educator Packages, for your country. In the 10-code pack the cost per student is about 20% lower than in the 5-code pack. |
| Spare code | 1 code for the group or the codes left over in the pack | Unused codes have no expiry date; an unused spare carries over to your next course. |
| Legal and admin costs | According to the rules where you live | Check local rules on registration, tax and insurance; this post does not give advice. |
Let's build a concrete example. Say you are opening an 8-week course with a group of 6. Eight weeks is 56 days; a monthly code gives 30 days of Premium, so each student needs two monthly codes, and the second code redeemed on the same account is added on top of the first. That means you need 12 monthly codes: one 10-code and one 5-code monthly pack (3 codes left over as spares). If you want students to continue at home after the course, the other option is to give each student one yearly code from a 10-code yearly pack; 6 codes are used and 4 remain for your next course. Whichever you choose, work out the code cost per student from the pack price and put it as a separate line in your fee table.
Why "BlueGrays Premium included in the course fee" works
- Students do not add a card. A student who gets Premium through a code does not need to link a payment method to their Apple or Google account; for high school students and their parents this is a real relief.
- No renewals to worry about. Educator packs are a one-time purchase; nobody is surprised by a forgotten subscription after the course ends.
- Everyone starts from the same place in the first lesson. The codes activate the same day for everyone, so nobody says "this project is locked for me".
- You see who used which code. On the My Codes screen you see each code's status (Unused, Active, Expired) and the name, username and email of the person who redeemed it.
- A student who drops out does not mean a bigger loss. Monthly packs come with 1 transfer per code and yearly packs with 6; the remaining time moves to another student with a new code.
- The road does not end with the course. With a yearly code, students keep going with projects, tools and the Workshop for months after the course, which stretches the impact of your class.
Say it clearly in your sign-up text: "The fee includes the kit you will use for 8 weeks and 2 months of BlueGrays Premium" or "… 1 year of BlueGrays Premium". When students know what they are paying for, nobody asks "what was that?" after the course. You can find how the packs work in general in the post on bulk codes for a class.
The first lesson and handing out codes
- A week before the course, buy your pack in the app from Profile > Educator Packages. Payment goes through the App Store or Google Play from your account; the codes appear on the My Codes screen.
- In your sign-up message, ask students to download the app, create an account and tell you if they have an active store subscription.
- In the first 10 minutes of the first lesson, share each student's own code with them in a personal message. Tapping the shared link opens the Redeem Code screen in the app with the code filled in; the student just taps Redeem Code.
- When a student redeems a code, their name, username, email and profile photo become visible to you. Tell students this clearly before you hand out the codes.
- Check on My Codes that every code is Active and who has it, then everyone opens the LED Blink project and builds their first circuit.
Stand out with your own projects
The ready-made projects are the backbone of the course; what sets you apart from other tutors are the projects you design yourself. In BlueGrays you can share your own project as a post in the Tutorial category through Learn > Forum > New Post: up to 5 images (project and circuit photos), a description, your Arduino code via Add code and related ready-made projects or components. The post goes live without review, in the language you are using the app in at that moment; it is not translated into other languages automatically. We walked through preparing the post step by step in the post on teaching with your own project.
For someone running a class, the real value is that this works like a portfolio. With the Share icon on the post you can send its link to your students, and even to candidates thinking about signing up; the ready-made projects you use in the course go out the same way with Share on the project page. Showing one in the intake chat with "this is one of the final projects we will build in this course" is more convincing than any flyer. Plan for two things: forum posts are public (they are not a private class area) and they do not appear in the project list or its filters, so keep the links to your own posts in one place. Reading the post is free, but students need Premium to see the full ready-made Premium projects you attach to it; the code you include in the course fee solves exactly that.
Outside class: how do students fill the week?
- Homework of the week: a sibling of the project done in class. After week 1, LED Police Lights; after week 2, Knight Rider LED Effect with Adjustable Speed; both are free and are built with small additions to the circuit from class.
- Daily questions: a set of 5 questions every day that takes about 3 minutes. It matches the student's level, and wrong answers come back in the My mistakes section. Details in the daily questions post.
- Code guide: 18 Arduino C++ cards; ask students to read the card that matches the week's concept (for example the for loop or analogRead). We described the cards in the code guide post.
- New projects with the parts at hand: a student with Premium who enters the parts of their kit in the Workshop sees the projects they can build with exactly those parts. How it works is in the Workshop guide.
- Order when stuck: first the project's Understand the code and Troubleshooting sections, then a classmate, and you last. This order makes students more independent and cuts down your messages.
End the course with a showcase. Use the second hour of week 8 for a short demo where students invite family and friends: in 3 minutes each student explains the problem, the circuit, a piece of their code and one bug they hit and how they fixed it. After the showcase you can hand out a certificate of attendance you designed yourself, listing the course length, the names of the completed projects and the name of the final project. BlueGrays does not issue certificates; you design the document and its value comes from the content of your course. You can find how to grade the final project and collect a student portfolio in the assessment rubric post.
Checklist before your first course
- Format, group size and schedule are fixed (for example 6 people, 8 weeks, one 2-hour session a week).
- The venue has a table, a socket and room for a laptop for every student; you have run a trial lesson.
- You have had the 5-question intake chat with every candidate and noted the placement test results.
- The kits are ready with identical contents, numbered and with a contents list; the spares box is full.
- Both week 1 projects have been tested with every kit; board, cable and port all work.
- Arduino IDE is installed on the laptops; the libraries needed for weeks 6 and 7 are on your list. For setup, see the Arduino IDE installation guide.
- You have built every project of the 8-week syllabus once with your own hands.
- The fee items are calculated and students have in writing what is included (kit, Premium period).
- The educator pack is bought; the number of codes is the number of students plus at least 1 spare, and they show on My Codes.
- Students have been told that their details become visible to you when they redeem a code, and that a code cannot be redeemed with an active store subscription.
- Final project options and the showcase date are set.
- Local rules on registration, tax, insurance and venue permits have been checked.
When you open your first course with this plan, you have a syllabus that says what happens every week, a fee with clear items and a path for students to keep going after the course. Once your first group finishes, adjust the syllabus to your own students' pace: which week was too much, which project got the most interest, which final project was picked again. As you start preparing, install BlueGrays on your phone and open the projects of the 8-week syllabus once yourself, so you already know the screens your students will see in the first lesson.
Frequently asked questions
Do I need a certificate to teach an Arduino class?
BlueGrays does not ask for a certificate to use the app in class or to buy an educator pack. The documents, registration, tax or permits needed to teach vary by country and city; check the rules where you live. What builds trust with students is a ready syllabus and projects you can show.
How many weeks should an Arduino course last?
For a group with no experience, an 8-week course with one 2-hour session a week comfortably covers the basics from LEDs to sensors, LCDs and servos. If you want something more intensive, a 5-day workshop format also works. What matters is that every week ends with a working project.
How many students should an Arduino class have?
For a first course with one tutor, 4–6 people is the most balanced number; everyone works on their own kit and you can check every circuit. Groups of 10–16 share kits in pairs and need assigned roles. One-to-one lessons are the most flexible option in pace and content.
What should an Arduino course fee include?
Your time as the tutor (including preparation), the kit or a share of kit use, the venue, one Premium code per student and a small reserve. Calculating the fee from these items and telling students in writing what is included avoids misunderstandings at the end. For legal and tax matters, check your local rules.
Does every student in my class need their own BlueGrays subscription?
No. As the tutor you buy a monthly or yearly pack of 5 or 10 codes on the Educator Packages screen in the app and give each student a code. Students get Premium without adding a card; only an account with an active Premium subscription through the App Store or Google Play cannot redeem a code.
Can students keep using the app after the course ends?
Yes. If you gave a yearly code, the student keeps Premium for 365 days. Even when a monthly code runs out, 60 free projects (20 per platform), the daily questions and the code guide stay open, and they can start their own subscription if they want.
Projects to build after reading this
See all projects
LED Blink
The very first hello of electronics: switching a single LED on and off. The Arduino turns the LED on and off at short intervals, so the light blinks quickly. You see in the simplest way how the board

Traffic Light
A tiny copy of the traffic light you see on the road every day. Red stays on for two seconds, yellow flashes for a moment, green stays on for two seconds, then it goes back to red through yellow again

LED Control with a Push Button (Push)
Just like a doorbell: the light stays on as long as you press, and goes off when you let go. The Arduino keeps listening to the button; while it's pressed the LED is on, and the moment you lift your f

Night Light with Ldr
A little night light that turns on by itself when it gets dark and goes off when morning comes. A light sensor measures how bright the room is, and the Arduino switches the LED on when it is dark enou

HC-SR04 Distance Measurement (Serial Display)
The HC-SR04 sensor works just like a bat finding its way in the dark: it sends out a sound you cannot hear, listens for the echo and measures how far away the object in front of it is. The Arduino wri

Temperature and Humidity with DHT11
How warm is your room, and is the air humid or dry? The DHT11 sensor measures temperature and humidity, and the Arduino writes the values on a two-line LCD screen, refreshing every couple of seconds.
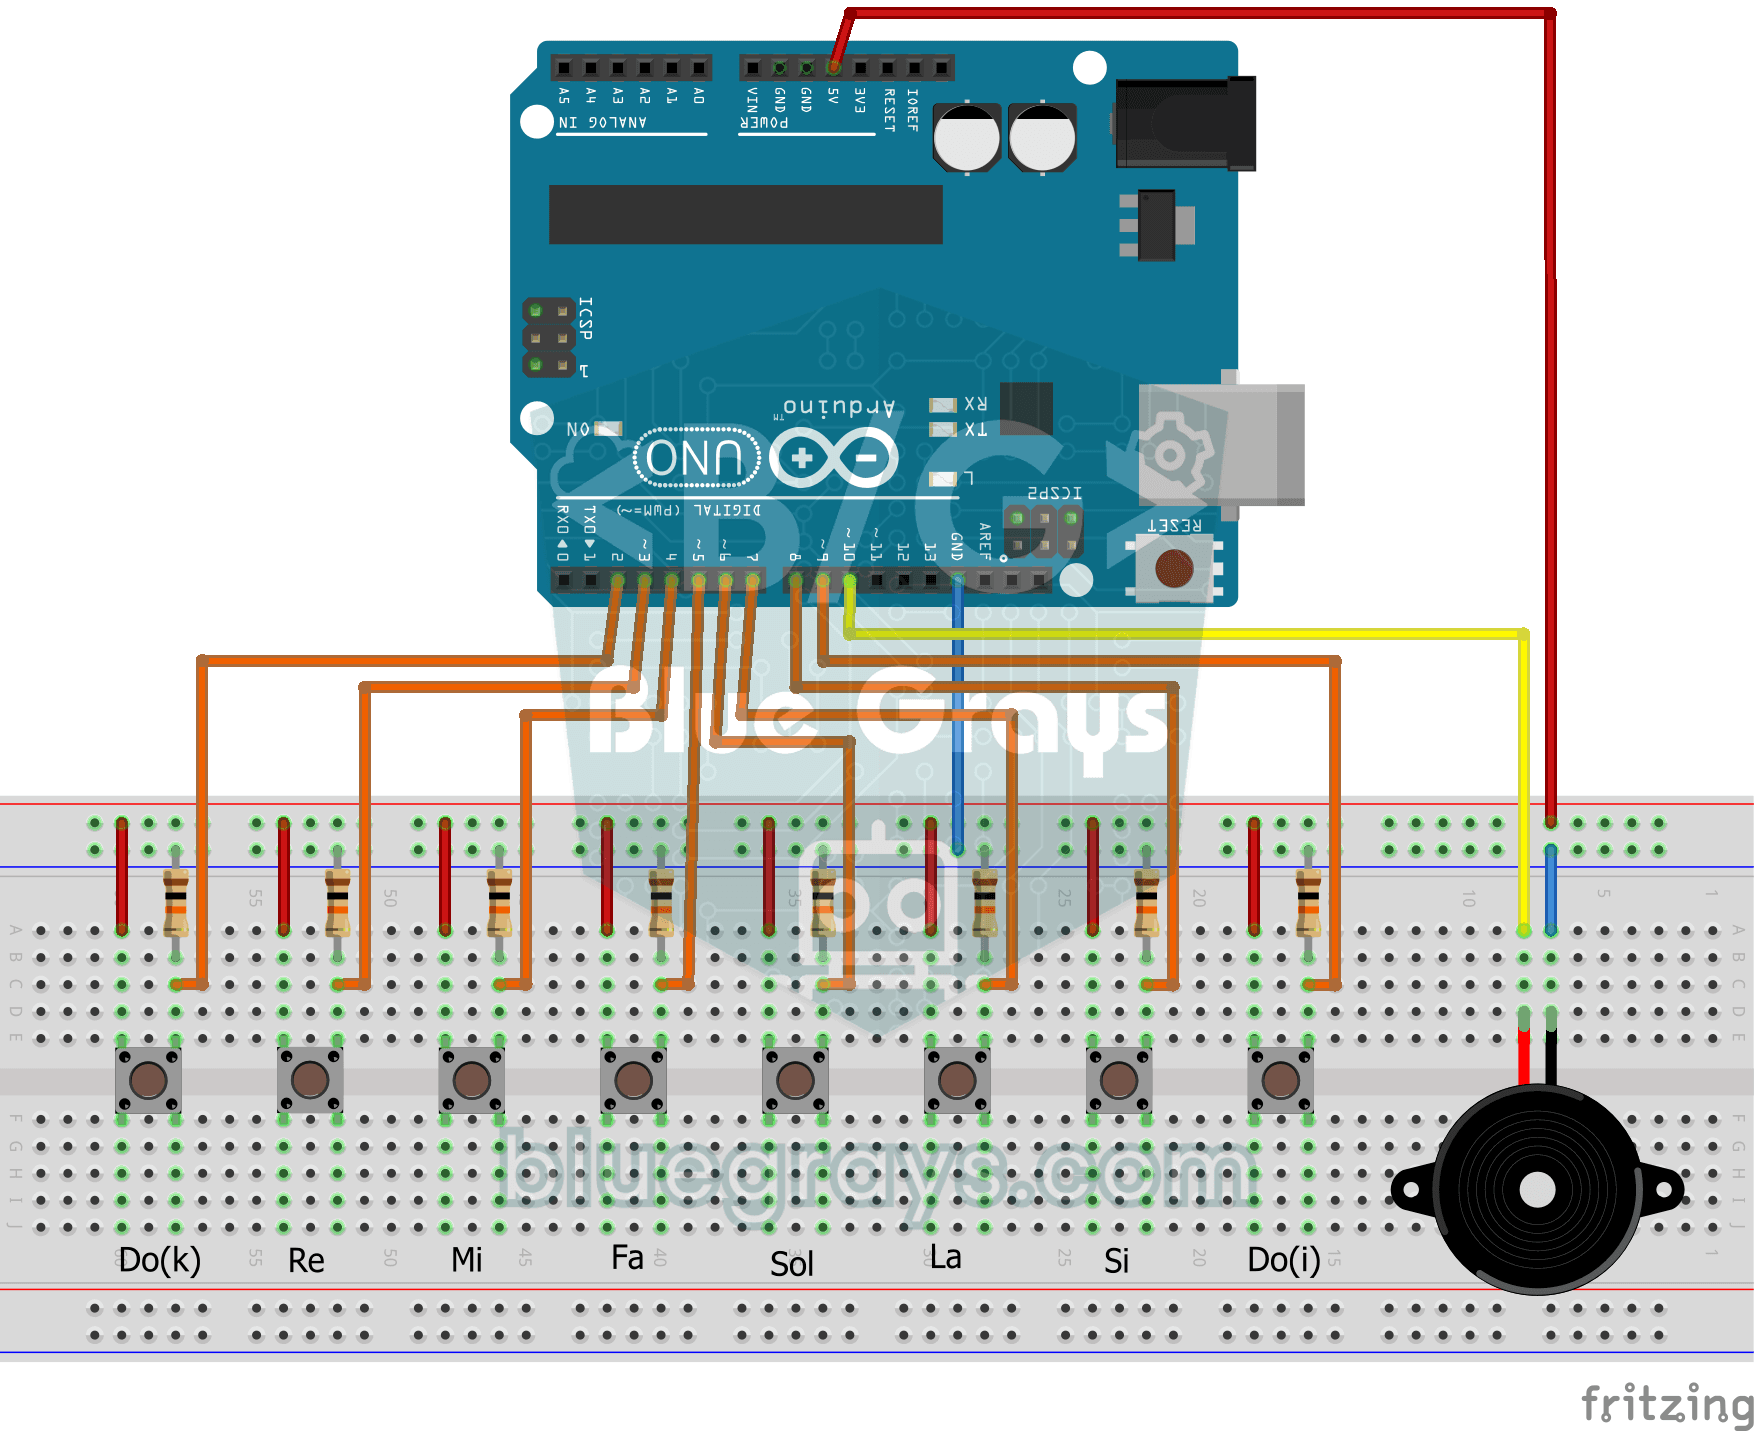
Simple Piano with Buzzer and Button
Build your own little piano with eight buttons. Each button is one note, from low to high: do, re, mi, fa, sol, la, ti and high do. The note plays through the buzzer as long as you hold the button and
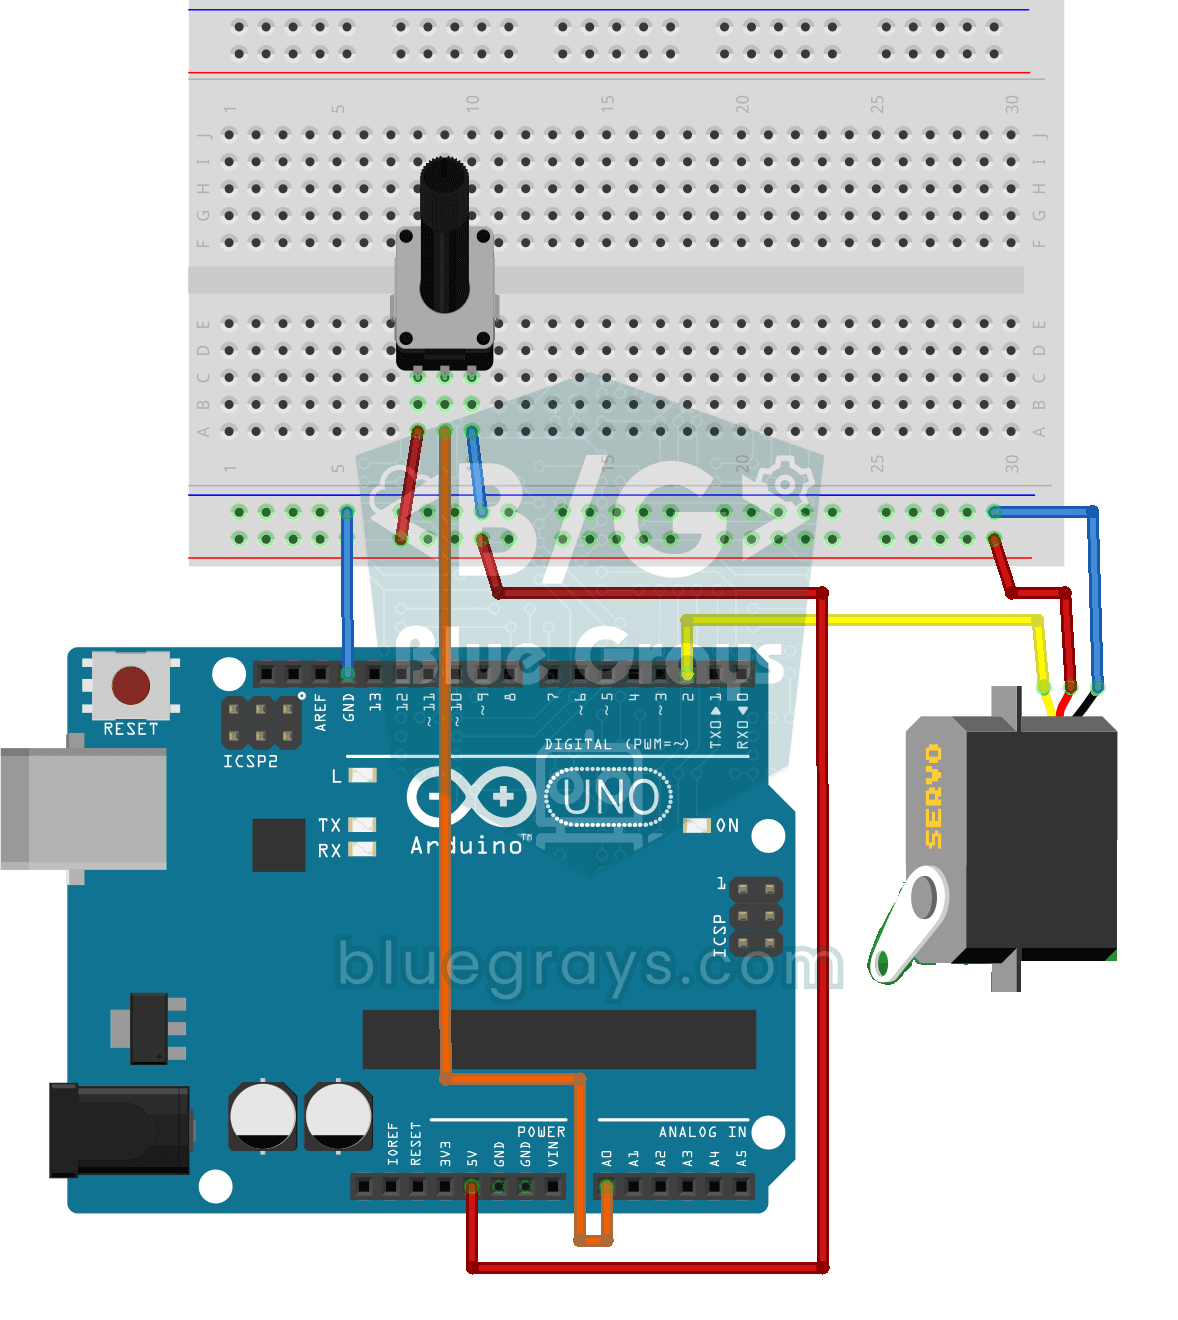
Servo Motor Operation with Potentiometer
As you turn the potentiometer knob, the servo motor's arm turns right along with it: one end of the knob means zero degrees, the other end means half a turn. The Arduino keeps reading the knob's posit