
IoT Project Ideas: 8 Ready-Made ESP32 and Pico W Templates
8 ready-made IoT templates for ESP32 and Pico W: relay lamp, DHT22, RGB strip, door sensor, plant watering, PIR and servo curtain, with pins, parts and code.
If you're looking for IoT project ideas, the fastest way to start is to build your first device from a template that's already been tested and proven to work. BlueGrays IoT offers 8 ready-made templates: relay lamp, temperature and humidity, room station, RGB LED strip, door / window sensor, soil moisture + pump, motion detector and servo curtain. Each template comes with a parts list, a wiring diagram, code that Ohmi prepares with your details filled in, and a control screen that builds itself on your phone. All you do is build the circuit and upload the code to the board from the Arduino IDE. The switches, sliders and charts are already waiting on your phone.
Every template works with both the ESP32 (Dev Module, WROOM, S3, C3) and the Raspberry Pi Pico W (Pico 2 W too), and your first device is free. This guide covers each template one by one: what it does, which pin it uses, which controls appear on your phone and the most common mistake. After that, we'll go through the plant watering template's code line by line, then look at which template to start with and how to combine templates.
What is a ready-made IoT template and what's included?
A template is a complete package built for one specific job. In the app, go to Workshop › My devices › Add new device. On the first step you answer "Which board?" with ESP32 or Pico W, and "What will it do?" by picking one of the 8 templates. The template you choose shapes the rest of the setup: which parts to gather, where the wires go, how the code is written and which controls show up on your phone. The code uses variable names that pair with the phone automatically, so you don't have to design a dashboard yourself.
- Parts list: the "Gather parts" screen lists every part the template needs. For watering, that's a soil moisture sensor, a relay and a mini pump.
- Wiring diagram: the "Connect the wires" screen shows which lead goes to which pin on the board you picked. You can change the pins in step 3 under "Connection pins".
- Ready-made code: a complete Arduino sketch built on the BlueGraysIoT library, with your Wi-Fi network name, password and device key (starting with bgd_) already filled in. Your Wi-Fi password stays on your phone and is never sent to the server.
- Phone screen: depending on the template, you get switches, sliders, a color picker, an effect list, live values and charts. Once the board connects, you'll see the "Online" status and a "Last data … ago" note.
- Access from outside your home: the board connects to the BlueGrays server over an encrypted WebSocket (TLS, port 443). It works even when your phone is on mobile data, with no port forwarding or IP address needed.
The 8 IoT templates at a glance: parts, pins and level
| Template | Parts | What you see on your phone | Level | ESP32 pin | Pico W pin |
|---|---|---|---|---|---|
| Relay lamp | Relay module | Lamp switch (on/off) | Beginner | Relay IN: GPIO26 | Relay IN: GP15 |
| Temperature and humidity | DHT22 | Temperature (°C) and humidity (%) + chart | Beginner | Data: GPIO4 | Data: GP16 |
| Room station | Relay + DHT22 | Lamp switch + temperature + humidity | Beginner | Relay GPIO26, DHT22 GPIO4 | Relay GP15, DHT22 GP16 |
| RGB LED strip | WS2812B (30 LEDs in code) | Light switch, color picker, brightness 0–100%, effect | Intermediate | Data: GPIO13 | Data: GP2 |
| Door / window | Magnetic reed sensor | Door: Open / Closed | Beginner | Reed: GPIO27 | Reed: GP14 |
| Soil moisture + pump | Soil moisture sensor + relay + mini pump | Soil moisture (%) + chart, Pump switch, Watering threshold | Intermediate | AO: GPIO34, relay GPIO26 | AO: GP26, relay GP15 |
| Motion detector | PIR (HC-SR501) | Motion detected / none, counter chart, Reset counter | Beginner | Output: GPIO33 | Output: GP13 |
| Servo curtain | SG90 servo | Curtain angle slider (0–180°) | Intermediate | Signal: GPIO18 | Signal: GP17 |
1. Relay lamp: switch it on and off from your phone
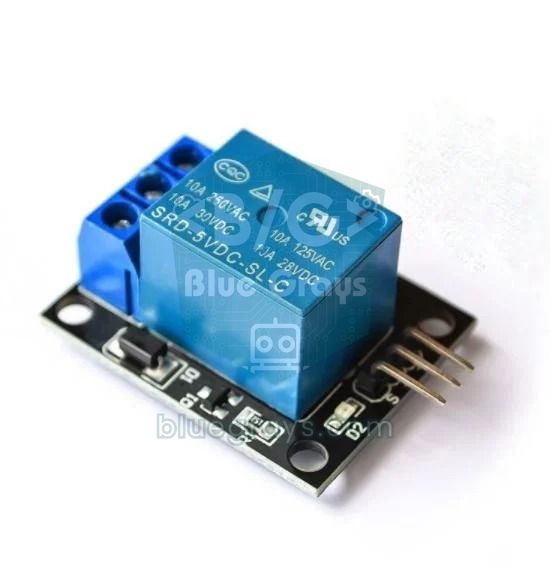
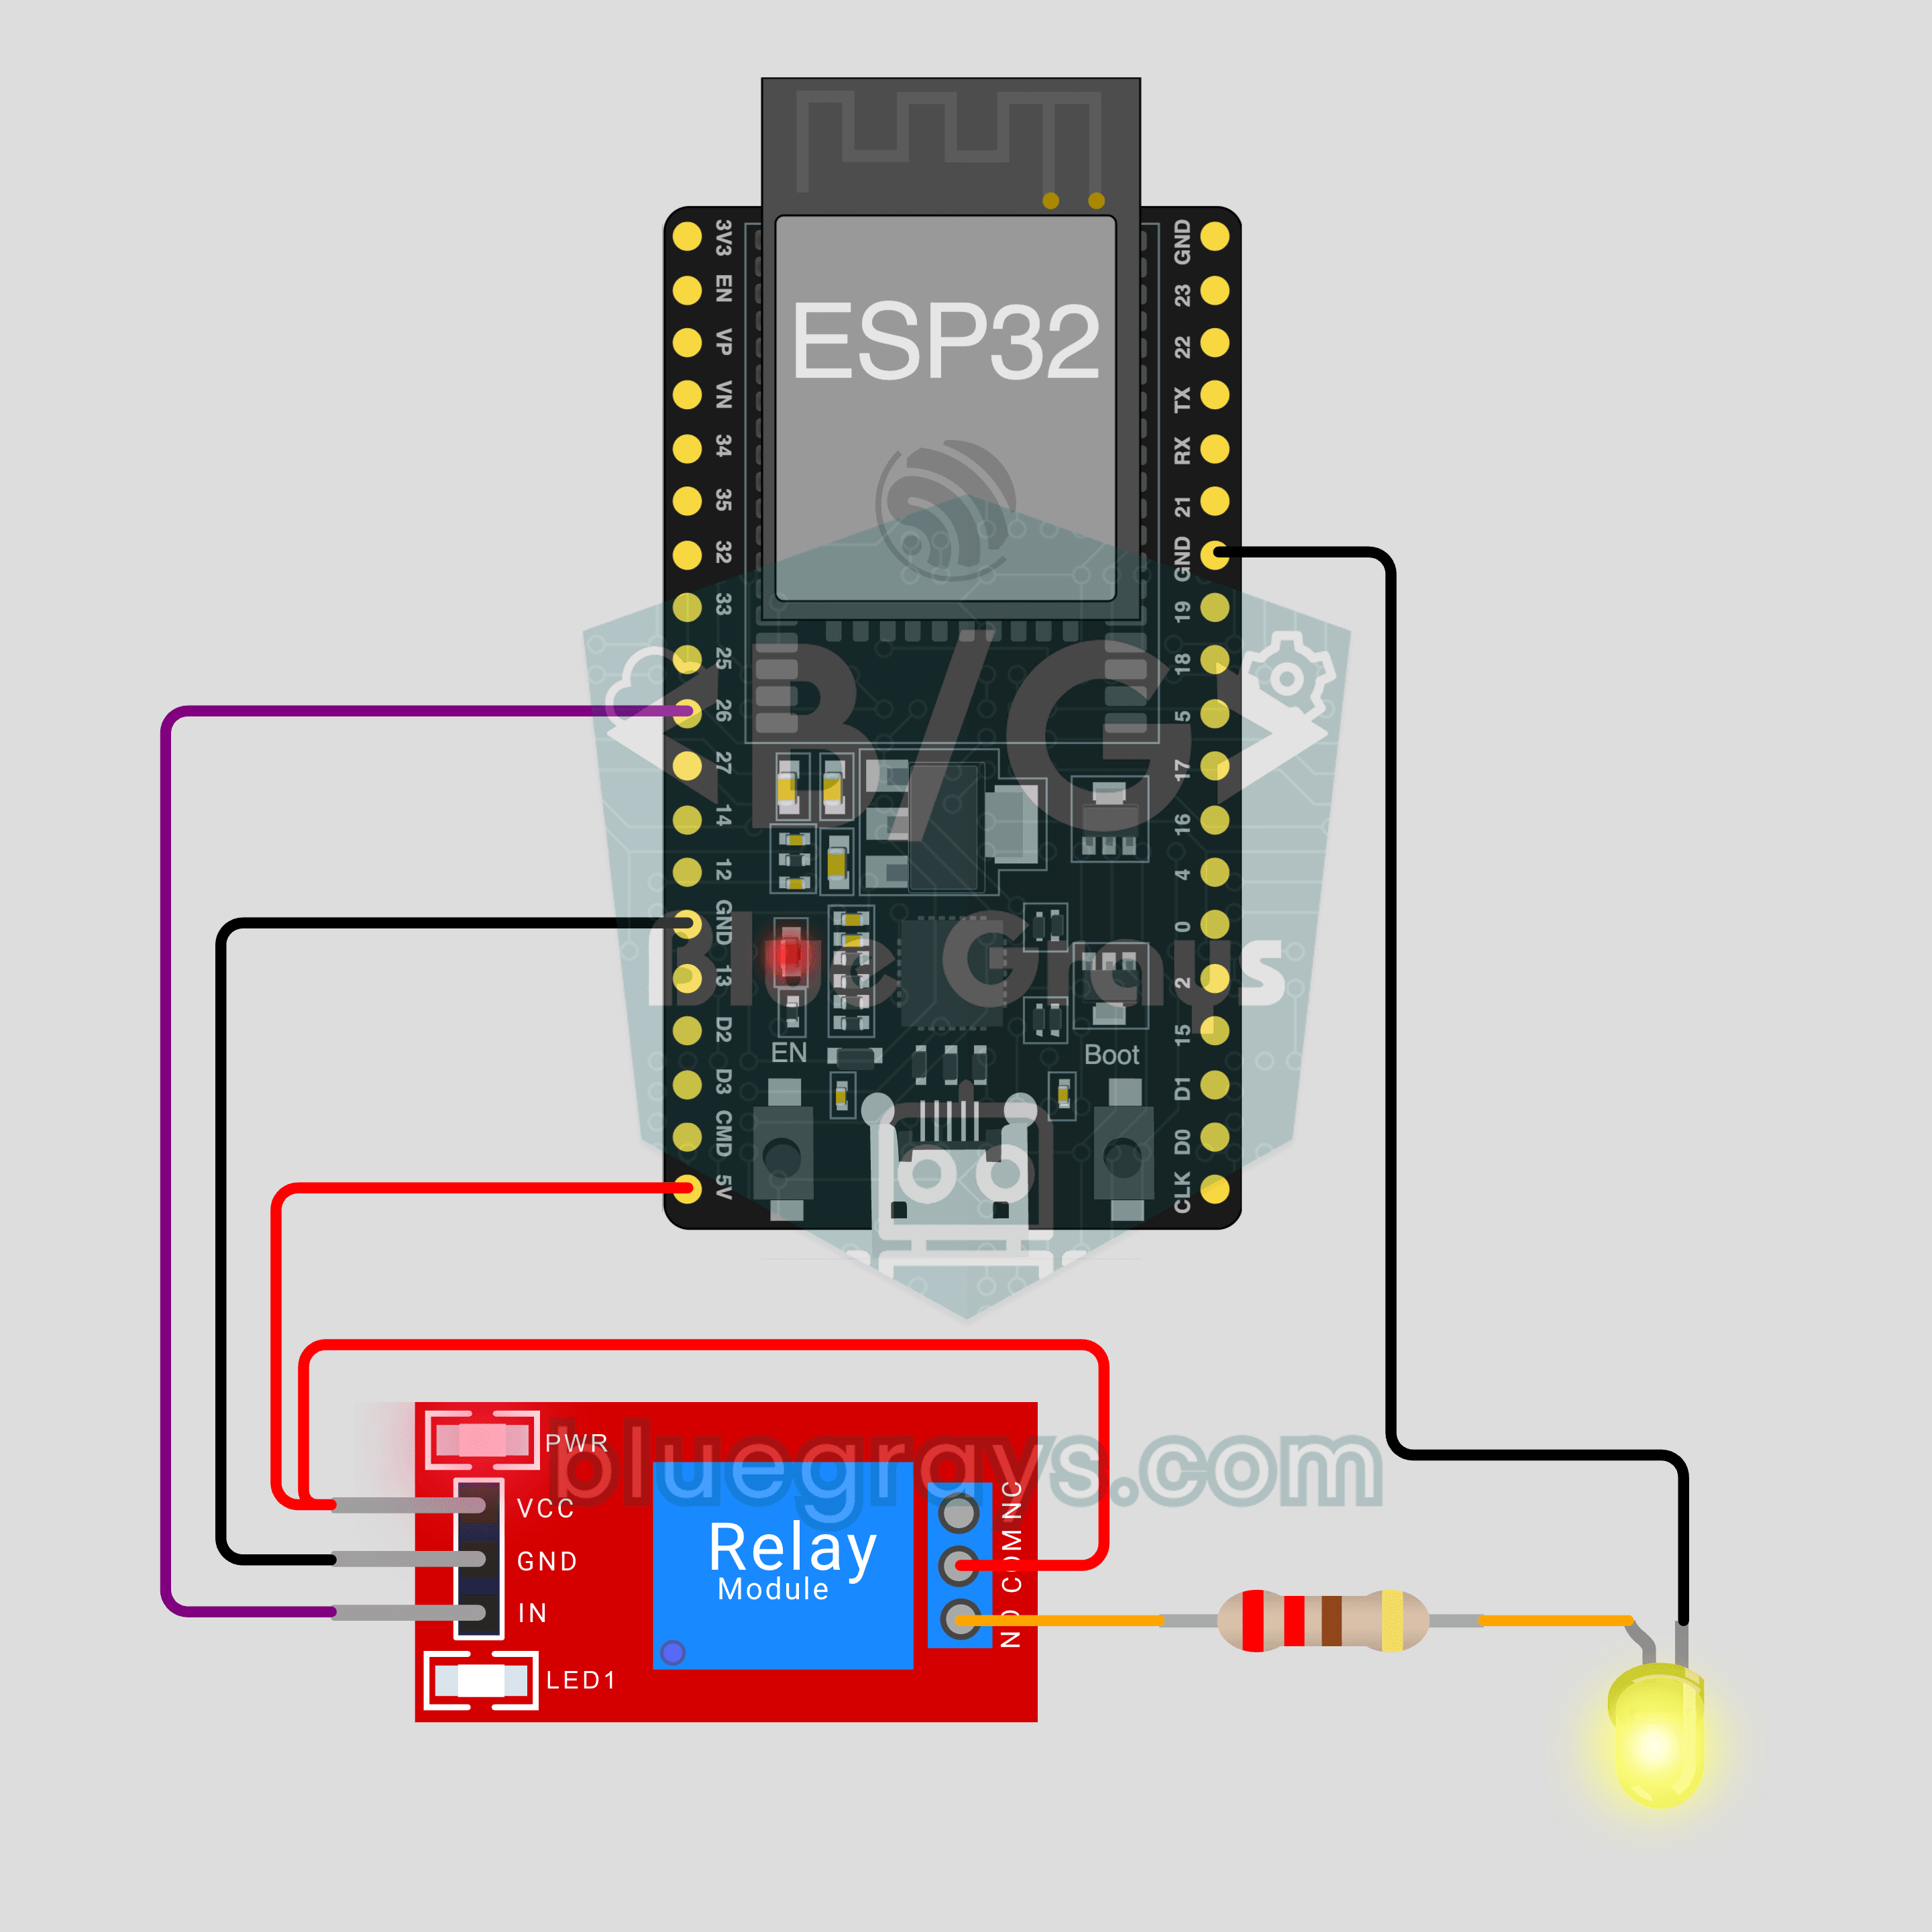
This is the simplest template. When you tap the Lamp switch on your phone, the board energizes the relay and turns on whatever load is wired to the relay contact. The only part is a relay module. The module's IN pin goes to GPIO26 on the ESP32 or GP15 on the Pico W. Power VCC from 5 V (VIN/5V on the ESP32, VBUS on the Pico W when it runs from USB), and tie GND to the board's GND. The code sets RELAY_ACTIVE_LOW = true, because most relay modules switch on with a LOW signal. If you're testing with an LED and a 220 Ω resistor instead of a relay, set this to false. Otherwise the LED works backwards and lights up while the switch is off. The board starts with the relay off at boot, and after a power cut the library restores the switch's last state. For the finished circuit and code, see the ESP32 IoT Lamp Switch (Relay) project. We explain how a relay works inside in What Is a Relay Module?.
2. Temperature and humidity: live values and charts with the DHT22
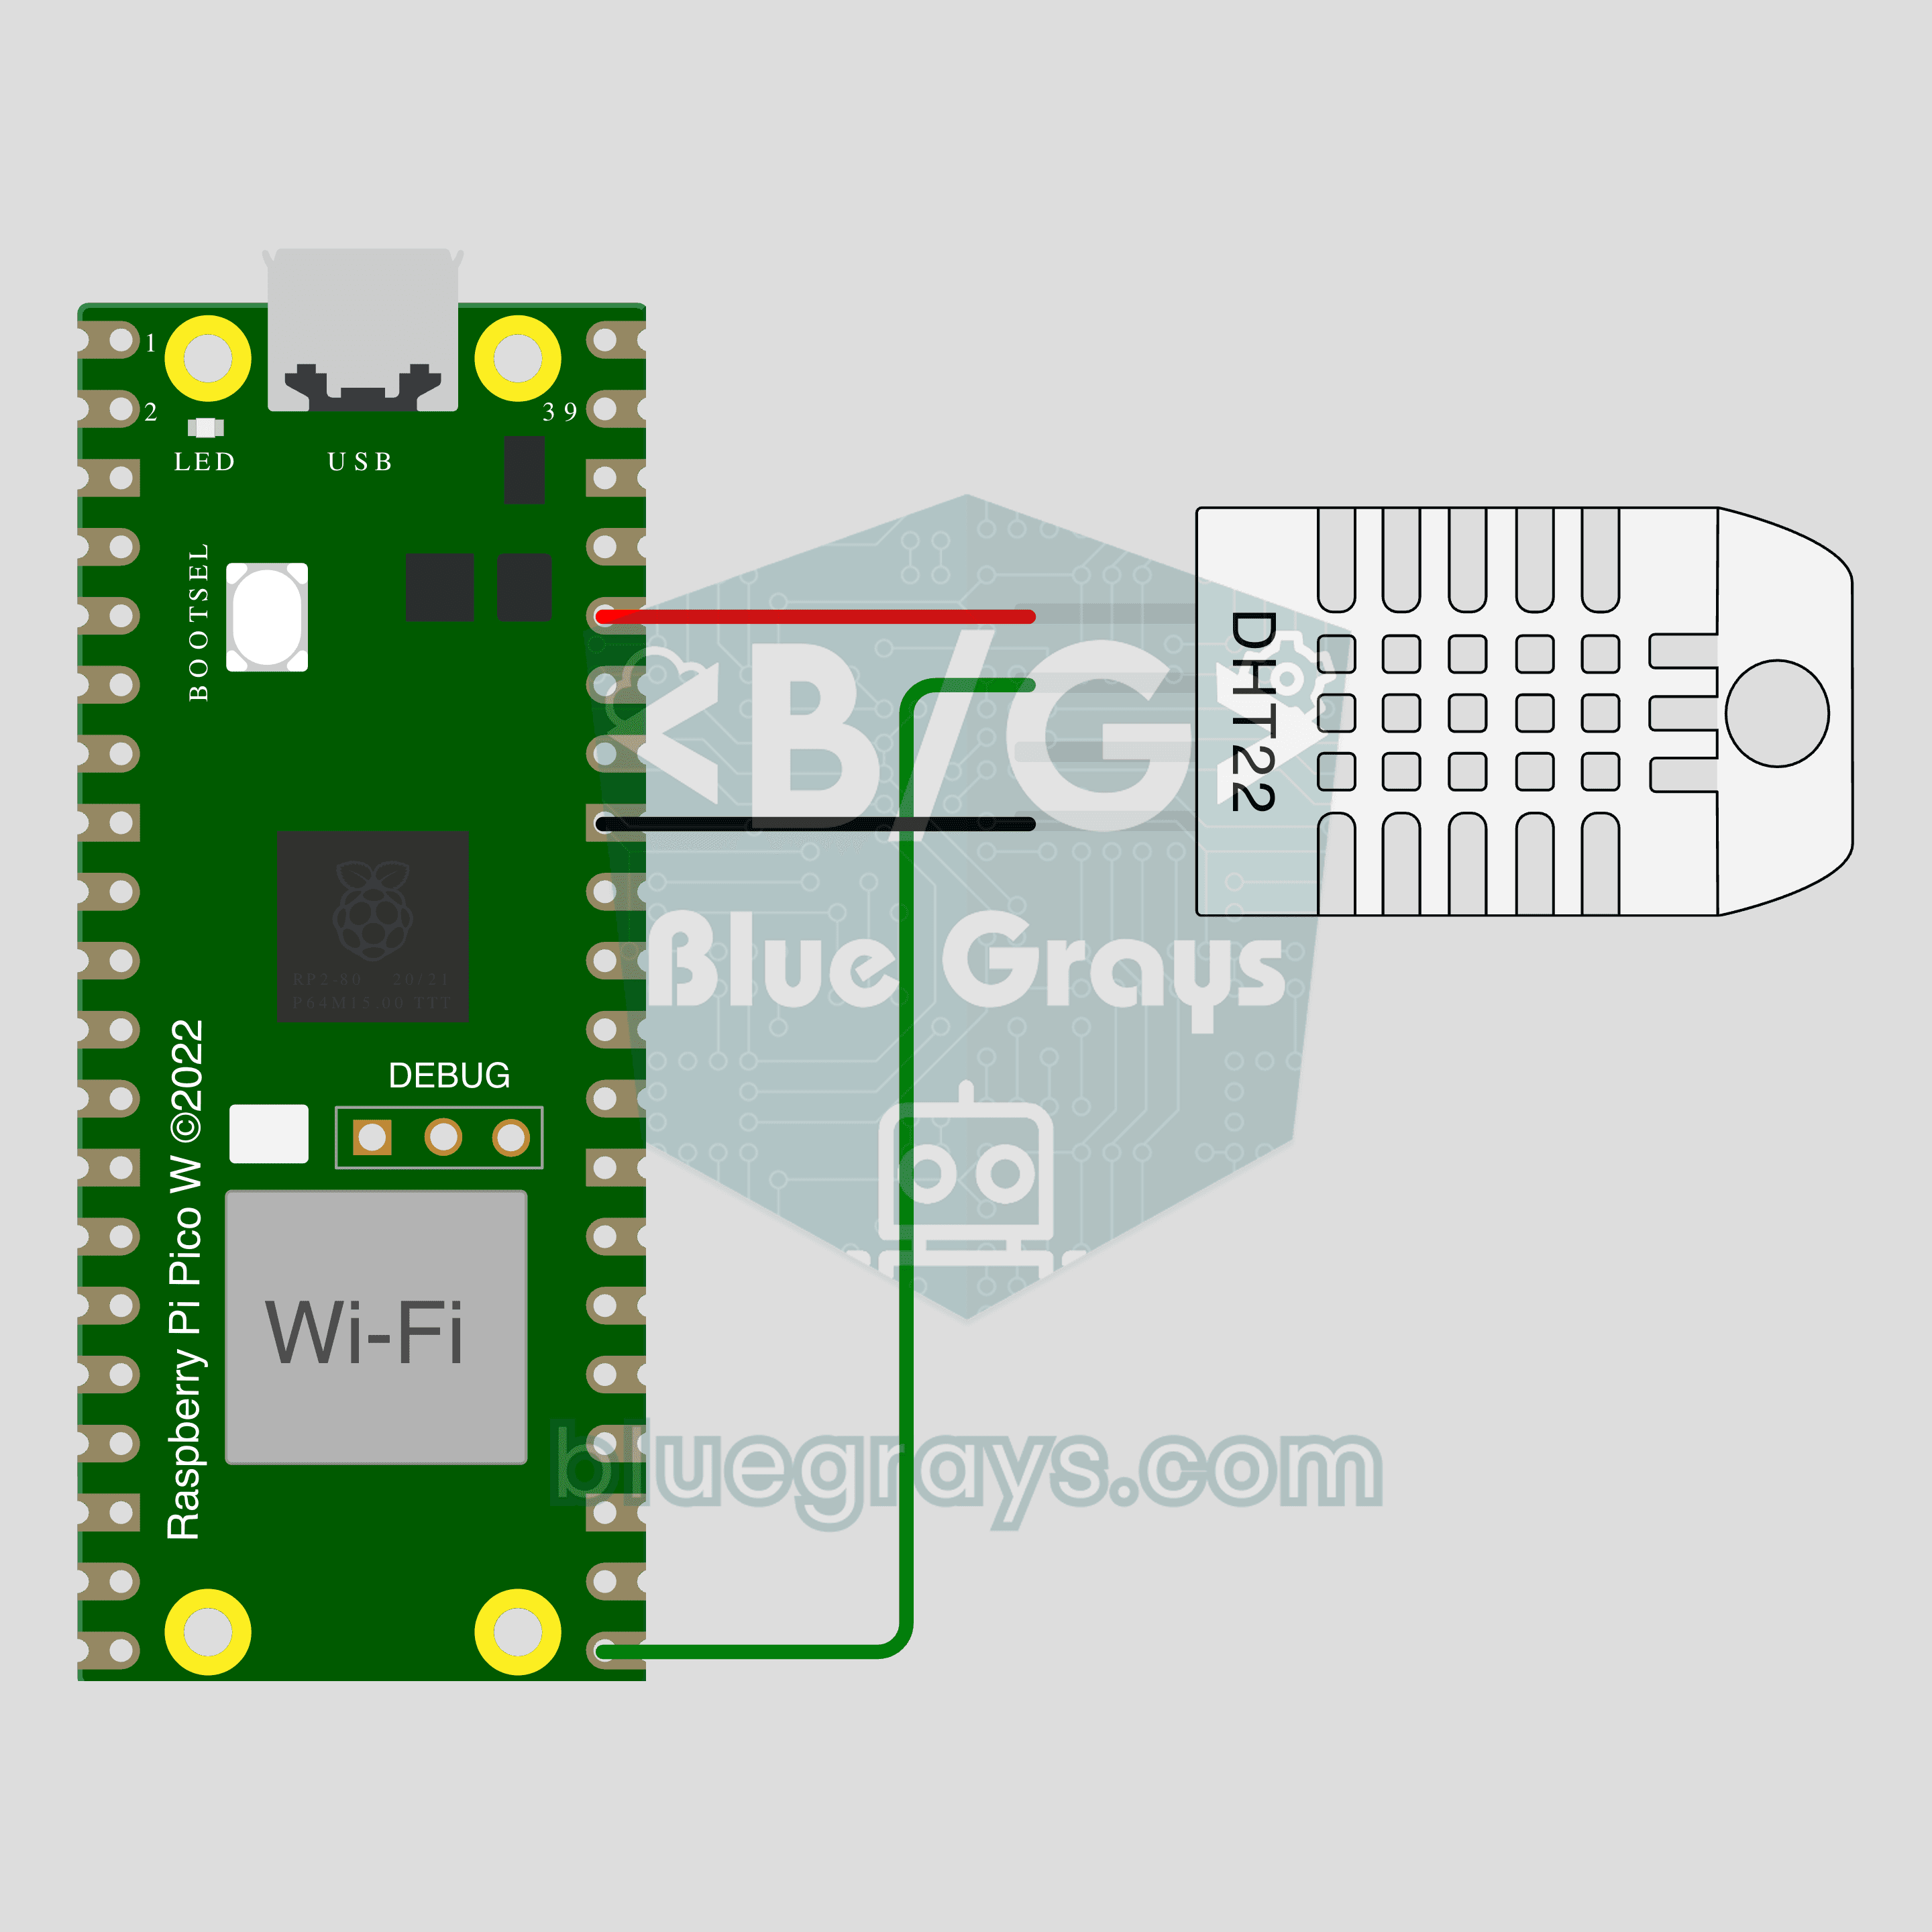
This template sends your room's temperature (°C) and humidity (%) to your phone as live values and stores them in a chart. The DHT22 runs on 3.3–5 V. Connect VCC to the board's 3V3 pin, GND to GND, and the data pin to GPIO4 on the ESP32 or GP16 on the Pico W. DHT22 breakout modules already have the 10 kΩ pull-up resistor on board. If you're using the bare four-pin sensor, add a 10 kΩ resistor between data and VCC. The DHT22 can be read at most once every 2 seconds and measures temperature to roughly ±0.5 °C. The chart offers 1 h, 24 h, 7 day and 30 day ranges. As long as the board stays connected, a new point is added every minute, and you'll see the Lowest / Highest / Latest values. Don't stick the sensor right on top of the board: the ESP32 warms up while Wi-Fi is running, which can push readings 1–2 °C higher. Move it a few centimeters away on a short cable. The project page for this template is Pico W IoT Temperature and Humidity (DHT22).
3. Room station: relay and DHT22 together
The room station combines the first two templates in a single device: your phone shows a Lamp switch alongside temperature and humidity. The wiring is the same: relay on GPIO26 (ESP32) / GP15 (Pico W), DHT22 on GPIO4 (ESP32) / GP16 (Pico W). The code defines a deadband of 0.1 °C for temperature and 1% for humidity. Nothing new is sent to the server until the value changes by at least that much, so you don't waste your send limit. Since one board does two jobs, this is the template that gets the most out of the free plan's single device. Keep in mind that the free plan stores chart history for only 1 variable. You'll see both values live, but chart history goes up to 20 variables on Premium. Switching the relay coil doesn't disturb the DHT22 readings, because readings happen every 2 seconds using millis(). For this template, check out the ESP32 IoT Room Station (Relay + DHT22) project.
4. RGB LED strip: color, brightness and effects
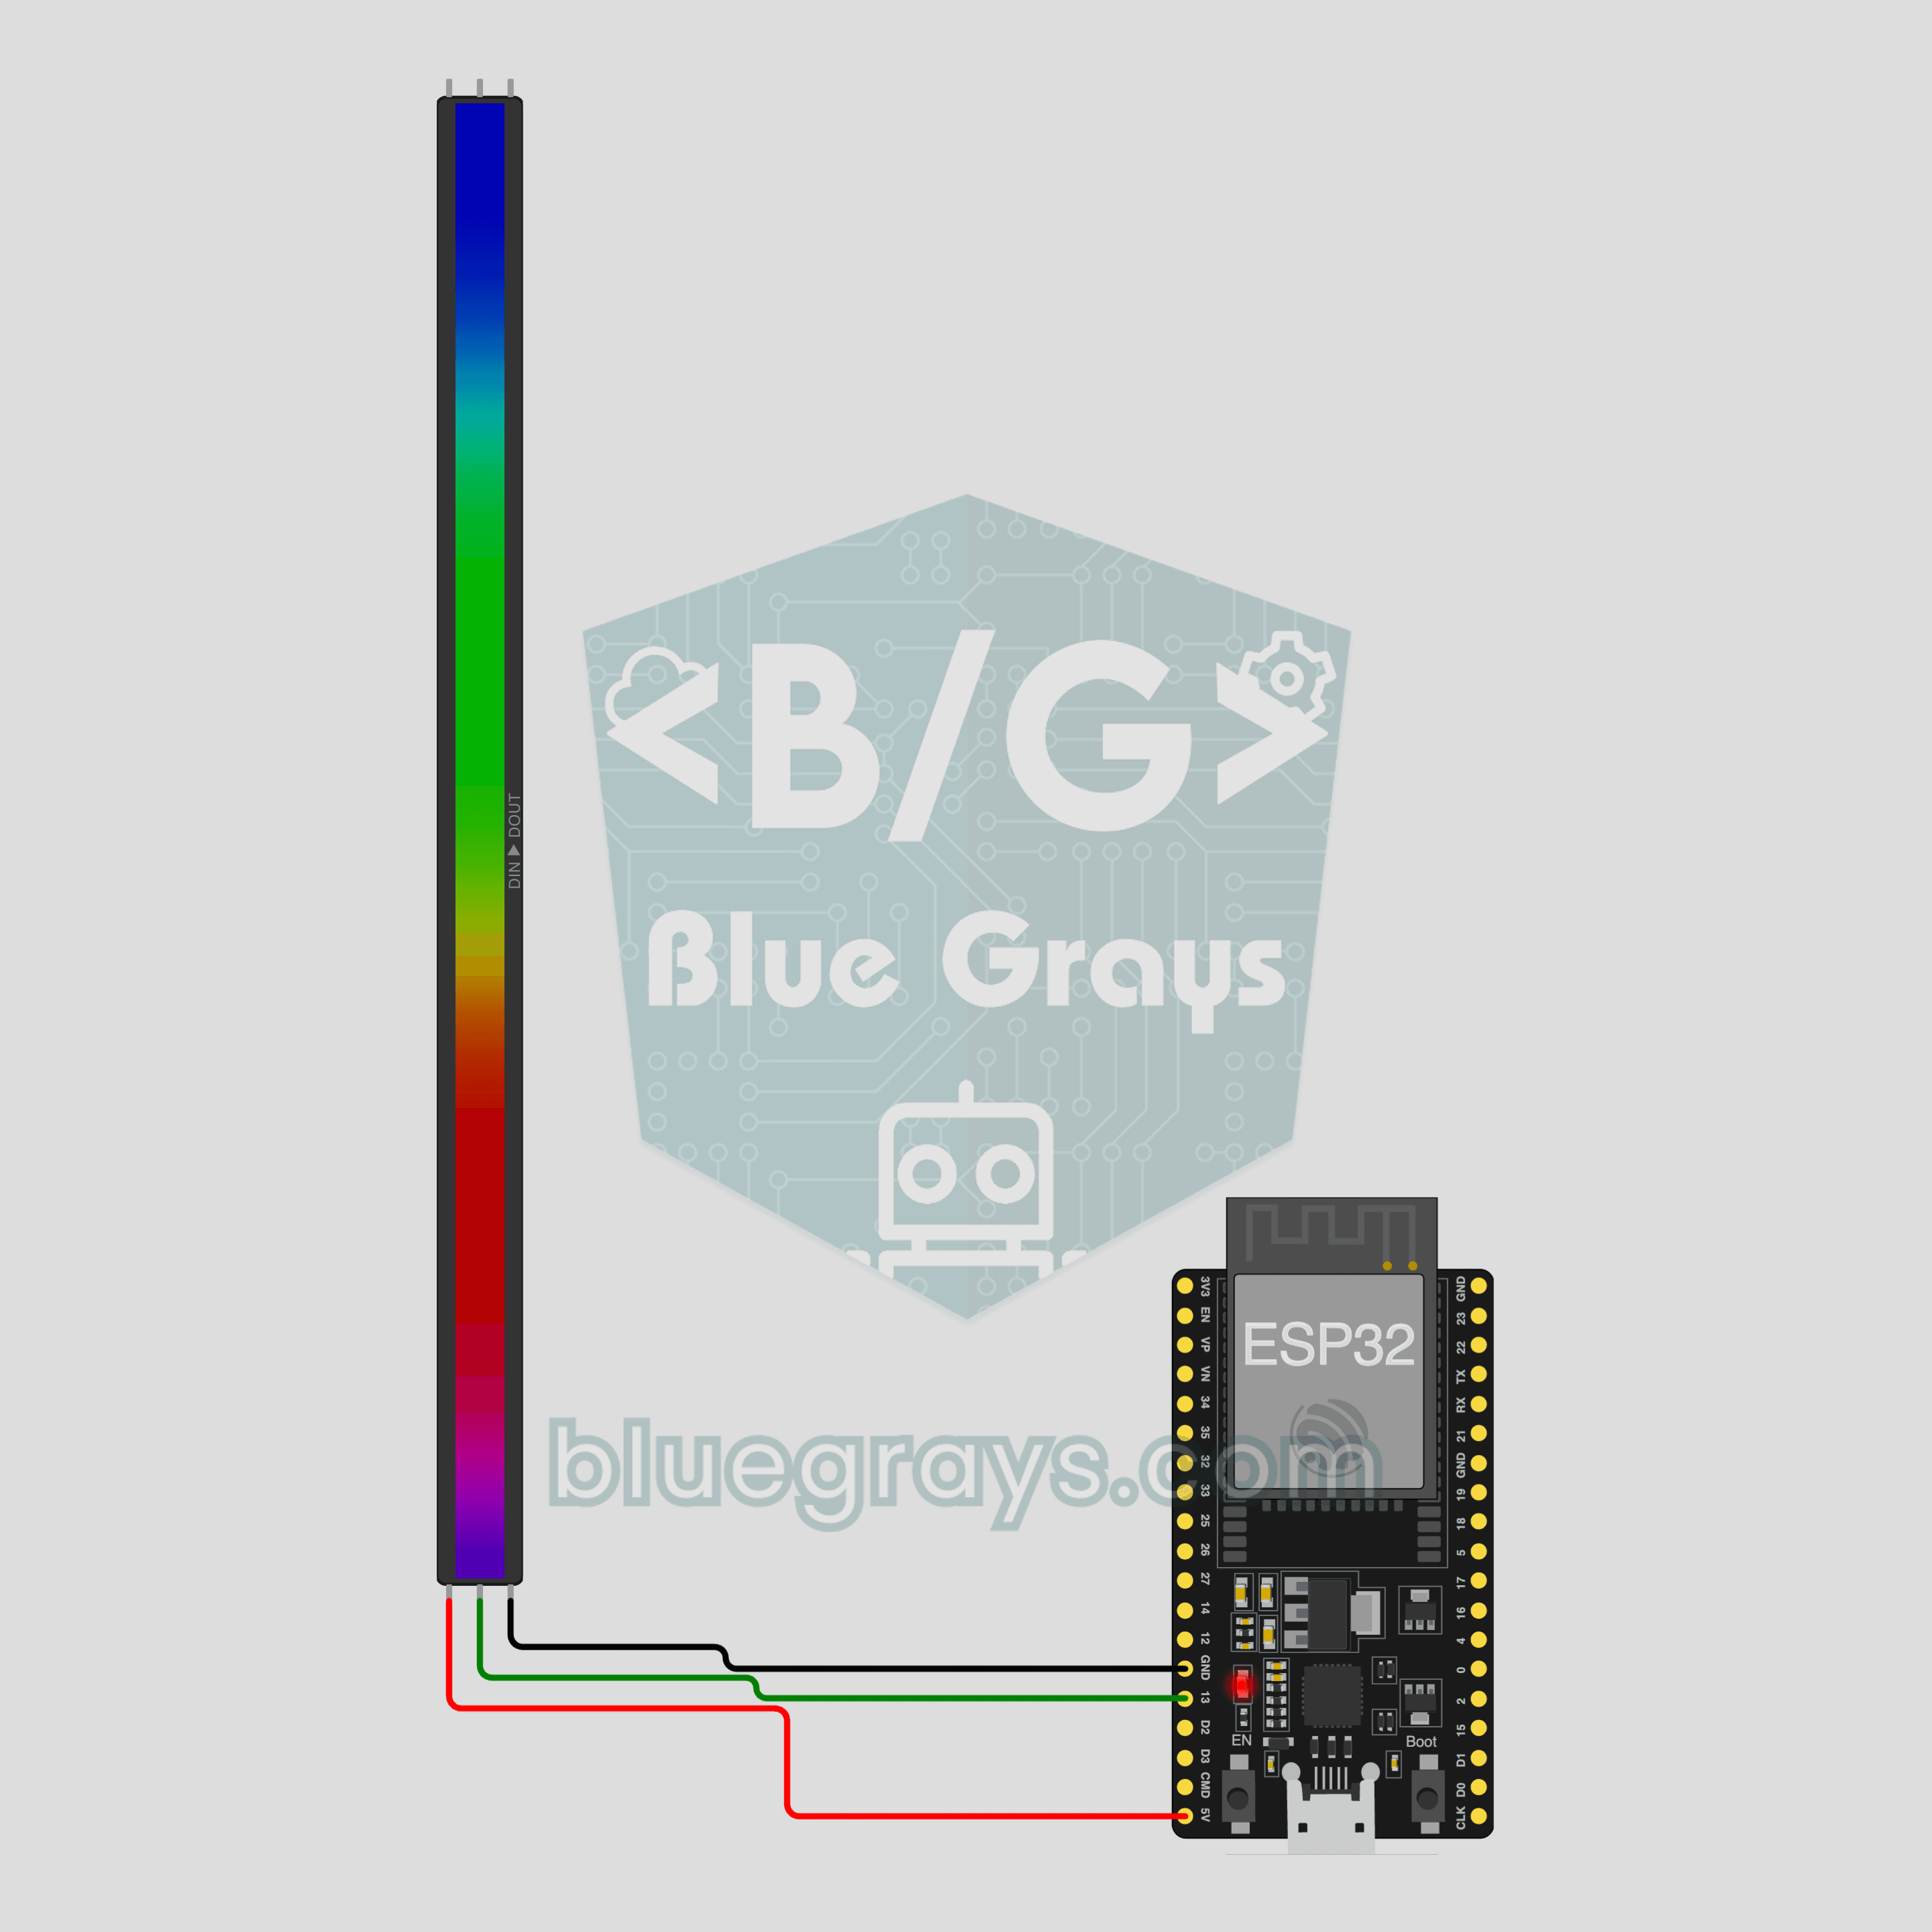
Each LED on a WS2812B strip is individually addressable, and the template's code is written for 30 LEDs. On your phone you get a Light switch, a color picker, a 0–100% brightness slider and four effects (Solid, Rainbow, Breathe, Blink). The code uses the Adafruit NeoPixel library, which you need to install separately from the Library Manager. The comment at the top of the code mentions this too. The strip's DIN pin goes to GPIO13 on the ESP32 or GP2 on the Pico W. Put a 330 Ω series resistor on this line, close to the strip. It limits reflections on the data line and the input current of the first LED. Connect a 1000 µF (at least 10 V) electrolytic capacitor across the strip's 5 V and GND at the start of the strip to soften the inrush current at power-up. The board's GND and the strip supply's GND must be connected, or the colors will flicker randomly. The finished circuit is in the ESP32 IoT RGB LED Strip (WS2812B) project. For how the strip works, see WS2812B NeoPixel LED.
5. Door / window: Open / Closed with a reed sensor
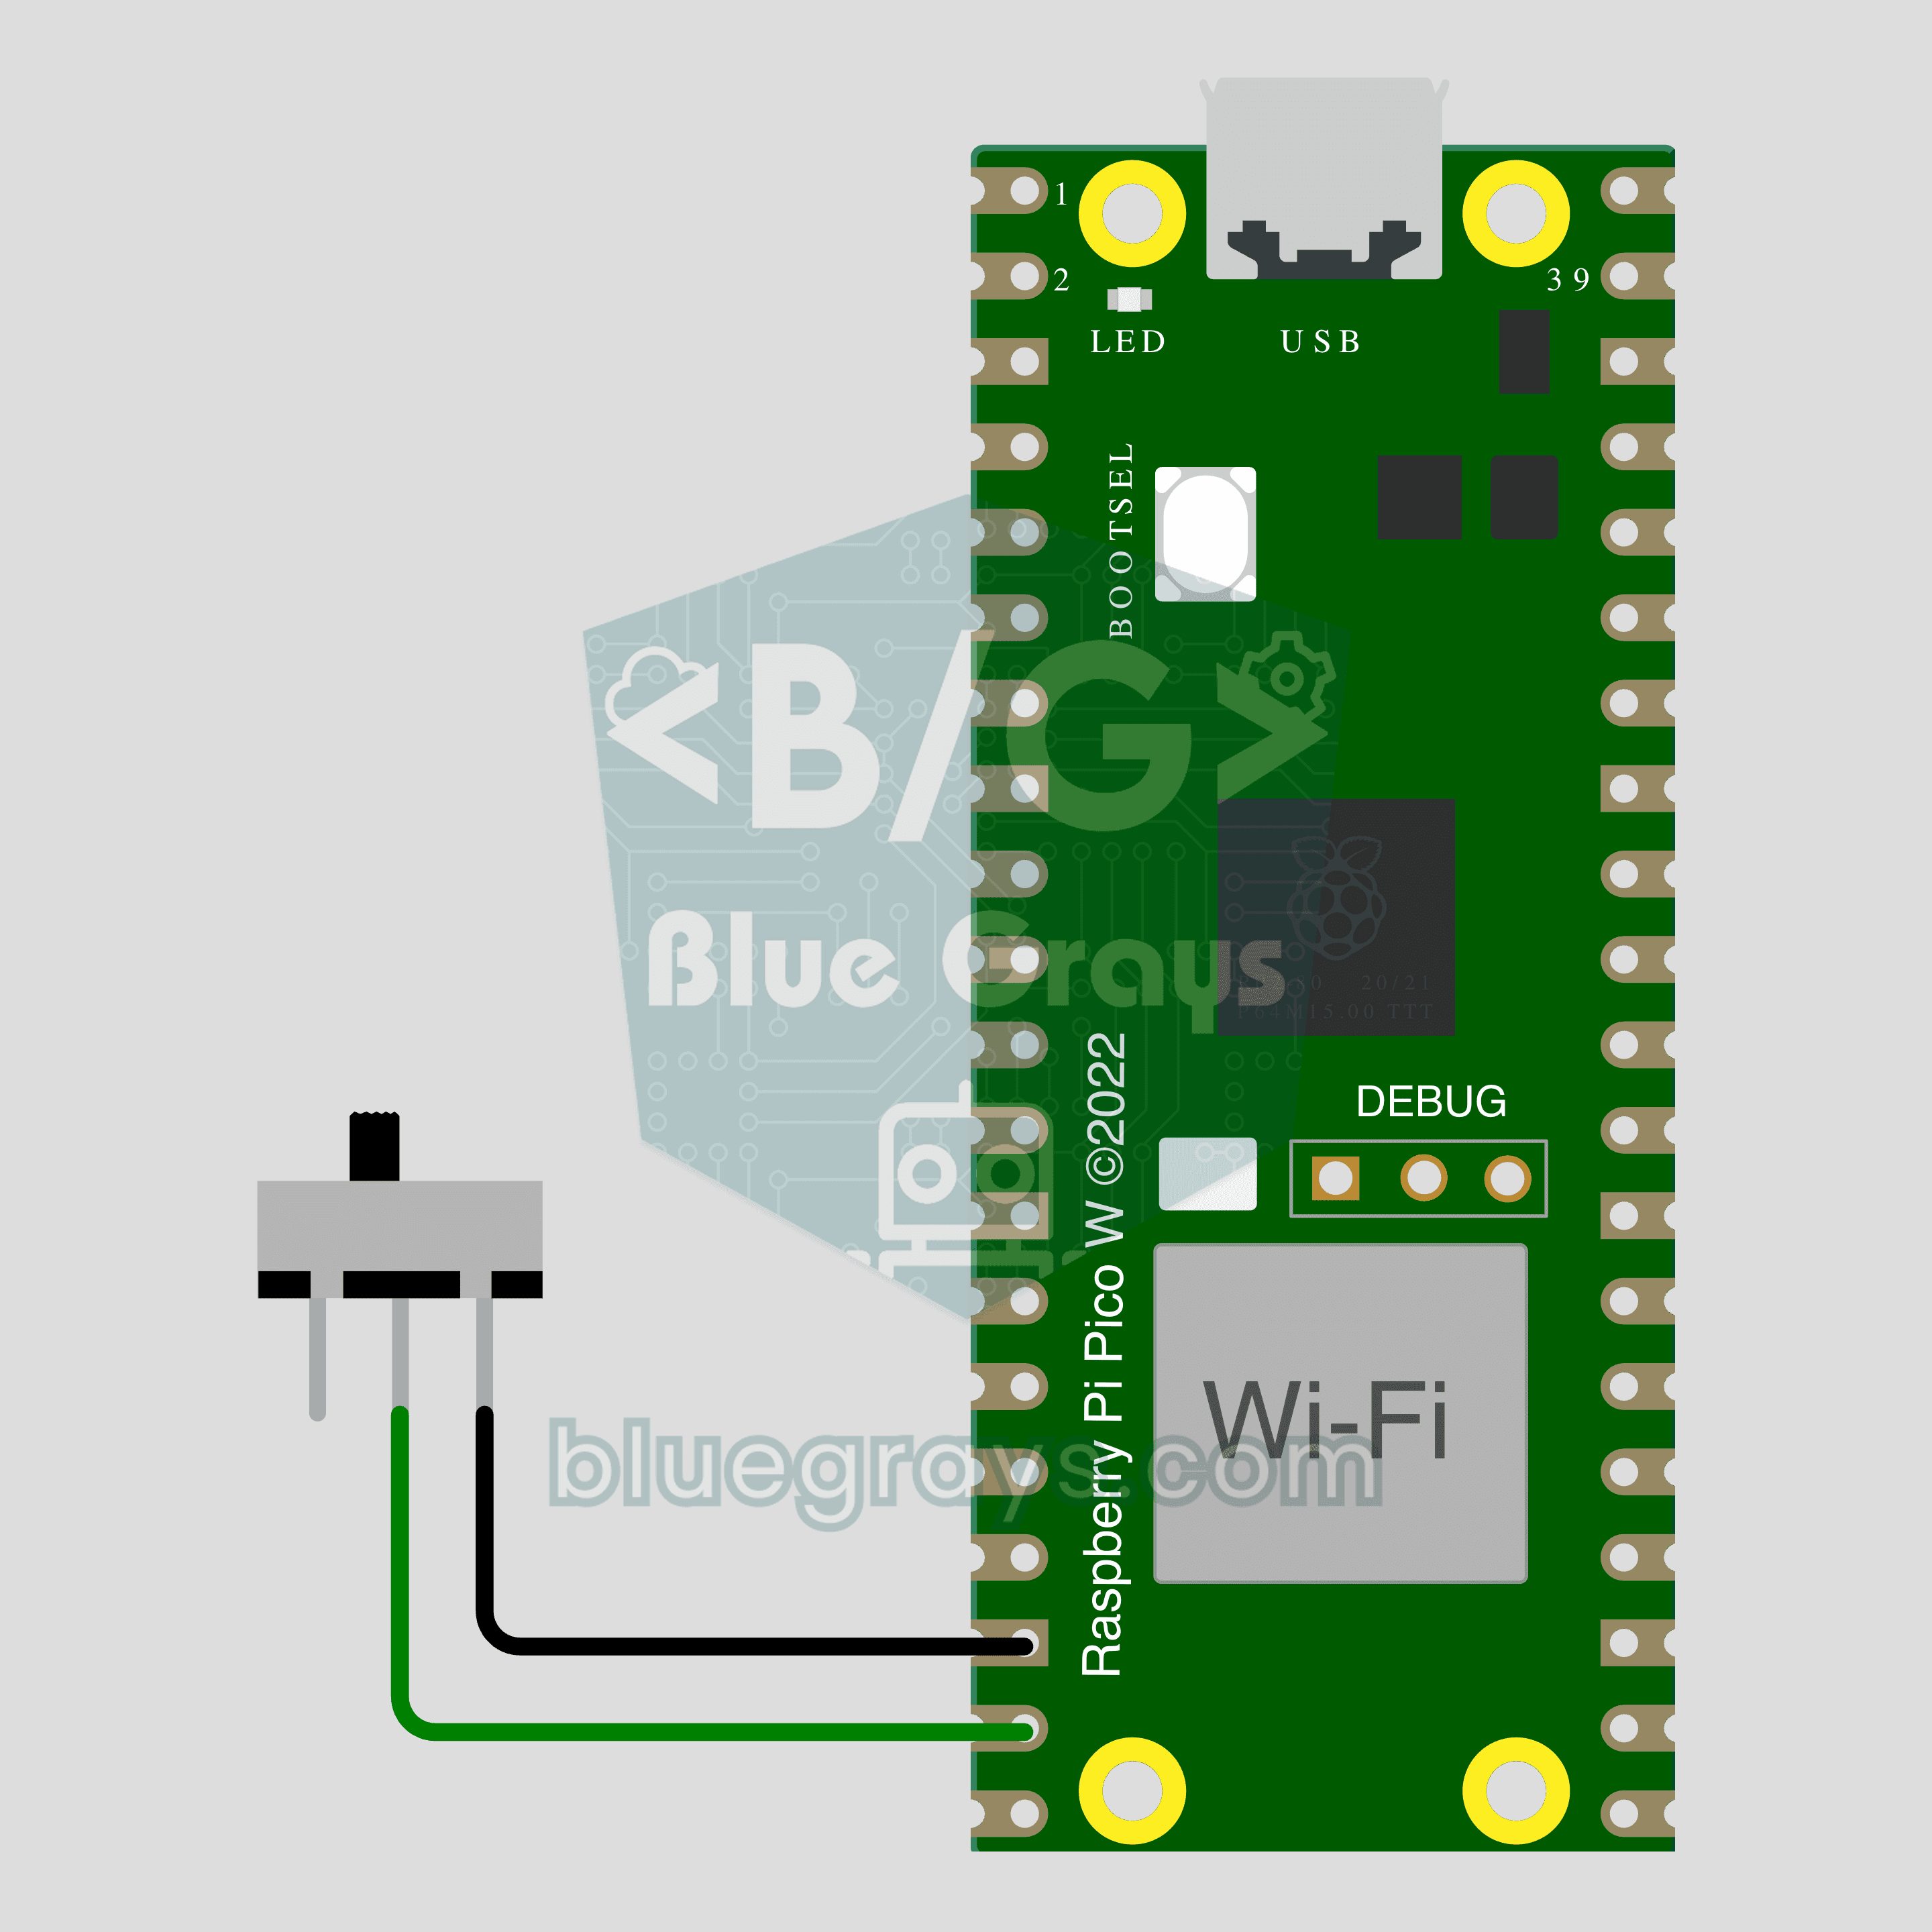
A magnetic reed sensor is a switch with two thin metal reeds inside that close when a magnet comes near. One lead goes to GPIO27 on the ESP32 or GP14 on the Pico W, and the other goes straight to GND. The pin is set to INPUT_PULLUP, so no extra resistor is needed. With the magnet away, the internal pull-up makes the pin read HIGH. When the magnet comes close and the contact closes, it reads LOW. Your phone shows "Door: Open / Closed". Mount the sensor body on the frame and the magnet on the door, leaving a gap of less than 1–2 cm when the door is closed. Mechanical contacts bounce for a few milliseconds as they close. That's why the status briefly flips between Open and Closed when a door slams shut. If you extend the code yourself, add a debounce that only accepts a new state after it has stayed stable for a short time, say 50 ms. Details are in Using a Reed Switch with Arduino, and the finished circuit is in the Pico W IoT Door Sensor (Reed) project.
6. Soil moisture + pump: automatic plant watering
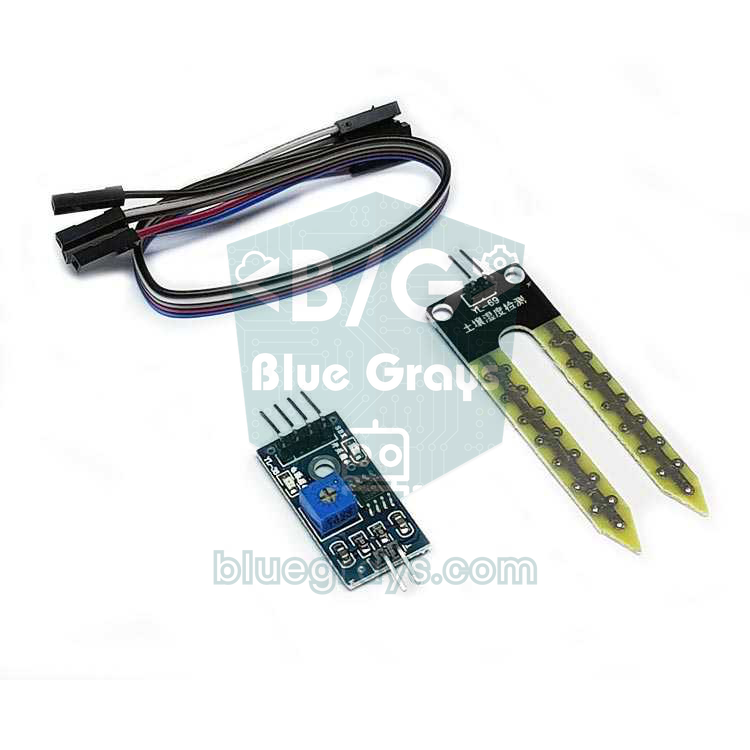
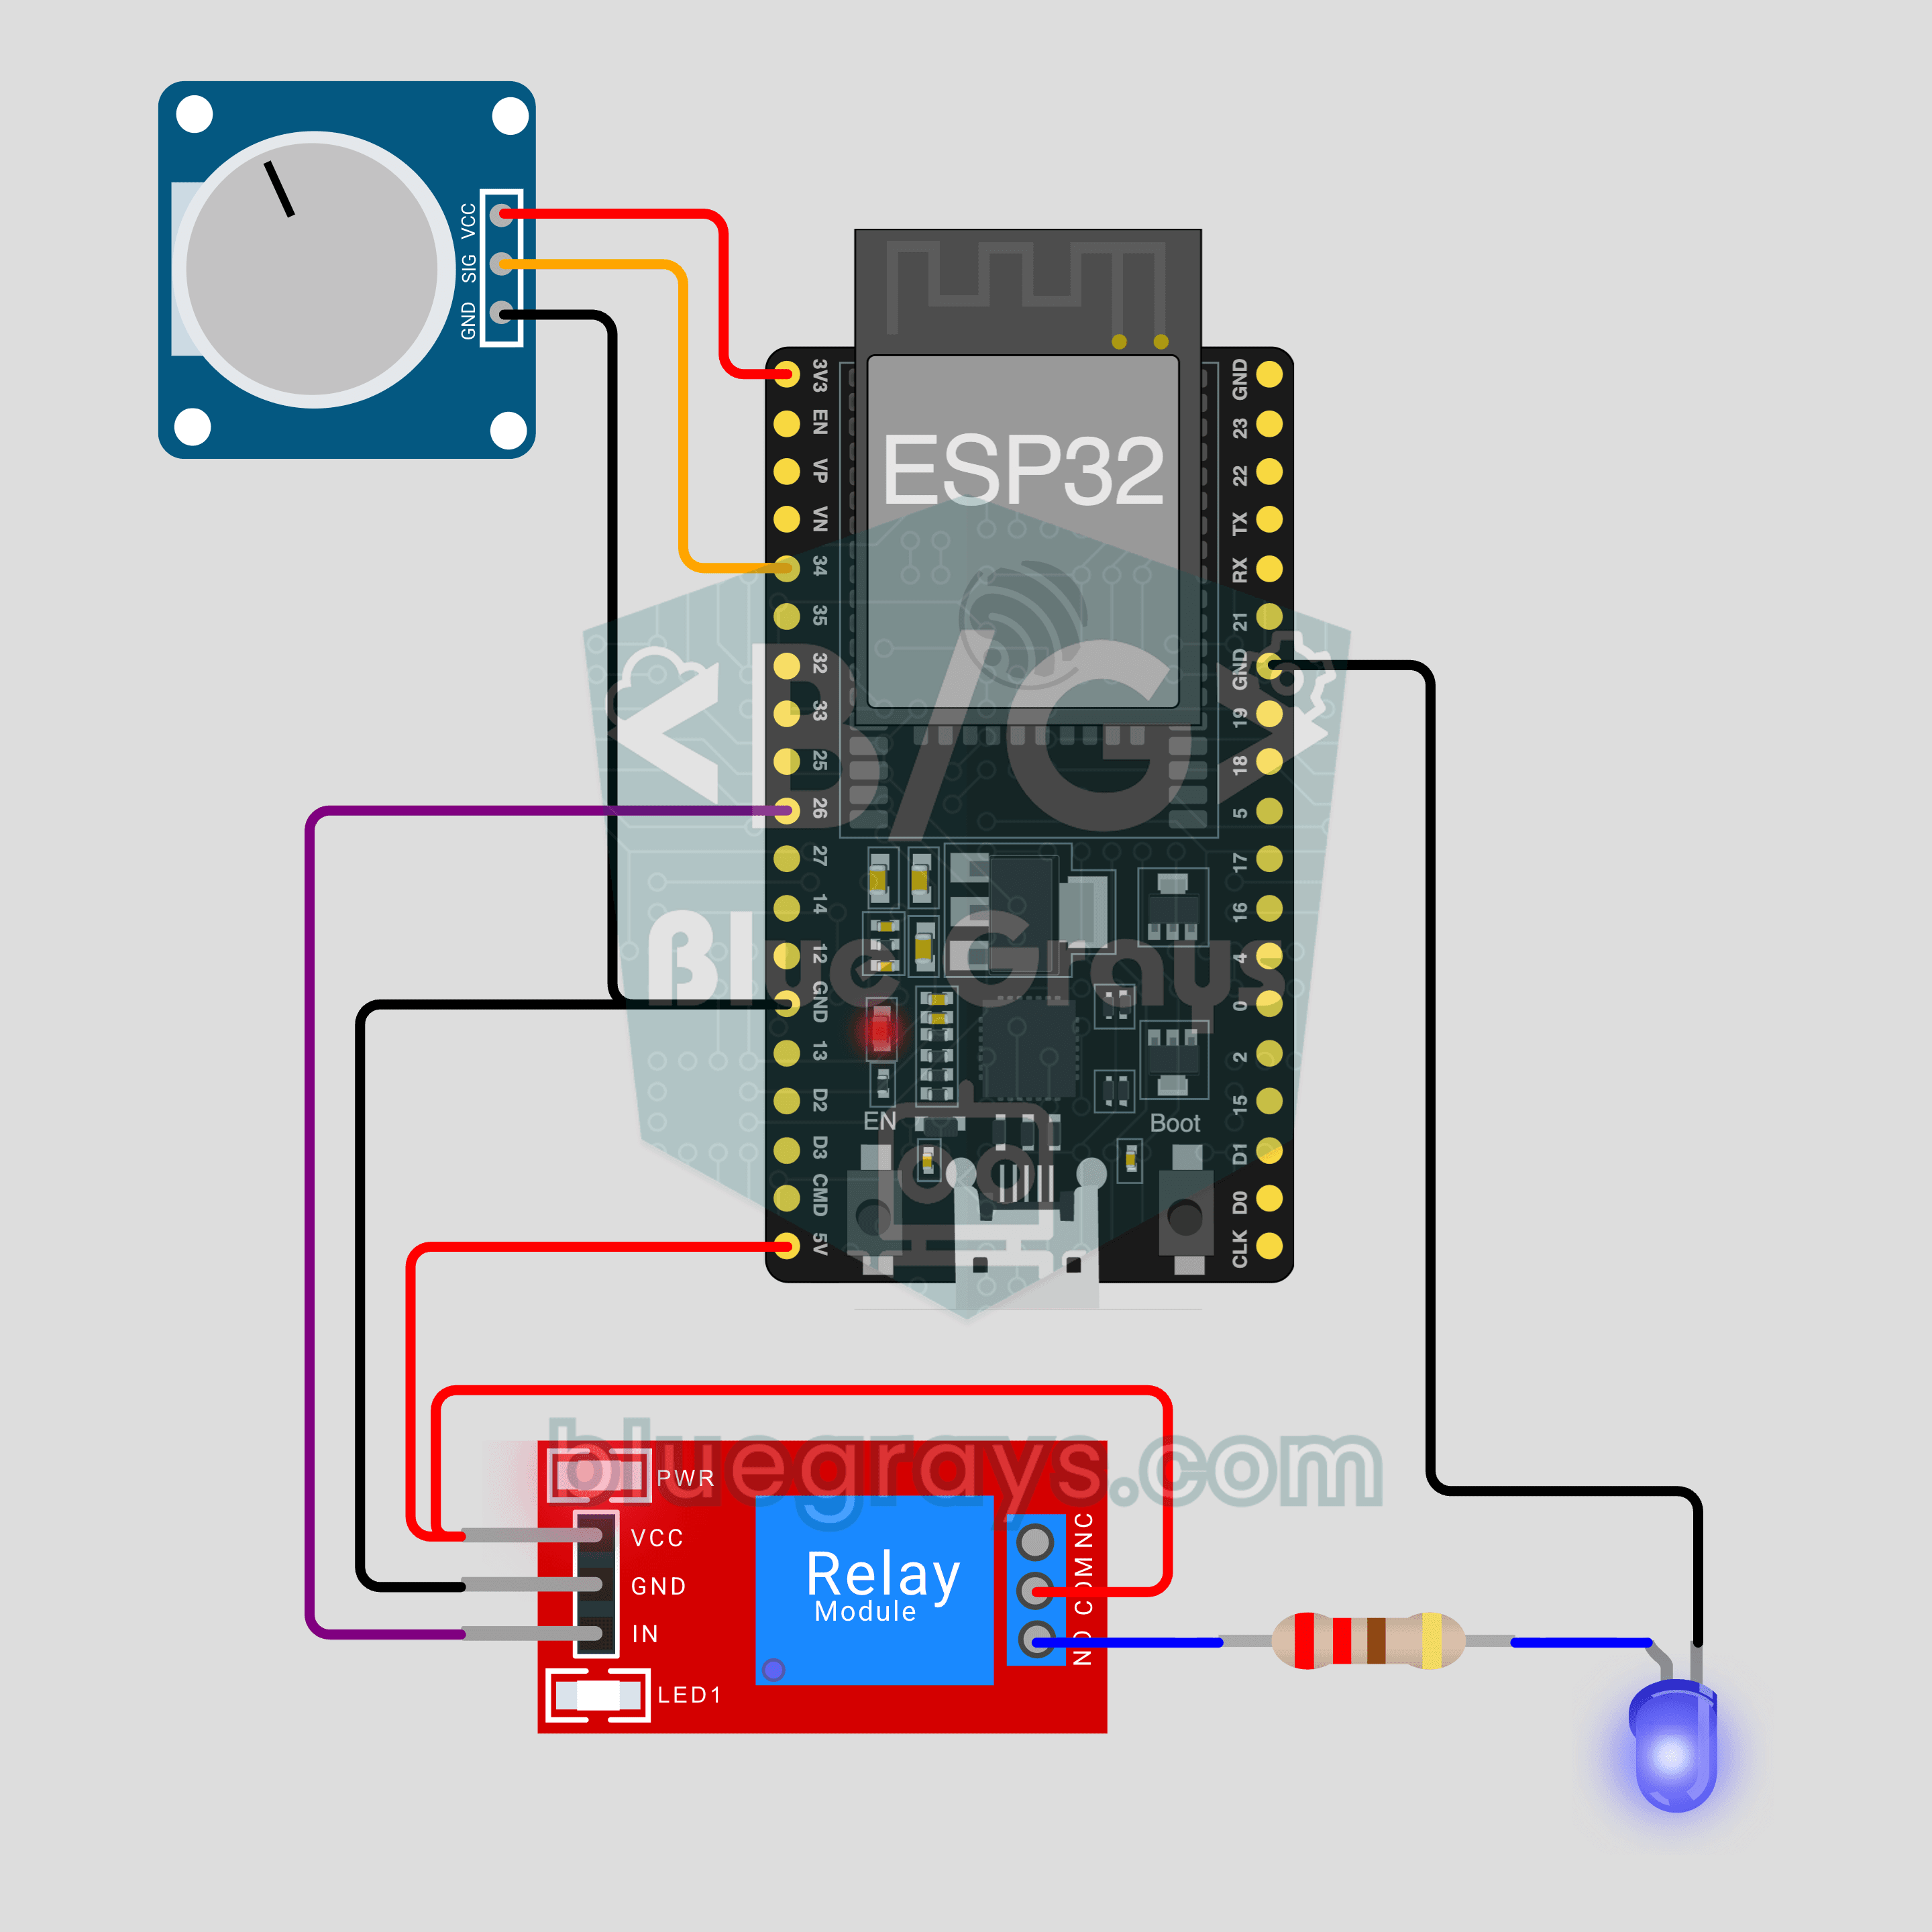
This template measures soil moisture as a percentage, turns the pump on when it drops below a threshold and turns it off once moisture rises 10 points above it. On your phone you'll see the Soil moisture (%) value and chart, a Pump switch for manual control and a 0–100% Watering threshold slider. The sensor's AO pin goes to GPIO34 on the ESP32 or GP26 on the Pico W. The relay is on GPIO26 (ESP32) or GP15 (Pico W). On the ESP32, always connect analog sensors to an ADC1 pin (GPIO32–39). ADC2 pins don't work while Wi-Fi is on, and you'll only get meaningless readings. The code's calibration values are dry 3200 / wet 1300 for the ESP32 and dry 3000 / wet 1200 for the Pico W (12-bit readings, 0–4095). These are typical values. Measure your own sensor first in air or dry soil, then in a glass of water, and enter your own numbers. Your readings will be much more accurate. Fork-style resistive sensors corrode within weeks due to electrolysis. For long-term use, choose a capacitive soil moisture sensor (such as v1.2) and power it from 3.3 V so its output doesn't exceed the ADC range. Ready-made project: ESP32 IoT Plant Watering (Soil Sensor + Pump).
7. Motion detector: a PIR counter
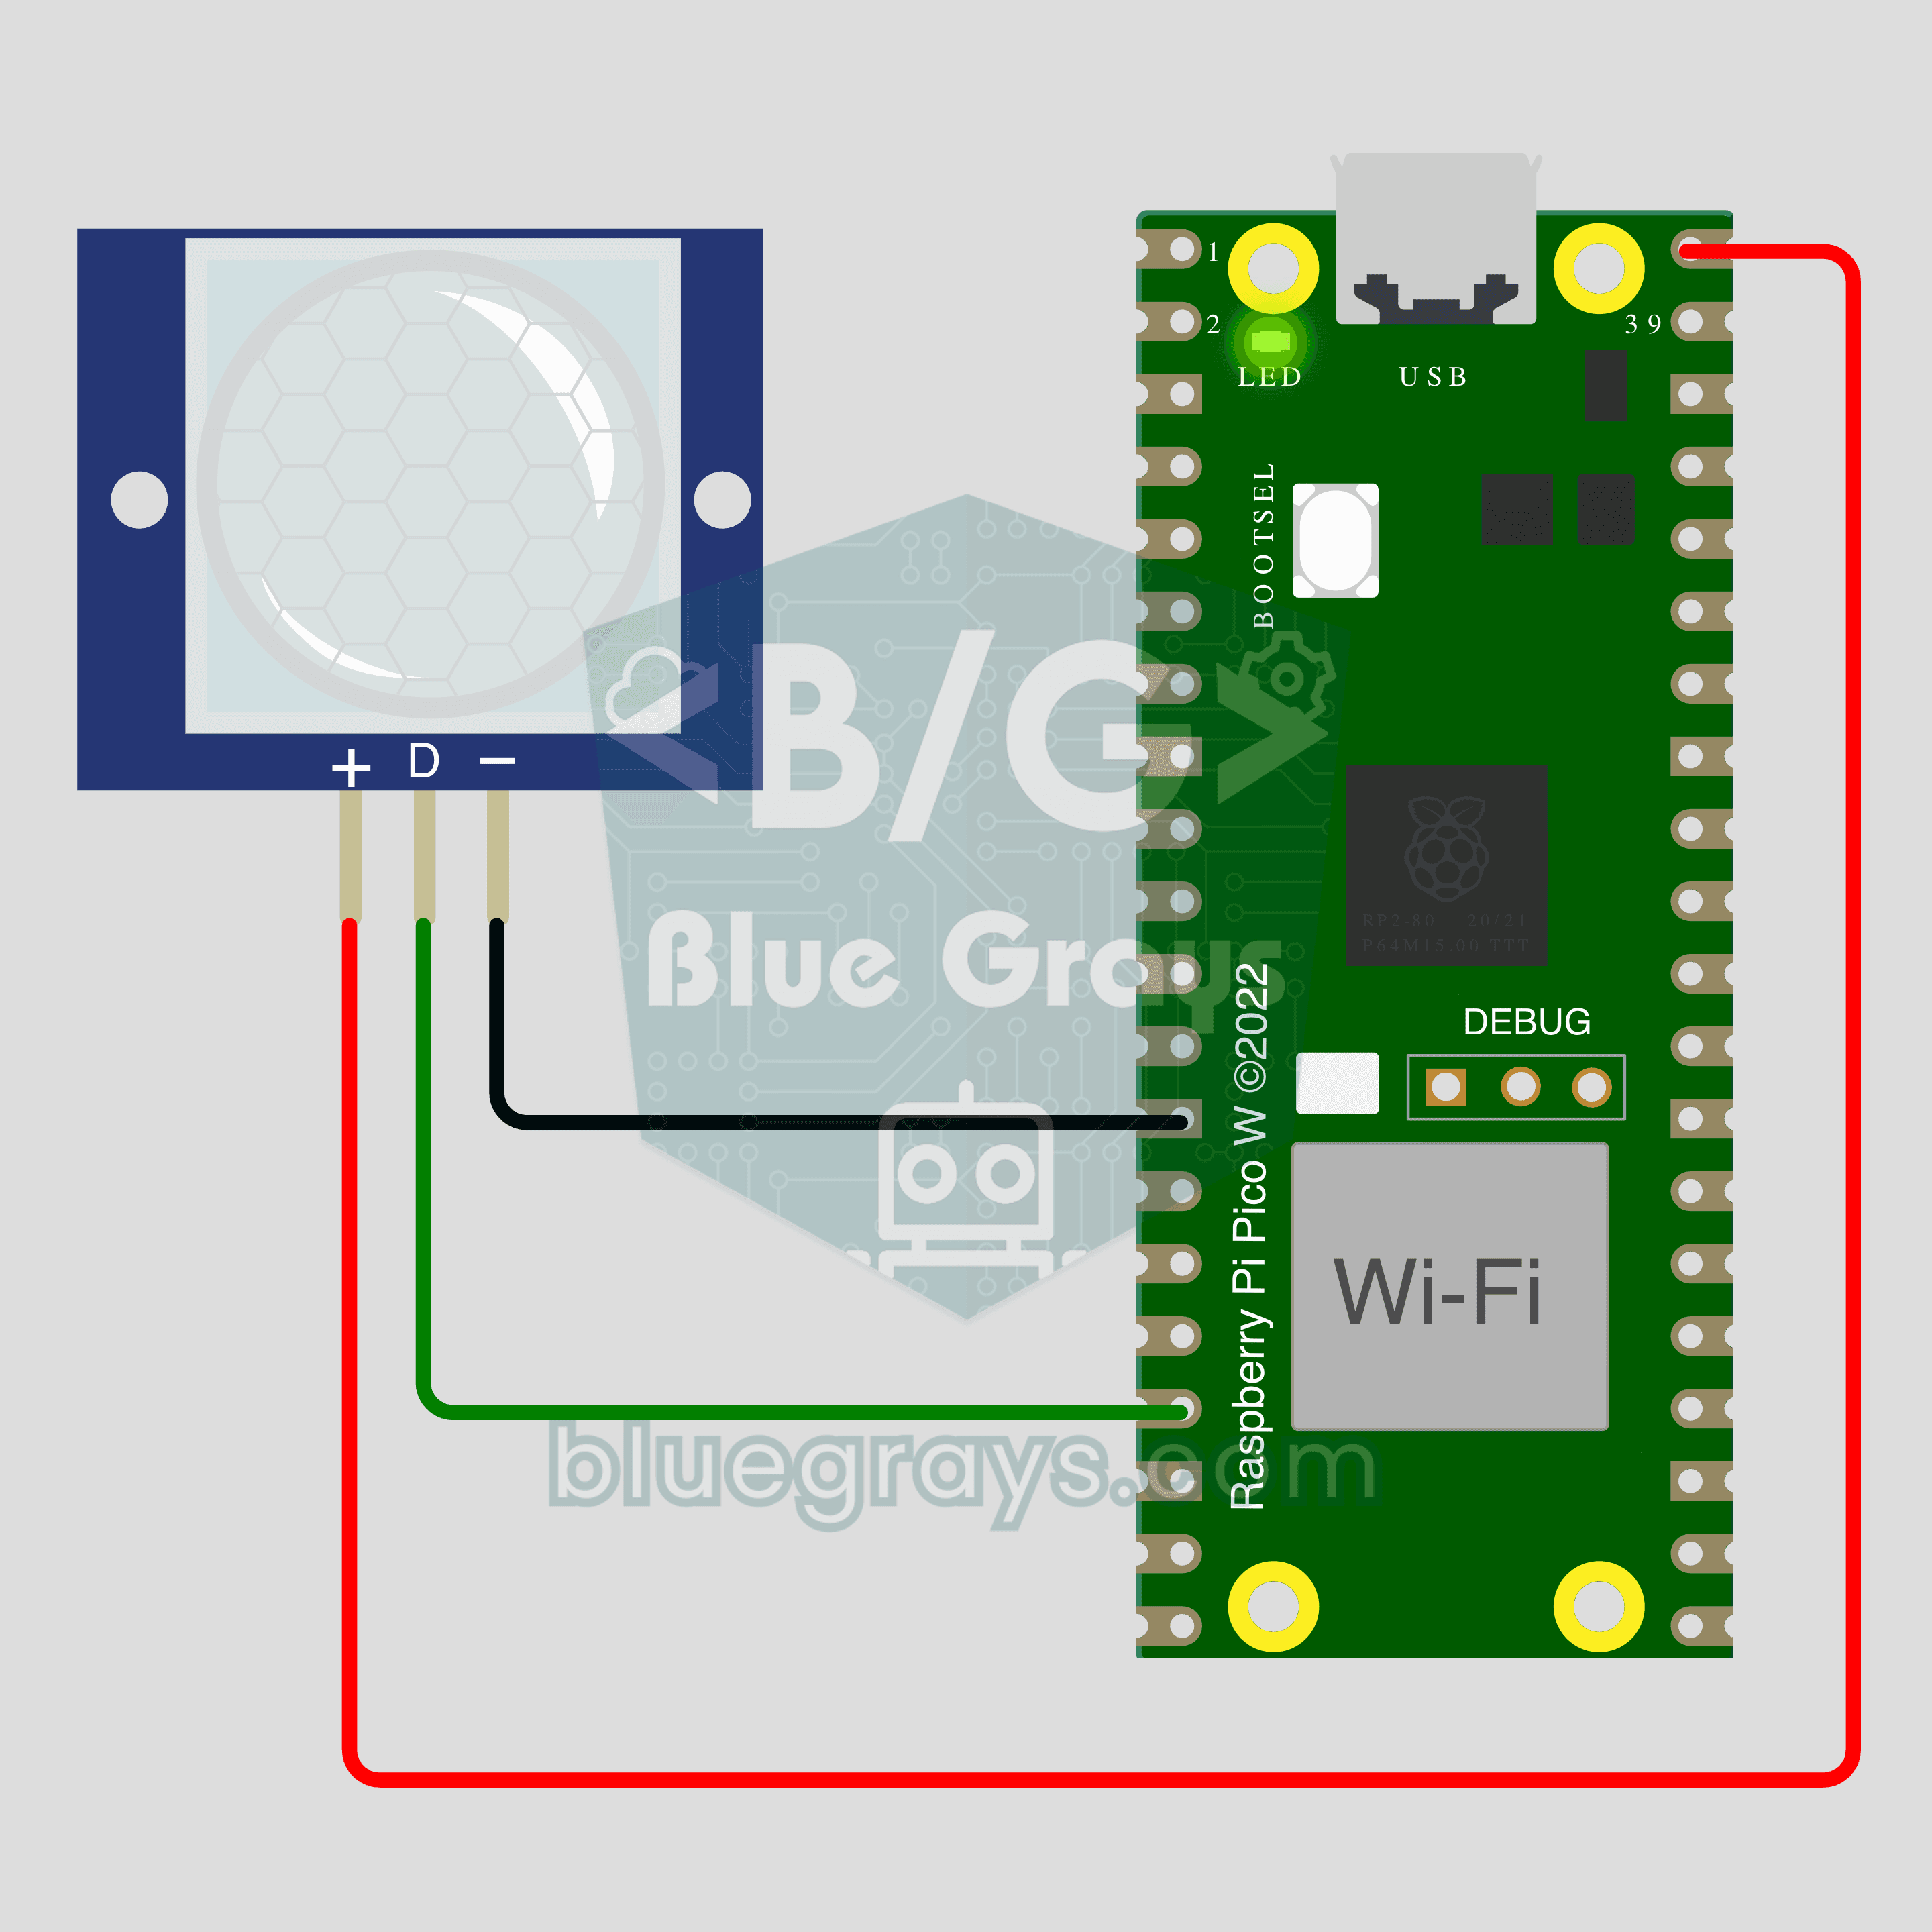
The HC-SR501 PIR sensor detects changes in the infrared radiation given off by the human body. The template shows "Motion detected / none" on your phone, a counter chart of detected movements and a Reset counter button. Connect the sensor's VCC to 5 V (VIN on the ESP32, VBUS on the Pico W). The module has its own regulator and its output is 3.3 V, so you can wire the output directly to GPIO33 on the ESP32 or GP13 on the Pico W. After power-up, the sensor warms up for about 30–60 seconds. False triggers during this time are normal, so reset the counter afterwards. Of the two potentiometers on the module, one sets sensitivity (roughly 3–7 m range) and the other sets how long the output stays HIGH (from a few seconds to a few minutes). Since you're counting, turn the time all the way down. A long hold time counts back-to-back movements as a single event. Details are in PIR Motion Sensor (HC-SR501), and the finished circuit is in the Pico W IoT Motion Counter (PIR) project.
8. Servo curtain: set the angle with a slider
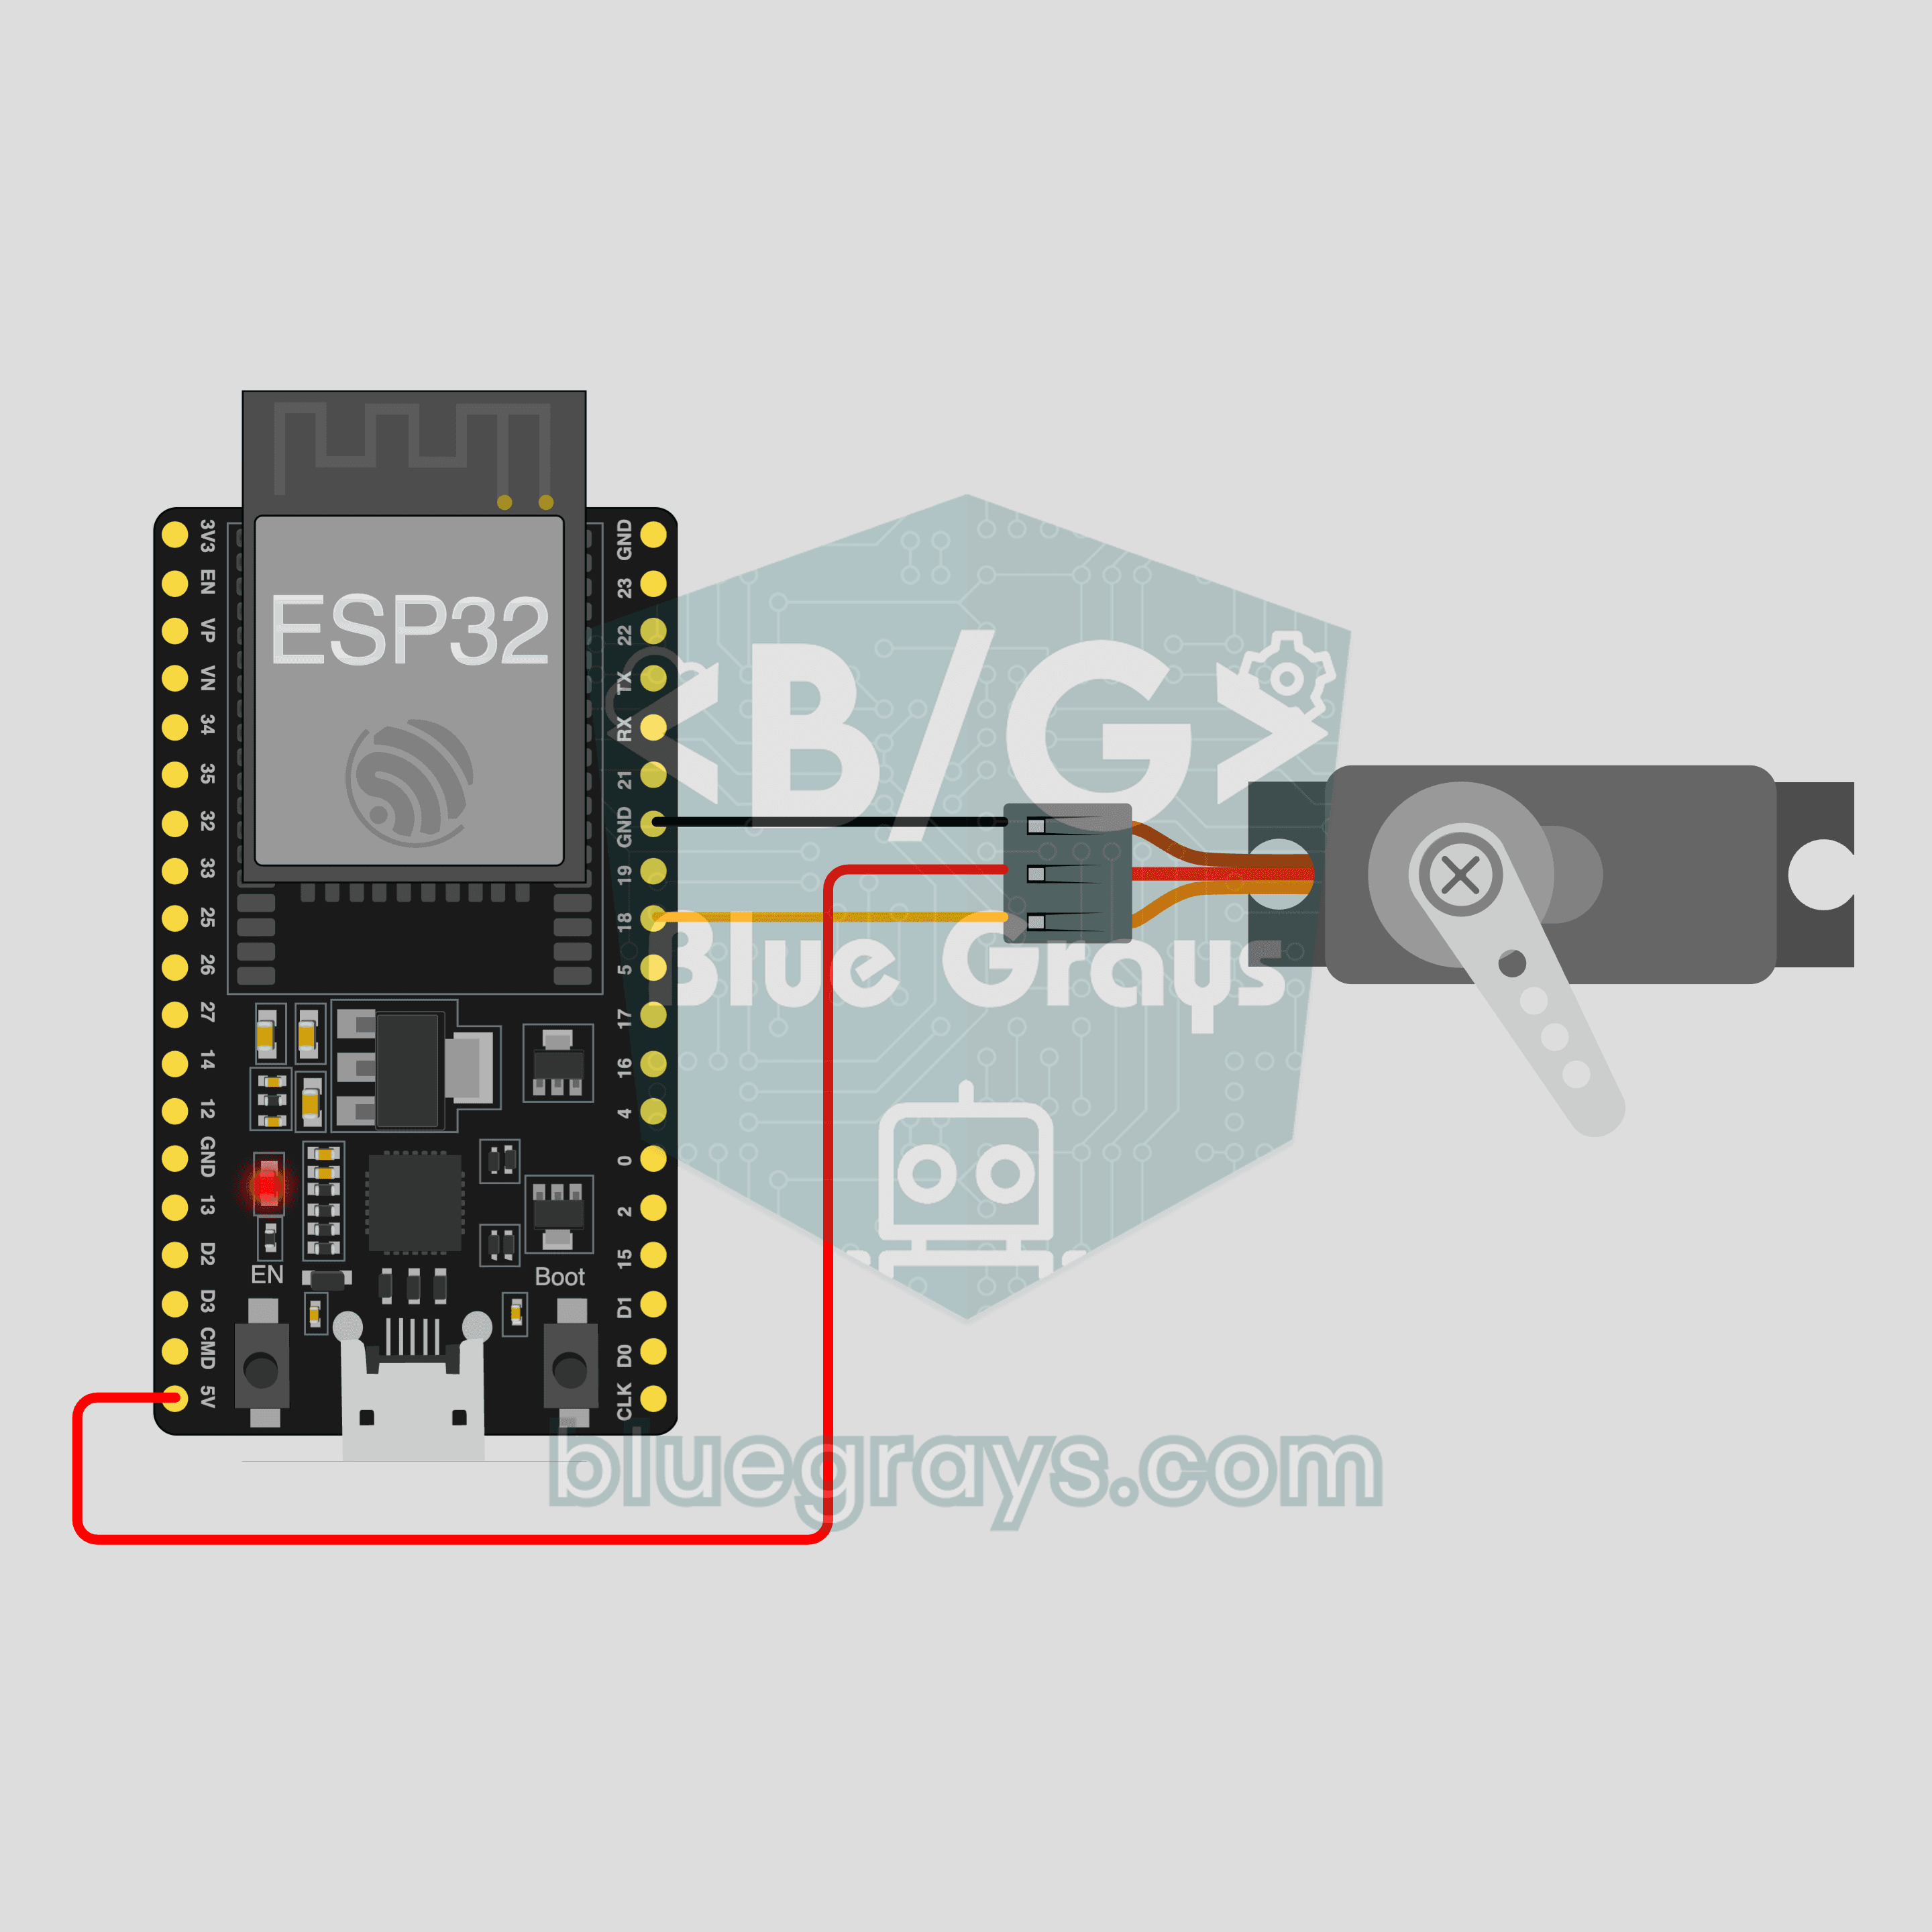
In this template, the Curtain angle slider on your phone sends a value between 0 and 180°, and the SG90 servo turns to that angle. The servo's signal wire (usually orange) goes to GPIO18 on the ESP32 or GP17 on the Pico W. On the ESP32 you need to install the ESP32Servo library. On the Pico W, the Servo.h that ships with the core is used. Power the servo's red (5 V) and brown (GND) wires from a separate 5 V supply, not a board pin, and connect the grounds. The SG90 can draw several hundred mA while moving or under load, which causes "brownout" resets on the ESP32. The SG90 delivers about 1.8 kg·cm of torque at 4.8 V. That's enough to turn a blind wand or push a light sheer curtain. For a heavy drape, pick a stronger servo like the MG996R. If the servo buzzes at 0° or 180°, it's pressing against its mechanical limit. Use the curtain's real travel on the slider, for example 10–170°. Ready-made project: ESP32 IoT Curtain Opener (SG90 Servo).
The plant watering template's code, line by line
Below is the ESP32 code for the soil moisture + pump template. The app generates it with your device key and Wi-Fi details filled in. Here you'll see placeholders instead. The code is short, but it contains the full logic of an automatic watering system: measuring, converting to a percentage, sending to the phone and switching the pump on and off based on a threshold.
1/*
2 * Saksı sulama · BlueGrays IoT
3 * BlueGrays · bluegrays.com
4 * Bu kodu paylaşma: içinde cihaz anahtarın ve Wi-Fi şifren var.
5 * Do not share this code: it contains your device key and Wi-Fi password.
6 */
7
8#include <BlueGraysIoT.h>
9
10const char *DEVICE_KEY = "bgd_UYGULAMADAKI_ANAHTARIN";
11const char *WIFI_NAME = "EV_AGI_2_4_GHZ";
12const char *WIFI_PASSWORD = "WIFI_SIFREN";
13
14BlueGraysIoT bg(DEVICE_KEY);
15
16const int RELAY_PIN = 26;
17const bool RELAY_ACTIVE_LOW = true;  // çoğu röle modülü LOW ile çeker / most relay modules switch on LOW
18void setRelay(bool on) { digitalWrite(RELAY_PIN, (on != RELAY_ACTIVE_LOW) ? HIGH : LOW); }
19const int SOIL_PIN = 34;             // sensörün AO ucu, ADC1 pini / sensor AO, an ADC1 pin
20const int SOIL_DRY = 3200;           // kuru toprakta okunan değer / reading in dry soil
21const int SOIL_WET = 1300;           // ıslak toprakta okunan değer / reading in wet soil
22int threshold = 30; bool pump = false; unsigned long lastReadMs = 0;
23
24void setup() {
25  Serial.begin(115200);
26  pinMode(RELAY_PIN, OUTPUT);
27  setRelay(false);
28  analogReadResolution(12);
29  bg.onSwitch("pompa", [](bool on) { pump = on; setRelay(on); });
30  bg.onNumber("esik", [](float v) { threshold = (int)v; });
31  bg.setDeadband("toprak", 1.0);
32  bg.setDebug(Serial);
33  bg.setLanguage(BG_LANG_TR);
34  bg.begin(WIFI_NAME, WIFI_PASSWORD);
35}
36
37void loop() {
38  bg.loop();  // burada uzun delay() kullanma / avoid long delay() calls here
39  if (millis() - lastReadMs >= 2000) {
40    lastReadMs = millis();
41    int pct = constrain(map(analogRead(SOIL_PIN), SOIL_DRY, SOIL_WET, 0, 100), 0, 100);
42    bg.send("toprak", pct);
43    // Eşiğin altına inince pompayı aç, 10 puan üstüne çıkınca kapat / Pump on below the threshold, off 10 points above it
44    if (pct < threshold && !pump) { pump = true; setRelay(true); bg.send("pompa", true); }
45    if (pct > threshold + 10 && pump) { pump = false; setRelay(false); bg.send("pompa", false); }
46  }
47}
48| Line | What it does |
|---|---|
| RELAY_PIN = 26, setRelay() | Drives the relay from GPIO26. Because RELAY_ACTIVE_LOW = true, turning it on means writing LOW |
| SOIL_PIN = 34 | The sensor's AO pin. GPIO34 is an ADC1 pin, so it works with Wi-Fi on |
| SOIL_DRY = 3200, SOIL_WET = 1300 | Raw readings in dry and wet soil. Measure your own sensor and change them |
| int threshold = 30 | Starting watering threshold (30%). The slider in the app changes it |
| analogReadResolution(12) | Sets readings to 12 bits: values from 0 to 4095 |
| bg.onSwitch("pompa", ...) | When you tap the Pump switch on your phone, sets the pump variable and the relay |
| bg.onNumber("esik", ...) | Writes the number from the Watering threshold slider into threshold |
| bg.setDeadband("toprak", 1.0) | Doesn't send a new value until moisture changes by at least 1 point |
| millis() - lastReadMs >= 2000 | Measures every 2 seconds. Since it doesn't use delay(), bg.loop() never has to wait |
| map(...), constrain(..., 0, 100) | Converts the raw reading to 0–100% and clips anything out of range |
| bg.send("pompa", true/false) | Updates the switch on your phone after an automatic on or off |
Here map() works in reverse: dry soil gives a high reading and wet soil a low one, so 3200 maps to zero and 1300 to a hundred. For example, if the sensor reads 2250, the result is (2250 − 3200) × 100 / (1300 − 3200) = 50, or 50%. constrain() keeps the result from going negative if a reading like 3400 comes in from dry air. The key part is hysteresis. The pump turns on when moisture drops below 30%, but only turns off once it passes 40%. With a single threshold, moisture hovering between 29% and 31% would make the relay click every 2 seconds and the pump would keep starting and stopping. The 10-point band protects both the relay and the pump, and it makes sure the soil gets properly soaked in one go. When you change the threshold from your phone, the new value goes straight into threshold and is used on the next reading (within 2 seconds). One catch: if you switch the pump on by hand while moisture is 10 points above the threshold, the code switches it back off on the next reading. If you switch it off by hand while moisture is below the threshold, it turns it back on. In other words, the automatic rule always has the final say. If you want to water manually for a while, temporarily change the threshold with the slider.
Which template should you start with?
- Relay lamp: one part, five wires. Building it with an LED first (RELAY_ACTIVE_LOW = false) and lighting it from your phone is the quickest way to see the whole system working end to end.
- Temperature and humidity: one sensor, three wires. This is where you'll first see live values and charts, which makes it ideal for understanding the send limit and the deadband.
- Door / window: the reed sensor has only two leads and needs no resistor. A good step for learning how INPUT_PULLUP works.
- Motion detector: the PIR's warm-up time and two potentiometers take some trial and error, but the circuit is still just three wires.
- Room station: combines the first two templates, so you'll see the relay and sensor running happily on the same board.
- Servo curtain: intermediate, because it needs a separate 5 V supply and an extra library (ESP32Servo).
- RGB LED strip: requires a current budget, a 330 Ω resistor, a capacitor and a strong adapter.
- Soil moisture + pump: needs the most parts (sensor, relay, pump, separate supply, water) plus calibration. Build it after you've tried the others.
Ideas for using templates side by side
- Door sensor + lamp: one board with a reed sensor on the front door, another with a relay in the living room. You see on your phone that the door has opened and turn the lamp on before you walk in.
- Motion detector + RGB strip: the hallway counter shows how many times someone has walked past, and you set the strip to a dim Breathe effect for the night.
- Temperature and humidity + servo curtain: when the room heats up in the afternoon, you see it on the chart and close the curtain a bit from your phone.
- Plant watering + room station: keep an eye on your balcony plant's soil moisture and your living room temperature at the same time.
- Two door sensors: one on the balcony door, one on a window. Before you leave home, check which one is still open.
Each of these ideas means two separate devices. Every board runs its own template and shows up as its own device in the app. The free plan includes 1 device, so a second board requires Premium, which lets you add up to 10 devices. If you want one board to do two jobs, the room station template is the ready-made way: the lamp switch and the temperature and humidity readings live on the same device.
Free plan vs. Premium
| Feature | Free | Premium |
|---|---|---|
| Number of devices | 1 device | 10 devices |
| Variables with chart history | 1 variable | 20 variables |
| History length | 24 hours | 30 days |
| Time between two sends of the same variable | At least 1 second | At least 0.2 seconds |
These limits are enforced on the server, so shortening the wait time in your code won't make sends any faster. Most templates measure every 2 seconds and only send when the value changes anyway, so you won't notice the free plan's 1-second limit in everyday use. If you delete a device with "Remove device", the device and its chart history are deleted and you get your device slot back. That way you can try the templates one after another on the free plan.
Setup: your first device in 5 steps
The app guides you from "Step 1 / 5" onward. You choose the board and template, gather the parts and connect the wires, enter your Wi-Fi network name and password and tap "Create device and prepare code". Then you upload the code to the board from the Arduino IDE, and the "Waiting for your board" screen moves on automatically once the board connects. The board only connects to 2.4 GHz Wi-Fi networks, so don't pick a 5 GHz network. In the Arduino IDE, search for BlueGraysIoT in the Library Manager and install it. If it asks about dependencies, choose "Install all". When you open the Serial Monitor at 115200 baud, you should see "BlueGrays IoT: connected". For detailed ESP32 steps, see the Control an ESP32 from your phone guide. For the Pico W setup with Earle Philhower's arduino-pico package, see the Control a Pico W from your phone guide. If you're installing the IDE for the first time, start with Installing the Arduino IDE. You can check your board's pin layout with the Pinout tool.
Common mistakes and fixes
| Symptom | Likely cause | Fix |
|---|---|---|
| Board doesn't connect within 2 minutes | 5 GHz network, or wrong upper/lower case in the password | Choose the 2.4 GHz network. Check whether the Serial Monitor shows "Wi-Fi connected" |
| Lamp switch works backwards | Testing with an LED instead of a relay, but RELAY_ACTIVE_LOW is still true | Set it to false when testing with an LED, and back to true when you switch to the relay |
| Board resets when the relay or servo activates | Brownout: insufficient power | Power the servo and pump from a separate 5 V supply and connect the grounds |
| Soil moisture always reads 0% or 100% | Sensor is on an ADC2 pin, or the calibration values don't match | Use an ADC1 pin (GPIO32–39). Measure the dry and wet values and enter them in SOIL_DRY and SOIL_WET |
| Random colors on the RGB strip | No common GND, or missing 330 Ω resistor or capacitor | Connect the grounds, add 330 Ω on the data line and 1000 µF on the supply |
| PIR always reports motion | Warm-up isn't finished, or sensitivity is too high | Wait 1 minute and turn the sensitivity potentiometer down a little |
| Door always shows Open | Magnet is too far from the sensor | Reduce the gap to under 1–2 cm with the door closed |
| ESP32 hangs at "Connecting…" | Board isn't entering upload mode | Hold down the BOOT button during upload |
Eight templates, eight different techniques: driving a relay, reading a digital sensor, addressable LEDs, pull-ups, analog calibration, hysteresis, PIR timing and servo positioning. Once you've built one, the logic behind the others gets easier too. In the BlueGrays app, you can view each of these eight IoT projects with a step-by-step wiring diagram, parts list and code, and jump straight into setup with the "Set up as IoT device" card on the project page.
Frequently asked questions
Can I modify the code of a ready-made IoT template?
Yes, the code is an open sketch in the Arduino IDE. You can change the calibration values, measurement interval or LED count. Just leave variable names like "lamba", "toprak", "pompa" and "esik" alone, because the app uses them to match the controls on your phone. To change pins, the safest way is the "Connection pins" section in step 3 of setup.
Can I add my own sensor to a template?
For now, BlueGrays IoT works with ready-made templates, and the app only shows the variables of the template you chose. You can read another sensor in your code, but its value won't appear as a separate control on your phone. The templates cover the most common needs: temperature, humidity, door, motion and soil moisture.
Do these IoT templates work with the Raspberry Pi Pico W?
Yes, all 8 templates can be built with either the ESP32 or the Pico W (Pico 2 W too). The app prepares the pins and code for the board you pick. In the Arduino IDE, you need to install Earle Philhower's "Raspberry Pi Pico/RP2040/RP2350" package. The feature doesn't work with the plain Raspberry Pi Pico, which has no Wi-Fi.
What happens to my IoT device if the internet goes down?
If the Wi-Fi or server connection drops, the BlueGraysIoT library retries on its own at increasing intervals and sends the values it measured while offline once it reconnects. After a power cut, switches go back to their last state. In the watering template, the threshold comparison runs in the board's own code and doesn't depend on commands from the server.
How many IoT devices can I set up for free?
In BlueGrays IoT your first device is free. The free plan includes 1 device, chart history for 1 variable and 24 hours of history. Premium unlocks 10 devices, chart history for 20 variables and 30 days of history. The wiring diagrams and code for all 8 IoT template projects are free in the app and on the website.
What parts do I need for the IoT templates?
Every template needs an ESP32 or Pico W, a USB cable that carries data, a breadboard and jumper wires. Depending on the template, add a relay module, DHT22, WS2812B strip, reed sensor, soil moisture sensor with a mini pump, HC-SR501 PIR or SG90 servo. Also have a separate 5 V supply ready for the strip, servo and pump.
Projects to build after reading this
See all projects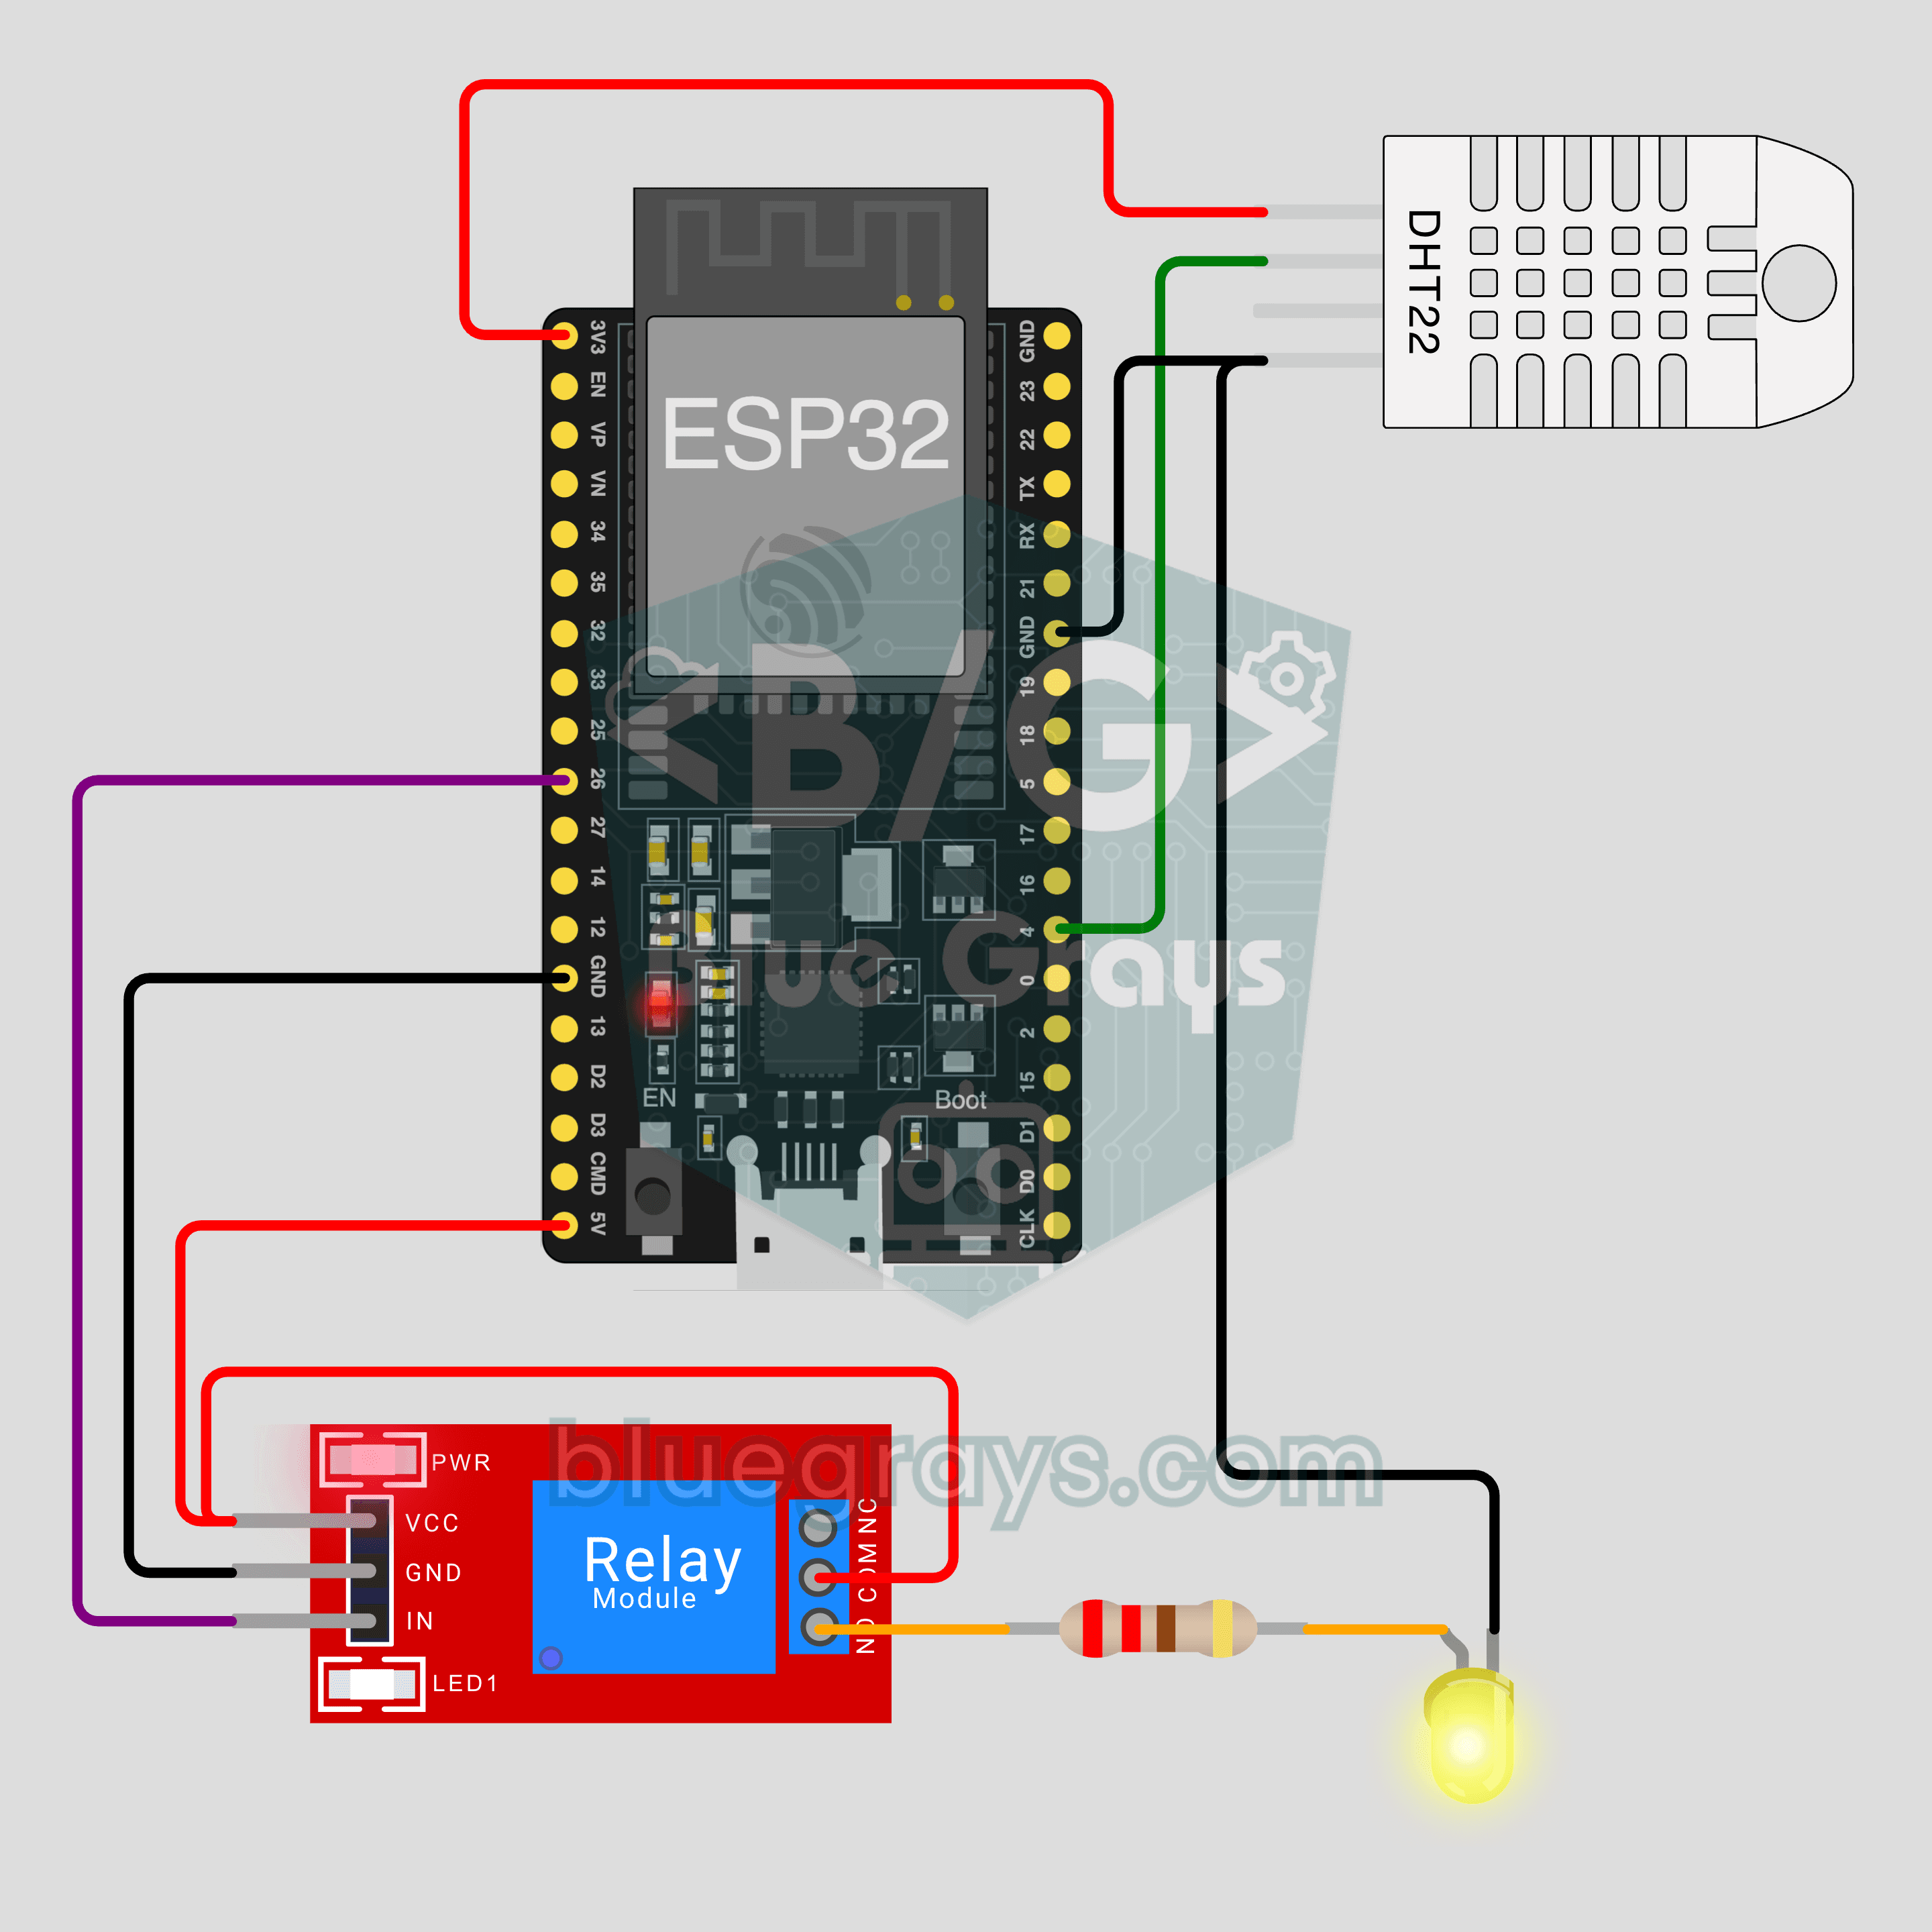
ESP32 IoT Room Station (Relay + DHT22)
Turn your lamp on from your phone and watch your room's temperature and humidity live, wherever you are. This project is the step-by-step guide to the Room station IoT template in the app, built with an ESP32, a relay module and a DHT22. Go to Workshop › Devices › Add a device and pick Room station; Ohmi prepares the code with your own device key. The code on this page is an example: the key and Wi-Fi details are placeholders.
ESP32 IoT Lamp Switch (Relay)
Turn your lamp on and off from your phone, wherever you are. This project is the step-by-step guide to the Relay lamp IoT template in the app, built with an ESP32 and a relay module and tried with an LED first. Go to Workshop › Devices › Add a device and pick Relay lamp; Ohmi prepares the code with your own device key. The code on this page is an example: the key and Wi-Fi details are placeholders.
Pico W IoT Temperature and Humidity (DHT22)
Watch your room's temperature and humidity live on your phone wherever you are. This project is the step-by-step guide to the Temperature and humidity IoT template in the app, built with a Raspberry Pi Pico W and a DHT22. Go to Workshop › Devices › Add a device, pick Pico W as the board and Temperature and humidity as the template; Ohmi prepares the code with your own device key. The code on this page is an example: the key and Wi-Fi details are placeholders.
ESP32 IoT RGB LED Strip (WS2812B)
Control your room's light from your phone: pick a color, set the brightness, turn on the rainbow or breathe effect. This project is the step-by-step guide to the RGB LED strip IoT template in the app, built with an ESP32 and a 30-LED WS2812B strip using three wires. Go to Workshop › Devices › Add a device and pick RGB LED strip; Ohmi prepares the code with your own device key. The code on this page is an example: the key and Wi-Fi details are placeholders.
Pico W IoT Door Sensor (Reed Switch)
Did you leave the door or window open? Check on your phone wherever you are. This project is the step-by-step guide to the Door / window IoT template in the app, built with a Raspberry Pi Pico W, a reed switch and a small magnet using two wires. Go to Workshop › Devices › Add a device, pick Pico W as the board and Door / window as the template; Ohmi prepares the code with your own device key. The code on this page is an example: the key and Wi-Fi details are placeholders.
ESP32 IoT Plant Watering (Soil Sensor + Pump)
Let the pump start by itself when the soil in your pot dries out, and watch the soil moisture live on your phone. This project is the step-by-step guide to the Soil moisture + pump IoT template in the app, built with an ESP32, a soil moisture sensor, a relay and a mini water pump. Go to Workshop › Devices › Add a device; Ohmi prepares the code with your own device key. The code on this page is an example: the key and Wi-Fi details are placeholders.
Pico W IoT Motion Counter (PIR)
Count how many times someone walks through a door or hallway, and see the moment of motion live on your phone. This project is the step-by-step guide to the Motion detector IoT template in the app, built with a Raspberry Pi Pico W and a PIR motion sensor using just 3 wires. Go to Workshop › Devices › Add a device; Ohmi prepares the code with your own device key. The code on this page is an example: the key and Wi-Fi details are placeholders.
ESP32 IoT Curtain Opener (SG90 Servo)
Tap + or − on your phone and the servo turns to that angle at the same moment: open and close a model curtain, a blind's tilt rod or a small lid from wherever you are. This project is the step-by-step guide to the Servo curtain IoT template in the app, built with an ESP32 and an SG90 servo using just 3 wires. Go to Workshop › Devices › Add a device; Ohmi prepares the code with your own device key. The code on this page is an example: the key and Wi-Fi details are placeholders.